
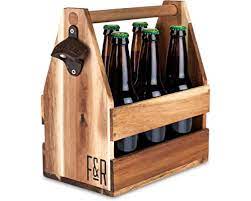
HARBOR FREIGHT DIY RUSTIC 6-PACK BOTTLE CADDY
FOLLOW THESE STEPS:
- Optional: If you want a similar look to our completed piece, stain the entire board first. Let dry beforeproceeding.
- Using the 1″ x 8″ x 96″ board (actual is 3/4″ x 7-1/4″ x 96″) length-wise into the follow sizes:
- (2) 14″ long sections (end pieces)
- (4) 9″ long sections (bottom, sides)
- Next, cut (1) 9″ piece down to 5.75″ WIDE -leave 9″ long. This will be your bottom/base.
- Then cut (3) 9″ pieces to 4.5″ inches wide. Leave 9″ long. These will be the sides & middle divider.
- Use the sander to sand the edges as desired to expose fresh wood if stained.
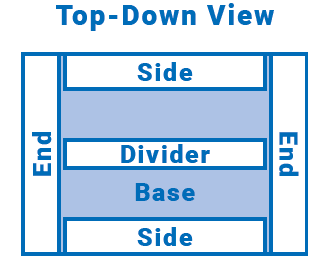
- Test fitment of all of the pieces – make sure that the (4) pieces that are 9″ long match in length – sand to match if needed.
MATERIALS:
- (1) 1″ x 8″ x 96″ Board (Actuals 3/4″ x 7-1/4″)
- (1) 3/4″ x 12″ Galvanized Steel Pipe (Threaded)
- (2) 3/4″ x 1″ Iron Pipe Cap (Threaded)
- (1) Bottle Opener (Screw mount)
- (1) Bottle of Wood Glue
- Optional: Wood stain, paint brush
RECOMMENDED TOOLS:
- Bauer 10″ Dual-Bevel Sliding Compound Miter Saw (Item 57179)
- Bauer 11″ 80T Fine Finishing Circular Saw Blade (Item 57089)
- Bauer 20v HYPERMAX™ Lithium-Ion Cordless 5″ Random Orbital Sander (Item 64943)
- Bauer 6.5 Amp Tool-Free Variable Speed Orbital Jig Saw with Laser (Item 64290)
- Warrior T-Shank General Purpose Jigsaw Blade 5 PK (Item 68088)
- Bauer 20v HYPERMAX™ Lithium-Ion Cordless 1/2″ Drill/Driver (Item 56725)
- Bauer Spade Wood Drilling Bit Set 6Pc. [For the 1″ Spade Bit] (Item 64744)
- Bauer 20v HYPERMAX™ Lithium-Ion 3.0 Ah High Capacity Battery (Item 64816)
- Bauer 20v HYPERMAX™ Lithium-Ion Rapid Charger (Item 63529)
- Central Pneumatic 18 Gauge 2-in-1 Air Nailer/Stapler (Item 68019)
- Fastenstrong 2″ 18 GA Galvanized Brad Nails, 1,000 Pc.n (Item 64304)
- (2) Pittsburgh 12″ Ratcheting Bar Clamp/Spreader (Item 62123)
DIY RUSTIC 6-PACK BOTTLE CADDY
The DIY beer & bottle caddy makes for an excellent gift, or a fun addition to home, garage or man cave decor. This step-by-step guides makes building your very own 6-pack drink caddy an easy and fun project for anyone!
Starting Actual3/4″ x 7-1/4″ x 96″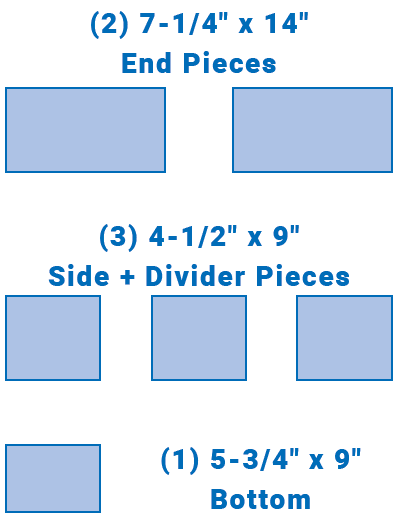
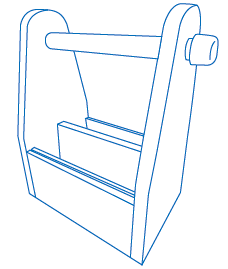
7. Next, measure 5.5″ up each long side of the 7-1/4″ x 14″ end pieces and mark them. Then go to the opposite end and measure 2-1/4″ in from the outer edge on each side and make a mark. Now use a straight edge to connect the marks, this will give you the cuts to make the ends taper inward at the top. Make these cuts with the jig saw or a sliding miter saw.8. Now measure 1.5″ down from the top center of each end piece, Use the pipe cap to trace a circle with the top of the cap 1.5″ down from the top. Use this to drill out a 1″ hole to feed the pipe through. Do this on both end pieces. Insert pipe and attach caps.9. Begin assembly. Test fi t all pieces, using clamps to hold ends to base. If fi tment is satisfactory, disassemble and apply glue to bottom & side pieces and place ends and sides against bottom. Brace with clamps.10. Add glue to ends of middle divider, place between end pieces, centered. Allow all pieces to dry for recommended time on glue bottle.11. Using nail gun, nail the ends & sides.12. Screw bottle opener onto end piece.13. Fill with beverage of choice – enjoy responsibly! Share pictures with your friends and family & brag about your new Harbor Freight-inspired DIY 6-Pack Bottle Caddy!
DIY RUSTIC 6-PACK BOTTLE CADDY
![]()
[xyz-ips snippet=”download-snippet”]