HDMI Dual Monitor KVM User Manual
Features:
- Using only 1 set of keyboard, mouse and 2 monitors to control 2 computers
- Support Unix/Windows/Debian/Ubuntu/Fedora/Mac OS X/ Raspbian/Ubuntu for Raspberry Pi and other Linux based systems
- Support hot plug, connect or disconnect devices to the KVM at any time without turning off PC
- Support keyboard hotkeys, front-panel keys and IR remote control to control the KVM
- Available to use keyboard and mouse without any delay after switching PC
- Support resolution up to 3840*
- With extra standard USB port, it is possible to connect bar code scanner, USB hard drive or other USB devices
- Support keyboard and mouse pass through mode to improve KM compatibility
Packing List
- 1 x 4 x 2 Dual Monitor KVM
- 1 x DC 12V adapter
- 1 x IR remote control
- 1 x User manual
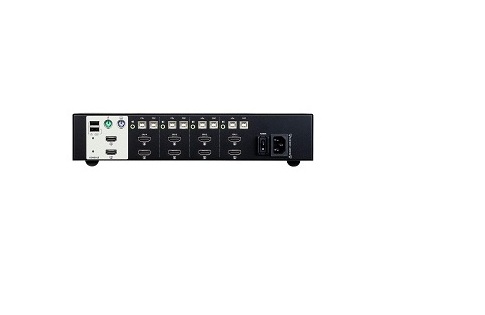
Panel Description :


|
ID |
Name |
Description |
|
1 |
USB connection status | LEDs will be lit if the USB Type B ports connect to computers, and computers are on |
|
2 |
Input selection status | Indicate current active selected input sourceLED1 on: Both monitors display PC1LED2 is on: Both monitors display PC2LED1 & LED2 on: One monitor display one PC |
|
3 |
Input selection button | Switch inputs between 2PCs |
|
4 |
IR receiver | Receive IR remote signal |
|
5 |
Power switch | Turn on or turn off power supply |
|
6 |
DC 12V | 12V DC power supply |
|
7 |
L/R audio outpu | Analog audio output, connect to speaker |
|
8 |
HDMI output | Connect to HDMI display |
|
9 |
Keyboard and mouse input | Connect to keyboard and mouse |
|
10 |
Standard USB 2.0 port | Connect to USB 2.0 devices, printers, USB drives |
|
11 |
PC 2 Input | HDMI: Connect to HDMI output of PC2DP: Connect to DP output of PC2USB: Connect to USB of the PC2(with Type A to Type B cable) |
|
12 |
PC 1 Input | HDMI: Connect to HDMI output of PC1 DP: Connect to DP output of PC1 USB: Connect to USB of the PC1(with Type A to Type B cable) |
Display Mode:
Display Mode 1:LED1 on: Both monitors display PC1 LED2 on: Both monitors display PC2
 Display Mode 2:LED 1 & LED 2 on: One monitor display one PC
Connection Diagram:
Step 1: Connect the two outputs of the PC1 to the Input A and Input B of the KVM PC1 inputs. Connect the USB of the PC to the USB of the KVM PC1 inputs with USB type A to B cable.

Note: Both Input A and Input B should be connected to the same computer. If connect only one of them, then the dual monitor function would not work properly.Step 2: Connect keyboard, mouse or wireless dongle of the keyboard and mouse to the specified ports.

Step 3: Connect speaker and monitor to the KVM.
 Step 4: Turn on the power switch to start the Dual Monitor KVM.
How To Use:
- Set up the connection according to the connection diagram.
- After all the PCs are started in step 1, then you can control the Dual Monitor KVM by keyboard hot keys, IR control or the front panel key `SW’, the specific control methods are as follows:
How to use keyboard hot keys:
 |
Press [Right-Alt] key twice to change active selected computer in display mode |
 |
Select input source 1 in display mode 1 |
 |
Select input source 2 in display mode 1 |
 |
Keyboard and mouse focus on the desktop of input source 1 in display mode 2 |
 |
Keyboard and mouse focus on the desktop of input source 2 in display mode 2 |
 |
Enable of disable buzzer sound |
 |
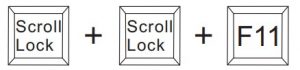
Turn on or off keyboard and mouse pass through mode |
Note: For the best compatiblity, it is better to turn on keyboard and mouse pass through mode. In this mode, the keyboard and mouse are dynamically mapped to computer, so you are able to use special keyboard and mouse that with multimedia keys or other customized keys.
How to identify whether the KVM is in keyboard and mouse pass through mode?Turn on the KVM, press [Scroll Lock] + [Scroll Lock] + [F3]if buzzer beeping twice, the KVM is in keyboard and mouse pass through mode. And beeping once means in keyboard and mouse emulation mode.HOW TO CHANGE THE HOT KEYS COMBINATION:If no [Scroll Lock] key on your keyboard or the [Scroll Lock] key is used for other functionality, you can take [Right-Ctrl] hotkey instead of [Scroll Lock] key by below way: Execute hotkey command [Scroll Lock]+[Scroll Lock]+[F1].
 |
Switch the control hotkey to [Right-Ctrl] |
After you had done as above , the hotkey combinations would be changed to: [Right-Ctrl]+[Right-Ctrl]+[xxx].Note: xxx refers to keyboard key 1~4, F11, F2, F3.The same if you want to change the hotkey from [Right-Ctrl] to [Scroll Lock], you could do as follows: Execute hotkey command: [Right-Ctrl]+[Right-Ctrl]+[F1].
 |
Switch the control hotkey to [Scroll Lock |
IR Remote Control :

|
Key |
Display Mode 1 |
Display Mode 2 |
 |
Cyclically select PC1 and PC2 | Switch to Display Mode 1 |
 |
Switch to Display Mode 2 | Swap the Desktop of two monitors |
 |
Switch to PC1 | Keyboard and mouse focus on the desktop of PC1 |
 |
Switch to PC2 | Keyboard and mouse focus on the desktop of PC2 |
Note: For the safety request by some express company, the remote control is not equipped battery by default. Please install the button battery CR2025 before using it.
Verified Keyboards and Mouses:
|
Mouse |
Model |
Keyboard |
Model |
| Logitech | G500S | Logitech | G105 |
| Microsoft Wireless Mouse | 2000 | Microsoft Wireless Mouse | 2000 |
| Hewlett-Packard | M100 | Dareu | CK535 |
| Zkll | ZM500-5 | ME TOO | Z5 |
| FL.SPORTS | G12 | Aigo | 8362 |
| Aigo | WQ-641 | AJAZZ | AK35I |
| LDK.al | Colourful X800 | Acer | KB21- 2X |
Note: The above list is part of the verified keyboards and mouses list with special HID protocol.
Warranty Information :
We warrant this product as free of defects in material and workmanship for a period of one (1) year from the date of shipment.If during the period of warranty this product proves defective under normal use, we will repair or replace this product, provided that this product has not been subjected to mechanical,electrical,or other abuse or modifications. If it fails under conditions other than those covered will be repaired at the current price of parts and labor in effect at the time of repair. Such repairs are warranted for six (6) months from the day of reshipment to the buyer.
[xyz-ips snippet=”download-snippet”]