HEATIT Z-Smoke DetectorInstallation Guide
Norwegian version Downloadmanuals.thermo-floor.nowww.thermo-floor.no
TABLE OF CONTENTS
1. Introduction2. Statement regarding products from multiple manufacturers3. Quick Start4. Installation/Mounting5. Add/Remove6. Behavior within the Z-Wave™ network7. LED-indicator /Function button8. Factory Reset9. Testing the smoke detector10. Alarm silence11. Calibration12. Serial connection13. Security14. Node Information Frame15. Command Classes15.1 Command Class Notification V815.2 Command Basic15.3 Command Class Sensor Multilevel V1115.4 Command Class Battery V116. Associations16.1 Association Groups
Product information
1. INTRODUCTION
Heatit Z-Smoke Detector is a wireless smoke sensor with built-in PIR motion sensor, temperature sensor and emergency light. Heatit Z-Smoke Detector is a wireless operated photo-electronic smoke detector designed to interact with most Z-Wave enabled controllers. The detector features smoke-, temperature-, and IR-detection. When other sensors in the Z-Wave network are activated and send an alarm signal, the smoke detector will also sound an alarm with its built-in siren to help give warning.
2. STATEMENT REGARDING PRODUCTS FROM MULTIPLE MANUFACTURERS
Please read this before installationThis device may be used with all devices certified with the Z-Wave Plus™ certificate and should be compatible with such devices produced by other manufacturers.Every primary controller is different depending on the manufacturer, their target audience and intended use/application. Please review the functionalities implemented by the primary controller you intend to use with our Z-Wave Plus certified device to ensure that it provides the necessary controls to take full advantage of our product’s capabilities.
3. QUICK START
- Unscrew the connection cover.
- Connect the ”L” phase to one of the wago connectors on the back of the smoke detector and connect the ”N” phase to the other wago connector.
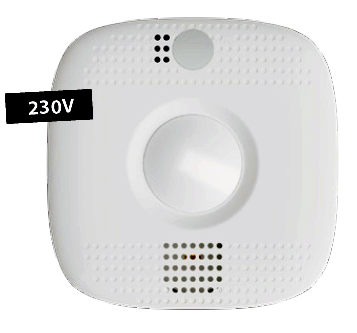
- Switch on the switch. Illustrated to the right.
- The device will enter auto inclusion mode after being powered on.
- Set the primary controller in add mode (security/non-security).
- The Heatit Z-Smoke Detector is now included in your Z-Wave network.
4. INSTALLATION/MOUNTING
Installation must be done by a qualified electrician in accordance with the National Building Codes. Before installation, disconnect any power to the smoke detector. During installation of the smoke detector, power to the smoke detector must be disconnected AT ALL TIMES!
Step 1. Place the smoke detector at the desired mounting location and use the Range Test function to make sure the smoke detector can be detected by the control panel where it has been placed.
Step 2. A mounting sheet is included in the package. The illustration size equals the smoke detector’s actual size and the perforated design allows for easy removal after installation.
Step 3. Position the sheet tightly against the wall/ceiling and use the four holes as a template to drill holes and insert wall plugs in the wall/ceiling if so required.
Step 4. Place the mounting bracket on top of the mounting sheet and screw it onto the wall/ceiling.NB! If used with cable channels mount the adapter with bracket mounted on the bottom.
Step 5. Connect Live and Neutral to the wago included in the packaging and place the connections in grove disigned to flush mount the connections.
Step 6. The smoke detector has four notches on its back cover. Gently align the four notches on the smoke detector with the hooks on the mounting bracket. Rotate clockwise to lock the hook.
Step 7. Turn on the backup battery of device by turning the switch mounted inside the device from OFF to ON.
Step 8. Installation is now complete. You may now tear off the mounting sheet. Turn on fuse to provide power for the device.
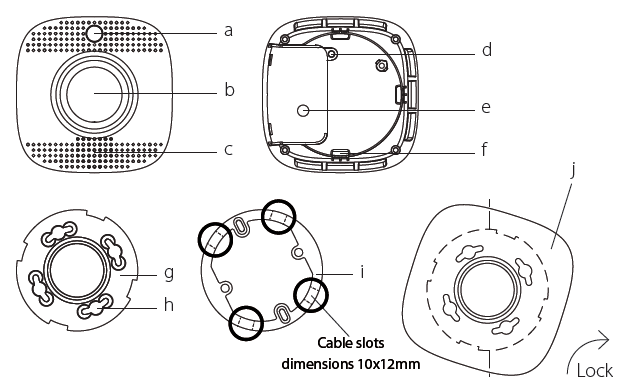
a. LED-indicator/function button/emergency lightb. IR-lensc. Buzzerd. Connection compartment fixing screwe. Connection compartmentf. Hooksg. Mounting bracketh. Mounting holes (for the hooks on the mounting bracket)i. Cable channel adapterj. Mount by aligning notches and hooks, then rotate clockwise
Installation recommendations
- It is recommended to install the device in the center of the ceiling.
- The device should be placed openly, unobstructed by appliances and furniture.
- It is recommended to place a smoke detector at the top of a stairway to detect heat and smoke rising from below.
- For the device to function correctly, it is important to ensure that its readings are done accurately in a stable environment. In order to achieve this:
- Do not place the detector in the kitchen: Cooking fumes may trigger the alarm.
- Do not place the detector near a ventilation fan, fluorescent lamp or air-conditioning unit: Air drafts may affect the accuracy of the detector.
- Do not place the detector near ceiling beams, at the top point of an “A” frame type ceiling or over a cabinet: Stagnant air in these areas may affect the accuracy of the detector.
- Do not place the detector where it may be exposed to direct sunlight.
- Avoid installing the smoke detector in areas where other installations may cause rapid changes in temperature within the detection area, e.g. near air conditioners, heaters, boilers or radiators.
- Avoid large obstacles in the detection area.
- Moving objects within the PIR detection area (e.g. curtains moving in a draft) may cause an unwanted alarm. Avoid if possible.
To test the PIR motion sensor: Press the function button to enter test mode. Walk around the protected area, and notice when the LED lights up. Check that the detection coverage is adequate.
The smoke detector is designed to be mounted on the ceiling. The ideal mounting height for the smoke detector is 2.7 to 3 meters above ground. Mounting the detector higher than 3 meters above ground may affect detection performance.
The smoke detector can support detection coverage within a radius of 4 meters. Please refer to the illustrations below for installation details.
IR Detection Coverage
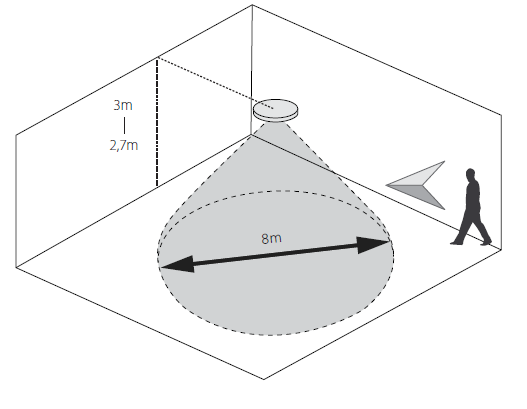
When mounted on the ceiling, the PIR motion sensor can most easily detect horizontal movement.
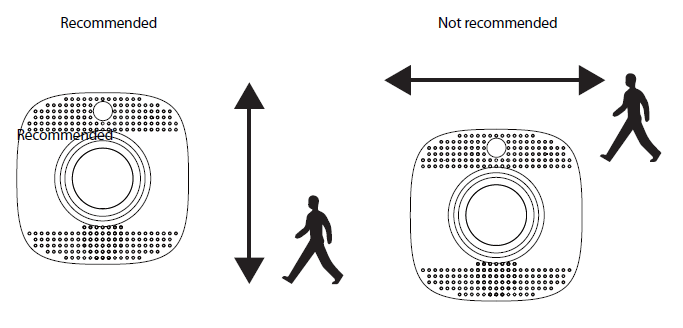
5. ADD/REMOVE
Please refer to your primary controller manual on how to enter add/remove mode. The device may only be added or removed from the network if the primary controller is in add/remove mode.
After power is applied, the smoke detector initiates a 1-minute warm-up period. During this minute, the device will automatically enter add/remove mode, and may now be added to the system via the primary controller.
After the calibration process is finished, you may access the add/remove mode by pressing the function button three times within 1.5 seconds. Removing the device will reset it to factory settings.
If the device already belongs to a network, you must remove it from that network before adding into a new one, or the setup will fail. When the device is removed from the network, it will revert to factory settings.
6. BEHAVIOR WITHIN THE Z-WAVE NETWORK
This device may be operated within any Z-Wave network with Z-Wave-certified devices from other manufacturers. All non-battery operated nodes within the network will act as repeaters regardless of manufacturer to increase the reliability of the network. On delivery, the device does not belong to any Z-Wave network. The device needs to be added to an existing network to communicate with the other devices within it. Devices may also be removed from a network. The add/remove processes are initiated by the primary controller/gaterway of the Z-Wave network.
The primary controller/gateway has a mode for adding or removing devices. Please refer to your primary controller manual on how to set the primary controller in add/remove mode. The device may only be added or removed from the network if the primary controller/gateway is in add/remove mode.
Red LED
- Turns ON briefly: Transmitting signal.
- Quick flash: Alarm.
- Flashes every second: Smoke detector in sleep mode, will not receive signals from other smoke detectors. Check the connections.
- Flashes every 2 seconds: Smoke detector in warm-up and calibration process.
- Flashes every 4 seconds: Battery exhausted.
Orange LED
- Flashes every second: Device power-on/calibration failed.
- Flashes every 5 seconds: Detecting smoke failed or device malfunctioning.
- Flashes every 4 seconds: Battery exhausted.
- Flashes every 45 seconds: Low battery condition
Function button
- Press the button once to send a test signal and temperature report to gateway.
- Press the button once during an alarm to silence the alarm.
- Press the button 3 times within 1.5 seconds to send a learn code.
- Press and hold the button for 10 seconds to enter the calibration process.
- Press and hold the button for 20 seconds to perform a factory reset.
White LED (emergency light)
- The emergency light will begin to flash slowly to alert users that an alarm has been triggered.
8. FACTORY RESET
Press and hold the function button for 20 seconds. This will reset the smoke detector. It will also re-perform the calibration process.NB! Please use this procedure only when the primary controller/gateway is missing or otherwise inoperable.
9. TESTING THE SMOKE DETECTOR
By pressing the function button on the smoke detector, you can test if the smoke detector is functioning normally.
- If the smoke detector functions normally, the Red LED turns on for 2 seconds, followed by a 2-tone beep.
- If the buzzer sounds 2-tone beeps 3 times, the “Optical Chamber” on the smoke detector is either dirty or out-of-order.
- If the buzzer sounds 2-tone beeps 5 times, the “Heat Sensor” is out of order.
10. ALARM SILENCE
When the smoke detector sounds the alarm, pressing the function button sets the smoke detector to alarm silence mode to silence the alarm for 9 minutes. The buzzer will only stop sounding after the alarm has been activated for at least1 minute.
If the smoke concentration has dropped below the alarm threshold after the 9-minute alarm silence period has expired, the smoke detector will emit a 2-tone beep and return to normal operation mode without sounding the alarm.
If smoke concentration still exceeds the alarm threshold, the smoke detector will start alarming again.
If smoke concentration continues to rise during the alarm silence period and exceeds a second alarm threshold, the smoke detector will start alarming again. An alarm activated by exceeding the second alarm threshold could not be silenced by pressing the function button
11. CALIBRATION
As the operating conditions of the smoke detector may vary after having been installed for some time, you may wish to recalibrate the smoke detector to set a new smoke detection threshold value and ensure optimal performance of the smoke detector.
To do this:
- Press 10 seconds on the function button and hold until the red LED starts to flash. The smoke detector will emit 2 short beeps, then follow the calibration process described in step 4 of the installation procedure to set the new reference value.
- Every time power is reapplyed after a powerloss, the smoke detector will also set the new threshold value following the warming and calibration process.
- After the initial installation, the smoke detector will perform auto-calibration after 4 hours. Afterwards, it will perform an auto-calibration once every month.
- If the calibration fails, the smoke detector will emit continuous beeps, and the red LED will also flash continuously. In this case, power off the smoke detector, and turn off internal battery. Wait for 30 secounds, then power the device back on remembering to turn on backup battery again.
12. SERIAL CONNECTION
The smoke detector can be used together with other Heatit Z-Smoke Detectors (maximum 6 in same serial connection)
To activate this functionality. It is rewired to assign associations towards the other devices.
- Add all smoke detectors to the same network.
- Assign the smoke detectors to the correct zone/room in primary controller.
- Access associations from the primary gateway (please refer to primary controller manual).
- Assign associations from each device using association group 2 (Sensor Basic Set) to all other smoke detectors.
This way it is ensured that no matter where the fire is detected, the devices will alarm with siren and emergency lights.
To stop an ongoing alarm, you can press the test button on a smoke detector.If the smoke detector was triggered from another device, the device will stop all alarms execpt from where the alarm was triggerd.
13. SECURITY
The S2 security enhances Z-Wave Plus with an additional layer of AES 128-bit encryption of the wireless Z-Wave communication to prevent hacking and man-in-middle attacks on the home network.
14. NODE INFORMATION FRAME
The node information frame is the business card of a Z-Wave device. It contains information about the device type and its technical features. The add and remove procedure of the device is confirmed by sending out a node information frame. Besides this, it may be necessary for certain network operations to send out a node information frame.
15. COMMAND CLASSES
Supported/Controlled Command Classes
15.1 COMMAND CLASS NOTIFICATION V8
Notification Command Class is used for various purposes in the smoke detector.The table below shows how the smoke detector will behave during different events.
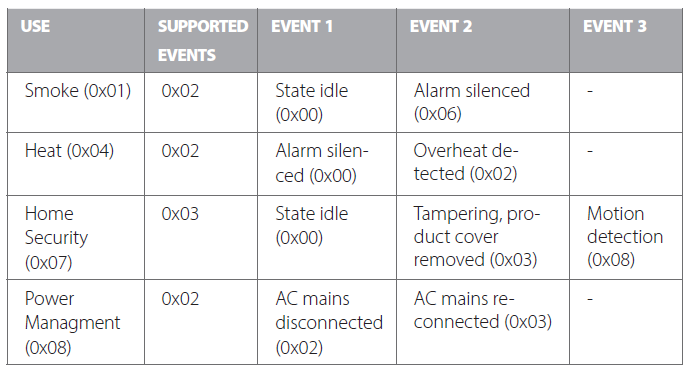
15.2 COMMAND BASIC
Basic is mapped towards;

When receiving Basic Set ON (0xFF) the siren will sound.When receiving Basic Set OFF (0x00) the siren will be turned OFF.
15.3 COMMAND CLASS SENSOR MULTILEVEL V11
Used to advertise the measured air temperature.

15.4 COMMAND CLASS BATTERY V1
Used to advertise the battery status of the internal 200mAh backup battery.When switch for backup battery is turned in OFF posistion, the device will report battery status as 0% (0x00). When charging, the battery will report the percentage at 20%, 30%, 40%, 50%, 60%, 70%, 80%, 90% and 100%.
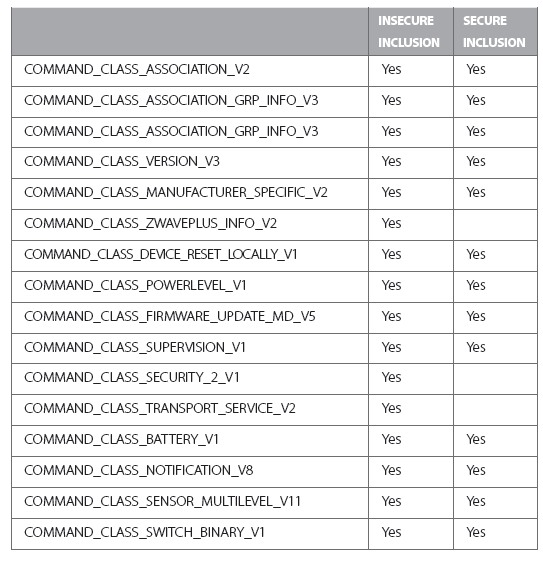
If the battery is discharged, the smoke detector will indicate using flashing LED every 4 seconds.
The following table lists all Command Classes supported by the Z-Wave device. The device supports both S0 and S2 Unauthenticated security.
16. ASSOCIATIONS
Z-Wave devices control other Z-Wave devices. The relationship between one device controlling another device is called an association. In order to control a subordinate device, the controlling device needs to maintain a list of devices that will receive controlling commands. These lists are called ”Association Groups”. They are always related to the specific event triggered (e.g., sensor reports). In case the event is triggered, all devices stored in the respective association group will receive a joint wireless command.
16.1 ASSOCIATION GROUPS
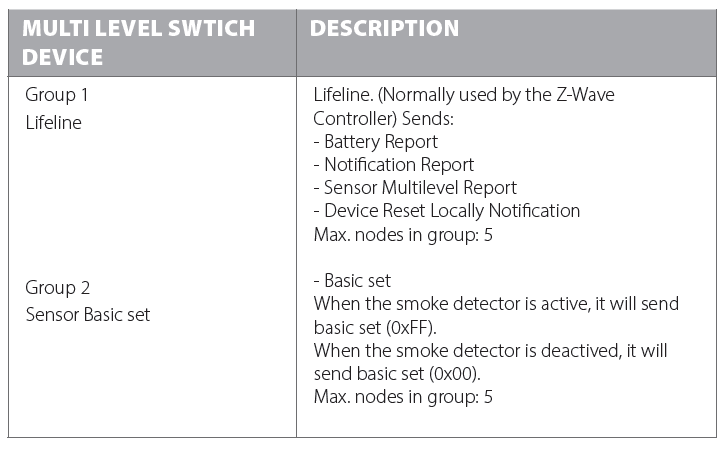
SETTING AND REMOVING ASSOCIATIONSAssociations may be assigned and removed via Z-Wave commands. Please refer to your primary controller/Z-Wave gateway for more information.
FEATURES
- Multifunctional smoke detector
- 230V
- Smoke Detection
- Heat Detection
- Serial connection capability (via gateway)
- Built-in motion sensor
- Built-in temperature sensor
- Built-in emergency lighting
- Back-up battery
- Mute button to silence unwanted alarms
- Tamper switch
- Firmware update (OTA)
- Supports encryption mode S0, S2 Unauthenticated Class
This product is a security-enabled Z-Wave Plus product with encryption. The product must be used with a security-enabled Z-Wave Controller in order to fully utilize the product.
TECHNICAL DATA
- Protocol: Z-Wave
- Chip: Z-Wave 500 chip
- Battery: 230V AC 50Hz; 200mAh, NiMh back-up battery
- Temperature sensitivity: ±1°C
- Alarm: 85dB at 3 meters distance
- Smoke sensor: Photoelectric
- Ambient temperature: 0°C to 50°C
- Humidity: Max. 85% RH
- Range, PIR: Up to 8m at 3m mounting height
- IP Code: IP 20
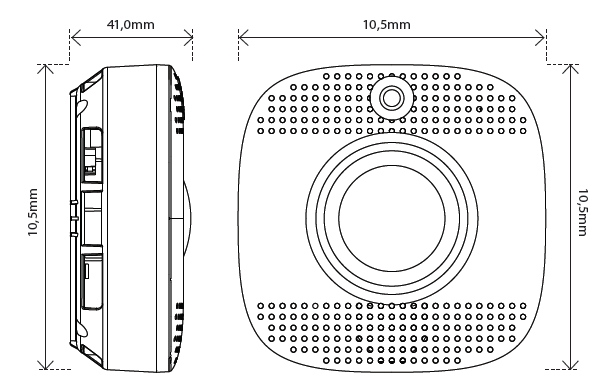
- Size (LxWxH): 105mm x 105mm x 41mm (ex. adapter)
- Approvals: Z-Wave Plus; CE, RoHS, EN 14604:2005, 14604/AC:2008
MAINTENANCE
The product should be tested regularly. Vacuum or blow the dust off the smoke detector regularly. The smoke detector must be replaced every 10 years.


Heatit Controls AB
Läkarvägen 4, 454 31 BRASTAD, SWEDENPhone: +47 61 18 77 77 lwww.heatit.com
References
[xyz-ips snippet=”download-snippet”]