
User Manual
HeatQ NEX 1.0 Electric Heating Element
Introduction
Producer: HeatQ TECHNOLOGY Sp. z o.o. / PL / www.heatq.com
Please read this installation and user manual and warranty terms before assembling the electric heating element.
After reading the manual, please save it just in case of need in the future
Safety requirements – installation and use
- Install the electric heating element in accordance with the producer’s guidance.
- Fitting and connection of the heating element should only be performed by a qualified installer.
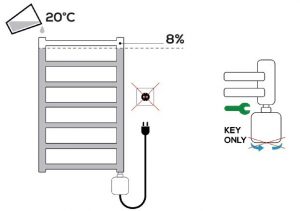
- Fitting and installation of the device must be carried out in accordance with all local regulations for electrical safety, including installation within permissible locations only. Observe bathroom electrical zone regulations.
- The producer does not accept any responsibility for damage or harm caused by unauthorised modification of the electric heating element.
- If a suppling cable becomes damaged it shall be replaced by producer or qualified service specialist.
- Switching the heating element on in the open air is permitted no longer than 2 seconds.
- Switching the heating element on in the empty radiator is prohibited.
- Do NOT place the controller in contact with water or any other liquids.
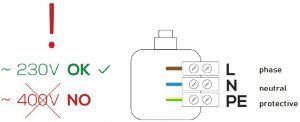
- Each type of electric installation to which the device is connected should be done in accordance with the EU regulations.
- The electric installation to which the heater is connected should have the right current differentiation and overcurrent relay (R.C.D.) of 30 mA.
- Do not use any adapters or extension for operate the device.
- If the device is not equipped with the measure allows to disconnecting the device on all poles or plug on the suppling cable there is oblige to install the power switch on the electric installation in accordance with the EU requirements.
- Ensure that minors aged 8 and under or those with a physical the device. Keep the device out of the reach of children.
- The device must be disconnected from the mains during cleaning and maintenance.
- Cleaning of the equipment by children under 8 years of age is only permitted under appropriate supervision.
Installation of the electric heating element (figures, page 3, 4)
![]() CAUTION! Before installing make sure the electric heating element is not connected to the power source. The device must not be switched when it is dry due to the risk of burning or damage of the thermal protection.
CAUTION! Before installing make sure the electric heating element is not connected to the power source. The device must not be switched when it is dry due to the risk of burning or damage of the thermal protection.![]() CAUTION! Make sure the radiator is filled with water or other heating agent before switching on the electric heating element for the first time!
CAUTION! Make sure the radiator is filled with water or other heating agent before switching on the electric heating element for the first time!
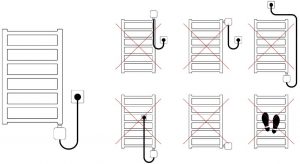
- The electric heating element should be connected to the radiator through the bottom outlet or through a previously assembled T-connector as shown in fig. 2.
 CAUTION! The electric heating element must not be held by the cover while assembling/ disassembling.
 - Tighten up the electric heating element with a 22-mm wrench appropriately in order to achieve required airtightness.
- Rotate the electric heating element cover to the proper direction to set the front of the controller in a desired position – it can be rotated by 330°. The rotation range is limited by a palpable stopper – if it is not possible to rotate the controller in one direction, try rotating in the opposite one.
- Fill the radiator in with the heating agent up to the required level specified by the manufacturer.
- Do not fill the radiator in with the heating agent at temperature exceeding 70˚C – there is a risk of thermal fuse damage. CAUTION! Electric heating element is equipped with one time activation thermal fuse (irrecoverable), which is activated when the temperature inside the tube exceed 87˚C. Result activation of thermal fuse: the controller is working but the heating element does not heat. Service is needed in order to reinstate the electric heating element.CAUTION! Do not fill the radiator up to 100% of its capacity. An exceeding amount and high temperature of the heating agent in a closed radiator may cause the pressure increase above the maximum value specified by the manufacturer. The maximum pressure of the electric heating element should not exceed 10 atm in order not to impose a threat to your health, life and property.
- Make sure the radiator is airtight and connect the electric heating element it to the power. Check if the voltage of the wiring complies with the voltage specified on the rating plate. When you find the electric heating element tight, you can connect it to the mains. Check whether the voltage of your home electrical system complies with the voltage provided on the product’s identification plate. Plug the electric heating element in a socket equipped with an earthing pin (PE circuit).
- The radiator with the electric heating element in the central heating must have supply and return cut-off valves.
- The electric heating element power cannot exceed the radiator power operating at 75/65/20°C. CAUTION! Non-compliance with any of the above safety precautions may impose a threat to your health, life and property.
Proper installation.
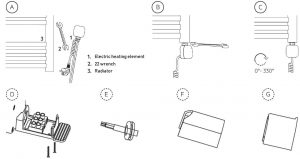
Components
- Heating element
- Controller housing
- Suppling cable
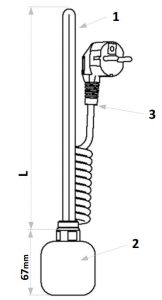
Length of heating elements

Technical information
1. Rating plate
- Model name: NEX 1.0
- Power supply: ~230VAC, 50Hz
- Insulation class: I
- Heat outputs: 120, 200, 300, 400, 500, 600, 800, 1000, 1200W
- Casing protection class [IP]: IPx5
- Type of electrical connection: Y
- Towel rail connection thread: 1/2″
- External temperature sensor: battery power supply 2x AAA
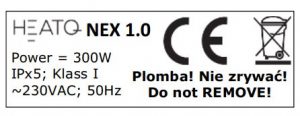
The rating plate is the warranty seal – DO NOT REMOVE!
2. Intended use of deviceThe electric heating element is an electric device intended solely for installation in radiators (autonomous or connected to the central heating system) used as space heaters, or towel dryers.![]() The heating agent (liquid heating agent in the radiator) must not cause corrosion or include ethylene glycol, except for the authorised agent applied in central heating systems.
The heating agent (liquid heating agent in the radiator) must not cause corrosion or include ethylene glycol, except for the authorised agent applied in central heating systems.
3. Functionality of the electric heating element
- Dryer. The temperature of the heating agent is adjusted with “+” and “-“ switches: 4 levels from 30 °C to 60 °C
- Space heater. The temperature of the room is adjusted with “+” and “-“ switches: 8 levels from 17 °C to 24 °C. Functionality is available in the configuration with the external temperature sensor.
- Controller switches the heating element off when the window is opened. Functionality is available in the configuration with the external open door/ window sensor.
- Weekly and daily programmer with possibility of setting 3 time zones per day – only in configuration with the mobile application.
- The dryer mode function with the possibility of setting the operating time:– timer „START” – after max 4 hours the electric heating element switches off,– timer „TURBO” – after max 4 hours the electric heating element returns to the previous setting,– timer „DELAY” – switching the device on with the delay max. 8 hours – operating time max. 4 hours.
- „HOLIDAY” mode – the possibility to quick decrease set temperature to the lowest level: 17˚C for the room and 30˚C for the radiator – functionality is available in configuration with the mobile application.
- „Parental control” – the possibility of lock the keyboard from the mobile application.
- Energy consumption meter – functionality is available in configuration with the mobile application.
- Intelligent visualisation of operating modes: heating, setting, timer, failure – colourful LED technology.
- The controller may be rotated by 330°.
- Intelligent operation control – microprocessor-based control.
- Protection against agent freezing – Antifreeze function.
- Three-level thermal protection.– the regulation controller prevents the temperature from exceeding 60 °C.– in case of an uncontrolled temperature increase, the thermal fuse cuts out the power if any damage of the regulator or temperature sensor occurs.– protection of the heating element against “operating in a dry radiator”, meaning operating outside the radiator or operating on the radiator without any heating agent inside. In case of a sudden temperature rise, the electronic system applied in the controller switches off the heating element at 87˚C, above which the single-usage thermal fuse actuates.
- The application of advanced electronics at the “operating” mode and the electronics of Ultra-Low-Power Technology at the “stand-by” mode provides the low power consumption.
NEX 1.0 – how to use the device
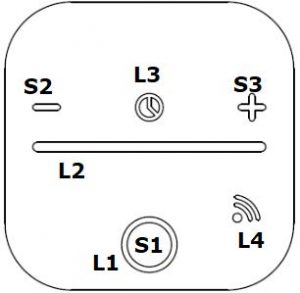
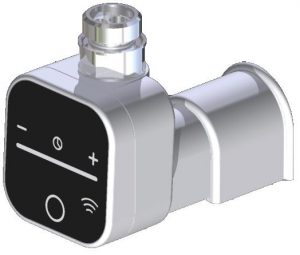
Buttons:S1 – ON/OFFS2 – decrease temperatureS3 – increase temperatureS4 – connection with NEX
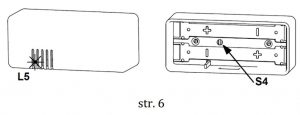
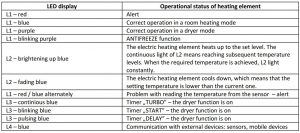
SignallingL1 – operating conditionsL2 – temperature and time settingL3 – switched on timerL4 – communication with external appliancesL5 – communication with NEX
- NEX thermostat is equipped with Bluetooth Low Energy communication module. The Bluetooth module allows to remote control by mobile devices. Mobile application is available for Android and IOS operational System. For the mobile devices the thermostat should appear as NEX 1.0. In order to pairing the thermostat with mobile device you should select the NEX1.0 device on your mobile phone and press button S2 on the thermostat.
- In order to pairing the NEX thermostat with external temperature sensor – press and hold the buttons S1 i S2 for about 5 seconds until LED L4 will start flashing. Insert two batteries into the sensor housing and during next 30 s press the button S4 located on the sensor in order to pair the devices (pairing is indicated by blue LED on external sensor).
- Press the “ON/OFF” button to switch the electric heating element on / off.
- Press the “+” button to set the agent temperature in the radiator or the room temperature (operating in configuration with external temperature sensor).
- Press the “-” button to set the agent temperature in the radiator or the room temperature (operating in configuration with external temperature sensor).
- During setting the temperature current status of the device is indicated by LED (see point 12).
- Press and hold the “+” button for about 3 seconds to switch timer TURBO on. The electric heating element begins to heat the heating agent to the set temperature and keeps it for max. 4 hours. After this time the controller returns to the temperature before switching the timer on.
- Press and hold the “-” button for about 3 seconds to switch timer START on. The electric heating element begins to heat the heating agent to the set temperature and keeps it for max. 4 hours. After this time the controller switches off the electric heating element.
- Press and hold the “+” and “-“ buttons for about 3 seconds to switch timer DELAY on. The electric heating element switch on with the delay (max. delay time – 8 hours), then begins to heat the heating agent to the set temperature and keeps it for max. 4 hours. After this time the controller switches off the electric heating element.
- The switching off the timers – press the buttons which switch on the specific timers. This operation cause that the device will switch off.
- ANTIFREEZE function. When the device is off and the temperature around temperature sensor drops down below 6oC, the device will switch on automatically. This is to prevent the heating agent inside the radiator from freezing. Activating Anti-freeze mode is indicated by blinking purple LED L1. Do not disconnect the plug from the socket to ANTIFREEZE function works properly. The electronics of Ultra-Low-Power Technology applied in HeatQ products provides the low power consumption at the „stand-by” mode.
- Visualisation of operarting modes
13. When power supply is recovered after its previous disappearance (power cut or unplugging) with the controller on, the electric heating element begins to operate in the mode before the voltage disappearance.14. The electric heating element is adjusted to operate with a standard timer.
Failures
In case when the electric heating element does not work properly:
- Check the modes of the electric heating element with the user manual (chapter V, point 12).
- Check if the electric heating element is installed properly and connected to the power source.
- Check the heating agent level in the radiator (the way of its filling up).
In case of any further failures, the electric heating element should be disassembled and returned to the distributor.
Maintenance of the electric heating element
![]() CAUTION! While cleaning the electric heating element with detergents or liquids, unplug the electric heating element. Prevent the controller from getting wet.
CAUTION! While cleaning the electric heating element with detergents or liquids, unplug the electric heating element. Prevent the controller from getting wet.
Use soft cloths or sponges for cleaning the surface. Do not use any aggressive or abrasive cleaning agents in order not to damage the decorative coat.
The painted surface should be wiped with warm water with delicate washing substances.
Chrome-plated surfaces should be cleaned with special cleaning agents intended for cleaning chrome-plated surfaces.
Disassembly of the electric heating element
- Switch the electric heating element off by pressing the switch and unplug it.
- In case of the electric heating element with an electric radiator disassembly it together with the radiator and turn the electric heating element upside down. There is no need to remove the heating agent.
- If the radiator is connected to the central heating close both supply and return valves. Remove the heating agent from the radiator.
- Remove the electric heating element from the radiator core with the 22 mm wrench.
![]() CAUTION! The electric heating element must not be held by the cover while assembling/ disassembling.
CAUTION! The electric heating element must not be held by the cover while assembling/ disassembling.
Disposal of the electric heating element
 After termination of the use the electric heating element must not be disposed as a municipal waste. The device should be taken to the point of collection and recycling of electric and electronic waste. Any information about the proper collection and recycling point may be obtained in the store or from the manufacturer.
By ensuring wastes are disposed properly you will help to prevent potential negative consequences for the environment.
HeatQ NEX 1.0 Electric Heating Element User Manual – HeatQ NEX 1.0 Electric Heating Element User Manual –
Questions about your Manual? Post in the comments!
[xyz-ips snippet=”download-snippet”]