![]()
 HD Smart Wi-Fi CameraHM202User Manual
Please read all instructions carefully before using this product and keep this User Manual as a reference for future use. This user manual will be updated regularly due to product upgrades or other reasons. HeimVision reserves the right to change the contents without notice.
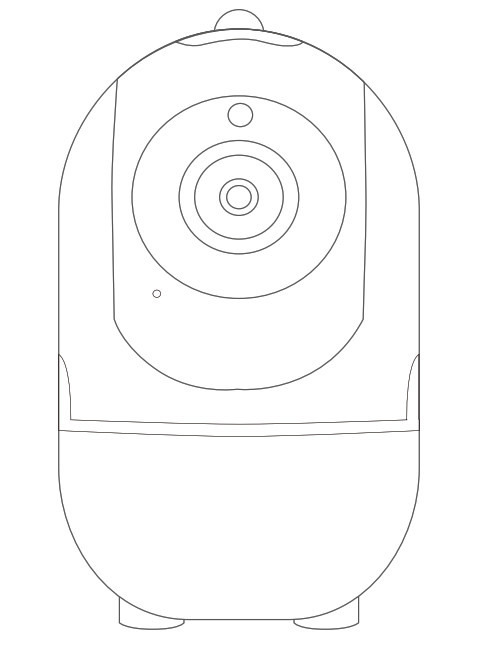
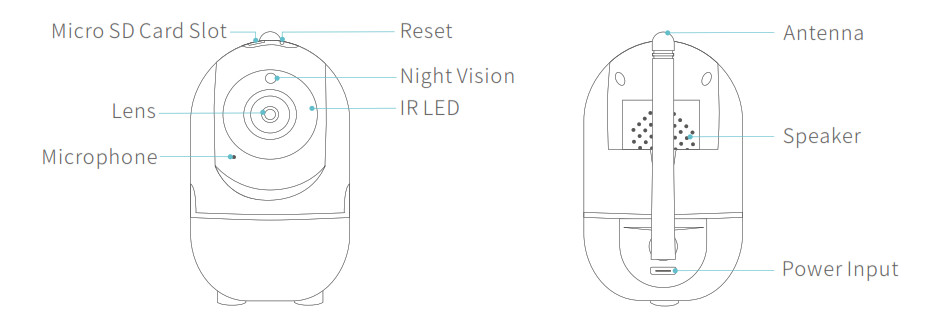
Product Overview and Main Features

Download the App into Your Mobile Device
Option 1: Search and download YCC365 Plus from App Store or Google Play;Option 2: Scan the QR code below to download.
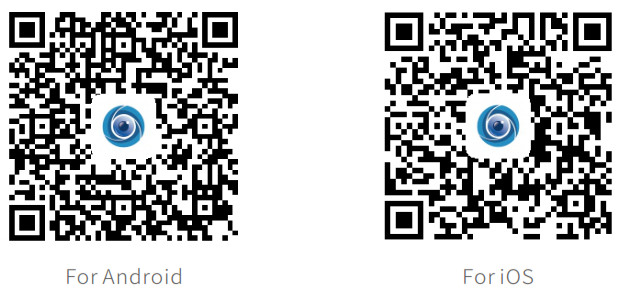
https://play.google.com/store/apps/details?id=com.ycc365plus.aws
https://itunes.apple.com/us/app/ycc365-plus/id1435567547?mt=8
Account Registration and Login
Please register an account with a valid email address at your first use of this App, then log in.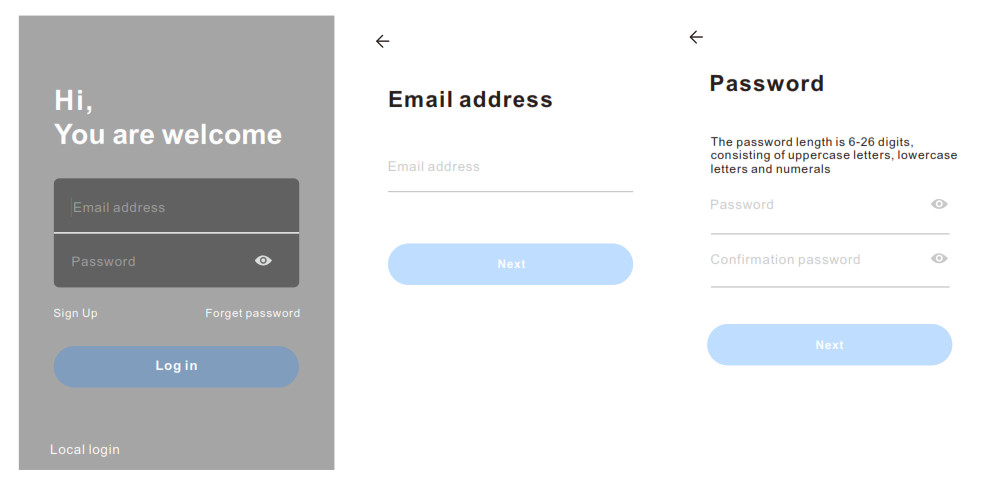
Note: Log in with a mobile phone number is only applicable to Vietnam.
Connecting the Camera to Your Mobile Device
IMPORTANT:
- For all connecting options, you will hear “Please configure camera by scanning code or AP hotspot” after the camera is powered on. Use the pin to press and hold the Reset button for 5-6s to reset the camera if no voice prompts. You will hear “Reset Success” at a successful reset;
- This camera only supports 2.4GHz Wi-Fi;
- For a stable network connection, please make sure the camera and the mobile device are close to the router.
Connecting by Scanning the QR Code
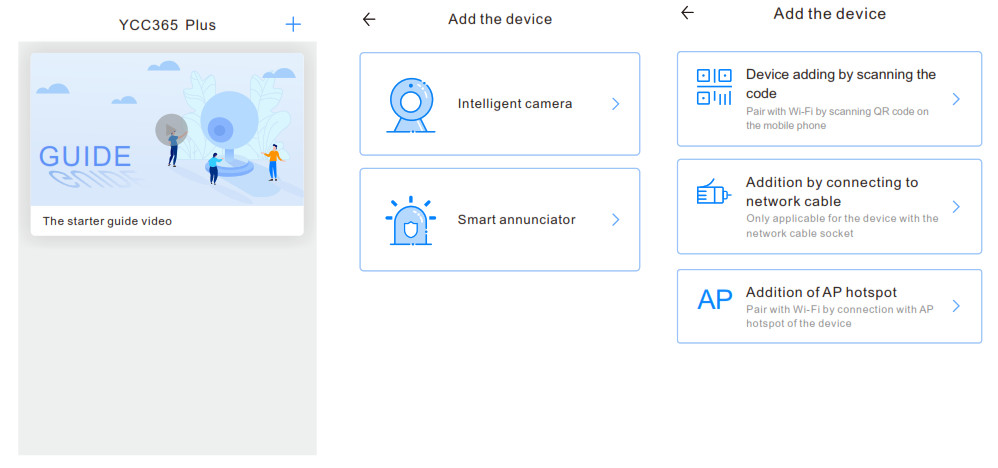
Step 1: Connect the mobile device to your Wi-Fi, then log in to YCC365 Plus. Click + in the upper right corner, select the Intelligent camera and Device adding by scanning the code;
Step 2: Tick If you have finished the above steps, click Connect to the Network, then click Connect to the network. Select the Wi-Fi your mobile device is connected to, enter the correct password, and click Next to continue:

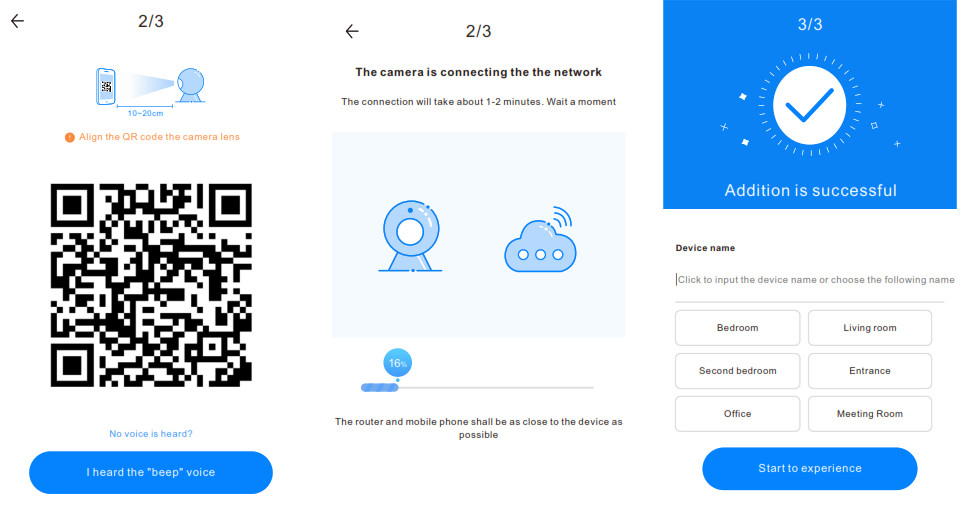
Tip: Click Network Testing in the upper right corner of Connect to Wi-Fi interface to check the status of your Wi-Fi connection.Step 3:Align the QR code on your mobile device with the camera lens and keep a distance of 4-8 inches;Step 4: Click I heard the “beep” voice to connect to the Internet after 2 beeps from the camera. During the process, you will hear “Please wait for Wi-Fi connecting “and “Please wait for Internet connecting”. When you hear “Internet-connected, welcome to use cloud camera”, the camera is connecting successfully.
Connecting by AP Hotspot
Step 1: Connect the mobile device to your Wi-Fi, then log in to YCC365 Plus. Click + in the upper right corner, select Intelligent camera and Addition of AP hotspot;
Step 2: Tick If you have finished the above steps, click Next, then click Next to enter the Network configuration interface;Step 3: Click Go to Setting to enter the network setting interface of the mobile device, then connect to the CLOUDCAM_XXXX Wi-Fi;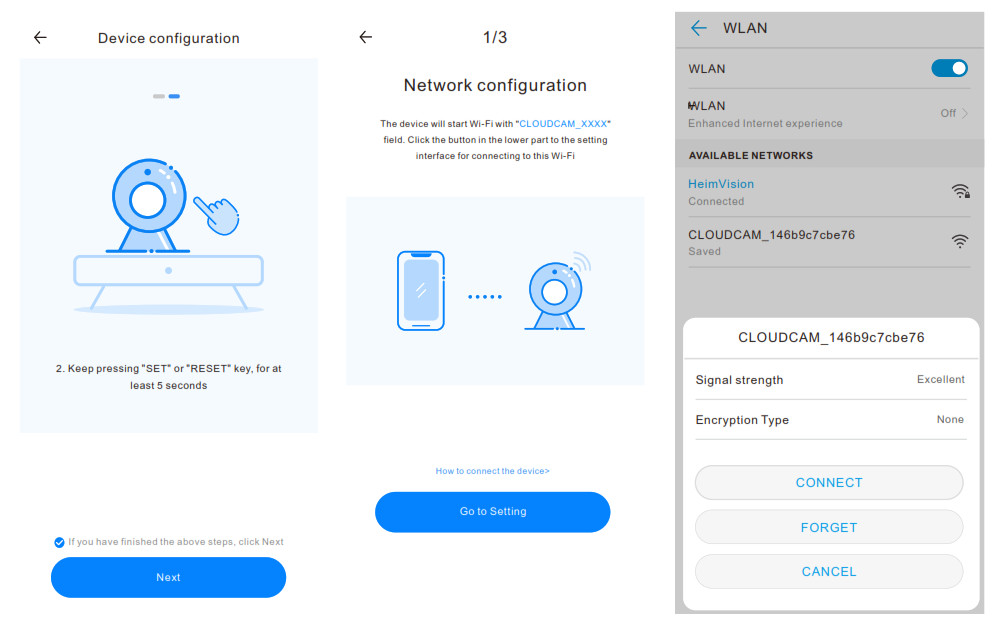 Step 4: Tap< to get back to YCC365 Plus to enter Network configuration interface, then click Next to continue;
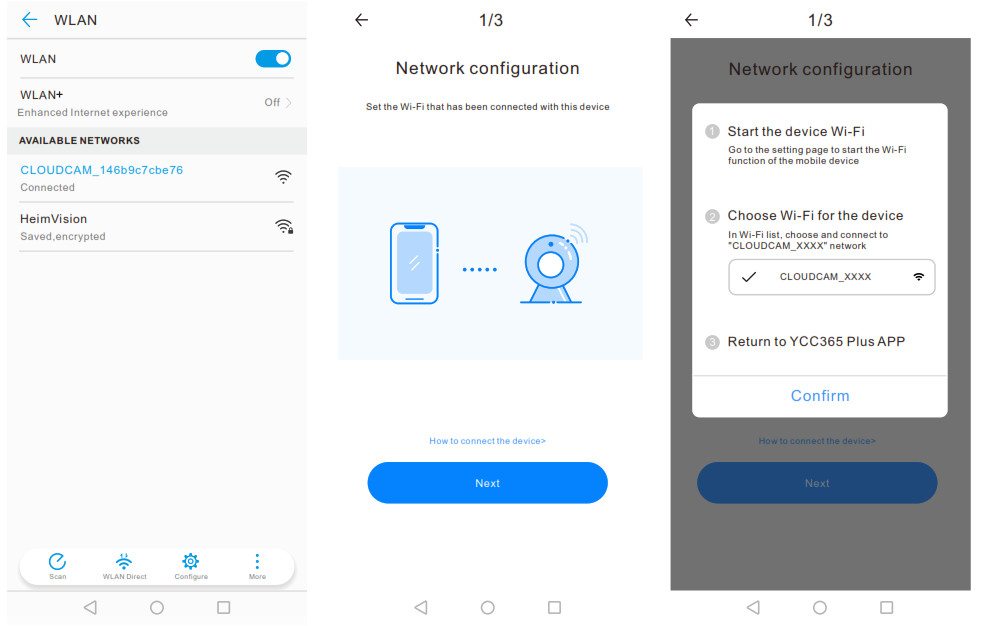 Tip: There will be a pop-up window if the CLOUDCAM_XXXX Wi-Fi connection is failed. Click Confirm to connect the Wi-Fi again.Step 5: Select the Wi-Fi your mobile device is connected to, enter the correct password, then click Next. The camera will connect to the Internet after 2 beeps from the camera. During the process, you will hear”Please wait for Wi-Fi connecting”and “Please wait for Internet connecting”. When you hear “Internet-connected, welcome to use cloud camera”, the camera is connected to Wi-Fi successfully.
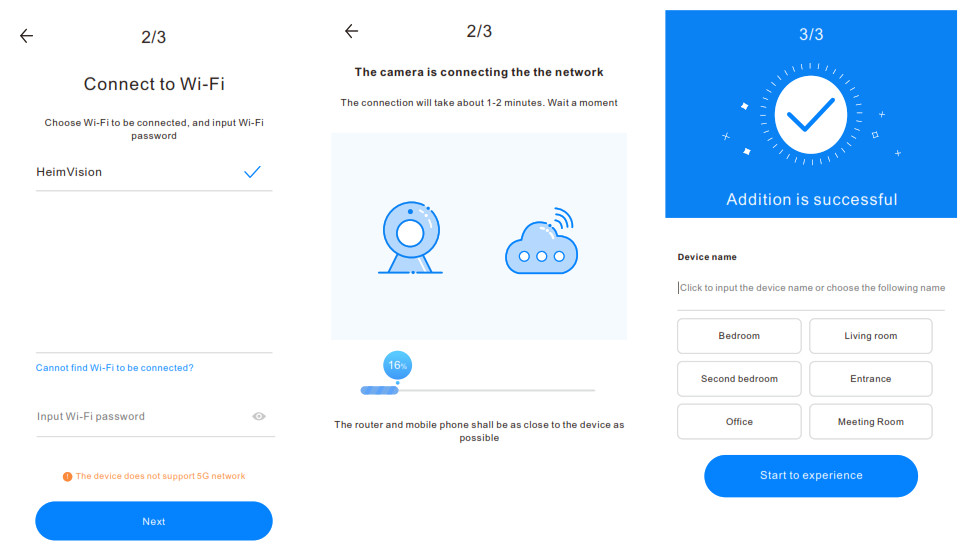
Note Addition by connecting to the network cable is not supported currently.
Off-line Direct AP Connection
Connect your mobile device to the Wi-Fi of the camera to watch the videos or set up the camera when there is no network connection. However, your mobile device must be located within the range of the camera’s Wi-Fi signal.Step 1: Use the pin to press and hold the Reset button for 2s, the camera will be rebooted. You will hear “Enter direct AP access mode after reboot”. There will be no more voice prompts after rebooting;Step 2: Enter the login interface of the App and click Local Login or the![]() icon to enter the Tool interface, then tap AP networked device preview to continue.
icon to enter the Tool interface, then tap AP networked device preview to continue.

Step 3: Click Next. There will be a pop-up window and click Confirm to enter the Network setting interface of the App. Click Go to Setting to enter the network setting interface of the mobile device;
Step4:Connect to the CLOUDCAM_XXXX Wi-Fi. After connected, tap to get back to YCC365 Plus toenter the Network setting interface, then click Next to continue;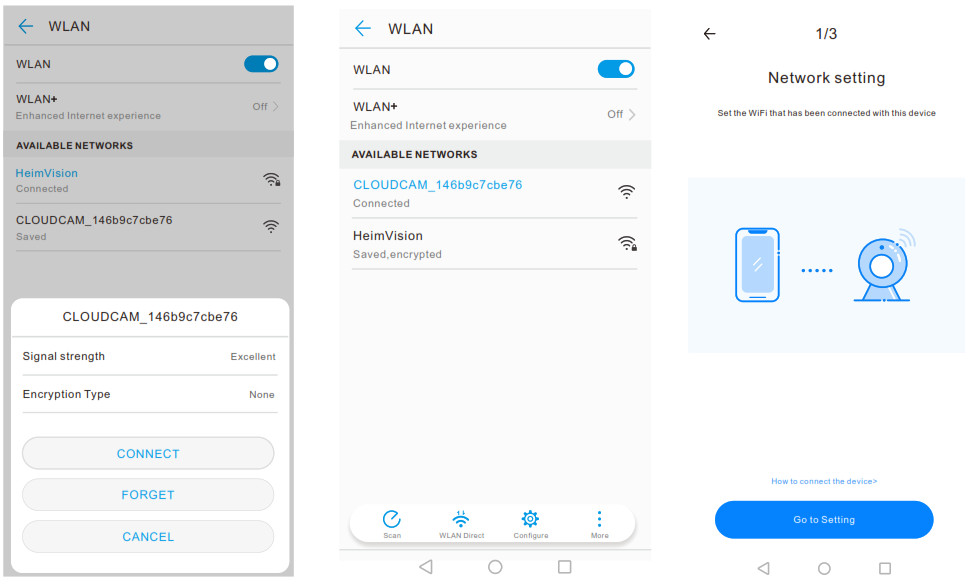
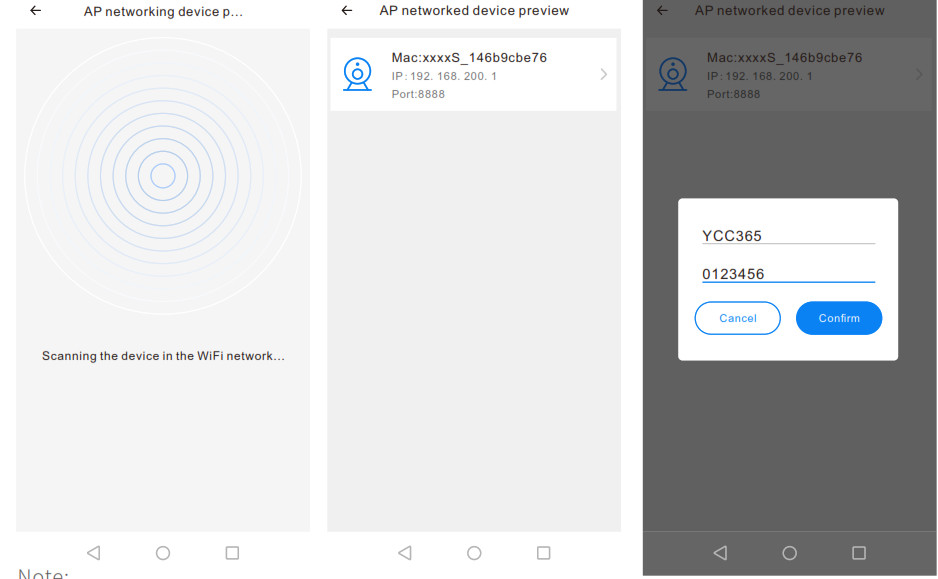
Step 5: If the scanning is successful, the App will display the information of this camera in the interface of AP networked device preview. Tap it, enter the account name YCC365 and the password 0123456 after selecting the camera, then click Confirm to watch the videos on this camera.
Note: All the communications will be disconnected from the network and some functions of YCC365 Plus are not available when your mobile device is connecting to the camera’s Wi-Fi.
Functions Introduction
Click the picture of the camera in the main interface of YCC365 Plus to enter the LIVE interface.
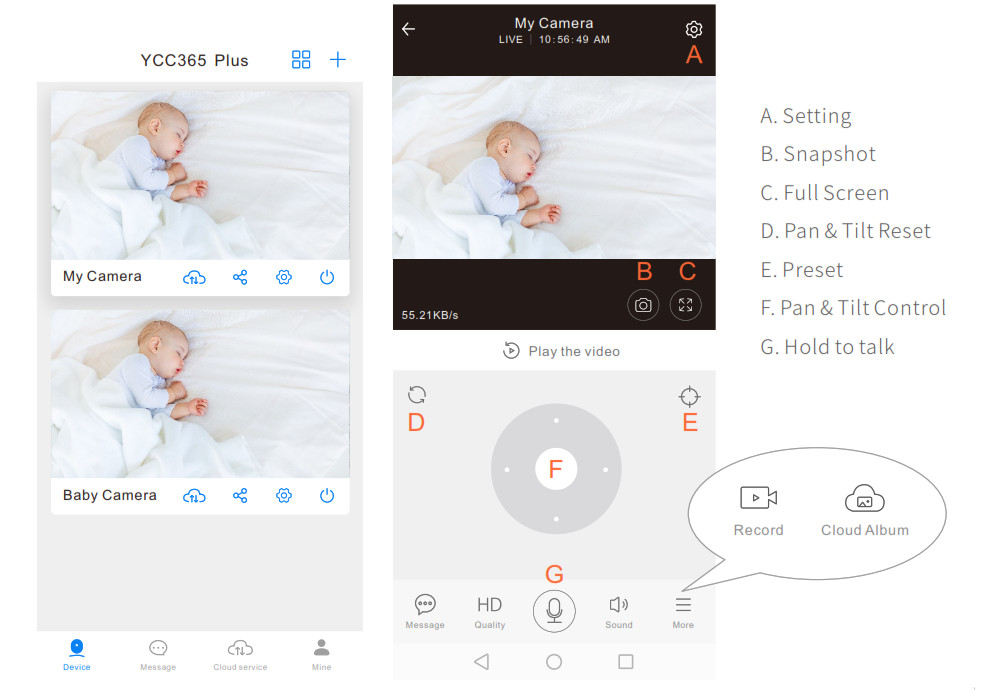
*Click ![]() play the video to play the historical videos*Click
play the video to play the historical videos*Click![]() to rotate the camera back to the default factory position*Click
to rotate the camera back to the default factory position*Click ![]() to preset the certain focal points for this camera*’Touch
to preset the certain focal points for this camera*’Touch ![]() to rotate the camera following your finger touch*Hold
to rotate the camera following your finger touch*Hold ![]() to talk, then release to send the audio to the camera*Click
to talk, then release to send the audio to the camera*Click ![]() to change the quality of image
to change the quality of image
Pan & Tilt Control and Preset
Pan & Tilt Control
- ‘Touch
 in the LIVE interface to rotate the camera following your finger touch;
 - Double-clicking of the picture in the live screen can digitally zoom in and zoom out the picture;
- ‘Rotate the camera by sliding the live screen with your finger.

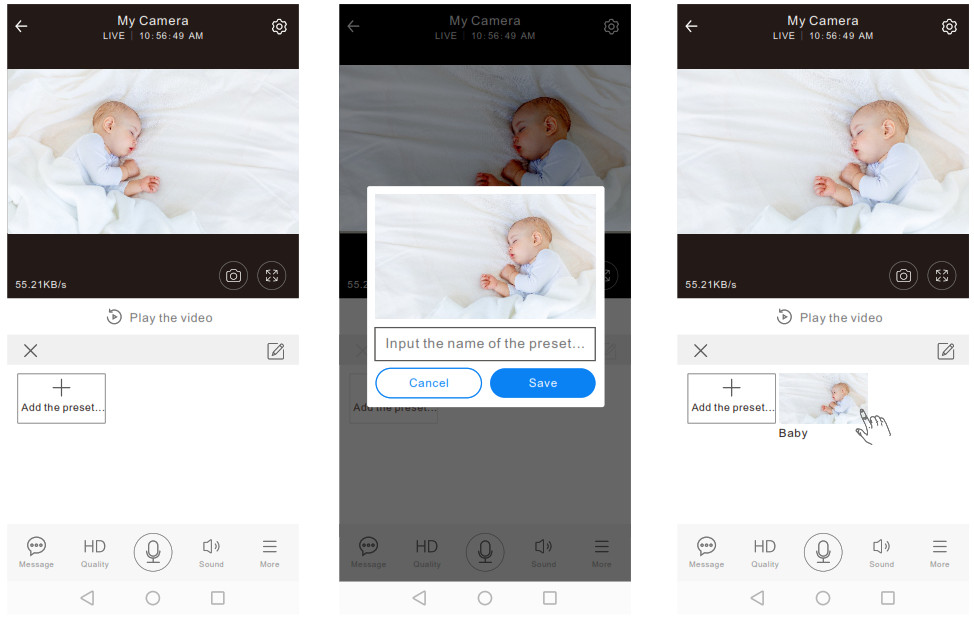
Tip: Due to the network environment, the rotation of the camera may not be smooth and the stream of the live video may lag.(2) Preset Click ![]() to preset the certain focal points for this camera, which can be added, called, and deleted; ‘Add a Preset: the click + to add a preset, enter the name, then click Save; ‘Call a Preset: the camera will directly rotate to the preset focal point by clicking the thumbnail.
to preset the certain focal points for this camera, which can be added, called, and deleted; ‘Add a Preset: the click + to add a preset, enter the name, then click Save; ‘Call a Preset: the camera will directly rotate to the preset focal point by clicking the thumbnail.
Video Playback
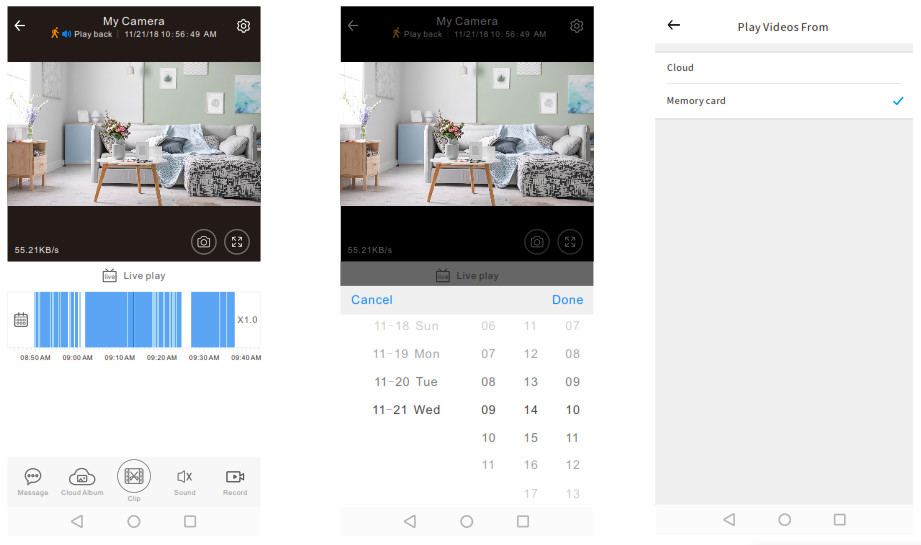
- Click Play the Play the video to enter the video playback interface. It will replay the historical videos in the Cloud Service of the camera by default.
- Dark blue in the timeline means the videos recorded when the camera detects the sound, motion, and so on, while the light blue means the normal videos;
- Click the to replay the video recorded on the selected date;
- Click the xi. o to control the playback speed, among which xo.s is slow motion, xi. o is normal speed, while X2.0 and X4.0 are fast forward.
Tip:
- Enter the interface of Setting, click Play Videos From, then select the Memory card to watch the videos in the microSD card;
- Colors in the timeline of the videos in the microSD card are the same;
- Fast forward and Slow motion are not supported when playing the videos from a microSD card.
Video Cut (Only Available in the Camera with Cloud Service)
Click ![]() play the video. to enter the video playback interface.Step 1: Drag the timeline, stop to the starting time of the video, then click
play the video. to enter the video playback interface.Step 1: Drag the timeline, stop to the starting time of the video, then click ![]() ;Step 2: Slide the orange bar leftward and rightward, or set up the Start time and Video duration to cut the video;Step 3: Enter the name and click Save to cloud.
;Step 2: Slide the orange bar leftward and rightward, or set up the Start time and Video duration to cut the video;Step 3: Enter the name and click Save to cloud.

Tip: The cut video is saved to the Cloud Album by default. You can enter the Cloud Album for watching and renaming, for sharing on Facebook, Twitter, YouTube, etc., and for downloading to the mobile device.
Messages (Only Available in the Camera with Cloud Service)
- Click to watch all the videos recorded when the camera detects the sound, motion, and so on. ‘ Filter the videos by different cameras, message types, and dates;
- Click the thumbnail to watch the detail of the selected video;
- Click , then select the video to delete.
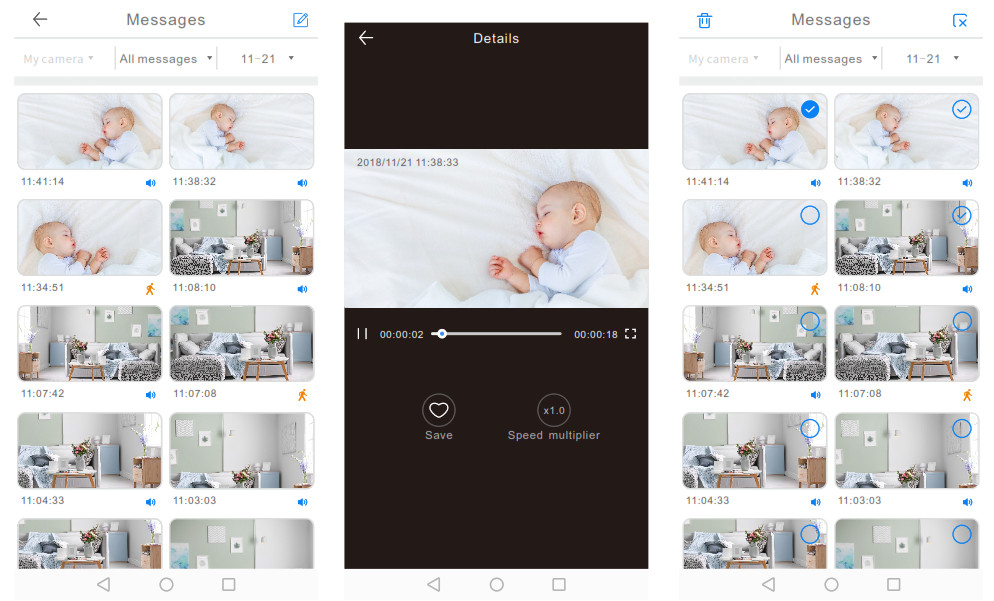
Note: The duration of videos is the same as the record time of the selected cloud service package, and the videos are automatically deleted when the cloud service expires. The video will loop to record and the former video will be automatically covered by the new video.
The MicroSD Card
Important: Install the microSD card into the camera, then power on the camera when using the microSD card; or reboot the camera after installing the micro so card.
- This camera can support the micro so card up to 128G;
- Go to Setting > Device storage > Memory card management:
- to check the microSD card status;
- to check the remaining capacity of the mic roSD card;
- to format the microSD card (it is recommended to format before using the micro so card);
- to set the memory card recording modes the microSD card. Selecting Not Recording means that the camera will not save any video, selecting Event recording means that the camera will record videos when detecting any sound, motion, etc., and selecting All-day recording means that the camera will always record the video.
- microSD card is consumable. Getting a microSD card with brands, such as Kingston and SanDisk, is recommended.

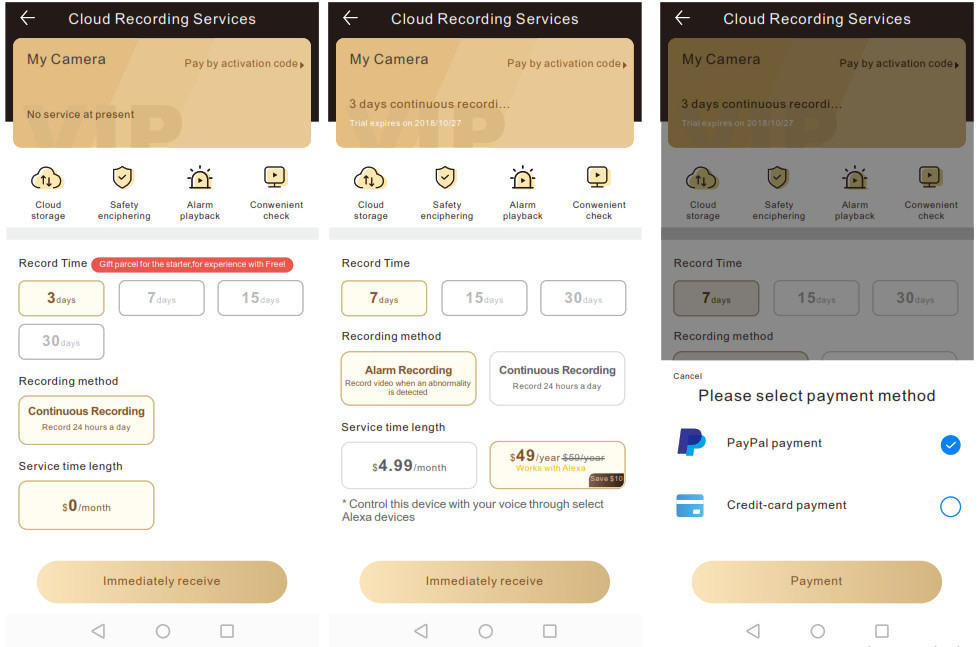
Optional Cloud Service
Select Cloud Service in the main interface or go to Setting > Device storage > Cloud storage management to check subscription packages.
- We offer a 30-day free cloud service and can save the video recorded for the latest 3 days (loop to record);
- The camera with a cloud service package that is paid yearly can be upgraded to support Alexa;
- Pay for the selected package by PayPal or credit card;
- The data in the Cloud Service is safe because we are using amazon’s cloud storage.
Note: Since the cloud service package is bound to the registered account, please contact HeimVision if you need to switch to another account.
Other Functions Introduction
Enter the interface of Setting to check other functions by clicking the ![]() in the main interface of YCC365 Plus or the
in the main interface of YCC365 Plus or the ![]() in the LIVE interface.Notification SettingsSound detection: ONThe camera will record the videos when detects the sound like the baby’s crying, then YCC365 Plus will push the alert notification to the notification bar of your mobile device;Motion detection: ONThe camera will record the videos when detects the moving objects, then YCC365 Plus will push the alert notification to the notification bar of your mobile device;Push Notification Settings‘Receive notificationYou can select to receive all notifications or just receive a summary. If you select Receive summary, you can set up the interval time for receiving the alert notifications with the same type;
in the LIVE interface.Notification SettingsSound detection: ONThe camera will record the videos when detects the sound like the baby’s crying, then YCC365 Plus will push the alert notification to the notification bar of your mobile device;Motion detection: ONThe camera will record the videos when detects the moving objects, then YCC365 Plus will push the alert notification to the notification bar of your mobile device;Push Notification Settings‘Receive notificationYou can select to receive all notifications or just receive a summary. If you select Receive summary, you can set up the interval time for receiving the alert notifications with the same type;
*Stop notification time:You will not receive alert notifications from the camera within a certain time after adding schedule(s);*Receive app notifications: ON
YCC365 Plus will push the alert notifications to the notification bar of your mobile device; ‘*Receive Email notifications: ONYCC365 Plus will send the alert notifications to your email (only available in the camera with cloud service).
Important: For receiving the real-time alert notifications, please switch on all the options: Motion detection, Sound detection, Receive app notification and Receive Email notifications.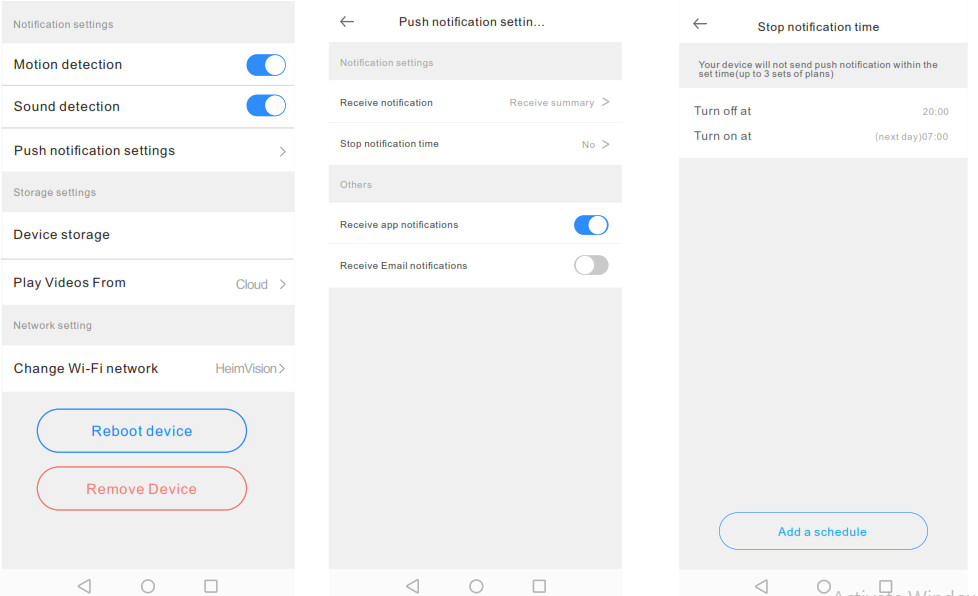
More functionsA: switches on and off the camera;B: switches on and off the microphone of the camera. You will not hear the sound from the camera and there is no sound when recording the videos when it’s off;C: the built-in buzzer will make a siren alert when the camera detects the sound, motion and soon if you switch on this button;D: turns on and off the IR LED of the camera. You can also set up to automatically switch on or off the IR LED based on the environment. After switching on the IR LED, the image will be white and black unless you change the setting; while after switching off the IR LED, the image will be colorful unless you change the setting;E: flips the picture of the video when the camera is mounted under the roof of the buildings;F: the camera will rotate following the moving object when it’s on. To keep the camera still and to reduce the noise, please switch off Intelligent Tracking. If the moving object is out of the range of monitoring, the camera will get back to the position before tracking. However, the camera will not track the moving object when you are using Pan & Tilt Control;G: checks the device ID, Mac address, and the Firmware version of the device;H: Share with your family, then they can watch live videos, watch the video playback or control the PTZ of the camera according to the selected function(s). The shared account should register YCC365 Plus with a valid email.I: the camera will not record video when detects any motion if you switch off this button;J: the camera will not record video when detects any sound if you switch off this button;K: You can change the Wi-Fi for the camera when it needs to connect to another Wi-Fi; however, it needs that the camera can connect to both Wi-Fis at the same time;L: reboots the camera remotely;M: clicks this button when you are no longer using the current camera or when connecting this camera with another registered account.


Simultaneously watch videos from multiple cameras
Multiple cameras can be connected to the same registered account. You can watch the live video of multiple cameras at the same time through the split-screen by clicking the ![]() in the upper right corner of the main interface.YCC365 Plus and PC can support 4 split screens currently, which means that you can simultaneously watch live videos from 4 cameras in the same screen at most. When there are more than 4 cameras connecting to this App, you can slide the screen to watch the live video of each camera.
in the upper right corner of the main interface.YCC365 Plus and PC can support 4 split screens currently, which means that you can simultaneously watch live videos from 4 cameras in the same screen at most. When there are more than 4 cameras connecting to this App, you can slide the screen to watch the live video of each camera.
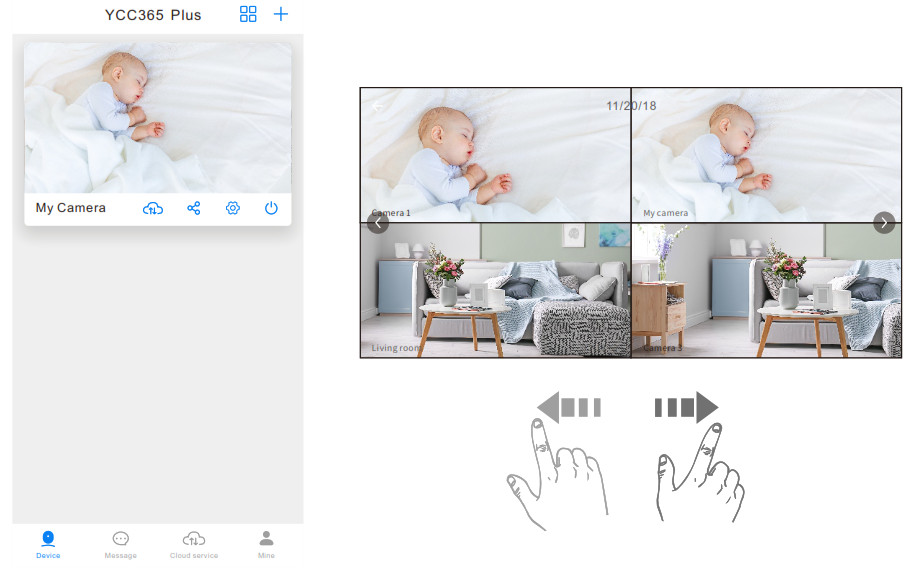
Tip: Simultaneously watching the live videos of multiple cameras has higher requirements for network bandwidth, so it may occur the video buffer and lag.
How to Watch the Videos on the Computer
Enter your email address and log in with your password after visiting www.ucloudcam.com. For a detailed introduction of functions, please refer to the above introduction for YCC365 Plus.
Troubleshooting Guide
Ql: How should I do when the camera fails to connect during the process?
- ‘Use the pin to press and hold the Reset button for 5-6s to reset the camera before connecting the camera. You will hear “Reset Success” at a successful reset;
- The camera only supports 2.4GHz Wi-Fi. Please make sure to connect to the correct Wi-Fi;
- You will hear different voice prompts when connecting the camera. Please take corresponding measures according to the voice prompts.
“Please configure camera by scanning code or AP hotspot”. You will hear this after the camera is powered on. If not, use the pin to press and hold the Reset button for 6s to reset the camera, then try again; “Please wait for form-Fi connecting”. You will hear this after select your Wi-Fi account and enter the password. If not, the Wi-Fi connection is failed. Please check whether the lens of the camera is blocked, whether the account and password are correct; “Please wait for Internet connecting”. If you cannot hear this, it means that the camera cannot get the IP address from the router. Please make sure the router works well and try to reduce the number of users who can access the current Wi-Fi; or, restart the router and try again; “Internet-connected, welcome to use cloud camera”. This voice prompt means the camera has been connected successfully. If you cannot hear this after trying many times, please contact us.
Q2: What can I do if YCC365 Plus shows “Uh-oh! Device disconnected”?
Make sure the camera is powered on and the network of the router works well.Solution 1: Click Trouble Shooting on the same page to fix.Solution 2: Restart the camera. If the camera still disconnects after the restart, please remove the camera from the App, then connect it again.
Q3: How can I get my camera connected to another Wi-Fi?
- If the current Wi-Fi of the camera and Wi-Fi you would like to switch can be connected at the same time, you can switch the Wi Fi directly by selecting Wi-Fi Network in the interface of Setting.
- If the camera is disconnected to the current Wi-Fi, the App will say “Device disconnected”. Click Trouble Shooting to connect to another Wi-Fi directly. Or remove the camera from YCC365 Plus, then connect the camera to the Wi-Fi you would like to switch.
Q4: Why are there blank parts in the timeline of the video?
- If you are using the Trial package or Alarm Recording package of Cloud Service, or you select Event Recording in Memory card recording mode, it will have blank parts in the timeline of the video. Because those options make the camera recording videos when it detects the sound, motion, etc.
Q5: I installed the microSD card, selected All-day Recording in Memory card recording mode, but why are there blank parts in the timeline of the video?
- Make sure you select SD Card in Play Videos From;
- Make sure the SD card status is Normal; If not, please format the SD card. If there are blank parts in the timeline of the video after formatting, please change to another SD card.Tip: When the camera is clearing cache memory and restarting, it will also make the blank parts in the timeline of the video.
Q6: Why cannot the camera read the SD card?
- Please make sure the SD card is not damaged. If the SD card is damaged, please change to another SD card.
- When the quality of the network is poor, the camera may not read the SD card. You can change the quality of the picture from HD to SD in the LIVE interface.Tip:
- Reboot the camera after installing and uninstalling the SD card.
- Do not install or uninstall the SD card when powering on the camera, which may damage the videos or the SD card.
Q7: Why is the timeline of the video blank when using an SD card after the cloud service expires? ‘Videos in the Cloud Service can’t be played if the cloud service package expires. If the camera hasn’t installed the SD card before, there would have no videos.
Q8: How can I watch the SD card videos on a mobile device and computer?
- Watch on the mobile device: If the SD card status is Normal, change Play Videos From to SD Card.
- Watch on the computer: Install the SD card into the computer, or copy the videos to the computer, then watch them with the player that supports MP4 format.
Q9: Why can’t I get the notifications on my phone?
- Make sure you allow YCC365 Plus to send you notifications in the Settings of your mobile device.
- Make sure you switch on all the options in Push Notification Settings.
- Make use the current time is not during the scheduled time that stops the notification.Usually, YCC365 Plus will push notifications to your mobile device when the camera records videos after detecting the sound or motion; however, notifying by the sound or the vibration depends on the setting of the mobile device itself.Tip: When you watch the live video of the camera, the mobile device will not get any notification.
Q10: How many accounts can I share when I select Private Share? How can I cancel the sharing?
- The limitation of network bandwidth and too many users accessing the camera at the same time will affect the connection and the video quality of the camera. The camera with cloud service subscription package can share with 10 accounts at most; while the camera without can share with 3 accounts at most;
- In the interface of Private Share, press and hold the account you want to cancel the sharing, then click .
Q11: Why can’t the shared account operate the camera?
- For security, the shared account can’t operate the camera. If the other user would like to operate the camera, please directly use the account which is bound to the camera to log in.
Q12: Why is there a circle in the video and why does the video have buffers when watching the video?
- The circle in the video means it’s still loading, please check the network connection of the camera and the mobile device. You can also change the quality of the video from HD to SD for smoother streaming.
Q13: Why is there image noise when the environment is dark?
- This is a normal phenomenon. However, to improve the image quality, the IR LED can be turned on when the environment is dark; at the same time, the color of the image will be black and white.
Q14: Why does the camera make noise?
- When the camera rotates, the motor will make a subtle sound, then the App will record the noise through the camera’s microphone can be eliminated by switching off the Sound in the LIVE interface, or switching off the Microphone in the interface of Setting. ln addition, it will occur an echo when the distance between the mobile device and the camera is very close. It can be eliminated by moving the mobile device away from the camera.lf the camera makes an unusual noise that cannot be eliminated, please contact us.
Q15: Do I have to subscribe to the cloud service package to use this camera? ‘
- You don’t have to subscribe to the cloud service package. We offer a 30-day free cloud service. You can use the SD card for video recording after the expiration; otherwise, you can only watch the real-time video.
- For better experience and safer storage, HeimVision recommends renewing the free trial package after expiration if you have subscribed to a cloud service package, please renew it before expiration. Otherwise, please get an SD card in time to avoid the interruption of video recording; and back up the important videos in the Cloud Service in time to avoid the situation that you can’t watch them after the cloud service expires.
References
[xyz-ips snippet=”download-snippet”]