HEINE DELTA 20 Plus Dermatoscopes Instructions
HEINE Dermatoscopes
These instructions apply to the following products of the HEINEDermatoscope series: HEINE NC1 Dermatoscope, HEINE DELTA 20 Plus Dermatoscope, HEINE DELTA 20T Dermatoscope, HEINE mini3000 LED Dermatoscope, HEINE mini3000 Dermatoscope
![]() Please read and follow these instructions for use of and keep them for future reference
Please read and follow these instructions for use of and keep them for future reference
Intended Use
The HEINE dermatoscopes are internally powered medical examination lights. It is an reflected-light microscope for non-invasive, visual inspection of intact skin by a healthcare professional. The diagnostic is not limited to any patient demography
![]() For U.S. only:Federal law restricts this device to sale by or on the order of aPhysician or Practitioner!
For U.S. only:Federal law restricts this device to sale by or on the order of aPhysician or Practitioner!
Warnings and Safety Information
![]() Caution! Indicates potential hazardous situations. Ignoring the corresponding instructions may lead to dangerous situations of mild to moderate extent. (Background color yellow, foreground color black.)
Caution! Indicates potential hazardous situations. Ignoring the corresponding instructions may lead to dangerous situations of mild to moderate extent. (Background color yellow, foreground color black.)
![]() Note! Note indicates valuable advice in terms of installation, operation, maintenance or repair. Notes are important, but not related to hazardous situations.
Note! Note indicates valuable advice in terms of installation, operation, maintenance or repair. Notes are important, but not related to hazardous situations.
Product overview
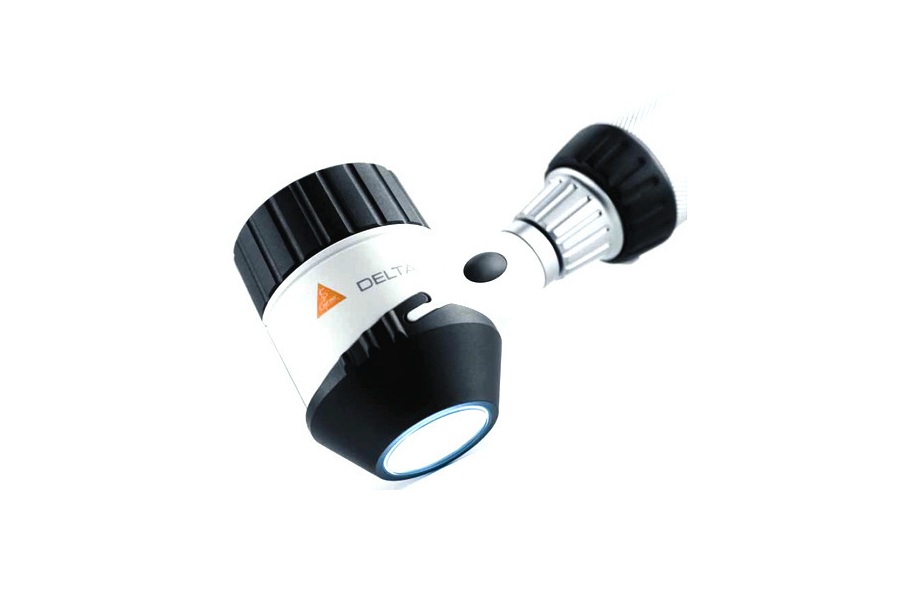
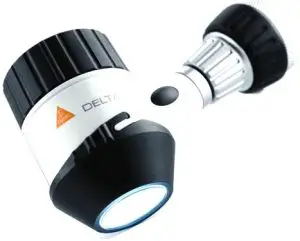
HEINE DELTA 20 Plus and HEINE DELTA 20T Dermatoscope

- Contact plate
- Contact plate immersion (N) with scale
- Contact plate immersion (N) without scale
- Contact plate polarisation (P) with scale
- Contact plate polarisation (P) without scale
- Contact plate DELTA 20T with scale
- Contact plate DELTA 20T without scale
- Changeover to 2 LEDs
- Focus ring
- Camera indicator
- Fixation groove
- BETA handle (optional)
- Dimmer
- Contact plate small
- Filter insert
- Polarizing insert
- Neutral density insert
- DELTA 20T filter insert
- Focusing ring
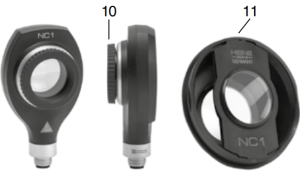
- Contact plateHEINE NC1 Dermatoscope

- Contact plate
- Contact plate small
- Ocular
- Focusing ring
- Light port
- Handle head
- Slide switch 1/0
- End capHEINE mini3000 LED/XHL Dermatoscope
- LED or XHL light source integrated in instrument head

Setting up
To set up the instrument, screw the instrument head into the HEINE battery handle or plug it on the HEINE rechargeable handle.
HEINE DELTA 20 Plus and HEINE DELTA 20T DermatoscopeAssembly of filter insert and contact plate Attach the insert (9) to the contact plate (1b) and rotate the insert to lock the bayonet connection. To disassemble the filter (9) from the contact plate, please reverse the procedure. Attachment of contact plate The contact plates (1 and 8) are attached by a bayonet connection. To remove the contact plate turn it counterclockwise and pull it away from the dermatoscope. To attach, reverse the procedure. Always check whether the bayonet is safely locked.
Operation
HEINE DELTA 20 Plus DermatoscopeFor examination of hard to reach lesions use the small contact plate (8) in place of the standard contact plate (1).Use DELTA 20 Plus with immersion contact plate (1a, 1b, 8).Prepare the skin by moistening with HEINE dermatoscopy-oil (use a cotton swab) or disinfectant spray.Turn the dermatoscope on by rotating the on/off ring (7) at the handle. Gently place the instrument so that the lesion is in the center of the contact plate.The examiner’s eye should be as close to the eye-piece (3) as possible. Adjust the focus ring until a crisp, clearly-focused-image is obtained.
![]() Always use the device in combination with one of the filter inserts(polarizing filter or neutral density filter). Only use contact plates from HEINE.
Always use the device in combination with one of the filter inserts(polarizing filter or neutral density filter). Only use contact plates from HEINE.
Using the DELTA 20 Plus with polarizing contact plate (1c, 1d) When using the polarizing contact plate, DO NOT prepare the skin with liquid like dermatoscopy-oil or disinfectants.Apart from that the general operation is the same as the procedure above
Brightness controlThe voltage regulation electronics of the HEINE DELTA 20 Plus Dermatoscope guarantee constant brightness. Pressing one of the two buttons on the instrument (2) will reduce the brightness by 50% and will turn off 2 of the 4 LED’s resulting in lateral illumination for improved contrast when viewing the pigmented structure.
![]() An electrical conducting connection between camera, PC and a mains power source is not permissible.
An electrical conducting connection between camera, PC and a mains power source is not permissible.
![]() For documentation with a digital camera only, use the HEINE photo adaptor and our recommend adaptor from the digital camera adaptor range.
For documentation with a digital camera only, use the HEINE photo adaptor and our recommend adaptor from the digital camera adaptor range.
HEINE DELTA 20T DermatoscopeThe DELTA 20T allows for a rapid change from polarized to non polarized examination mode over a side switch. Application remains the same as the DELTA 20 Plus with the immersion contact plate (see above). A difference is that no immersion fluid is required in the polarized examination mode.
HEINE NC1 DermatoscopeThe device can be used in non-contact modus. To do this, the contact plate, which is attached through magnets, must be removed. Hold the device approximately 2 cm above the skin area to be examined. Bring your eye towards the eye piece (10) as close as possible and adjust the eye piece focus until a sharp image is achieved.Contact modus (with contact plate)See HEINE DELTA 20 Plus Dermatoscope with polarizing contact plate.
An extra lens is integrated in the contact plate (11) which provides a 9x magnification when the contact plate is connected. Without the contact plate, a 6 x magnification is achieved.
HEINE mini3000 LED/XHL DermatoscopeMoisten the affected skin with HEINE dermatoscopy oil or comparable with a cotton wool swab. Switch on the device and place it gently over the lesion, so that it is in the center of the contact plate (12). The examiner’s eyes should be as close as possible to the ocular (14). With the free hand adjust the focusing ring (15) until a clearly focused image is obtained. Using the scale on top of the dermatoscope you can control the adjustment of the focusing ring. In most cases it is only necessary to set up the focus once.
Removing the contact plateThe contact plate (12) is attached by a bayonet fitting. To remove, simply rotate the knurled ring counterclockwise and detach from the dermatoscope. The small contact plate (13) can be used instead of the contact plate (12) for the examination of inaccessible lesions. To remove it, simply hold the knurled housing and pull off without twisting. When replacing, make sure that the light port (16) faces the bulb/LED. HEINE dermatoscopes are intended for a brief examination of less than 10 minutes with a 20 minutes break until the next application. The setup and operation of the HEINE handles are described in a separate instruction for use
Hygienic Reprocessing
Instructions on hygienic reprocessing must be adhered to, based on national standards, laws and guidelines.Classification according to KRINKO: non-critical Spaulding Classification USA: non-critical
![]() Allow the device to cool down before reprocessing.In the event of suspected contamination, the instruments should be forwarded for reprocessing immediately.The described cleaning and disinfection measures do not replace the specific rules applicable for the establishment.HEINE Optotechnik only approves the agents and procedures mentioned below.Cleaning and disinfection may only be carried out by personnel with sufficient hygienic knowledge.Observe the instructions of the manufacturer of the reprocessing media. Do not use spray or immersion disinfection, dripping wet or heavily foaming tissues. Do not use ultrasonic reprocessing. Do not use reprocessing media including alcohol.The contact plates have to be cleaned and/or disinfected after each use. They should only be sterilized after the treatment of high risk patients. The mini3000 contact plate up to 4 times max., the DELTA 20 Plus contact plate up to 25 times max.Steam sterilization of the instrument heads, the filter inserts (9), the small contact plates of the DELTA 20 Plus and DELTA 20T (8), of the mini3000, mini3000 LED dermatoscope (13) and the contact plate of the NC1 dermatoscope (11) and the DELTA 20T (1e+1f ) is not allowed.
Allow the device to cool down before reprocessing.In the event of suspected contamination, the instruments should be forwarded for reprocessing immediately.The described cleaning and disinfection measures do not replace the specific rules applicable for the establishment.HEINE Optotechnik only approves the agents and procedures mentioned below.Cleaning and disinfection may only be carried out by personnel with sufficient hygienic knowledge.Observe the instructions of the manufacturer of the reprocessing media. Do not use spray or immersion disinfection, dripping wet or heavily foaming tissues. Do not use ultrasonic reprocessing. Do not use reprocessing media including alcohol.The contact plates have to be cleaned and/or disinfected after each use. They should only be sterilized after the treatment of high risk patients. The mini3000 contact plate up to 4 times max., the DELTA 20 Plus contact plate up to 25 times max.Steam sterilization of the instrument heads, the filter inserts (9), the small contact plates of the DELTA 20 Plus and DELTA 20T (8), of the mini3000, mini3000 LED dermatoscope (13) and the contact plate of the NC1 dermatoscope (11) and the DELTA 20T (1e+1f ) is not allowed.
Procedure
Instrument head
Clean and disinfect the head of the dermatoscopes manually (clean and disinfect through wiping)
Recommended agents Cleaning agent: Neodisher MediCleanDisinfectant agent: quaternary ammonium compounds (e.g. Microbac Tissues)
Contact plates
Clean and disinfect the contact plates manually after removing from the instrument head (clean and disinfect through wiping)
Before cleaning or disinfection you can remove the additional lens othe NC1 dermatoscope, but you must remove the filter insert of the DELTA 20 Plus and of the DELTA 20T.
Recommended agentsCleaning agent: Neodisher MediCleanDisinfectant agent: quaternary ammonium compounds (e.g. Microbac Tissues)The contact plates can be reprocessed up to 1000 cycles (without autoclaving).The contact plates of the DELTA 20 Plus (1a-1d) and of the mini3000, mini3000 LED dermatoscope (12) can be sterilized once they have been removed from the instrument head and the filter inserts have been removed.
Recommended programs of sterilization Steam sterilization:132-134°C; 3 minFractional vacuum procedure (three-times) or gravitational procedure (three-times).
Changing the light source![]() Allow the device to cool down before changing the bulb.
Allow the device to cool down before changing the bulb.
HEINE DELTA 20 Plus, HEINE DELTA20T, HEINE NC1 and HEINE mini3000 LED Dermatoscope
The LED cannot be changed.
HEINE mini3000 DermatoscopeRemove the instrument head from the handle and pull out the bulb. Wipe down the head of the new bulb with a soft cloth Insert the new bulb as far as possible into the socket.
Maintenance and ServiceThe instruments do not require maintenance or service.
General Warnings
- Check the correct operation of the device before use!
- Do not use the device if there are visible signs of damage or the light begins to flash.
- Do not use the device in fire- or explosive risk area (e.g. oxygen saturated or anaesthetic environments)
- Do not modify the device.
- Use only original HEINE parts, spare parts, accessories and power sources.
- Repairs shall only be carried out by qualified persons.
- Do not look directly into the light source to avoid dazzle from the intense light. The dermatoscopes are not suitable for eye examination.
General Notes
![]() The warranty for the entire product is invalidated if non-genuine HEINE products or non-original parts are used and if repairs or modifications are made to the device by persons not authorized by HEINE. For more information, please visit www.heine.com.If you don’t use the device for a longer period of time, please remove the batteries in advance.
The warranty for the entire product is invalidated if non-genuine HEINE products or non-original parts are used and if repairs or modifications are made to the device by persons not authorized by HEINE. For more information, please visit www.heine.com.If you don’t use the device for a longer period of time, please remove the batteries in advance.
Disposal
![]() The product must be recycled as separated electrical and electronic devices. Please observe the relevant state-specific disposal regulations.
The product must be recycled as separated electrical and electronic devices. Please observe the relevant state-specific disposal regulations.
Electromagnetic Compatibility
Medical electric devices are subject to special precautionary measures with regard to electromagnetic compatibility (EMC). Portable and mobile high frequency communication equipment can affect medical electric devices.
- This is a device in the domestic environment, this device may cause radio interference, so that it may be necessary in this case, to take appropriate remedial measures, as e.g. orientation, new arrangement or shielding of the device or restrict the connection to the site.
- The use of accessories, converters or cables other than the ones specified by HEINE might lead to increased emission and reduced electrical immunity of the medical equipment.
- The device may not be stacked directly near or used directly beside other devices. If the device is to be operated in a stack or with other devices, the device should be watched to ensure it operates properly in this location.
The appendix contains following tables
- Guidance and manufacturer’s declaration Electromagnetic immunity
- Technical specification
- Explanation of the used symbols

References
[xyz-ips snippet=”download-snippet”]