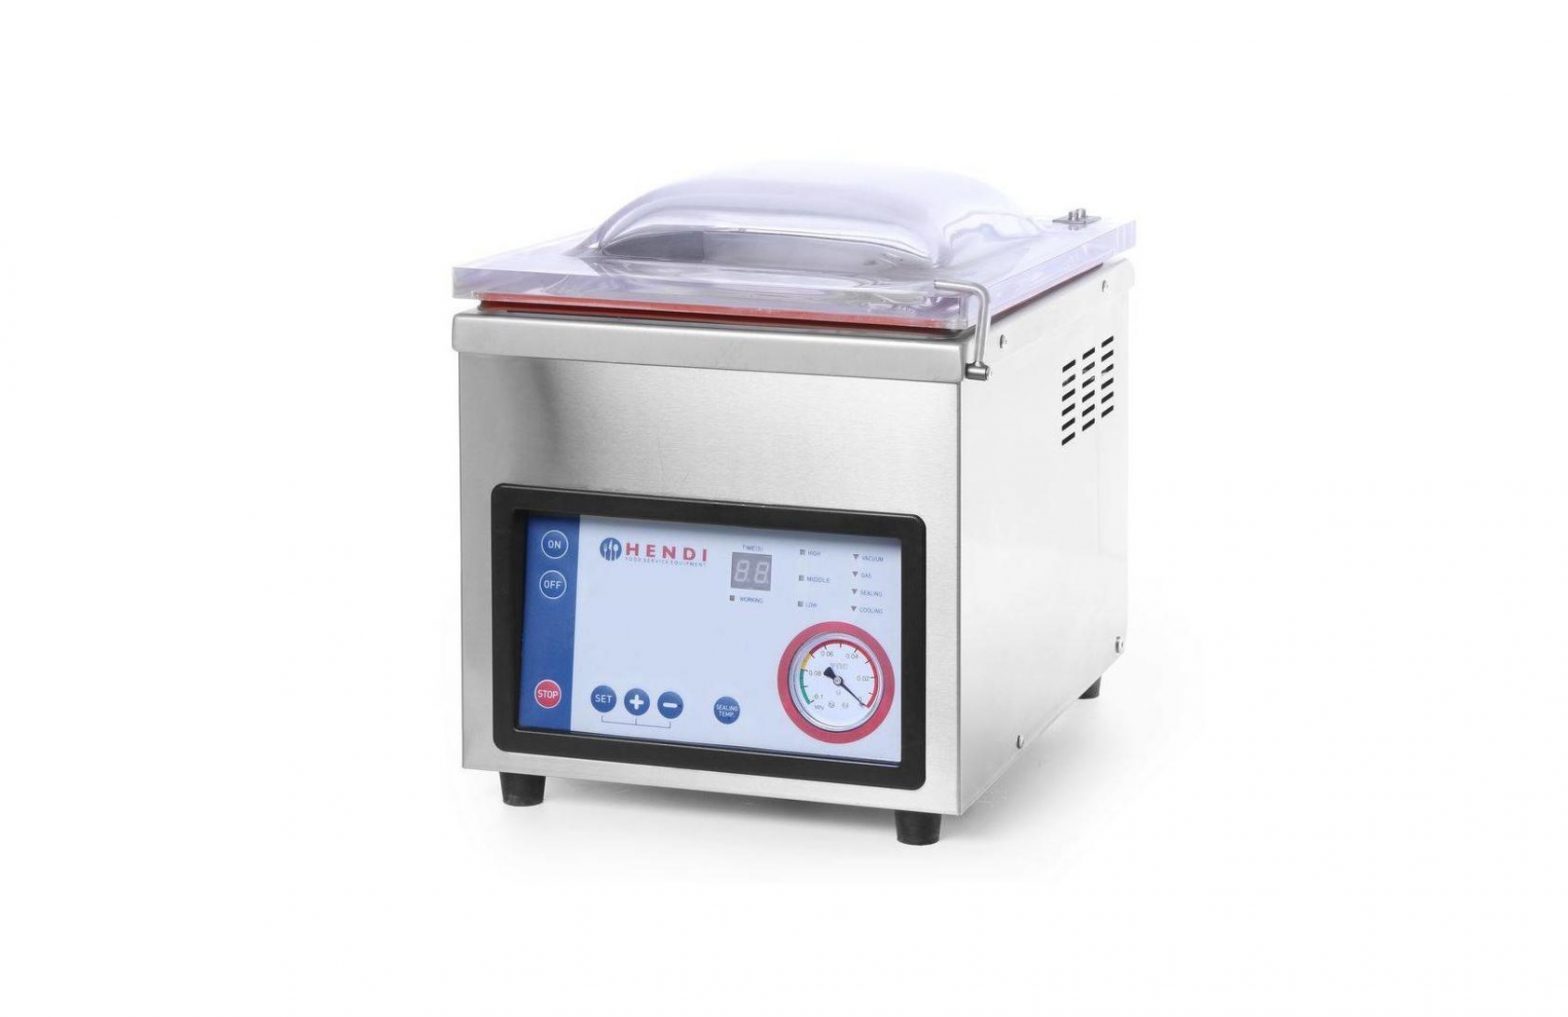
HENDI Vacuum Chamber Packaging Machine Profi Line User Guide
Dear Customer,Thank you for purchasing this Hendi appliance. Read this manual carefully, paying particular attention to the safety regulations outlined below, before installing and using this appliance for the first time.
Safety regulations
- This appliance is intended for commercial use only.
- Only use the appliance for the intended purpose it was designed for as described in this manual.
- The manufacturer is not liable for any damage caused by incorrect operation and improper use.
- Keep the appliance and electrical plug away from water and other liquids. In the event the appliance falls into water, immediately remove the power plug from the socket. Do not use the appliance until it has been checked by a certified technician. Failure to follow these instructions will cause life threatening risks.
- Never attempt to open the housing of the appliance by yourself.
- Do not insert objects into the housing of the appliance.
- Do not touch the plug with wet or damp hands.
 Danger of electric shock! Do not attempt to repair the appliance by yourself, repairs are only to be conducted by qualified personnel.
- Never use a damaged appliance! When it’s damaged, disconnect the appliance from the socket and contact the retailer.
- Warning! Do not immerse the electrical parts of the appliance in water or other liquids.
- Never hold the appliance under running water.
- Regularly check the power plug and cord for any damage. When damaged it must be replaced by a service agent or similarly qualified person in order to avoid danger or injury.
- Make sure the cord does not come in contact with sharp or hot objects and keep it away from open fire. Never pull the power cord to unplug it from the socket, always pull the plug instead.
- Make sure that the power cord and/or extension cord do not cause a trip hazard.
- Never leave the appliance unattended during use.
- Warning! As long as the plug is in the socket the appliance is connected to the power source.
- Turn off the appliance before unplugging it from the socket.
- Connect the power plug to an easily accessible electrical socket so that in case of emergency the appliance can be unplugged immediately.
- Never carry the appliance by the cord.
- Do not use any extra devices that are not supplied together with the appliance.
- Only connect the appliance to an electrical outlet with the voltage and frequency mentioned on the appliance label.
- Never use accessories other than those recommended by the manufacturer. Failure to do so could pose a safety risk to the user and could damage the appliance. Only use original parts and accessories
- This appliance should not be operated by persons with reduced physical, sensory or mental capabilities, or persons that have a lack of experience and knowledge.
- This appliance should, under any circumstances, not be used by children.
- Keep the appliance and its power cord out of reach of children.
- WARNING: ALWAYS switch off the appliance and unplug from power socket before cleaning, maintenance or storage.
Special Safety Regulations
- Use the appliance only as described in this manual.
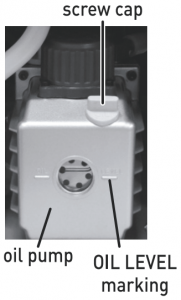
- Important! Make sure that the pump oil is at least over the OIL LEVEL.
- Use the supplied pump oil only. The pump oil level should be checked regularly by a qualified service technician. Do not use old pump oil.
- Danger of burns! Never touch the sealing bar. It is very hot even after use. There is a danger of burns. Wait until the appliance has cooled down. Also, do not touch the appliance while in use.
- The appliance must be cleaned and food residues must be removed regularly. If the appliance is not maintained in a clean condition, this will lead to a detrimental effect on the service life of the appliance and can result in a dangerous condition during use.
- Do not place the appliance on a heating object (gasoline, electric, charcoal cooker, etc.) Keep the appliance away from any hot surfaces and open flames. Always operate the appliance on a level, stable, clean, heat-resistant and dry surface.
- Do not use the appliance near explosive or flammable materials, credit cards, magnetic discs or radios.
- This appliance is not intended to be operated by means of an external timer or separate remote-control system.
- Important: Keep all ventilation openings in the appliance clear of obstruction. Allow at least 10 cm spacing around the appliance for ventilation purpose during use.
- Important: This appliance is suitable for sealing food in both solid state such as biscuits, chips & liquid state such as juice, soup, etc.
- Danger of crushing hands! Be careful when closing the lid.
- Special care should be taken when moving or transporting the machine due to heavy weight. With at least 2 people or using a trolley for assistance. Move the machine slowly, carefully and never be inclined over 45°.

Intended Use
- This appliance is intended for professional use.
- This appliance is only intended for vacuuming and sealing plastic bags with food inside. Any other use may lead to damage to the appliance or personal injury.
- Operating the appliance for any other purpose shall be deemed as a misuse of the device. The user shall be solely liable for improper use of the device.
Grounding installation
This appliance is classified as protection class I and must be connected to a protective ground. Grounding reduces the risk of electric shock by providing an escape wire for the electric current. This appliance is fitted with a power cord that has a grounding wire and grounded plug. The plug must be plugged into an outlet that is properly installed and grounded.
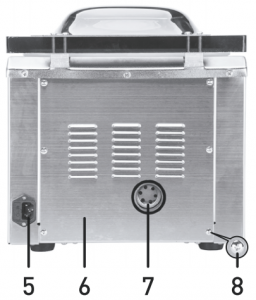
Main parts of the appliance
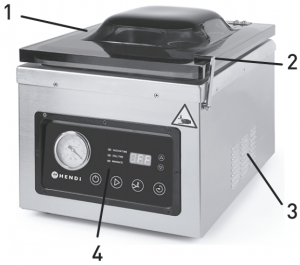
- Lid
- Clamp lock
- Ventilation holes
- Control panel
- Power cord socket
- Rear cover
- Pump oil level display
- Fixing screws for rear cover
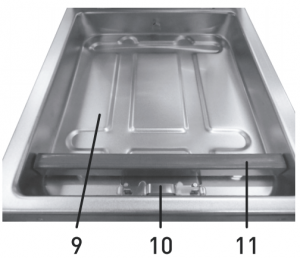
- Chamber
- Clamp for fixing vacuum bag
- Sealing bar
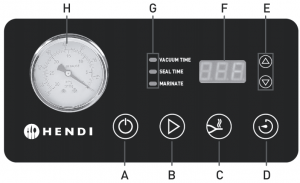
- ON/OFF button: Press this button to switch the machine on or off.
- START button: The machine has an automatic start function which activates when the lid is closed. If this is not set use the START button (1).
- SEAL button: Press the SEAL button to stop the vacuum process and start the sealing process.
- SET button: With the lid (1) open, press the “SET” button to set the time of the 3 processes (VACUUM TIME, SEAL TIME and MARINATE).
- Time adjust button ( Increase / Decrease) Press these buttons to adjust the time for each process (VACUUM TIME, SEAL TIME and MARINATE).
- Digital display
- It shows the remaining time of the 3 processes (VACUUM TIME, SEAL TIME and MARINATE).
- When the vacuum and sealing process is finished and the lid (1) is still closed. “CLO” will be displayed.
- Light indicator (VACUUM TIME / SEAL TIME / MARINATE)
- With the lid (1) open, the indicator will light up blue, press the or to adjust the time of the corresponding process.
- During each of the process: the corresponding light indicator is ON to show which part of the process is active.
- With the lid (1) open, the indicator will light up blue, press the
- Vacuum gauge: It shows the pressure level inside the vacuum chamber
Accessories
- Wrench (1x)
- Screw driver (1x)
- Empty bottle with nozzle (1x)
- A bottle of pump oil (Volume: 230ml) (1x)Note: Vacuum bag is not included.
Adding and draining vacuum pump oil
Add oil to the pump if the following situations occur.Important! Make sure the pump oil is above OIL LEVEL marking and check regularly.
- Before first use, the pump needs to be filled with oil (Supplied).
- When the oil level is below the OIL LEVEL marking.
- When the performance of the machine deteriorates.
- Drain out and re-fill the pump with oil every six months.
Adding oil procedures
- Use the screw driver (supplied) to loosen the screws (8) of the rear cover (6), remove the cover to expose the pump.
- Twist off the screw cap anti-clockwise using a tool (not included).
- Add pump oil using the oil bottle (supplied) until the oil level is above the OIL LEVEL marking.
- Tighten the screw cap clockwise using a tool (not included).
- Reinstalling the rear cover (6) by fixing the screws (8) using a screw driver (supplied).

Draining procedures
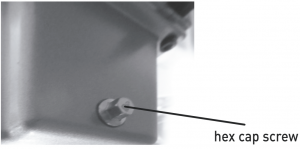
- Take a collection container and place it beneath the oil draining port which is covered by the hex cap screw.
- Loosen the hex cap screw anti-clockwise by using the wrench (supplied).
- After all the oil is drained, screw the cap back on clockwise and tighten it.
Important
1. Please dispose of the drained pump oil according to the environmental regulations.2. After re-filling pump oil, please place the machine in a horizontal position. Do not tip the machine over.
Preparations before use
- Remove all protective packaging and wrapping. Check to make sure the appliance is undamaged and the completeness of the accessories. In case of incomplete delivery and damages. Do not use the machine and contact supplier (See ==> Warranty).
- Clean the appliance before use (See ==> Cleaning and Maintenance).
- Make sure the appliance is completely dry. Place the appliance on a horizontal, stable and heat resistant surface that is safe from water splashes.
- Ensure that there is sufficient ventilation. Keep a minimum distance of 10 cm around the appliance.
- Add oil to the vacuum pump.
Operation
- Select the proper size of vacuum bag. (Bag width of 260mm for item 201428; 300mm for item 201435). Allow a minimum of 3 ~ 4 cm of extra spacing at the top to ensure well sealing.
- With the lid (1) kept open, insert a power plug to a suitable electrical power outlet “OFF“ will be shown on the digital display (F). Press ON/OFF button (A) to enter into ready state.
- Next, press SET button (D) to select VACUUM TIME, SEAL TIME and MARINATE TIME, adjust the time of each process by using the increase/ decrease button (E). See below for the setting range of different operations:
- Vacuum Time: 5 ~ 90 seconds (With 5 seconds interval)
- Seal Time: Set up to 6 seconds (With 0,5 second interval)
- Marinate Time: 9 ~ 99 minutes (One cycle last for 9 minutes, can be set up to 11 cycles)
- Put the food in a vacuum bag. Then, put the whole bag under the fixing clamp (10) inside the chamber (9) of the machine. Please make sure that the opening of the vacuum bag is entirely and properly under the seal bar (11) for sealing. And the whole vacuum bag is locked by the clamp (10) inside the chamber (9)
Vacuum and Seal process
- Close the lid (1) and put up the clamp lock (2). The machine will start vacuum-and-seal process automatically. If the machine does not work automatically, press “START“ button (B) and the machine can start the operation.
- VACUUM TIME indicator (G) will light up in blue and the machine will start countdown
- The digital display (F) will show the remaining time of vacuum process. When the vacuum process finish, it will enter into the sealing process automatically.
- Similarly, SEAL TIME indicator (G) will light up and the digital display (F) will start the countdown. Remaining time of sealing process will be shown on the digital display (F).
- Now, air inside the vacuum bag and chamber is sucked out (9).
- A beep will sound 3 times when the sealing process is finished.
- “CLO” will be displayed (F).
- Put down the clamp lock (2) and take away the packaged food.
Vacuum and Marinate process
- Select marinate process first, then close the lid (1) and put up the clamp lock (2).
- The machine will start the vacuum-and-marinate process automatically.
- One cycle of marinate process is 9 minutes (1 minute for vacuum process + 8 minutes maintaining the vacuum).
- A beep will sound when the marinate process is finished.
- “CLO” will be displayed (F).
- Put down the clamp lock (2) and take away the packaged food.
Note:
- When the machine is operating “vacuum” process, you can press “SEAL” button (C) to switch to “sealing” process instantly.
- When the machine is operating, you can press the “ON / OFF” button (A) to stop the process at any time.
- When the display shows “CLO” the machine is in idle mode and can’t perform any tasks no matter which button is pressed. Open the lid (1) to get the machine out of this mode.
- Check if the seal and vacuum is sufficient. If not, adjust the vacuum and/or seal time
Food Storage and Safety information
- This vacuum chamber packaging machine uses the vacuum sealing method to airtight pack food. Vacuum packaging is an easy and efficient way of packaging a variety of food, because it can prevent spoilage and extend the shelf life of food. The lack of air in the bag hinders hinder the growth of bacteria and molds. You can buy food in large quantities and vacuum pack them without the threat of food waste.
- However, please keep in mind that not all kinds of food can benefit from vacuum packaging. Never use vacuum packaging to store garlic or fungi such as mushrooms. A dangerous chemical reaction will take place when air is removed, causing these foods to be dangerous if ingested. Vegetables should be washed and peeled before packaging to kill any enzymes that may cause deterioration when air is removed under vacuum packaging.
| Food | Vacuum and freezer storage | Vacuum and fridge storage | Typical storage |
| Fresh beef & veal | 1 ~ 2 years | 3 ~ 4 weeks | 1 ~ 2 weeks |
| Fresh pork | 1 ~ 2 years | 3 ~ 4 weeks | 1 week |
| Fresh fish | 1 ~ 2 years | 2 weeks | 3 ~ 4 days |
| Fresh fruits | 1 ~ 2 years | 2 weeks | 3 ~ 4 days |
Remark: Above table is just for reference only and suggest to follow local hygienic and epidemiological regulations
Cleaning and Maintenance
Attention: Always unplug the machine from the electrical power outlet and let it cool down completely before cleaning & storage
Cleaning
- Never immerse the machine in water or other liquids.
- Clean the cooled exterior surface with a slightly damp cloth or sponge with some mild soap solution.
- Never use abrasive sponges or detergents, steel wool or metallic utensils to clean the interior or exterior parts of the appliance.
Pump oil
- Check the colour of the pump oil regularly through the display (7). The oil should be clear, bright and above the MIN level.
- If the pump oil becomes muddy and darken, it means that the oil contains impurities and need to be replaced.
- Change the pump oil for at least every 6 months
Storage
- Before storage, always make sure the machine is disconnected from the electrical outlet and cooled down completely
- Store the machine in a cool, clean and dry place and make sure the lid is closed and secured with the clamp
Troubleshooting
If the machine does not function properly, please check the below table for the solution. If you are still unable to solve the problem, please contact the supplier/service provider
| Problems | Possible cause | Possible solution |
| The machine does not switch on. | Power plug is not connected properly with the electrical power outlet. | Make sure the power plug is connected properly with the electrical power outlet. |
| The ON/OFF button (A) is not pressed. | Press ON/OFF button (A) to start the machine if it cannot start automatically. | |
| The vacuum bag is not vacuum and / or sealed completely. | Vacuum/ Seal time is not long enough. | Set longer Vacuum/Seal time. |
| The opening of the vacuum bag was not entirely and properly placed under the sealing bar (11). | Pack the food in a new bag and place properly in the chamber so the en- tire opening can be sealed. Don’t use bags that don’t fit the sealing bar. | |
| The sealing bar (11) and the inside vacuum chamber (9) is not clean enough. | Wipe the surface of the sealing bar (11) and inside the vacuum chamber (9) to keep clean, dry and free of de- bris. | |
| There is some moisture, food particles or debris on the seal area of the vacuum bag. | Wipe the seal area of the vacuum bag to make sure it is dry and clean. | |
| Vacuum bag loses vacuum after being sealed. | Inside the vacuum bag has food with sharp points to penetrate the bag and thus air enters into the vacuum bag. | Cut off the sharp points or cover it be- fore packing. |
| Some food can release gases also food can release gases due to food spoilage. | Blanch or frozen the food properly before packaging. Discard the food if in doubt. |
Error codes display
| Error codes shown on the digital display (F) | Possible cause | Possible solution |
| E01 |
|
|
| E02 |
|
|
| LP |
|
|
Technical specification
| Item no. | 201428 | 201435 |
| Operating voltage and frequency | 220-240V~ 50Hz | |
| Rated input power | 1000W | 950W |
| Protection class | Class I | |
| Max vacuum bag width | 260 mm | 300 mm |
| Pump capacity | 103 L/min | |
| Pressure |
|
|
| Width of sealing bar | 5mm | |
| Dimension | 330 x 480 x (H) 361 mm | 359 x 425 x (H) 366 mm |
| Net weight | approx. 26,2 kg | approx. 25,2 kg |
Remark: Technical specification is subjected to change without prior notification
Warranty
Any defect affecting the functionality of the appliance which becomes apparent within one year after purchase will be repaired by free repair or replacement provided the appliance has been used and maintained in accordance with the instructions and has not been abused or misused in any way. Your statutory rights are not affected. If the appliance is claimed under warranty, state where and when it was purchased and include proof of purchase (e.g. receipt).
In line with our policy of continuous product development we reserve the right to change the product, packaging and documentation specifications without notice.
Discarding & Environment
When decommissioning the appliance, the product must not be disposed of with other household waste. Instead, it is your responsibility to dispose to your waste equipment by handing it over to a designated collection point. Failure to follow this rule may be penalized in accordance with applicable regulations on waste disposal. The separate collection and recycling of your waste equipment at the time of disposal will help conserve natural resources and ensure that it is recycled in a manner that protects human health and the environment.
For more information about where you can drop off your waste for recycling, please contact your local waste collection company. The manufacturers and importers do not take responsibility for recycling, treatment and ecological disposal, either directly or through a public system.
Contact us
Hendi B.V.Innovatielaan 6, 6745 XW De Klomp, The NetherlandsTel: +31 317 681 040Email: [email protected]
Hendi Polska Sp. z.o.o.ul. Firmowa 12, 62-023 Robakowo, PolandTel: +48 61 658 7000Email: [email protected]
Hendi Food Service Equipment GmbHEhring 15, 5112 Lamprechtshausen, AustriaTel: +43 6274 200 10 0Email: [email protected]
Hendi Food Service Equipment Romania S.R.L.Str. 13 decembrie 94A, Hala 14 Brașov, 500164, RomaniaTel: +40 268 320330Email: [email protected]
PKS Hendi South East Europe SA5 Metsovou Str. 18346 Moschato, Athens, GreeceTel: +30 210 4839700Email: [email protected]
Hendi Italia S.R.L.Via Leonardo da Vinci 4, 39100 Bolzano (BZ), ItalyTel: +39 800 727 438Email: [email protected]
Hendi HK Ltd.1208, 12/F Exchange Tower, 33 Wang Chiu Road, Kowloon Bay, Hong KongTel: +852 2154 2618Email: [email protected]
Find Hendi on internet:www.hendi.plwww.facebook.com/HendiToolsforChefswww.linkedin.com/company/hendi-food-service-equipment-b.v.www.youtube.com/HendiEquipment
References
[xyz-ips snippet=”download-snippet”]