![]()
Installation Guide
THANK YOU FOR PURCHASING FROMHERITAGE PATIOS
Your purchase is engineered by nearly a half-century of commercial and residential solar product design proudly manufactured in the USA from responsibly sourced materials in our own state-of-the-art manufacturing facilities.
Your Heritage Patios purchase is covered by our exclusive transferable limited warranty on last page of this manual.
PLEASE READ & REVIEW THE COMPLETE INSTALLATION GUIDE STEP-BY-STEP
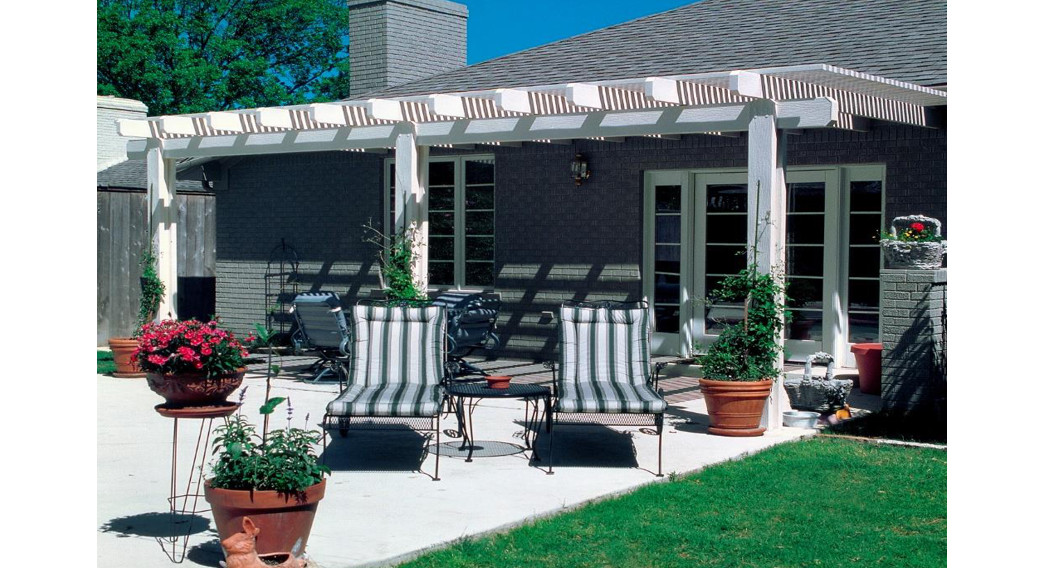
WELCOME
The Heritage Patios Attached Open Lattice Pergola Patio Cover installation guide recommends 1-to-3 physically fit individual(s) with some experience in Do-it-Yourself (DIY) home projects and should complete installation within 1015 hours with proper planning.Please review this installation guide thoroughly and understand each step’s task before the start of the installation process. All recommended tools are required for a successful installation and some components will require alterations to fit your structure’s unique installation. Inspect your project area for safety issues noting all electrical power lines and electrical outlets.DO NOT begin this project until the project area is safe.
TOOLS
Recommended & required tools are not included but necessary for a successful installation of this solid cover patio kit as each structure & location is unique.

MATERIALS
Inventory all materials received in your shipment within a safe distance from work area before you begin the installation process.Each “Step” will note components to complete the task on each page.
| Item No. | Part Description | Dimensions | Step # | Check-in |
| LATTICE COMPONENTS | ||||
| 1 | Ledger Board Kit w/ inserts | 2″ x 6-1 /2″ | 1 | |
| 2 | Rafter | 2″ x 6-1/2″ | 2 | |
| 3 | Header Beam | 3″ x 8″ | 2 | |
| 4 | Square Post | 3″ x 3″ | 2/3 | |
| 5 | Foam Filled Side Plate | 2″ x 6-1/2″ | 5 | |
| 6 | Square Lattice Tube | 2″ x 2″ | 6 | |
| MOUNTING BRACKETS | ||||
| 7 | Inside Brackets | 2″ x 6-1 /2″ | 3 | |
| 8 | Rafters to Beam Bracket | 2 | ||
| 9 | Top Post Bracket | 2 | ||
| 10 | Bottom Post Bracket | 3 | ||
| 11 | End Cap | 2″ x 6-1/2″ | 6 | |
| 12 | End Cap | 3″ x 8″ | 6 | |
| 13 | Square Tube End Cap | 2″ x 2″ | 6 | |
| HARDWARE | ||||
| 14 | SMS Bolt (A) | #10 x 1-1/4″ | multiple | |
| or | SMS Bolt (B) | #12 x 2-1/2″ | multiple | |
| 15 | TEK Screw (self-drilling) | #8 x 5/8″ | multiple | |
| 16 | TEK Screw (self-drilling) | 1/4 ” x 3/4″ | multiple | |
| 17 | SMS Bolt | #14 x 3/4″ | multiple | |
| 18 | Wedge Anchor | 3/8″ x 2-3/4″ | 4 | |
| 19 | SMS w/ Neoprene Washer | #8 x 2-1/2″ | 7 | |
| 20 | Plastic Plugs | 5/8″ | 7 | |
| 21 | Lag Screw w/ Washer | 5/16″ x 5-1/2″ | method 2 | |
| 22 | Angle Bracket (Fascia only) | method 2 |
Email [email protected] to request a missing part
ORGANIZE
Organize and familiarize yourself with an inventory of all materials by “Step” from pervious page before you begin the installation process. Each “Step” page begins with Components List & Tools Required to complete the step task.

Email [email protected] to request a missing part
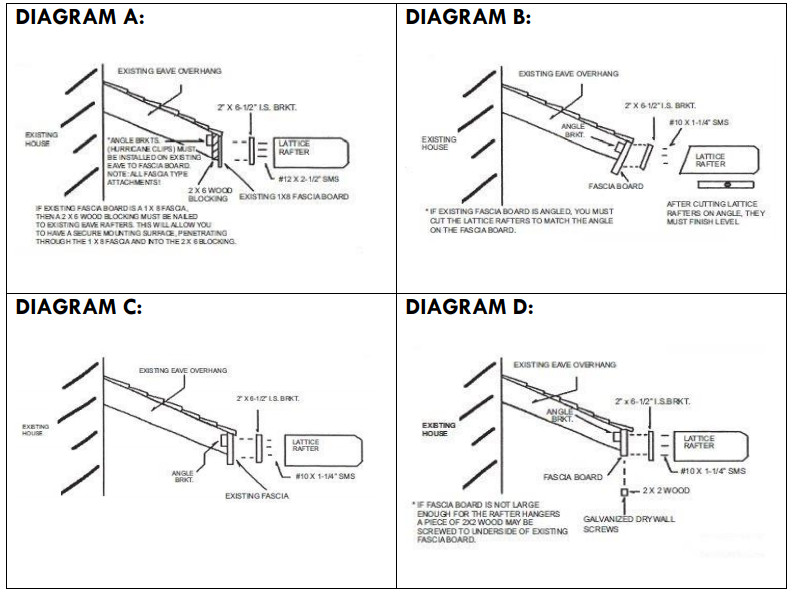
WALL ATTACHMENT
Plan the location for pergola lattice cover to be clear of all swinging doors and windows and finish with a minimum height of 6’8” to underside of front fascia.

NOTE: Skip next page and begin on Step 1 if METHOD 1 installation is selected
SKIP THIS STEP FOR METHOD 1
| Components List√ Ledger Board Kit |
Tools Required
|

Plan for lattice height should clear of all swinging doors and windows and finish at a minimum height of 6’8” to the underside of the front fascia.METHOD 2 NOTE: Locate the first rafter hanger 12” on center from the edge of your starting point and mount with 3 each #10 x 1-1/4” SMS. Locate additional rafter hangers on 24” center.*Starting Point = Desired location of patio cover on fascia board.
STEP 1: LEDGER & RAFTER HANGERS
| Components List√ Ledger board√ 5/16” x 5-1/2” Hex lag screws√ #10 x 1-1/4” SMS | Tools Required
|

 |
FIRST: Select mounting area on the house wall, snap a level chalk line along the wall at desired ledge height. (Min. 88” to the underside of the ledger. |
| SECOND: Attach the ledger board to the house wall, using 5/16” x 5-1/2” hex head lag screws @ 16” on center |
 |
THIRD: Locate the first rafter hanger 12” on center from edge of ledger board and mount with 3 each #10 x 11/4” SMS.Locate additional rafter hangers on 24” centers. |
STEP 2: RAFTER TO BEAM BRACKETS
| Components List√ Header beam√ Rafter beam brackets√ Post brackets |
Tools Required
|
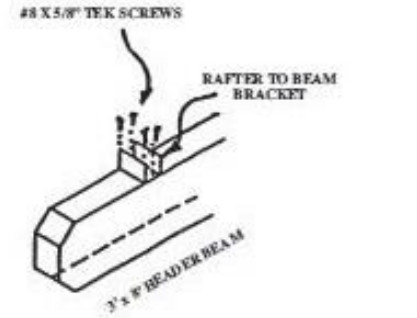 |
FIRST: Attach the rafter to beam bracket to the top of the 3”x 8” header beam (seam towards the top side) using4 each #8 x 5/8” TEK screws per bracket. These brackets should be 12” on center from each end with 24” on center spacing similar to the rafter brackets on ledger board. |
 |
SECOND: Attach the top post bracket to the bottom of 3” x 8” header beam. The top post bracket is placed 12” on center in from each end (typ.) of the 3” x 8” header beam, Each top post bracket is secured with 4 each $14 x ¾” SMS through the top post bracket into3” x 8” header beam. |
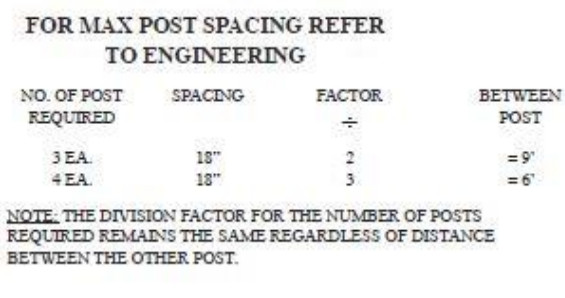 |
THIRD: If more than two posts are required with an installation. Calculate spacing needed between posts as shown in the example chart to left. |
STEP 3: POST ASSEMBLY
| Components List√ 3” x 3” square post√ Bottom post brackets | Tools Required
|

 |
FIRST: Now fasten the bottom post bracket to the 3” x 3” sq. post with 4 each ¼” x ¾” TEK screws with 2 on each side.NOTE: If your concrete slab has slope in it and is not level, the post will have to be various lengths to compensate for the uneven surface. |
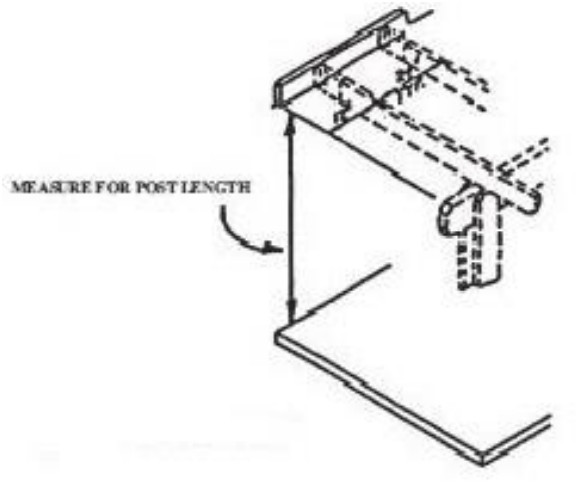 |
SECOND: Determine the length of the 3” x 3” sq. post by measuring the distance from the concrete slab to the bottom of the rafter hanger previously installed. Then subtract 8” to allow for the height of the 3” x 8” header beam.When finished, the top of the 3” x 8” header beam should be level with the bottom of the rafter hangers. The header beam should also be level from end to end. |
 |
THIRD: Now attach previously cut 3” x 3” sq. post to 3” x 8” header beam while still on the ground. Secure with 4 each ¼” x 3/4” TEK screws, 2 on each side. |
STEP 4: RAISE POST & HEADER
| Tools Required
|

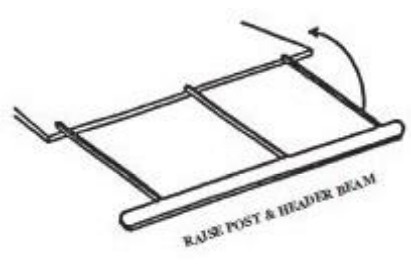 |
FIRST: Raise the post and header beam assembly from the ground. NOTE: All seams on rafters are to face towards thetop side. Attach one rafter to each end of 3” x 8” header beam and to each end rafter hanger at ledger location.Fasten with 4 each #8 x 5/8” TEK screws 2 on each side. Rafters should extend past 3” x 8” header beam. (12” typ.) |
 |
SECOND: At this point, move the post and 3” x 8” header beam to ensure that the end rafters are square with building.After the unit is square with the building, the next step is to plumb the post in both directions. Now drilling a 3/8” hole with a masonry bit, fasten to the slab with 3/8” x 2-3/4” wedge anchor and tighten anchor bolts. |
 |
THIRD: After all posts are plumbed and anchored in place, the remaining rafters can now be installed and secured in the same manner as the end ones. |
STEP 5: FOAM SIDE PLATE
| Components List√ Foam filled side plate |
Tools Required
|

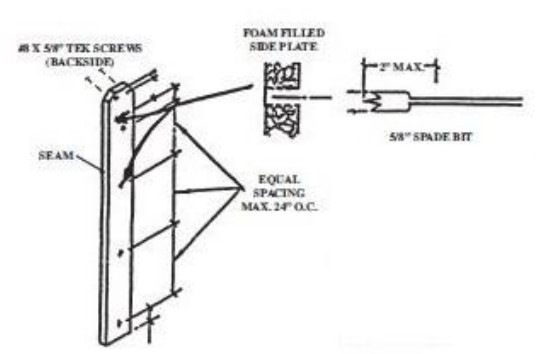 |
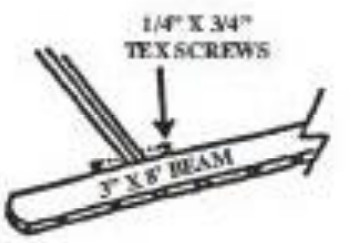
FIRST: PRIOR TO INSTALLING SIDE PLATES TO POST, PUT 2” X 6-1/2” END CAPS ON MITERED END. The 2” x 61/2” foam-filled sideplates should be cut 8” taller than the 3” x 3” sq. post (mitered end on the top side). When drilling holes inside plates, lay two side plates next to each otherwith the seams facing each other. This will allow for the seams to run in thesame direction on all of the side plates once installed. Seven to nine 5/8” diameter holes are drilled through ONE face and the foam in each side plate. DO NOT drill through the backface. Next, fasten 2 each 8# x 5/8” TEK screws to the backside of the side plate to secure the 2 x 6 end cap to a side plate. |
 |
SECOND: Attach side plate to 3” x 3” sq.post and 3” x 8” header beam with #14 x ¾” SMS. Insert the 5/8” plastic plugs after all the side plates are properly fastened. |
STEP 6: TUBE INSTALLATION
| Components List√ Lattice tubing√ End caps | Tools Required
|
 |
FIRST: Starting 2” away from the ledger board, install the lattice tubes with 2” spacing between each lattice tube.Measuring at each end of lattice tube to ensure both sides have equal overhang. Place the 2” x 2” lattice tube so that all the seams face towards the top side.Secure tubes using the 8# x 2-1/2” SMS with neoprene washers to each rafter. |
 |
NOTE: By laying out a few 2” x 2” tubes at a time and securing every other tube this will be 4” on center with 2” spacing between tubes. |
 |
SECOND: The remainder of all the 2” x 6-1/2”, 3” x 8”, and 2” x 2” end capscan now be installed. |
WARRANTY
LIMITED LIFETIME MATERIAL AND LABOR WARRANTYHeritage Patios warrants that lattice, patio cover, carport and awning components (hereinafter referred to as the “Products’) be manufactured but Heritage Patios will not peel blister. flake, chip, split, rust or crack, object to the limitations and conditions listed here for the life of the original retail purchaser (steel Products are not warranted against rust and the term ‘crack’ as used herein shall not include minute tracking of the Product which may occur in the proper fabrication of the Products). This limited lifetime warranty (hereinafter referred to as ‘Warmer) commences on the completed construction date of the Product on the original purchaser’s property. This Warranty remains in effect for as long as the owner(s)of the property to which the Products were originally applied [the “Original Property Owner(s), continues to live in and/or own the property. In the event that there is more than one Original Propertipwropenrerti this Warranty will remain in effect as long as one of the Original Owners is living in and/or owns the property. This Warranty is TRANSFERABLE by the Original Property Owner(s) to subsequent owners) of the Products during the first ten (/0) years of Warranty coverage In the event of a transfer of this warrant., the warranty period Mall be ten (10) years from the date of the original installation of the Products and shall only apply to manufacturing defects in the Products.
NOTICE AND INSPECTIONIf you suspect or notice manufacturing defect(s) in your Heritage Patios product notify Heritage Patios in writing of the claimed defect(s) within 30 days of discovery of said defect(s), at the following address, 6450 Caballero Blvd. Buena Park. CA. 90620. Attention Warranty Services. This written notification must include a description of the defect(s) (to the best of your ability), the exact address of the installed Products. Os the work order number, date. and rime/address/phone of the contractor who installed the Products. As Heritage Patios must have a reasonable opportunity to inspect the Products to confirm the defect(s), do not begin any repays prior to said inspection Any repairs or attempted repair made before an inspection by Heritage Patios may void the terms of this warranty.
REMEDIES AND PRORATIONSN, after inspection by Heritage Patios, it is determined that said defects) is covered by this warranty. Heritage Patios shall have one hundred twenty (120) days to deliver to you refinished, repaired or new Products to remedy the defective Products as knows:
- During the first three (3) years of the warranty period. the Products. at Metars option, will be refreshed, repaired, or replaced to remedy any defect in cost to win
- During years four (4) through fifteen (6) of the warranty period. the Product, at Heritage Patios’s option, will be refinished, retained, or replaced to remedy any defect at no cost to you other than labor and shipping.
- From the sixteenth year through the remaining lifetime of the warranty period, any defective Product at Heritage nation’s option. will be refinished, repaired, or replaced, at a cost to the origins buyer of 50% of the current wholesale cost of the defective it(s). Labor and shipping charges will be the responsibility of the Original Property Owner or proper transferee. as the case may be. This shall be the exclusive remedy for any such defect Heritage Patios, in any event, shall not be bare for any ping, labor (except during the first three years of the warranty Palo, removal or installation costs to remedy the defective products. NI replacement material is furnished ROB. at our nearest Service Center.
EXCLUSIONS AND LIMITATIONSThis warranty is strictly limited to the Products outlined herein and shall only apply to products masted…ad by Heritage Patios. Heritage Patios does not control the installation of its products and cannot be held responsible for consequential damages caused by misapplication or improper installation. or for damage done to the product by you or by third parties, by unreasonable use, by the installer. a by failure to provide necessary and proper maintenance. Defects in the installation are warranted, if at all by the installers and/or the manufacturers of related equipment used in the installation
EXCLUSIONS AND LIMITATIONS (CONTD)This warranty shall not be valid or enforceable unless it is registered with Heritage Patios within thirty (30) days after completion of the or original installation of the product covered hereby and on the registration form attached hereto. If any statement on the registration form stall be false. if any damned defect shall betels& or if the registration tarn dots not contain the true signature of the property owner, this warranty shall not be valid or enforceable. Repaired, rehashed. restored or replaced Products supplied by Heritage Patios to correct the defect(s) will only be warranted for the unexpired portion of the original warranty and shat not be deemed to have been warranted from the date we roe my work was performed or completed. Fading or chalking of any painted fir, as well as defects caused by condensation on skylights located above hot tubs, spas, or pools, are excluded from this warranty. Normal weathering and aging of existing Product col preclude a perfect color-match of repairs. refinished, restored, or replaced Products. Heritage Patios reserves the right to discontinue and make changes in any of its Products. In the event that Products covered by this warranty are not available. Heritage Patios shall have the right to substitute Products, that at Heritage Patios’ discretion are of comparable grade, quality, or price. At no time does this warranty confer on the hmieumns the right to renal, editing restoration or replacement without written notice and agreement by a d lip authorized representative of Heritage Patios. Any such work undertaken by the homeowner shall be for its own account and may result in this warranty becoming null and void. This limited warranty only applies to Products erected within the United States. Canada and Mexico. which have been exposed to normal weather and atmospheric conditions. It does not apply to any failure or defects caused as a result of acts of God war, fire, other accidents, or casualty. vandalism. radiation. falling objects. external forces. explosions. riots, civil commotion, harmful fumes, cement, and foreign substances in the atmosphere, blowing sand dust particles, hail storms. salt due to proximity to the seacoast. chemical spray in the community where the Product ate installed. and damage as a resat of walk over the products. Heritage Patios is providing this limited lifeline warranty under the provisions of the Magnuson-Moss Federal Warranty Act Heritage Patios can not and shall not be liable to you for breach of =Met written or oral express warranties. such as those, if any. given tires, riders, contractors. or installers of Heritage Patios Products. covers any and all warranted agreements, express or implied, between Heritage Patios and the original retail purchaser of the Heritage Patios Products. No other person is authorized to offer any other warranty, or assume any other liabilities on behalf of Heritage Patios. ANY IMPLIED WARRANTIES OF MERCHANTABILITY AND FITNESS FOR PURPOSE ARE LIMITED el TIME TO THE DURATION OF THIS EXPRESS WARRANTY. Patios SHALL NOT BE LIABLE TO YOU FOR ANY INCIDENTAL OR GUMMI DAMAGES FOR BREACH OF ANY EXPRESS. WRITTEN ORAL OR IMPLIED WARRANTY ON ITS PRODUCTS, Your EXCLUSIVE REMEDY shall be repaired. refinishing restoration of eating only on the terms stated Innis warranty;arry claims do not extend the duration of this warranty.
LEGAL RIGHTSSome states do not allow limitations on how long an implied warranty lasts. so the above limitation may not apply to you Some states do not allow the exclusion or limitation of incidental or consequential damages, so the above limitation or exclusion may not apply to you. This warranty gives you specific legal rights and you may also have other rights, which may vary, from state to state.HERITAGE PATIOS LIMITED LIFETIME WARRANTY REGISTRATION
Please complete and mum this certificate within thirty (30) days of completion of installation. 1 hereby certify that I am the *Opine retell purchaser of the installation described on this certificate. that It has been supplied as ordered. has been properly installed, and functions satisfactorily.
Buyer___________________Date__________Buyer Address__________________________City___________State_______Zip__________Phone Number_________________________E-mail Address_________________________Location_____________Invoice of Job d_____Location here If you do not wish to receive product updates and notification.
![]()
LIMITED LIFETIME WARRANTYPlease retain for your records.TRANSFERABLE
CARE & MAINTENANCE OF COATED ALUMINUM
Cleaning Tips
In addition to their enduring good looks, Heritage Patios aluminum products are easy to maintain. Airborne pollutants. however, suds as emissions from autos and local manufacturing plants can cause an acid): build-tp on any baked enamel product surface. This can easily be ternately by periodic cleaning with any household detergent Simply VI( a few teaspoons of dishwashing liquid In a bottle a hose sprayer and apply liberally to all exposed surfaces, then r hse freely.
CAUTION: DO NOT USE ABRASIVE OR SOLVENT-TYPE MATERIALS OR PAINT REMOVER THOSE MATERIALS MAY SOFTEN OR REMOVE YOUR BAKED ENAMEL FINISH.
To remove mildew: Black spots on the surface of your aluminum product may be caused by mildew Watch carefully fcc It, especially on protected surfaces, such as beneath eaws or In patio enclosures. To eliminate mildew prepare the following solution:1/3 cup detergent (example: Tide)2/3 cup to-sodium phosphate (example: Sdlax) 3 quarts of water1 quart 5% sodium hypocrite (example: Ciao’)Mb( ingredients together and apply with a sponge cloth to mildewed areas. Wear protective gloves and avoid skin contact.
CAUTION: GREATER CONCENTRATIONS MAY CAUSE DAMAGE TO THE ALUMINUM FINISH. AVOID SKIN CONTACT. FOLLOW INSTRUCTIONS FOR CLEANING AND RINSING GIVEN ABOVE UNDER “CLEANING TIPS”.
WARRANTY REGISTRATIONHeritage Patios6450 Caballero Blvd.Buena Park, CA 90620
© 2016 Itntsge Patios• Heritage Patios logos are registered trademarks ofHeritage Patios
Warranty RegistrationHeritage Patios6450 Caballero Blvd.Buena Park, CA 90620
[xyz-ips snippet=”download-snippet”]