![]()
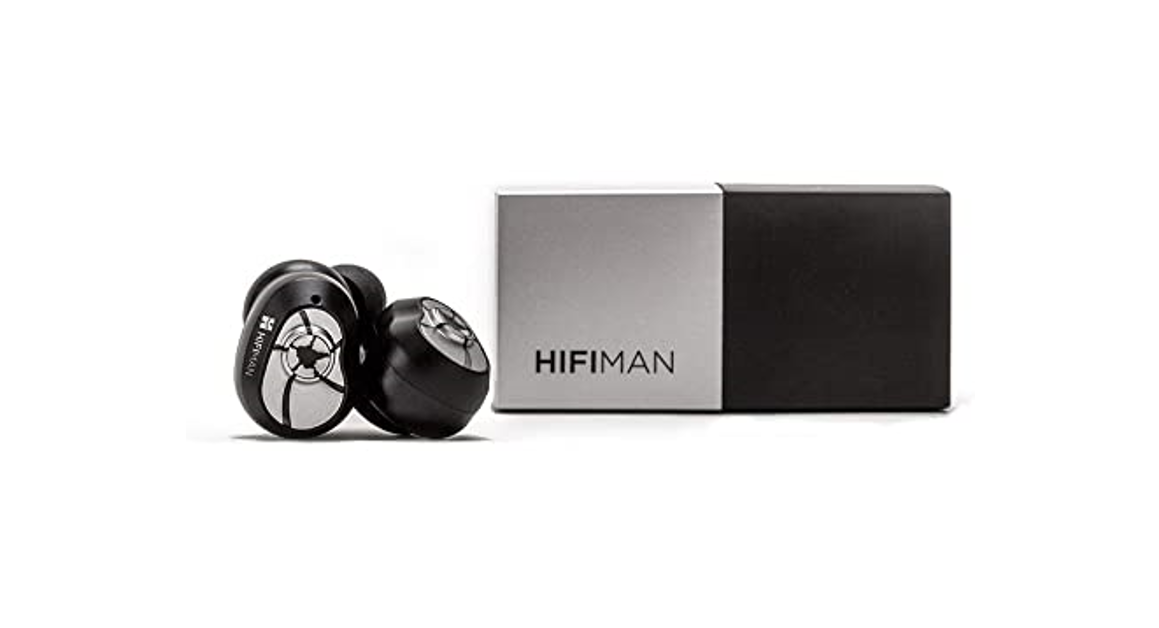
Innovating the Art of ListeningTWS 400Owner’s Guide
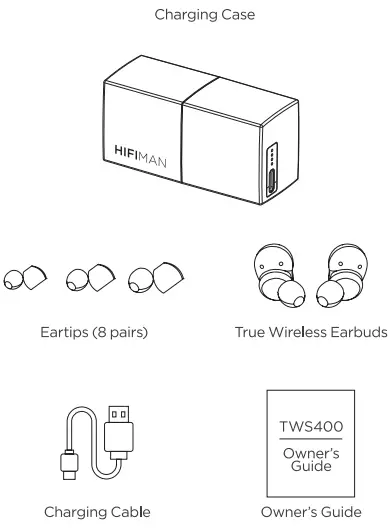
Accessories
Overview

| 1 | Music & Call Button |
| 2 | Microphone |
Power on / off
The earbuds will power on automatically when removed from the charging case.The earbuds will turn off and begin recharging automatically when you place them back in the charging case.
Attention: When you first use the product, please allow the case and earbuds inside to fully charge, up to 1.5 hours.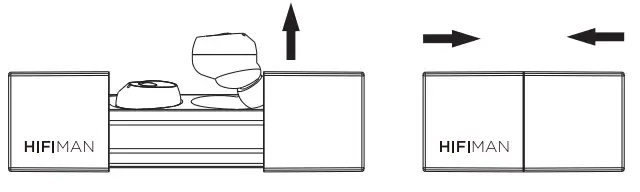
Bluetooth Pairing
- On removing the earbuds from the charging case the right side will automatically connect to the left. The earbuds will enter pairing mode and the LED will flash red and blue. Tips:You have 3 minutes to connect the earbuds to your device, otherwise, the earbuds will exit and power off automatically. You can re-enter pairing mode by replacing in the case and then extracting once more.
- Open the Bluetooth function menu on your device, select: HIFIMAN TWS400. Once paired, you will hear “Connected”. The red and blue LEDs will stop flashing.
Use Left Earbud Only
Please keep the right earbud in the charging case. The left one will enter one-sided mode automatically to return to stereo simply remove the right earbud from the charging case.
Use Right Earbud Only
Remove the right earbud from the case, press the button until you hear power off. Continue to press you will first hear power on until you heard pairing. Then you can connect with the right earbud only. When you wish to return to stereo mode, put both earbuds in the charging case, then bring the left earbud out first. After it connects to your device then simply return to stereo by bringing the right earbud out.
Tips:
The left earbud connects to your device only.The right earbud will connect the left one.The left and right earbuds can be used as single-channel headphones.
Wear
Try all the ear tips to find the best fit (To help you get for means you ought to get a complete seal, feel comfortable, and can enjoy the best sound quality at once.).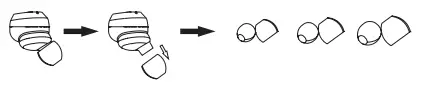
Insert earbuds with the ear tips to your ear directly. Twist gently until they fit your ear perfectlly and feel comfortable.
Tips:
More than one eartips’ size may fit you. Please choose the best one for your ear to get the best experience. You may need different size ear tips for the left ear and right ear.
Music & Calls
Music
- Press once to pause, press again to resume play.
- Double-press the left earbud to reduce volume, double-press the right earbud to increase volume.
- Triple-press the left earbud to turn to the next track, triple-press the right earbud to turn to the previous track.
Calls
Calls are initiated and answered with either the left or right earbud.
- Press once to accept an incoming call, or press and hold 2 seconds to reject.|
- Press once to end the call.
- When you are talking on the phone and receive another incoming call: Press once to end the first call and answer the new coming call.
*Press and hold two seconds to activate the phone’s voice control.
Charging
Charge the Earbuds
Place the earbuds in the charging case and close the lid. The red light will turn on when charging, and a blue light will appear when finished.Note: Some eartips may not fit properly in the case Oversized tips may need to be removed before placing the earbuds in the charging case.
Charge the Charging Case
Insert a Type-C USB cable into the socket to charge the battery case and earbuds. One to four LED lights will appear, indicating the case and earbuds. Up to four will be visible: One light indicates minimal power remains, and four buds indicate charging is complete.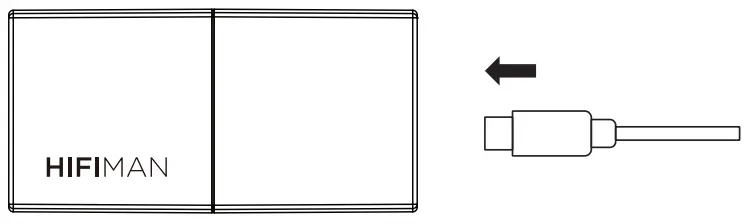
Charge Level
When the battery power is low or entirely drained, the words “Battery Low” will be heard every 20 seconds.
Earbuds Status Light
| Charging | Light keeps steady red |
| Pairing | Blinking blue and red |
user Guide
Charging Case Status Light
| Charging | One-to-four lights are visible while charging |
| Full charged | Steady light |
Note:
Please do not remove or replace the internal battery, doing so will void your warranty automatically.
When the earbud can not be automatically paired) The Right and Left Earbud Pairing Guide ( only use)
- Press both earbuds for 6 seconds to power off.
- Press both earbuds for about 12 seconds.A pink-blue flashing appears twice and then turns off.
- Press both earbuds for 2 seconds to restart. The two earbuds will pair with each other automatically when they’re close to each other.
- Please try to pair with your Bluetooth equipment again.
User Guide
Basic Specification of Earbud
| Earbud size | Length: 25mm Width:17.4mm Height: 26mm |
| Single head weight | 5.9g |
| Battery capacity | 55mAH x 2 |
| Earbud charging time | 1H |
| Work voltage | 3.3V-4.2V |
| Standby time of Earbud | 110H |
| Music time | 5-6H |
| Call time | 4-5H |
| Bluetooth version | Bluetooth 5.0 |
| RF transmission power | Class 2 |
| Transmission range (Hz) | 2.40GHz-2.48GHz |
| Transmission distance | >10m, up to 50m(depending on the environment) |
| Audio coding format | CVSD. HSBC, SBC.ACCESS |
| SNR | >95dB |
Specification of Charging Case
| Size | 34 x 28 x 33mm |
| Weight | 35g |
| Charging port | Type-C USB |
| Base charging (full) provides power to the earbud | 2.5 times |
| Charging time | 1.5 H |
Safety Information
- Avoid high listening volume to prevent hearing loss.
- Do not use the TWS400 when driving a car, cycling, near traffic, or in any dangerous environment that requires full attention.
- To maximize battery life, disconnect the USB cable after charging. Permanently on the charge may shorten battery life.
- HIFIMAN recommends using the original Type-C USB charging cable. The maximum input should be 5V/1.5A. An unsupported third-party cable may damage the case or earbuds. If you are using an unsupported charger it may cause damage.
Please note that If using TWS400 to watch videos or for gaming, the audio will be slightly delayed. This is unavoidable due to the latency of Bluetooth transmissions.
FCC STATEMENT
- This device complies with Part 15 of the FCC Rules.Operation is subject to the following two conditions:This device may not cause harmful interference, and This device must accept any interference received, including interference that may cause undesired operation.
- Changes or modifications not expressly approved by the party responsible for compliance could void the user’s authority to operate the equipment.
FCC Radiation Exposure Statement:
The device has been evaluated to meet general RF exposure requirements.The device can be used in portable exposure conditions without RF striction.
NOTE: This equipment has been tested and found to comply with the limits for a Class B digital, pursuant to Part 15 of the FCC Rules. These limits are designed to provide reasonable protection against harmful interference in a residential installation. This equipment generates, uses, and can radiate radio frequency energy and, if not installed and used in accordance with the instructions, may cause harmful interference to radio communications, However, there is no guarantee that interference will not occur in a particular installation. If the equipment does cause harmful interference to radio or television reception, which can be determined by turning the equipment off and on, the user is encouraged to try to correct the interference by one or more of the following measures:
- Reorient or relocate the receiving antenna.
- Increase the separation between the equipment and
- Connect the equipment into an outlet on a circuit different from that to which the receiver is connected.
- Consult the dealer or an experienced radio/ TV technician for help.
HIFIMAN Limited Warranty
HIFIMAN warrants this product to be free of defects in material or workmanship for a period of one year from the date of original retail purchase. If your product is found to be defective during the warranty period. HIFIMAN will, at its sole option, either repair the product or replace the product with a new or factory reconditioned or substantially equivalent model. This limited warranty does not apply to any defects attributable to damage beyond the reasonable control of HIFIMAN including damage caused by abuse, misuse, misapplication, or modifications performed by anyone other than HIFIMAN.
If your product is under warranty and a problem appears, please contact HIFIMAN customer service or your authorized dealer. If necessary, and at our discretion, we will provide a warranty repair or replacement of your productCaution: do not disassemble or modify the product in any way. Tampering with or modifying your HIFIMAN product will void its warranty.
This Limited Warranty does not apply to :
- Defective or discolored parts if the damages are caused by fluids, dirt, missing keys, broken plastic parts, or improper use.
- Damage caused by misuse of another product.
- Use of the product for other than its normal intended use, including, without limitation, failure to use the product in accordance with the supplied “Owner’s Guide”
- damage caused by accident, abuse, neglect, or misuse.
- If you do not have a valid dated receipt showing proof of
- Damage caused by services/repairs or other modifications to the system carried out by anyone other than HIFIMAN or an authorized HIFIMAN distributor or dealer.
- Damage caused by self-repair or if the unit has been disassembled or modified in any way.
HIFIMAN greatly desires your satisfaction and will do everything reasonable to achieve that. If you have any questions or concerns with your product, simply contact your authorized dealer or HIFIMAN directly (if purchased from us) and explain the issue in detail. Should a return be required, an RMA# will be issued. Return shipping to HIFIMAN or authorized service facility will be at the owner’s expense.
The warranty applies to the first purchaser and is not transferable.
For any further information or questions, please contact your authorized HIFIMAN dealer, or email us directly at customerseryicea HIFIMAN.com.
![]()
Innovating the Art of Listening
 report this ad
 facebook.com/hifimanelectronics
 Twitter.com/hifrmanofficial
 www.hifiman.com
[xyz-ips snippet=”download-snippet”]