
![]() USER MANUALRead the manual carefully and ensure you have fully understoodits contents before operating this device for the first time.
USER MANUALRead the manual carefully and ensure you have fully understoodits contents before operating this device for the first time.
Important Safety Instructions
Important NoticeParagraphs beginning with the symbol![]() indicate important instructions, tips, or conditions for the following settings.
indicate important instructions, tips, or conditions for the following settings.
![]() For your own safety and the optimal performance of your TV, ensure to read the safety instructions before performing any installation.
For your own safety and the optimal performance of your TV, ensure to read the safety instructions before performing any installation.
It is not guaranteed the operation and performance of peripheral devices made by other manufacturers. We disclaim any liability or damage that may arise from the operation and/or performance from the usage of such other maker’s peripheral devices. The recording and playback of content on this or any other device may require permission from the owner of the copyright or other such rights in that content. It is your responsibility to ensure that your use of this or any other device complies with applicable copyright legislation in your country. Please refer to that legislation for more information on the relevant laws and regulations involved or contact the owner of the rights of the content you wish to record or playback. The Index/Glossary explains certain terms used in this user manual and in the TV menu.
| Read these instructionsFollow all instructionsHeed all warningsKeep these instructionsAll rights reserved. |  |
Safety Instructions
To ensure safe and correct use of this product, always comply with the following precautions to avoid dangerous situations and damage to your unit:
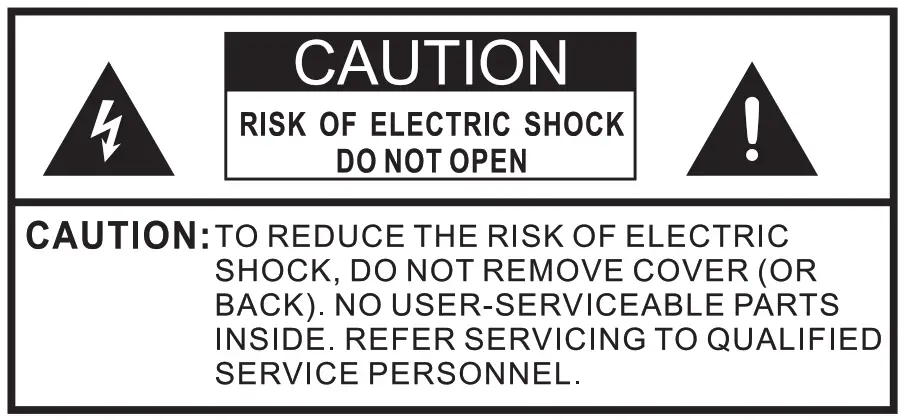
 The lightning flash with the arrowhead symbol, within an equilateral triangle, is intended to alert the user to the presence of uninsulated dangerous voltage within the product’s enclosure that may be of sufficient magnitude to constitute a risk of electric shock.
![]() The exclamation point within an equilateral triangle is intended to alert the user to the presence of important operating and maintenance (servicing) instructions in the literature accompanying the appliance.
The exclamation point within an equilateral triangle is intended to alert the user to the presence of important operating and maintenance (servicing) instructions in the literature accompanying the appliance.
| AC voltage: This symbol indicates that the rated voltage marked with the symbol is AC voltage. | |
|
Class II product: This symbol indicates that it does not require a safety connection of protective earthing (ground). |
The intended use and ambient conditions for this TVThis TV is intended for the rendering of video and audio signals, on a table-top or wall-mounted, in a home or office environment. It must not be used in rooms with a high level of humidity or dust concentration. The warranty is only valid if used as intended by the manufacturer.
![]() WARNING
WARNING
High humidity and dust concentration may lead to current leaks in the device. To reduce the risk of fire or electrical shock:
- Do not expose this unit to rain, moisture, dripping, or splashing water, and do not place objects filled with liquids, such as vases, cups, etc. on or over the unit.
- Do not touch the TV with wet hands.
- Do not expose to direct air-conditioning and keep candles or other naked flames away from the TV at all times.
If the TV is moved from a cold environment to a hot environment, leave it switched off for at least an hour to avoid condensation. If used outside, make sure it is protected from moisture.If you notice anything unusual, immediately remove the power plug.In case of fire, use preferably a CO2 gas or powder fire extinguisher. If such extinguishers are not accessible, try to isolate the electrical supply before using a water fire extinguisher.
WARNING
Never place a television set in an unstable location. A television set may fall, causing serious personal injury or death. Many injuries, particularly to children, can be avoided by taking simple precautions such as:
- Using cabinets or stands recommended by the manufacturer of the television set.
- Only using furniture that can safely support the television set.
- Ensuring the television set is not overhanging the edge of the supporting furniture.
- Not placing the television set on tall furniture (for example, cupboards or bookcases) without anchoring both the furniture and television set to a suitable support.
- Not placing the television set on cloth or other materials that may be located between the television set and supporting furniture.
- Educating children about the dangers of climbing on furniture to reach the television set or its controls.
If your existing television set is being retained and relocated, the same considerations as above should be applied.
Moving/TransportationBefore moving this TV, disconnect all cables and move in the vertical position only. Grasp the device on the upper and lower edges of the frame.
- Do not press or put stress on the front panel of the TV. It may take two or more people to carry larger TVs.
If you have to briefly lay down the TV, place the unit with its entire front surface lying flat on soft material.The LED screen is made of glass and can break if is not handled properly. Always wear rubber gloves to carry the unit. If the LED screen is damaged, liquid crystal might leak out. In case of skin contact, immediately rinse thoroughly with water.
Power SupplyIncorrect voltages can damage the TV.Only connect this unit to a power supply with the correct voltage and frequency noted on the type plate, using the supplied power cable.The power plug must be easily accessible so that the device can be disconnected at all times. The unit is live, even if in standby mode, as long as the unit is connected to a power outlet.It is recommended that this unit be placed on a dedicated circuit.
- Do not overload the power outlets by connecting too many appliances to the same outlet. Overloaded wall outlets, extension cords, etc. are dangerous and can result in electric shock and fire.
After power off, don’t turn it on again in 5 seconds. Frequent switching power supply in a short period of time can cause abnormal TV.
Power plug and power cable
- Do not touch the power plug with wet hands.
- Do not place heavy objects on the power cable. Route the cable so that it is not kinked or laid over sharp edges, walked on or exposed to chemicals. A power cable with damaged insulation can cause electric shock and fire.
- Pull the power plug, NOT on the cable when disconnecting. The cable can become damaged and cause a short circuit if pulled on.
- Do not place the power cable near a high-temperature object.
- Do not move the TV with the power cable plugged into a socket.
- Do not use a damaged or loose power cable, or a damaged socket outlet.
- Do not use any power cords other than the one supplied with this unit.
Set-upCheck that the location is suitable to bear the load of the TV. Place on a level, sturdy and horizontal base. Ensure that the unit does not hang over the edge of the base when placed in or on furniture. If placed on a cart, use caution when moving to avoid the unit from tipping over.
- Place the unit in a normal upright horizontal position. It must never be operated vertically, lying flat or hanging overhead from the ceiling.
- Place the unit where it is not exposed to direct sunlight or other sources of heat.
When mounting the TV on a wall, follow the instructions supplied with the wall- mount, make sure not to install the TV by hanging the power and signal cables on the back of the TV.
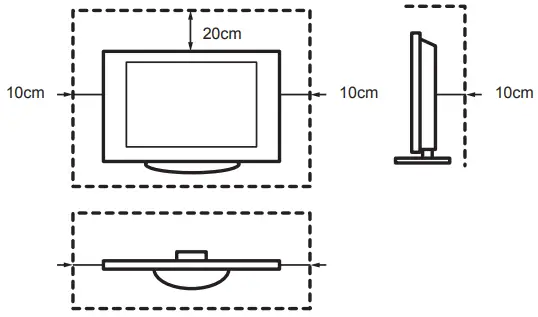
Air ventilation and high temperaturesInstall your TV only where there is proper ventilation, and ensure that there is at least 10 cm free space on the sides and 20 cm above the unit for air circulation. Excessive heat and obstruction of ventilation could lead to fire or early failure of some electric components.
- Do not block any ventilation openings with newspapers, tablecloths, curtains, etc.
- Do not dry clothing etc. on top of the unit.
- Take care not to touch the ventilation openings since they may become hot.
- Do not insert foreign objects into the TV through the vents.
The Stand
- Do not use any stand other than the one supplied with this unit.
- Do not modify or use the stand if it becomes warped of physically damaged.
- During setup, make sure that all the screws are securely tightened.
- Ensure that the TV does not suffer any impact during the attachment of the stand.
- Ensure that children do not climb onto the stand.
- Attach or remove the stand with at least two people.
Prevent small items from getting into the interior of the device through the ventilation slots. Such objects may cause short circuits, which may cause fire.If something should get inside the unit, immediately unplug the power plug of the device and contact service support.
The LED screenDespite thorough care when manufacturing this display, it cannot be 100% guaranteed that no sub-pixel defects will occur due to technical reasons. These cannot be considered device defects in terms of the guarantee. They will not affect the performance and reliability of the TV.To prevent “image burn”, avoid displaying still images for long periods of time, there is a possibility that a copy of the image may remain. If the aspect ratio is set to 4:3 for a long period of time, image burn may occur on the black areas. Image burn is not covered by the warranty.
- Do not apply strong force or impact on the display panel.
Avoid touching the LED screen or touching it for long periods of time. Doing so may produce some temporary distortion effects on the screen.
Radio waves
- Do not use the TV in any medical institutions or locations with medical equipment. Radio waves may interfere with medical equipment and causemalfunction.
- Do not use the TV near any automatic control equipment such as automatic doors or fire alarms. Radio waves may interfere with automatic control equipment and cause malfunction.
If you have a cardiac pacemaker, keep a distance of at least 22 cm from the TV. Radio waves may interfere with the operation of a pacemaker.
Built-in wireless LAN
Do not connect to wireless networks that you do not have the usage rights for. Data transmitted and received over radio waves may be intercepted andmonitored.The built-in wireless LAN uses a 2.4 GHz, frequency band. To avoid malfunctions or slow response caused by radio wave interference, keep the TV away from devices such as other wireless LAN devices, microwaves, mobile phones, and other devices that use 2.4 GHz signals.
Warning about off-gassingNew furniture, carpet, paint, building materials, and electronics can release chemicals into the air through evaporation.After you set your TV up and turn it on for the first time, you may notice a slight smell within a couple of hours. This is because some components of TV are heating up for the first time. The materials that we use fully meet the environmental requirements and regulations. Your TV is working just fine and the fumes from the off-gassing will diminish eventually.
Supervision
- Do not let children play unsupervised close to the TV. It could tip over, be pushed off, or pulled down from the stand surface and injure someone.
- Do not allow a switched-on TV to run unattended.
VolumeLoud music and noises can lead to irreversible damage to your ears. Avoid extreme volume, especially over long periods and when using headphones.If you hear a drumming noise in your ears, turn down the volume or temporarily stop using headphones.
Thunder StormsPull out the power plug and all connected antenna cables from the TV during a thunderstorm. Overvoltage caused by lightning strikes can damage the TV via the antenna system, as well as the wall socket.
Long periods of absenceAs long as the power plug is connected to a live socket outlet, the TV will consume power even in standby mode. The power plug and all connected antenna cables should be disconnected out during long periods of absence.
CAUTION:Unplug the power cord prior to cleaning the TV.Clean the TV, the screen, and the remote control with a soft, moist, clean, and color-natural cloth only. Do not use any chemicals.
- Do not subject the surfaces to insect repellent, solvent, thinner, or other volatile substances. This may degrade the surface quality.
- Do not spray water or other liquids directly on the TV. The liquid inside could lead to product failure.
- The surface of the display panel is treated and may be easily damaged. Take care not to scratch it with fingernails or other hard objects.
- Also, wipe the power plug with a dry cloth at regular intervals.
Service/RepairNever remove the cover/back of the TV;there are no user-serviceable parts inside.Refer all services to qualified service personnel.
PackagingKeep the anti-moisture materials and plastic bags out of reach of children. Plastic bags can cause suffocation and the anti-moisture material is harmful if swallowed. If swallowed by mistake, force the patient to vomit and visit the nearest hospital.
ModificationDo not attempt to modify this product in any way. Unauthorized modification could void the warranty of this unit, cause electric shock and fires.
Remote Control batteries
- Incorrect installation may cause battery leakage, corrosion and explosion.
- Replace only with the same or equivalent type.
- Do not mix old and new batteries.
- Do not mix different battery types.
- Do not use rechargeable batteries.
- Do not burn or break up batteries.
- Be sure to dispose of batteries correctly.
- Do not expose batteries to excessive heat such as sunshine, fire or the like.
Outdoor Antenna GroundingIf an outdoor antenna is used, be sure the antenna system is protected against voltage surges and built-up static charges.
DisposalRefer to the recycling section of this manual.Product image is only for reference, actual product may vary in appearance. Parts of the software function changes with the system upgrade.
Accessories List
The following accessories are included with the TV:User Manual × 1 Warranty Card × 1 Remote Control × 1Base Stand × 2 AAA Battery × 2 Screw × 4Power Cord × 1(only for 65″) RCA jack to AV Cable × 1(43″/50″/55″)
![]() The accessories may be different from the list above due to different models, countries/regions, please refer to the actual accessory bag
The accessories may be different from the list above due to different models, countries/regions, please refer to the actual accessory bag
SIMPLIFIED EU DECLARATION OF CONFORMITY
Hereby, Hisense Czech s.r.o declares that the radio equipment type [43A7100F / 43A7120F / 43A7140F / 43A7160F / 43AE7000F / 43AE7010F / 43AE7030F / 43AE7050F / 43A7100FTUK / 43A7120FTUK / 43AE7000FTUK / 43AE7010FTUK / 50A7100F / 50A7120F / 50A7140F / 50A7160F / 50AE7000F / 50AE7010F / 50AE7030F / 50AE7050F / 50A7100FTUK / 50A7120FTUK / 50AE7000FTUK / 50AE7010FTUK / 55A7100F / 55A7120F / 55A7140F / 55A7160F / 55AE7000F / 55AE7010F / 55AE7030F / 55AE7050F / 55A7100FTUK / 55A7120FTUK / 55AE7000FTUK / 55AE7010FTUK / 65A7100F / 65A7120F / 65A7140F / 65A7160F / 65AE7000F / 65AE7010F / 65AE7030F / 65AE7050F / 65A7100FTUK / 65A7120FTUK / 65AE7000FTUK / 65AE7010FTUK] is in compliance with Directive 2014/53/EU. The full text of the EU declaration of conformity is available at the following internet address: http://global.hisense.com/downloads.
Installing the Stand or Wall mount bracket
Installing the Stand![]() CAUTION
CAUTION
- Be sure to disconnect the A/C power cord before installing a stand or Wall-Mount brackets.
- The screen display is very fragile and must be protected at all times when installing the base stand. Be sure that no hard or sharp object, or anything that could scratch or damage the screen display, comes into contact with it. DO NOT exert pressure on the front of the TV at any time because the screen could crack.
Follow the illustrations and textual instructions below to complete the installation steps:
- Carefully place your TV face-down on a soft, flat surface to prevent damage to the TV or scratching to the screen.
- Remove the Base Stand from the accessory bag and then insert the stands into the bottom slots of the TV.
- Secure the Base Stand to the TV with the screws in the accessory tightly.
43″/50″/55″

65″Attention: According to the size of the TV supporting surface, you can select one of the base stand installation patterns, as shown in the figure.
Installing the wall mount bracket
| Wall mount hole pattern (mm) | 200 × 200 (43″)200 × 300 (50″/55″)300 × 200 (65″) |
| Wall mount screw size (mm) | M6 |
8.0-10.0 mm(50″/55″) 9.5 -11.5 mm(43″/65″)
Follow instructions provided with the wall mount bracket.
![]() NOTE
NOTE
- The diameter and length of the screws differ depending on the wall mount bracket model.
- Wall mount bracket is optional, your device may not have wall mount bracket, please refer to the actual accessories.
TV Front
![]() Single-button (Remote sensor / Power indicator / Standby)
Single-button (Remote sensor / Power indicator / Standby)
|
Item |
Description |
| Remote sensor | Receive remote signals from the remote control.Do not put anything near the sensor, as its function may be affected. |
| Power indicator | The light is red in standby mode. |
 Standby / Source Standby / Source |
Press the single button when in standby mode, the TV will be turned on. Press the single button to call up the menu, when the focus is on “Power Off”, wait for 3 seconds, then the TV will go into standby mode automatically./ Press the single button to call up the menu and then select among the different input signal sources. |
![]() NOTES
NOTES
- The Picture is Only for Reference.
- Powering on the TV requires several seconds to load programs. Do not rapidly turn the TV off as it may cause the TV to work abnormally.
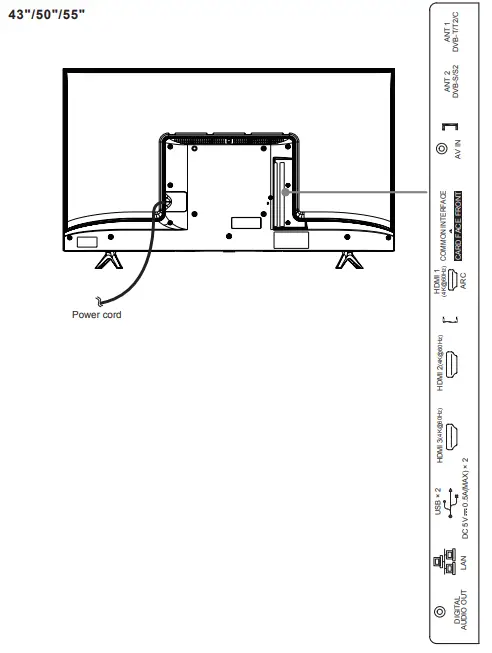
TV Rear
NOTES
- ANT2 Jack supports power supply for satellite antenna (13/18V, 0.5A max.)
- Check the jacks for position and type before making any connections. Loose connections can result in image or color problems. Make sure that all connections are tight and secure.
- Not all A/V devices have the ability to connect to a TV, please refer to the user’s manual of your A/V device for compatibility and connections procedure.
- Before connecting external equipment, remove the main plug from the wall socket. Otherwise, it may cause electric shock.
Making Connections
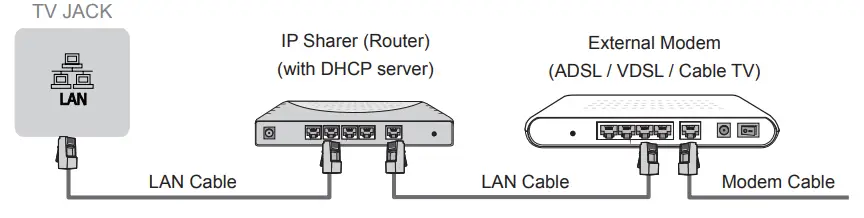
LAN (Wired setup)Connect your TV to your network by connecting the LAN port on the back of your TV to an external modem or router using a LAN (Ethernet/Cat 5) cable. See the illustration below.
- We recommend using a modem or router that supports Dynamic Host Configuration Protocol (DHCP). Modems and routers that support DHCP automatically provide the IP address, subnet mask, gateway, and DNS, so you don’t have to enter them manually. Most home networks already have DHCP.
Wireless setupConnect your TV to your network wirelessly, you need a wireless router or modem.See the illustration below.
- The built-in Wireless LAN Adapter supports the IEEE 802.11b/g/n communication protocols. We recommend using an IEEE 802.11n router. Low transfer rates for b/g may have an influence on the quality of streaming videos and other media.
![]() NOTES
NOTES
- You must use the built-in Wireless LAN Adapter to use a wireless network because the set doesn’t support an external USB network adapter.
- If the wireless router supports DHCP, your TV can connect more easily to the wireless network.
- If you apply a security system other than the systems listed below, it will not work with the TV.Security system:WPA,WEP,WPA2.
- In order to guarantee a smooth network, the distance between the router and TV should be less than 10 meters.
Making Connections
ANT
DIGITAL AUDIO OUT
HDMI
AV IN
COMMON INTERFACE
![]() NOTES
NOTES
- Before you insert/remove the CI+ module, ensure that the TV is switched off. Then insert the CI card into the CI+ module in accordance with the Service Provider’s instructions.
- Do not repeatedly insert or remove the Common Access Module as this may damage the interface and cause a malfunction.
- You must obtain a CI+ module and card from the service provider of the channels you want to watch.
- Insert the CI+ module with the SmartCard in the direction marked on the module and SmartCard.
- CI+ is not supported in some countries and regions; check with your authorized dealer.
USB
![]() NOTES
NOTES
- When connecting a hard disk or a USB hub, always connect the mains adapter of the connected device to the power supply. Exceeding a total current consumption may result in damage. The USB1.1 and USB2.0 devices maximum current consumption are 500mA.
- For individual non-standard high-capacity mobile hard disk, if its impulse current is greater than or equal 1A, it may cause TV-rebooting or self-locking. So the TV does not support it.
- The USB port supports a voltage of 5V.
Remote Control
- POWER: Switch the TV on or into standby mode
- INPUT: Select input sources
- Number button: Direct channel selection or numbers input
- GUIDE: Display the Electronic Program Guide (DTV mode)
- Subtitle: Activate or deactivate the subtitle mode
- Special function buttons
- Display the Quick setup menu
- TXT: Turn on/off the Teletext function
- Allows you to navigate the OSD menus and adjust the system settings to your preference
 OK: Confirm the selection in the OSD menus
- BACK: Return to the previous menu
- EXIT: Exit the menu
- HOME: Enter the Smart
- CH.List: Display the Channel List on the screen
- VOL + /-: Adjust the volume
- CH + /-: Switch channel
- MUTE: Mute or restore the TV sound
- Playpad keys
- NOTE: The information here will vary depending on the remote control model.App: Quick access to the appAudio Only: When you select this option, the screen will not display the picture
- NOTE: The information here will vary depending on the remote control model.App: Quick access to the appMedia: Enter the media mode
NOTE: The included remote control will vary depending on model, country. Check information according to the actual remote control in the accessory bag.
- POWER: Switch the TV on or into standby mode
- INPUT: Select input sources
- Number button: Direct channel selection or numbers input
- GUIDE: Display the Electronic Program Guide (DTV mode)
- Subtitle: Activate or deactivate the subtitle mode
- Special function buttons
- Display the Quick setup menu
- TXT: Turn on/off the Teletext function
- Allows you to navigate the OSD menus and adjust the system settings to your preference
- OK: Confirm the selection in the OSD menus
- BACK: Return to the previous menu
- EXIT: Exit the menu
- HOME: Enter the Smart
- CH.List: Display the Channel List on the screen
- VOL + /-: Adjust the volume
- CH + /-: Switch channel
- MUTE: Mute or restore the TV sound
- Playpad keys
- Info: Display the present program information
- NOTE: The information here will vary depending on the remote control model.CH.List: Display the Channel List on the screenApp: Quick access to the app
NOTE: The included remote control will vary depending on model, country. Check information according to the actual remote control in the accessory bag.
Installing Batteries in the Remote Control
 |
1. Slide the back cover to open the battery compartment of the remote control. |
|
2. Insert two AAA size batteries. Make sure to match the (+) and ( – ) ends of the batteries with the (+) and ( – ) ends indicated in the battery compartment. |
|
3. Close the battery compartment with the cover. |
![]() NOTES
NOTES
- Product image is only for reference, actual product may vary in appearance.
Handling the Batteries
- Incorrect use of batteries may cause corrosion or battery leakage, which could cause fire, personal injury, or damage to property.
- Only use the battery type indicated in this manual
- Do not mix old and new batteries or different types of batteries.
- Do not dispose of used batteries as domestic waste. Dispose of them in accordance with local regulations.
Remote Control Operation Range
![]()
Turning the TV on for the First Time
- Connect the mains cable to the mains socket after you have completed all theconnections.
- The first time you turn the TV on, it will go straight into the Installation Guide.
- Press the buttons to navigate the menu and change the settings. Press the [OK] button to confirm.
| Language | Select your desired language to be displayed on the menu. |
| Country | Select the Country where you will operate the TV. |
| Time Zone | Select the local time zone according to your region. |
| Wireless
Network |
If your TV does not automatically detect an Ethernet connection, then use a wireless network, select your network from the list that displays, also you can add a hidden network. When you’re done, move to the next screen. |
| End-User LicenseAgreement | Your use of this device and all related services is governed by the End User License Agreement and relative policies. Please review these documents carefully and make sure that you have read and agree to the provisions of the End User License Agreement. |
| Finish SetupWizard | Press “Start” to use your TV, for retailers press “Store Mode”. |
Specifications
|
Item |
43″ |
50″ |
|
| Dimension(W x H x D) | Without Stand | 37.8 x 22.0 x 3.3 inches (961 x 560 x 83 mm) | 43.9 x 25.5 x 3.2 inches (1116 x 648 x 82 mm) |
| With Stand | 37.8 x 24.1 x 7.7 inches (961 x 613 x 196 mm) | 43.9 x 27.9 x 8.9 inches (1116 x 709 x 226 mm) | |
| Weight | Without Stand | 15.0 lbs (6.8 kg) | 21.6 lbs (9.8 kg) |
| With Stand | 15.2 lbs (6.9 kg) | 21.8 lbs (9.9 kg) | |
| Active Screen Size (Diagonal) | 108 cm | 126cm | |
| Screen resolution | 3840 x 2160 | 3840 x 2160 | |
| Audio power | 7W + 7W | 8W + 8W | |
| Operating mode power density | 0.015 Watts/cm2 | 0.020 Watts/cm2 | |
| Power consumption when turned off | < 0.5 W | < 0.5 W | |
| Power consumption In standby mode | 0.5 W | 0.5 W | |
| Power consumption | Please refer to the rating label. | ||
| Power supply | Please refer to the rating label. | ||
| Receiving systems | output Power(Max) | PAL-D/K, B/G, I, SECAM-D/K, B/G | |
| Digital | DVB-T/T2, DVB-C, DVB-S/S2 | ||
| wireless LAN Module specifications | Model | ZDGF7638GU-C | VVTA1M2500 |
| Frequency Range | 2.4-2.4835GHz | 2.4-2 A835GHz | |
| output Power(Max) | 2.4-2.4835GHz 17dBm | 2.4-2.4835GHz 17dBm | |
| Bluetooth Module specifications | Model | ZDGF7638GU-C | VVTA1M2500 |
| Frequency Range | 2.4-2.4835GHz | 2.4-2 A835GHz | |
| Output Power I (Max’) | 2.4-2.4835GHz, Class1, 6dBm | 2.4-2.4835GHz, Classl, 6dBm | |
| Environmental conditions | Temperature: 41°F – 95°F (5°C – 35°C)Humidity: 20% – 80% RHAtmospheric pressure: 86 kPa – 106 kPa | ||
| HDMI Input | RGB / 60 Hz (640×480, 800×600, 1024×768)YUV / 60 Hz (480 I, 480 P, 720 P, 1080 I, 1080 P) YUV / 50Hz (576 I, 576 P, 720 P, 1080 I, 1080 P) 3840×2160 / 24Hz, 3840×2160 / 25Hz 3840×2160 / 30Hz, 3840×2160 / 50Hz, 3840×2160 / 60Hz |
| Item | 55″ | 65″ | |
| Dimension(W x H x D) | Without Stand | 48.4 x 28.0 x 3.4 inches (1230 x 712 x 86 mm) | 57.0 x 32.8 x 3.2 inches (1448 x 834 x 81 mm) |
| With Stand | 48.4 x 30.4 x 8.9 inches (1230 x 773 x 226 mm) | 57.0 x 35.2 x 11.4 inches (1448 x 894 x 290 mm) | |
| Weight | Without Stand | 27.1 lbs (12.3 kg) | 36.8 lbs (16.7 kg) |
| With Stand | 27.8 lbs (12.6 kg) | 37.5 lbs (17.0 kg) | |
| Active Screen Size (Diagonal) | 139 cm | 164 cm | |
| Screen resolution | 3840 x 2160 | 3840 x 2160 | |
| Audio power | 8W + 8W | 10W + 10W | |
| Operating mode power density | 0.016 Watts/cm2 | 0.014 Watts/cm2 | |
| Power consumption when turned off | < 0.5 W | < 0.5 W | |
| Power consumption In standby mode [Power | 0.5 W | 0.5 W | |
| consumption | Please refer to the rating label. | ||
| Power supply | Please refer to the rating label. | ||
| Receiving | Analog | PAL-D/K, B/G, I, SECAM-DX, B/G | |
| systems | Digital | DVB-T/T2, DVB-C, DVB-S/S2 | |
| Model | WTA1M2500 | ||
| Wireless LAN Module | Frequency Range | 2.4-2.4835GHz | |
| specifications | Output Power 2.4-2.4835GHz 17dBm (Max.) | ||
| Bluetooth Module | Model | VVTA1M2500 | |
| Bluetooth Module | Frequency Range | 2.4-2.4835GHz | |
| specifications | Output Power (Max.) | 2.4-2.4835GHz, Class1, 6dBm | |
| Environmental conditions | Temperature: 41°F – 95°F (5°C – 35°C) Humidity: 20% – 80% RH Atmospheric pressure: 86 kPa – 106 kPa | ||
| HDMI Input | RGB 160 Hz (640×480, 800×600, 1024×768) YUV / 60 Hz (480 I, 480 P, 720 P, 10801, 1080 P) YUV / 50Hz (576 I, 576 P, 720 P, 1080 1, 1080 P) 3840×2160 / 24Hz, 840×2160 / 25Hz 3840×2160 / 30Hz, 3840×2160 / 50Hz, 3840×2160 / 60Hz |
Other Information
Recycling/LicensesWEEE (Waste Electronic Electric Equipment)European Directive 2012/19/EU
- This symbol on the product or on its packaging indicates that this product must not be disposed of with your household waste. Instead, it is your responsibility to dispose of your waste equipment by handing it over to a designated collection point for the recycling of waste electrical and electronic equipment. The separate collection and recycling of your waste equipment at the time of disposal will help to conserve natural resources and ensure that it is recycled in a manner that protects human health and the environment. For more information about where you can drop off your waste equipment for recycling, please contact your local city office, your household waste disposal service or the shop where you purchased the product.BatteriesIn accordance with the Battery Directive, used batteries should not be disposed of in domestic waste. Dispose of your batteries in the collection containers specific for this purpose in retail stores.
 This symbol on the product or on its packaging indicates that this product must not be disposed of with your household waste. Instead, it is your responsibility to dispose of your waste equipment by handing it over to a designated collection point for the recycling of waste electrical and electronic equipment. The separate collection and recycling of your waste equipment at the time of disposal will help to conserve natural resources and ensure that it is recycled in a manner that protects human health and the environment. For more information about where you can drop off your waste equipment for recycling, please contact your local city office, your household waste disposal service or the shop where you purchased the product.Batteries
 In accordance with the Battery Directive, used batteries should not be disposed of in domestic waste. Dispose of your batteries in the collection containers specific for this purpose in retail stores.
ROHS (Restriction of Hazardous Substance) European Directive 2011/65/EU
 report this ad
![]() This European directive limits the use of dangerous and hazardous substances which are difficult to recycle.This allows recycling easily the EEE and contributes to the safeguard of the environment.Substances included in this product match to the RoHS directive.
This European directive limits the use of dangerous and hazardous substances which are difficult to recycle.This allows recycling easily the EEE and contributes to the safeguard of the environment.Substances included in this product match to the RoHS directive.
![]() The terms HDMI and HDMI High-Definition Multimedia Interface, and the HDMI Logo are trademarks or registered trademarks of HDMI Licensing Administrator, Inc. in the United States and other countries.
The terms HDMI and HDMI High-Definition Multimedia Interface, and the HDMI Logo are trademarks or registered trademarks of HDMI Licensing Administrator, Inc. in the United States and other countries.
![]() Manufactured under license from Dolby Laboratories. Dolby, Dolby Audio, Pro Logic, and the double-D symbol are trademarks of Dolby Laboratories. Confidential unpublished works. Copyright 1992-2019 Dolby Laboratories. All rights reserved.
Manufactured under license from Dolby Laboratories. Dolby, Dolby Audio, Pro Logic, and the double-D symbol are trademarks of Dolby Laboratories. Confidential unpublished works. Copyright 1992-2019 Dolby Laboratories. All rights reserved.
![]() For DTS patents, see http://patents.dts.com. Manufactured under license from DTS Licensing Limited. DTS, the Symbol, DTS and the Symbol together, and DTS Studio Sound are registered trademarks and/or trademarks of DTS, Inc. in the United States and/or other countries. © DTS, Inc. All Rights Reserved.
For DTS patents, see http://patents.dts.com. Manufactured under license from DTS Licensing Limited. DTS, the Symbol, DTS and the Symbol together, and DTS Studio Sound are registered trademarks and/or trademarks of DTS, Inc. in the United States and/or other countries. © DTS, Inc. All Rights Reserved.
References
[xyz-ips snippet=”download-snippet”]