

USER MANUAL
Important Safety Instructions
▐ Important Notice
Paragraphs beginning with the symbol ![]() indicate important instructions, tips or conditions for the following settings
indicate important instructions, tips or conditions for the following settings
![]() For your own safety and the optimal performance of your TV, ensure to read the safety instructions before performing any installation.
For your own safety and the optimal performance of your TV, ensure to read the safety instructions before performing any installation.
It is not guarantee operation and performance of peripheral devices made by other manufacturers. We disclaim any liability or damage that may arise from operation and/or performance from usage of such other maker’s peripheral devices.
The recording and playback of content on this or any other device may require permission from the owner of the copyright or other such rights in that content. It is your responsibility to ensure that your use of this or any other device complies with applicable copyright legislation in your country. Please refer to that legislation for more information on the relevant laws and regulations involved or contact the owner of the rights of the content you wish to record or playback.
The Index/Glossary explains certain terms used in this manual and in the TV menu.
Read these instructions
Follow all instructions
Heed all warnings
Keep these instructions
All rights reserved.

▌Safety Instructions
Important Safety Instructions
If your existing television set is being retained and relocated, the same considerations as above should be applied.
Important Safety Instructions
Important Safety Instructions

Important Safety Instructions
If you have a cardiac pacemaker, keep a distance of at least 22 cm from the TV. Radio waves may interfere with the operation of a pacemaker.
Important Safety Instructions
Contents
Figures and illustrations in this manual are provided for reference only and may differ from actual product appearance.
Parts of the software function changes with the system upgrade.
Contents
Accessories List
-
The accessories may be different from the list above due to different models, countries/regions, please refer to the actual accessory bag.
Installing the Stand or Wall mount bracket
![]() Installing the Stand
Installing the Stand
- Be sure to disconnect the A/C power cord before installing a stand or Wall-Mount brackets.
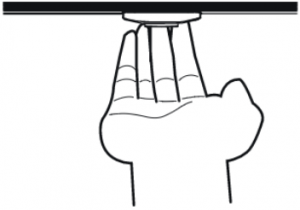
- The screen is very fragile, and must be protected at all times when installing the base stand. Be sure that no hard or sharp object, or anything that could scratch or damage the screen, comes into contact with it. DO NOT exert pressure on the front of the TV at any time because the screen could crack.
- After the installation is complete, make sure the TV is steady on a table or firmly attached to a wall mount, before removing all protective film, if any.
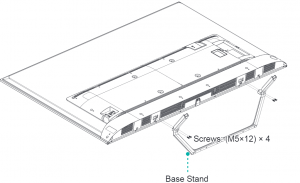
- Carefully place your TV face-down on a soft, flat surface to prevent damage to the TV or scratching to the screen.
- Remove the Base Stand from the accessory bag and then insert the stand into the bottom slots of the TV.
- Secure the Base Stand to the TV with the screws in accessory tightly.
2
Installing the Stand or Wall mount bracket
![]() Installing the wall mount bracket
Installing the wall mount bracket
Wall mount hole pattern (mm) 300 × 200
Wall mount screw size (mm) M6
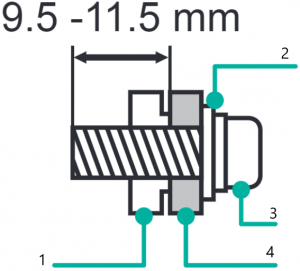
- Rear cover of the TV
- Wall Mount Bracket
- Wall Mount Screw
- Wall Mount Spacer
- The diameter and length of the screws differ depending on the wall mount bracket model.
- Wall mount bracket is optional, your device may not have wall mount bracket, please refer to the actual accessories.
TV Front
TV Front
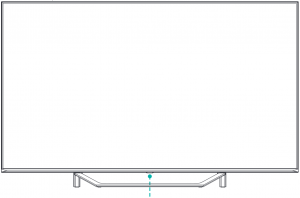
Single button (Remote sensor / Power indicator / Standby)
Item Description
Remote sensor Receive remote signals from the remote control.
Do not put anything near the sensor, as its function may be affected.
Power indicator The light is red in standby mode.
Standby / Source
/ Press the single button to call up the menu and then selectamong the different input signal sources.
- The Picture is Only for Reference.
- Powering on the TV requires several seconds to load programs. Do not rapidly turn the TV off as it may cause the TV work abnormally.
TV Rear
TV Rear
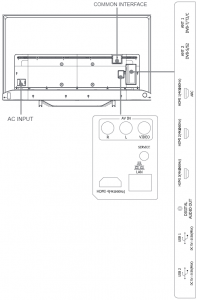
- ANT2 Jack supports power supply for satellite antenna (13/18V, 0.5A max.)
- Check the jacks for position and type before making any connections. Loose connections can result in image or color problems. Make sure that all connections are tight and secure.
- Not all A/V devices have the ability to connect to a TV, please refer to the user’s manual of your A/V device for compatibility and connections procedure.
- Before connecting external equipment, remove the mains plug from the wall socket. Otherwise, it may cause electric shock.
Making Connections
-
We recommend to use a modem or router that supports Dynamic Host Configuration Protocol (DHCP). Modems and routers that support DHCP automatically provide the IP address, subnet mask, gateway, and DNS, so you don’t have to enter them manually. Most home networks already have DHCP.

- The built-in Wireless LAN Adapter supports the IEEE 802.11a/b/g/n/ac communication protocols. We recommend using IEEE 802.11n router. Low transfer rates for b/g may have the influence on the quality of streamed videos and other media.

Wireless LAN Adapter built-in TV set, Wireless router with DHCP, LAN Cable

- You must use the built-in Wireless LAN Adapter to use a wireless network because the set doesn’t support external USB network adapter.
- If the wireless router supports DHCP, your TV can connect more easily to the wireless network.
- If you apply a security system other than the systems listed below, it will not work with the TV. Security system:WPA,WEP,WPA2.
- In order to guarantee smooth network, the distance between router and TV should be less than 10 meters.
Making Connections
DIGITAL AUDIO OUT

HDMI
HDMI(ARC)

HDMI

AV IN
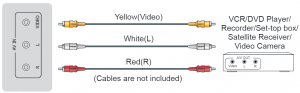
Making Connections
COMMON INTERFACE

- Before you insert/remove the CI+ module, ensure that the TV is switched off. Then insert the CI card into the CI+ module in accordance with the Service Provider’s instructions.
- Do not repeatedly insert or remove the Common Access Module as this may damage the interface and cause a malfunction.
- You must obtain a CI+ module and card from the service provider of the channels you want to watch.
- Insert the CI+ module with the Smart Card in the direction marked on the module and SmartCard.
- CI+ is not supported in some countries and regions; check with your authorized dealer.
USB
- When connecting a hard disk or a USB hub, always connect the mains adapter of the connected device to the power supply. Exceeding a total current consumption may result in damage. The USB1.1 and USB2.0 devices maximum current consumption are 500mA.
- For individual non-standard high-capacity mobile hard disk, if its impulse current is greater than or equal 1A, it may cause TV-rebooting or self-locking. So the TV does not support it.
- The USB port supports a voltage of 5V.
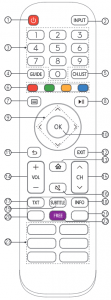
Remote Control
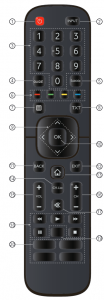
- POWER: Switch the TV on or into standby mode
- INPUT: Select input sources
- Number button: Direct channel selection or numbers input
- GUIDE: Display the Electronic Program Guide (DTV mode)
- Subtitle: Activate or deactivate the subtitle mode
- Special function buttons
- Display the Quick setup menu
- TXT: Turn on/off the teletext function
- ∧/∨ / < / >: Allows you to navigate the OSD menus and adjust the system settings to your preference
- OK: Confirm the selection in the OSD menus
- BACK: Return to previous menu
- EXIT: Exit the menu
- HOME: Enter the Smart
- CH.List: Display the Channel List on the screen
- VOL + /-: Adjust the volume
- CH + /-: Switch channel
- MUTE: Mute or restore the TV sound
- Media content control function buttons
- Quick access to the app Audio Only: When you select this option, the screen will not display the picture
- Quick access buttons to apps Media: Enter the media mode
NOTE: The included remote control will vary depending on model, country. Check information according to the actual remote control in the accessory bag.
Remote Control
- POWER: Switch the TV on or into standby mode
- INPUT: Select input sources
- Number button: Direct channel selection or numbers input
- GUIDE: Display the Electronic Program Guide (DTV mode)
- CH.List: Display the Channel List on the screen
- Special function buttons
- Display the Quick setup menu
- Media content control function buttons
- ∧ /∨ / < / >: Allows you to navigate the OSD menus and adjust the system settings to your preference
- OK: Confirm the selection in the OSD menus
- BACK: Return to previous menu
- EXIT: Exit the menu
- HOME: Enter the Smart
- VOL + /-: Adjust the volume
- CH /: Switch channel
- MUTE: Mute or restore the TV sound
- TXT: Turn on/off the teletext function18
- INFO: Display the present program information
- SUBTITLE: Activate or deactivate the subtitle mode
- MUSIC: Quick access to MUSIC Quick access to the app
- ART: Quick access to ART Quick access to the app
- FREE: Quick access to FREE
- Quick access buttons to apps MEDIA: Enter the media mode :
NOTE: The included remote control will vary depending on model, country. Check information according to the actual remote control in the accessory bag.
Remote Control
Installing Batteries in the Remote Control
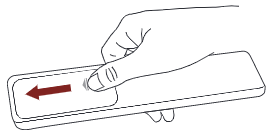
1. Slide the back cover to open the battery compartment of the remote control.
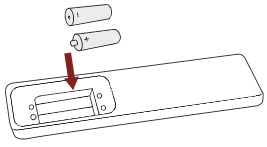
2.Insert two AAA size batteries. Make sure to match the (+) and ( – ) ends of the batteries with the (+) and ( – ) ends indicated in the battery compartment.

- Product image is only for reference, actual product may vary in appearance. Handling the Batteries
- Incorrect use of batteries may cause corrosion or battery leakage, which could cause fire, personal injury or damage to property.
- Only use the battery type indicated in this manual.
- Do not mix old and new batteries or different types of batteries.
- Do not dispose of used batteries as domestic waste. Dispose of them in accordance with local regulations.

Turning the TV on for the First Time
Turning the TV on for the First Time
- Connect the mains cable to the mains socket after you have completed all the connections.
- The first time you turn the TV on, it will go straight into the Installation Guide.
- Press the [ ∧/∨ / < / >] buttons to navigate the menu and change the settings. Press the [OK] button to confirm.
Language Select your desired language to be displayed on the menu.
TV Mode Select “Home Mode” or “Store Mode”.
Wireless Network If your TV does not automatically detect an Ethernet connection, then use a wireless network, select your network from the list that displays, also you can add a hidden network. When you’re done, move to the next screen.
Country Select the Country where you will operate the TV.
Time Zone Select the local time zone according to your region.
End User License Agreement Your use of this device is subject to the End User License Agreement, lack of your acceptance of the End User License Agreement will turn off all smart features of this device. You can choose to turn on/off each type of smart features separately, a click to the box of each type of smart feature means you give your consent to the corresponding privacy notice/terms and conditions.
Enhance Viewing Enhanced viewing can automatically adjust the picture mode and sound mode so as to match with the current content displayed on this device in case it is recognized by the automatic content recognition service.
(This function is only applicable in certain models/countries.)
VIDAA Account Setup Screen Link your TV with VIDAA account.
Specifications
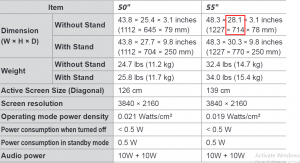
Dimension(W × H × D)
Weight
Without Stand 41.9 lbs (19.0 kg)
With Stand 43.7 lbs (19.8 kg)
Active Screen Size (Diagonal) 164 cm
Screen resolution 3840 × 2160
Operating mode power density 0.017Watts/cm²
Power consumption when turned off < 0.5 W
Power consumption in standby mode 0.5 W
Audio power 10W + 10W
Power consumption Please refer to the rating label.
Power supply Please refer to the rating label.
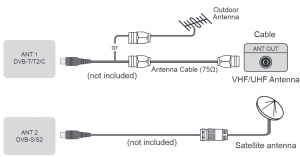
Receiving systems
Analog PAL-D/K, B/G, I, SECAM-D/K, B/G
Digital DVB-T/T2, DVB-C, DVB-S/S2
Specifications
Wireless LAN Module specifications
Model ZDGF7668AU-F
Frequency Range 2.4~2.4835GHz 5.15~5.85GHz
Output Power (Max.)
2.4~2.4835GHz 17dBm
5.15~5.25GHz 15dBm
5.25~5.35GHz(DFS Band) 14dBm
5.49~5.71GHz(DFS/TPC Band) 13dBm
5.725~5.85GHz(for Non EU) 13dBm
Bluetooth Module specifications
Model ZDGF7668AU-F
Frequency Range 2.4~2.4835GHz
Output Power(Max.) 2.4~2.4835GHz, Class1, 5dBm
Environmental conditions
Temperature: 41°F – 95°F (5°C – 35°C)
Humidity: 20% – 80% RH
Atmospheric pressure: 86 kPa – 106 kPa
HDMI Input
Other Information
Recycling/Licenses
WEEE (Waste Electronic Electric Equipment)
European Directive 2012/19/EU

This symbol on the product or on its packaging indicates that this product must not be disposed of with your household waste. Instead, it is your responsibility to dispose of your waste equipment by handing it over to a designated collection point for the recycling of waste electrical and electronic equipment. The separate collection and recycling of your waste equipment at the time of disposal will help to conserve natural resources and ensure that it is recycled in a manner that protects human health and the environment. For more information about where you can drop off your waste equipment for recycling, please contact your local city office, your household waste disposal service or the shop where you purchased the product.

In accordance with the Battery Directive, used batteries should not be disposed of in the domestic waste. Dispose your batteries in the collection containers specific for this purpose in retail stores.
ROHS (Restriction of Hazardous Substance)
European Directive 2011/65/EU

This European directive limits the use of dangerous and hazardous substances which are difficult to recycle.
This allows recycling easily the EEE and contributes to the safeguard of the environment.
Substances included in this product match to the RoHS directive.

15
Other Information

Dolby, Dolby Vision, Dolby Audio, and the double-D symbol are trade-marks of Dolby Laboratories. Manufactured under license from DolbyLaboratories. Copyright © 1992-2019Dolby Laboratories. All rights reserved.

For DTS patents, see DTS INC Patents. Manufactured under license from DTS Licensing Limited. DTS, the Symbol, DTS and the Symbol together, Virtual:X, and the DTS Virtual:X logo are registered trademarks and/or trademarks of DTS, Inc. in the United States and/or other countries. © DTS, Inc. All Rights Reserved.

For DTS patents, see DTS Inc Patents. Manufactured under license from DTS Licensing Limited. DTS, the Symbol, DTS and the Symbol together, DTS-HD, and the DTS-HD logo are registered trademarks and/or trademarks of DTS, Inc. in the United States and/or other countries. © DTS, Inc. All Rights Reserved.
This product does not support decoding of DTS CD bitstream. Playback of this format may produce undesirable noise.
16
Hisense AE7400FTUK 4K Smart TV User Manual – Hisense AE7400FTUK 4K Smart TV User Manual –
[xyz-ips snippet=”download-snippet”]