Hisense HK870 Series All-in-One Point of
Sale System Integration Manual
Copyright Statement
© 2015 Hisense Company Ltd. All Rights Reserved.All material in this System Integration Manual is the property of Hisense Company Ltd. and its subsidiaries, and is protected under US, CANADA, MEXICO and International copyright and/or other intellectual property laws. Reproduction or transmission of the materials, in whole or in part, in any manner, electronic, print, or otherwise, without the prior written consent of Hisense Company Ltd. is a violation of Hisense Company Ltd. rights under the aforementioned laws.
No part of this publication may be stored, reproduced, transmitted or distributed, in whole or in part, in any manner, electronic or otherwise, whether or not for a charge or other or no consideration, without the prior written permission of Hisense Company Ltd.
Requests for permission to store, reproduce, transmit or distribute materials may be made to one of the following addresses:
USAHisense USA CorporationPO Box 3289Suwanee, GA 30024
CanadaHisense Canada Co., Ltd,405 Britannia Rd E., Suite 11Mississauga, Ontario,L4Z 3E6
MexicoBoulevard Miguel de Cervantes Saavedra No. 301, Torre Norte,Piso 2 Colonia Ampliación Granada, C.P. 11520, en México DistritoFederal. Piso PH y 12, Col Anzures C.P.11590, Mexico D.F.
ChinaNo.11 Jiangxi Road Qingdao266071 China
Hisense, and any and all other Hisense product names, logo’s, slogans or marks are registered trademarks of Hisense Company Ltd. and its subsidiaries. All other trademarks are the property of their respective holders
Safety Notice
Safety notices to follow before installing or using the POS system
Caution:
- Make sure that the voltage of the power outlet is the same as the voltage that’s marked on the outside of the POS system.
- Always keep the power cable properly connected and grounded.
- Keep the POS product in a safe, stable place that’s away from heavy or sharp objects.
- Install the POS product in a well-ventilated area and use it in a clean and dry place.
- Make sure your USB flashdrive or disk does not contain viruses before you insert it into the POS product and always back up important files.
- Use the separate power strips specifically designed for this POS system.
- Do not use loose or damaged power cables.
- Do not touch the power plug with wet hands.
- Do not plug in the AC power cord while you are opening the unit to install features or service this POS product.
Warning
- Static may cause damage to the POS.
- Incorrectly replacing a battery can result in an explosion. Make sure to only replace the battery with the same or equivalent type as recommended by the manufacturer (Hisense). Discard used batteries according to the manufacturer’s instructions.
- Do not remove the peripheral device before you turn off the system.
- Turn on the system after you turn on peripheral devices and turn off the peripheral devices after you turn off the system
The manufacturer has the right to modify contents of this manual without prior announcements!
Section 1. Introduction
Welcome to the Hisense family!
Welcome to the Hisense family! This Hisense HK870 Series All-in-one POS System Integration Manual provides steps to install and configure the Hisense HK870 Series All-in-One Point-of-Sale (POS) System. In order to install this successfully, you should have an understanding of different programming languages, computer networking, hardware components, application integration and POS systems.
Overview of the Hisense HK870 Series All-in-one POS System
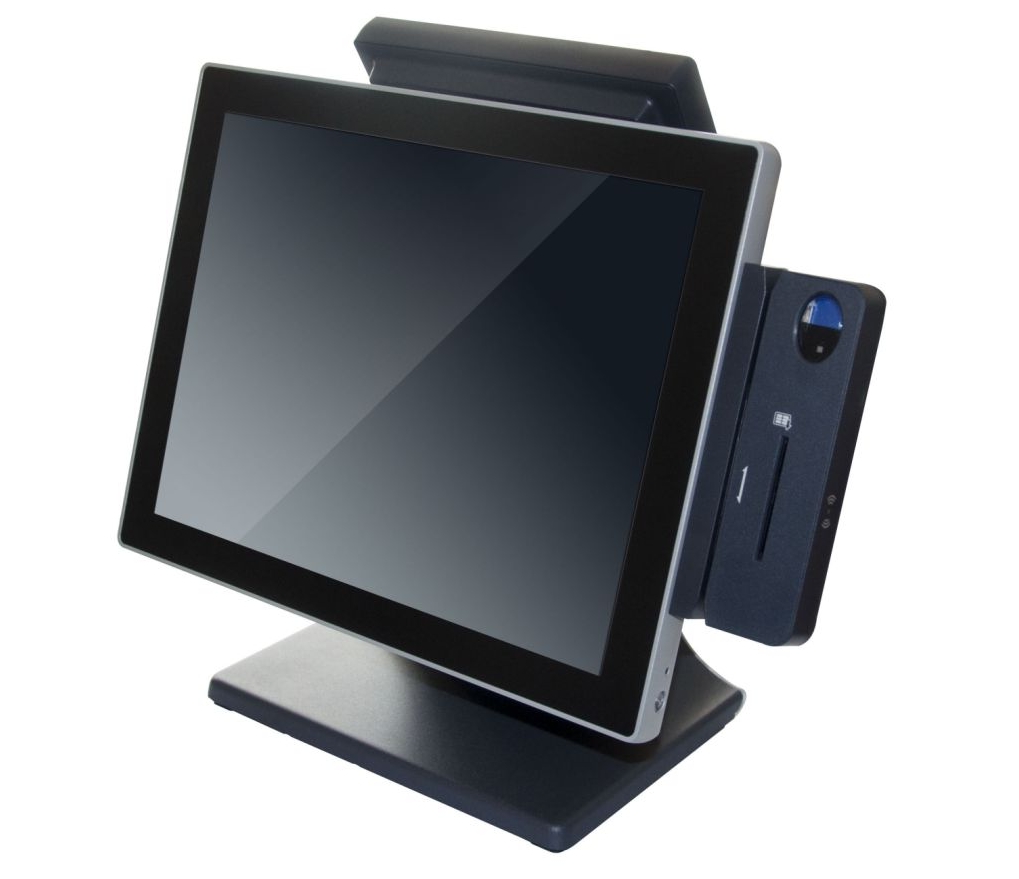
Because we understand that processing sales transactions is an integral part of business, we’ve designed an all-in-one solution called the Hisense HK870 Series All-in-one POS System. This system has a 15” LED light display for the panel, an Intel processor for powerful speed and many other powerful features to meet the business needs of our customers.
Items that were packaged with the POS system
After you unpack the unit, check to ensure the following items are included inside the package:
- HK870 POS System ( with base and cable cover)
- Driver CD (including the manual)
- Power adapter (in the base)
- Power cord
Contact information for questions
If any items are missing from the carton box or you have questions, contact Hisense via phone, email or postal mail.
Phone: (86) 532 5575 -1252 (International): Monday through Friday between 9 a.m. to 6 p.m.
Email: [email protected]
Mailing Address: No.11 Jiangxi Road Qingdao, 266071 China
Website address: http://hics.hisense.com
Required toolsYou will need a Phillips screwdriver to disassemble the POS in order to access the motherboard.
Section 2. Understanding the HK870 Series POS
This section describes the exterior of the POS system, the dimensions at different angles and the input/output ports.
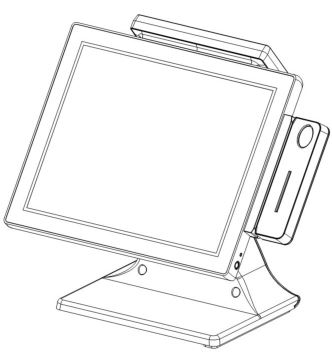
Controls and other Exterior Components
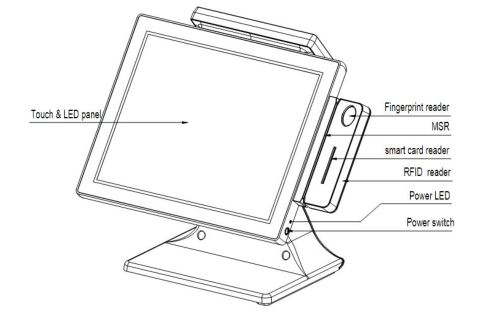
Disclaimer: The exterior design and specifications for this product may be changed without prior notice in order to improve quality.
HK870 POS System dimensions and angles
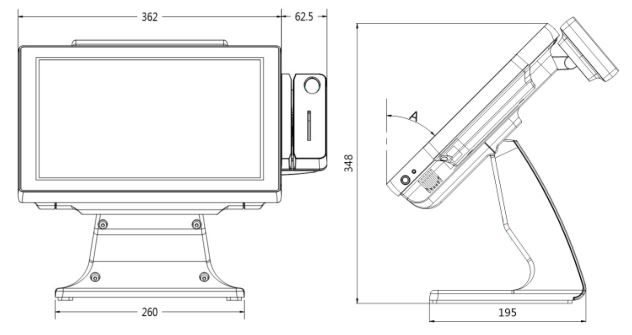
Ports
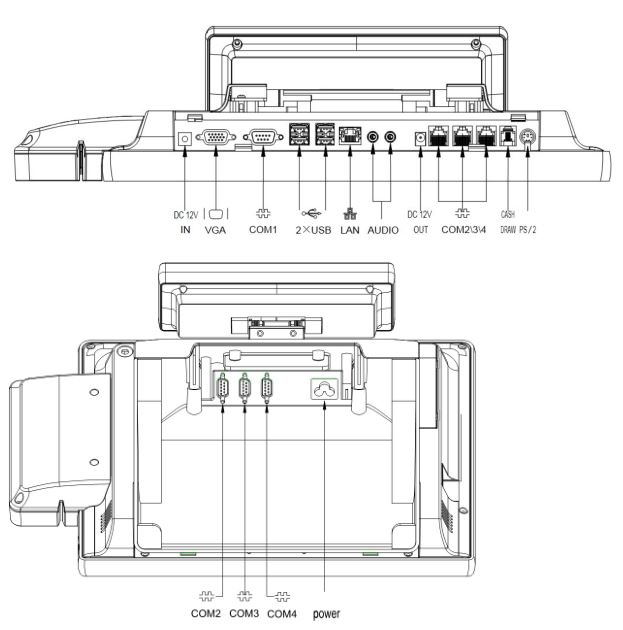
HK870 (D2550 motherboard) POS system has 16 built-in ports.
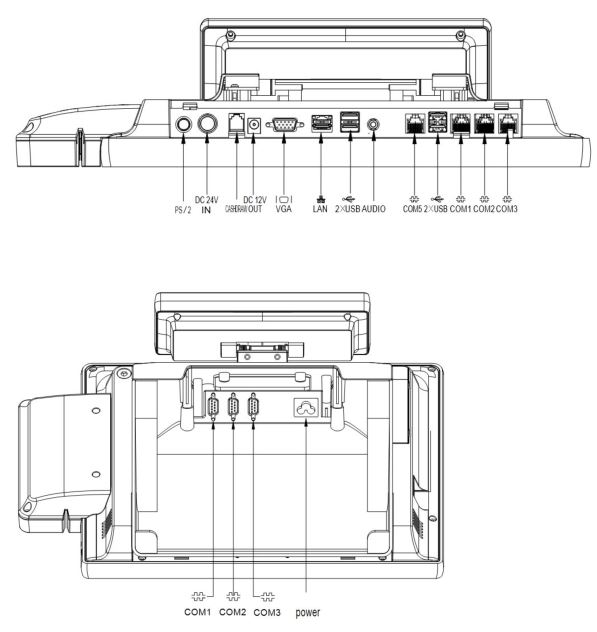
HK870E (Baytrail J1900 motherboard) POS system has 15 built-in ports.
Section 3. Installing the POS System
This section provides the steps to install the POS system, connect peripherals and the DC power supply cable.
Finding the right location to install the POS system
Finding the right location to install the POS system
- Choose a desk or table big and strong enough to support the weight of the system and peripherals.
- Choose a flat, hard surface. Carpeted area can generate static electricity that can alter memory or damage system components.
- Make sure to install the system in a well-ventilated place and keep the space free around the system.
- Choose appropriate environmental conditions such as cool and dry places. Avoid humid and dusty places. Also avoid direct sunlight, rapidly changing temperatures, or placing the system near heat sources.
- Select the appropriate voltage. Connect all the equipment into an isolated outlet to prevent static electricity and short circuit.
- Choose a location where sufficient power outlets are available for printers and other peripheral devices.
- Do not install the POS system near electromagnetic and electrical devices, such as phones and electric motors, that can cause system damage.
- The socket-outlet should be installed near the equipment and easy to access .
Connecting Peripherals
To connect peripherals, first remove the [Back cover] that’s in the bottom of the system. Next, remove the [Cable arrange cover] located in the rear of the system.
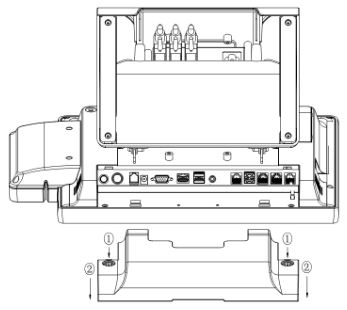
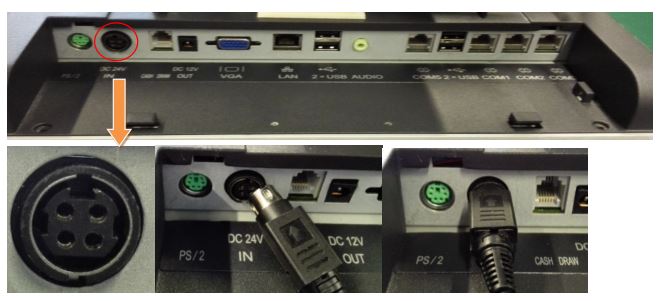
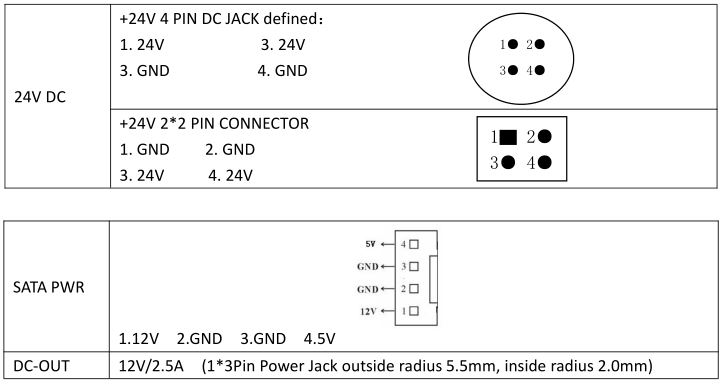
Connecting a DC power supply cable
Connect the [DC power cable] to the [DC power input] at the bottom of the system.Note: You can use a 100V – 240V adapter with this POS system.
Caution: You should only use the manufacturer (Hisense) adapter with this POS system. Hisense will not be held liable for any damages caused by using products made by other manufacturers.
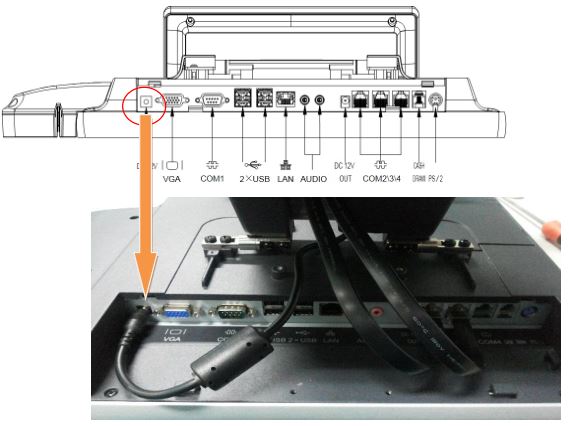
HK870 (D2550 motherboard)
HK870E (Baytrail J1900 motherboard)
Section 4. Installing Utility Software
POS Driver and Utility Introduction
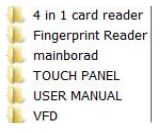
This section provides the steps to run the utility software that’s needed to install the drivers on the mainboard. The POS drivers and other utilities are located on the CD that came with the system.
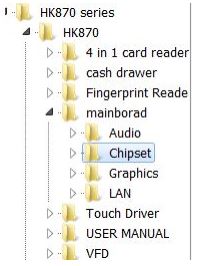
Installing software on the HK870 Mainboard
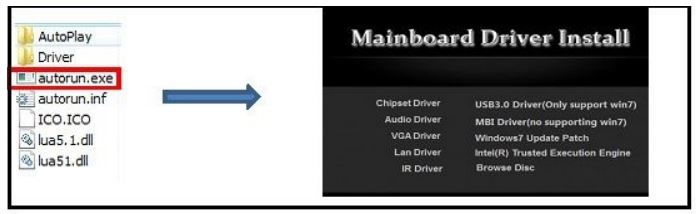
To install the software on the HK870 (D2550 ) MainboardInstall the Chipset , Graphics, LAN, Audio in proper sequence on the HK870 system.
To install the software on the HK870E(Baytrail J1900) Mainboard:
Mainboard
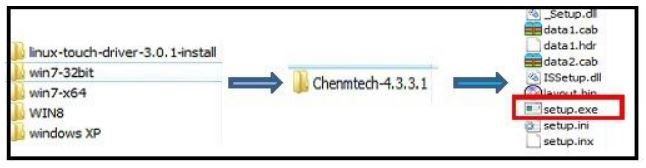
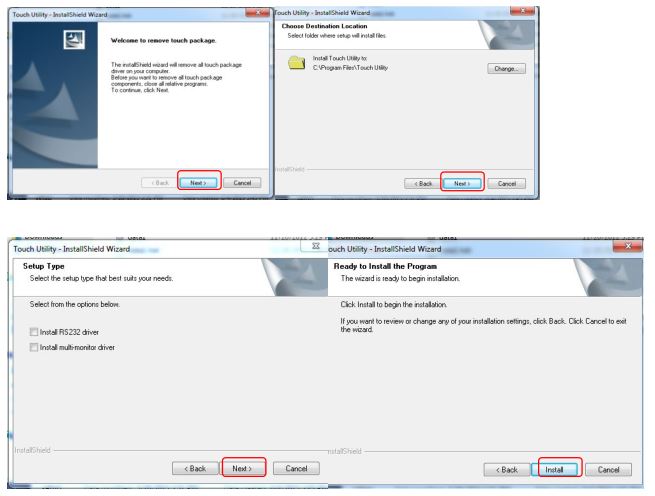
Touch Panel
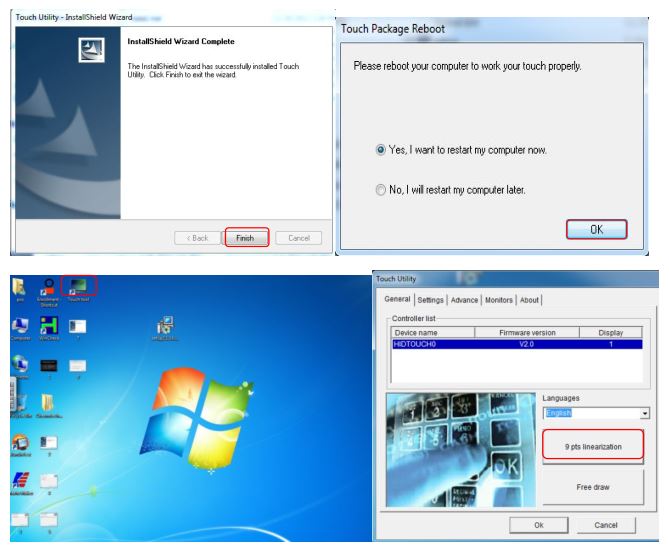
Using a Dual Monitor with the POS system
You can use a dual monitor (which is two monitors for one system) with the POS system. You can connect the additional monitor to the [VGA] port. The screen for the sub-monitor can be displayed as a duplication of the main monitor or as an extended screen.
Note: The steps below apply to a Windows 7.
To connect a second monitor:
- Connect the external monitor when the system is off.Note: Remove the [Interface cover] at the top of the system to see the VGA connector.
- Connect a [Power Cable] to the external monitor.
- Press the [Power] button of the system.
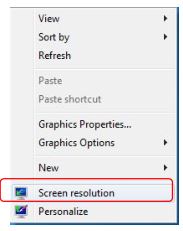
- Right-click your mouse on the Windows desktop screen and select Screen resolution from a pop-up menu.

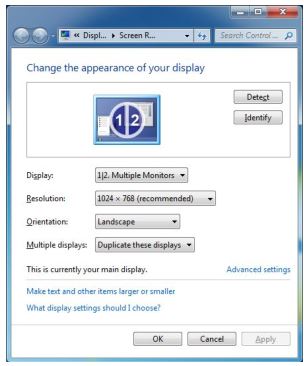
Figure 11. Screen resolution feature After you select the Screen resolution, the Change the appearance of your display dialogue window will appear. The Display option is set as ‘1|2. Multiple Monitors’ and the Multiple displays option is set as ‘Duplicate these displays’.In figure 12, the dual monitor shows a duplicated screen.
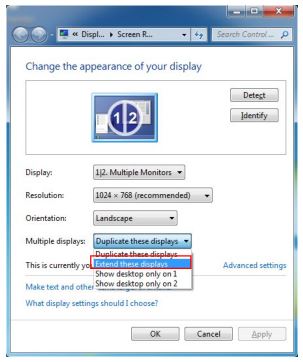
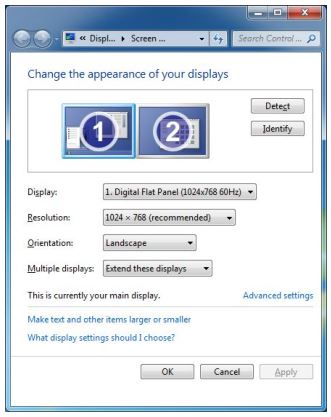
Figure 12. ‘Change the appearance of your display’ dialogue window If you want to change to an extended screen, set the Multiple displays option to ‘Extend these displays’ and click “OK”. Figure 13 shows where two different extended screen monitors are being used.
Figure 13. Extend these displays option - Click the Keep changes button on the ‘Display Settings’ dialog window to keep the current settings.
Figure 14. Display settings window - If the configuration is finished, click the OK button to close the Change the appearance of your displays dialog window.
Figure 15. Change the appearance of your displays window

Section 5. Getting familiar with the HK870 motherboards
The HK870 Series is comprised of two different motherboards: HK870 and HK870E.
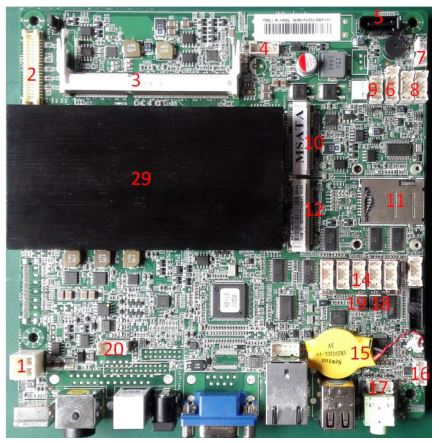
HK870 (D2550) Motherboard Layout
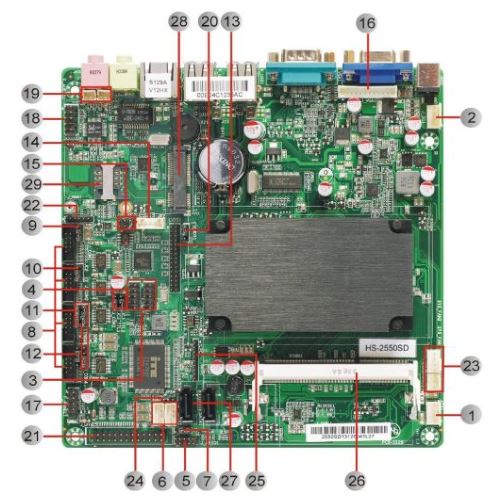
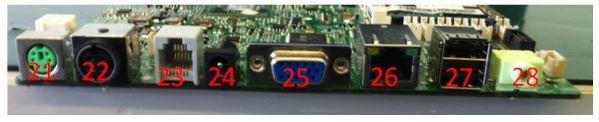
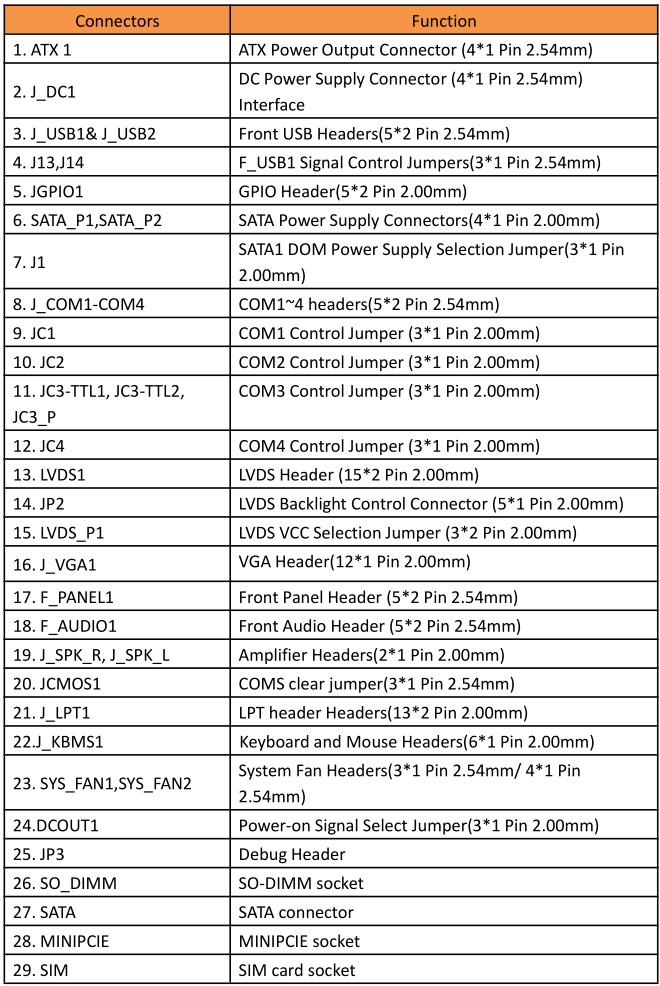
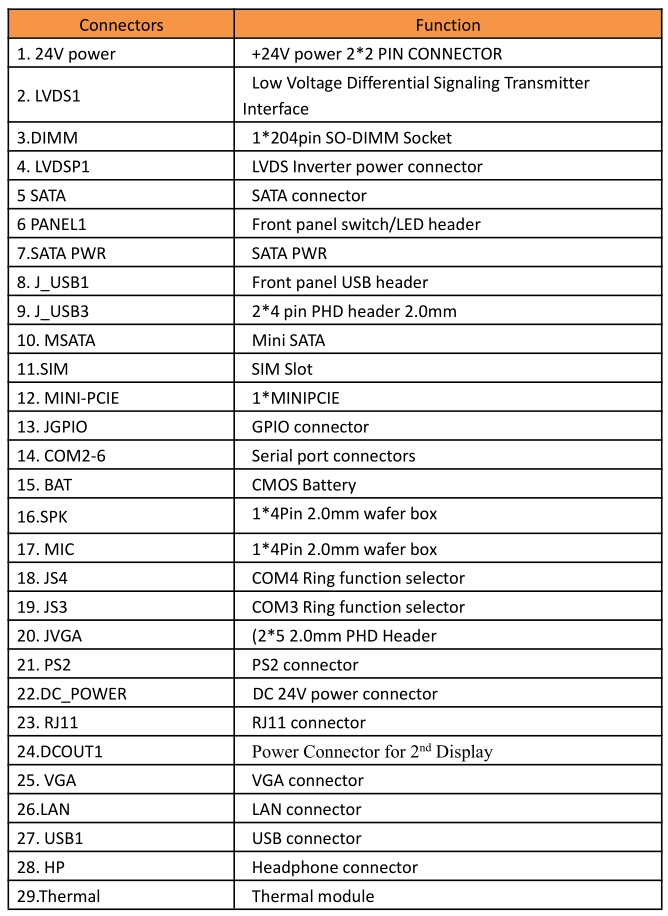
HK870 Connectors and Functions
Table 1. HK870 Connectors and Functions
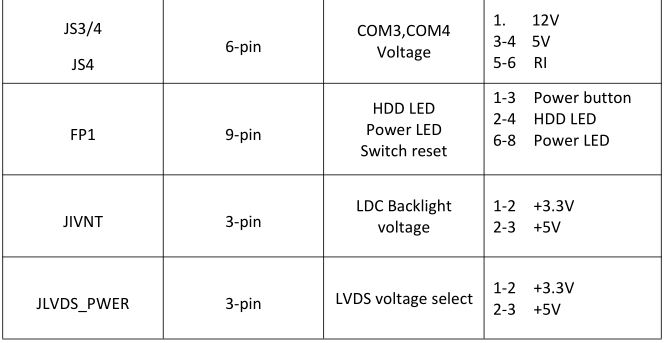
HK870 Common Jumpers and functions
Table 2. Common Jumper Descriptions
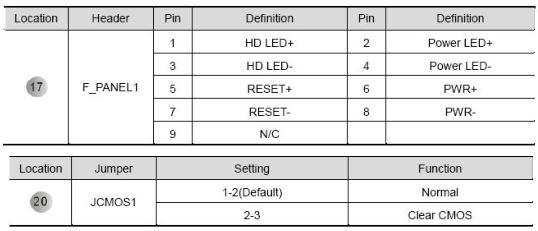
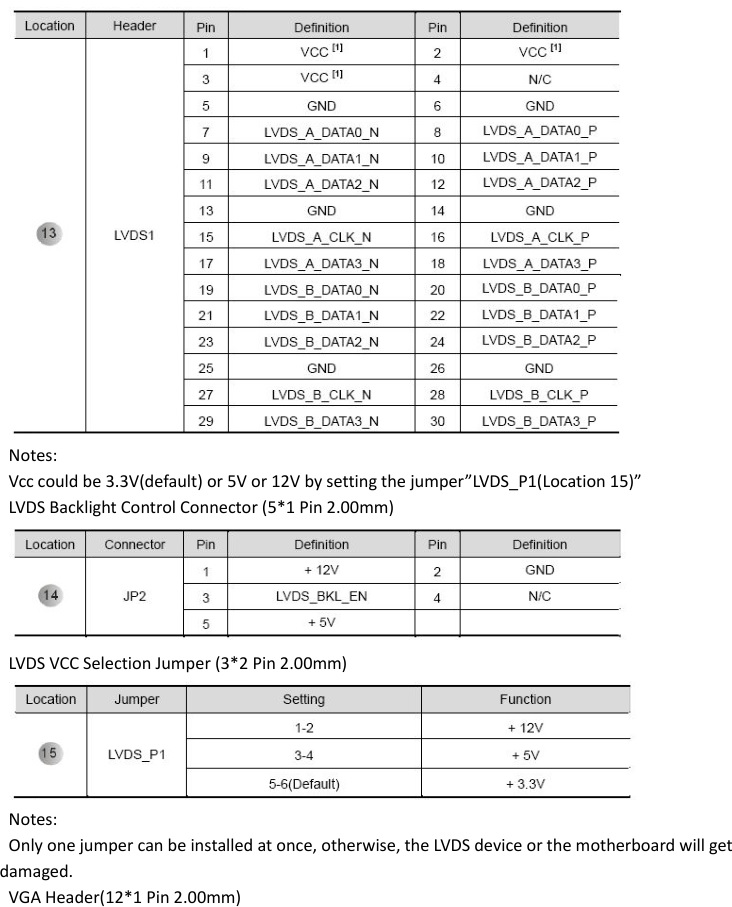
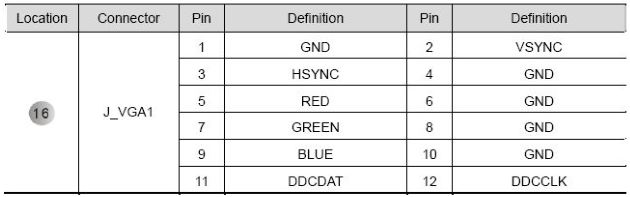
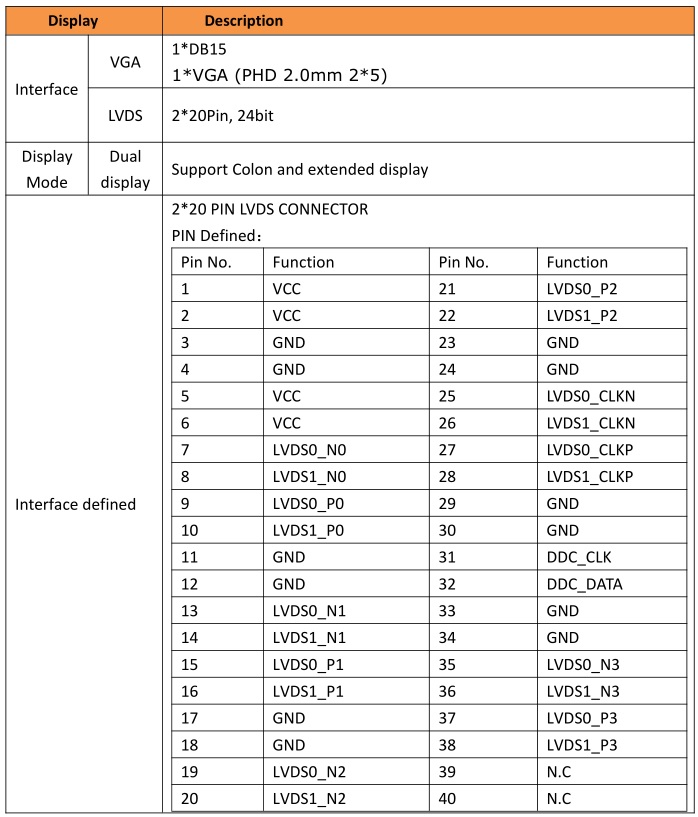
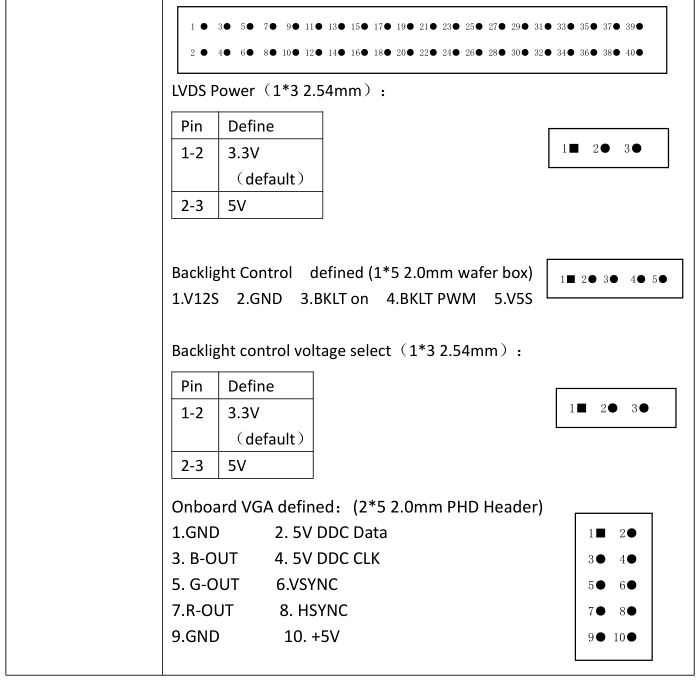
HK870 Display Description
Table 3. HK870 Display Description
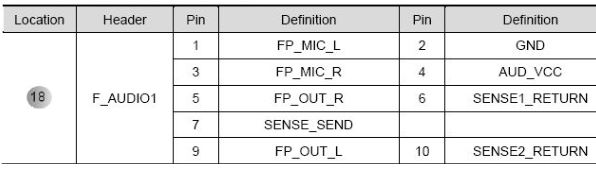
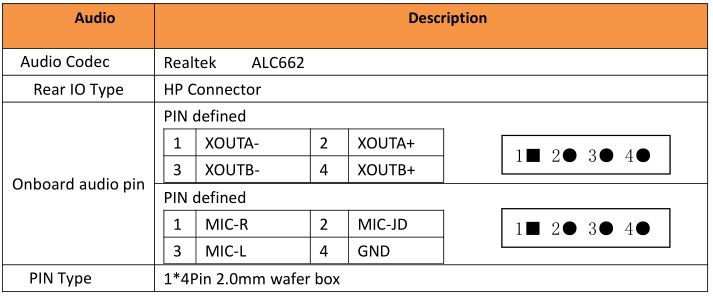
HK870 Audio Description
Table 4. HK870 Audio description
HK870 LAN Description
Table 5. HK870 LAN Description

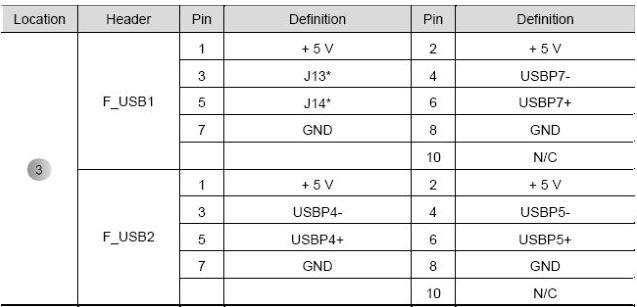
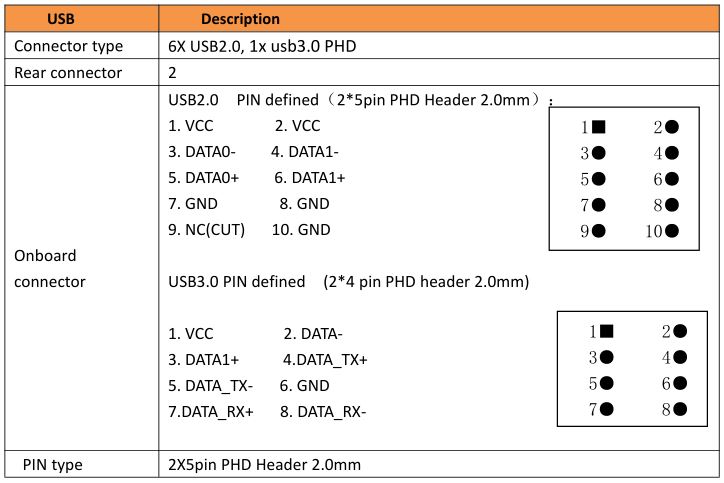
HK870 USB Description
Table 6. HK870 USB Description
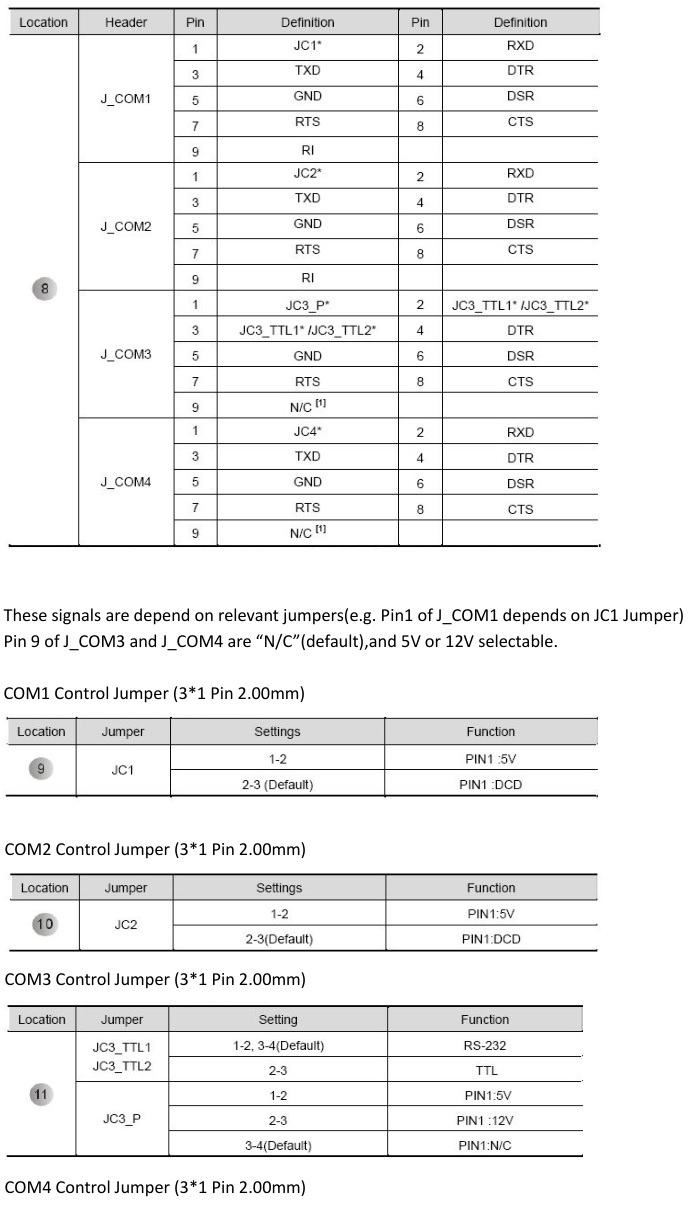
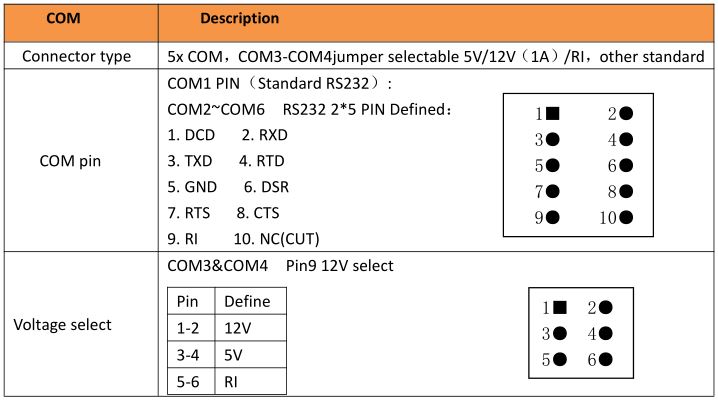
HK870 COM Description
Table 7. HK870 COM Description

HK870 MINI-PCIE Description
Table 8. HK870 Mini-PCIE description

HK870 Cash Drawer Description
Table 9. HK870 Cash Drawer Description

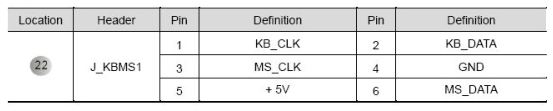
HK870 PS/2 Description
Table 10. HK870 PS/2 Description
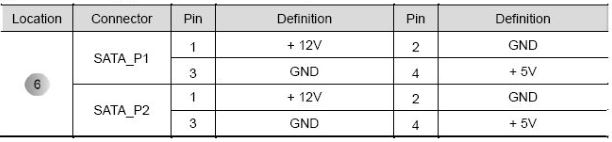
HK870 Power connector description
Table 11. HK870 Power connector description
HK870E (Baytrail J1900) Motherboard Layout

HK870E Connectors and Functions
Table 12. HK870E Connectors and Functions
HK870E Common Jumpers and functions
Table 13. Common Jumper Descriptions

HK870E Display Description
Table 14. HK870E Display Description
HK870E Audio Description
Table 15. HK870E Audio description
HK870E LAN Description
Table 16. HK870 LAN Description

HK870E USB Description
Table 17. HK870E USB Description
HK870E COM Description
Table 18. HK870E COM Description
HK870E MINI-PCIE Description
Table 19. HK870E Mini-PCIE description

HK870E Cash Drawer Description
Table 20. HK870E Cash Drawer Description

HK870E PS/2 Description
Table 21. HK870E PS/2 Description

HK870E Power connector description
Table 22. HK870E Power connector description
Section 6. Assembling and Disassembling the POS System
This section provides the steps to assemble and disassemble the POS system.
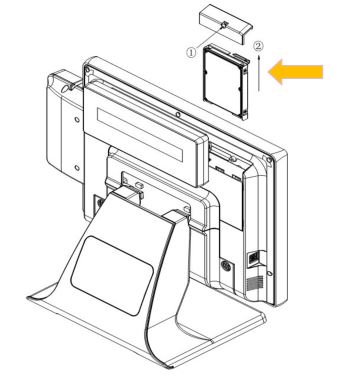
- Remove the Hard Disk Drive (HDD)
- To disassemble the POS, first remove the screw of the [HDD cover] and take off the cover.
- Pull out the hard disk assembly.
Figure 18. HDD cover to remove
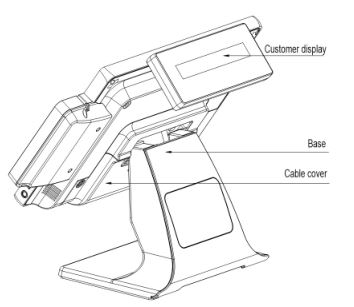
- Remove the cable cover
- Press the switch.
Figure 19. Cable cover - Pull out the cable cover
Figure 20. Cable cover that’s detached
- Press the switch.
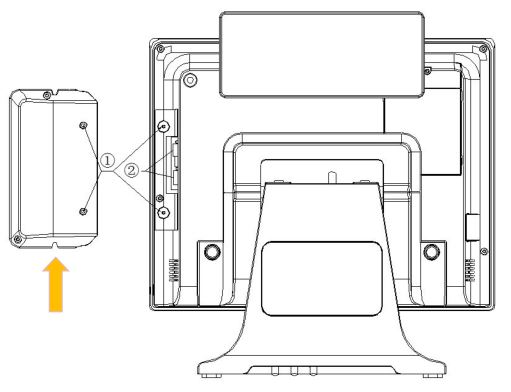
- Remove the multi-function card reader
- Release the two screws.
- Pull off the cable terminal and remove the multifunction card reader.
Figure 21. Multi-function card reader
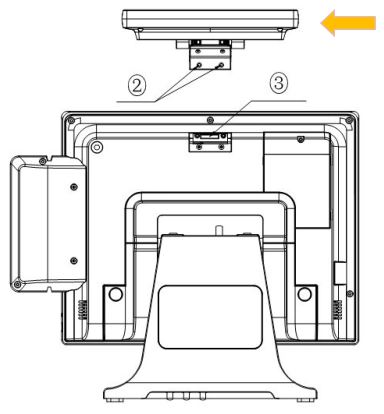
- Remove the customer display
- Rotate the customer display to the horizontal position.
Figure 22. Rotated customer display - Release the two screws.
- Pull off the cable terminal and remove the customer display.
Figure 23. Second display
- Rotate the customer display to the horizontal position.
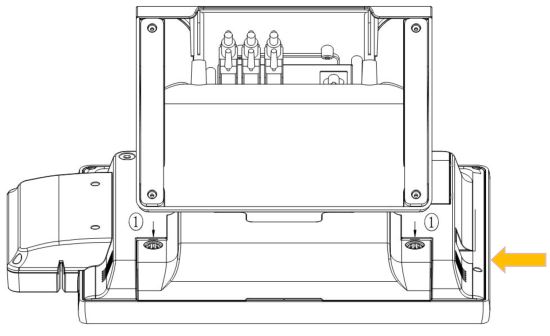
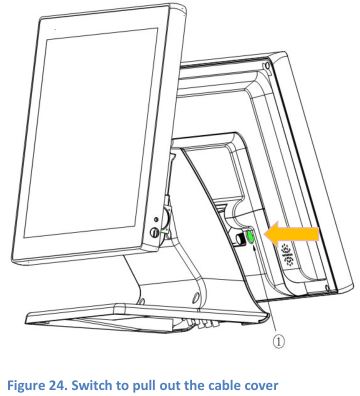
- Remove the second display
- Press the switch and pull out the cable cover.
- Release the two tool-less screws.
- Rotate and pull the second display.
Figure 25. Second display that’s rotated
- Press the switch and pull out the cable cover.


Section 7. Product Specifications
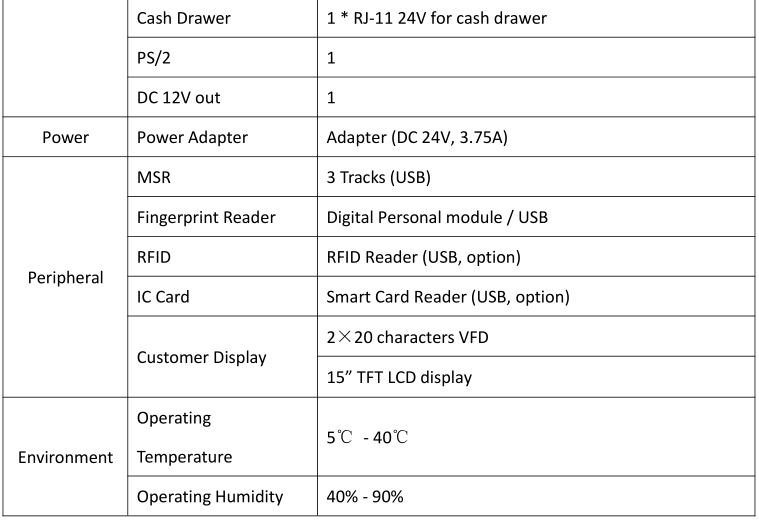
HK870 series Specifications
Table 23. HK870 Specifications

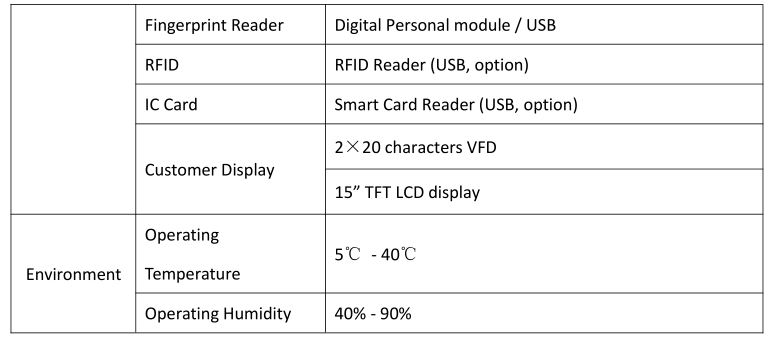
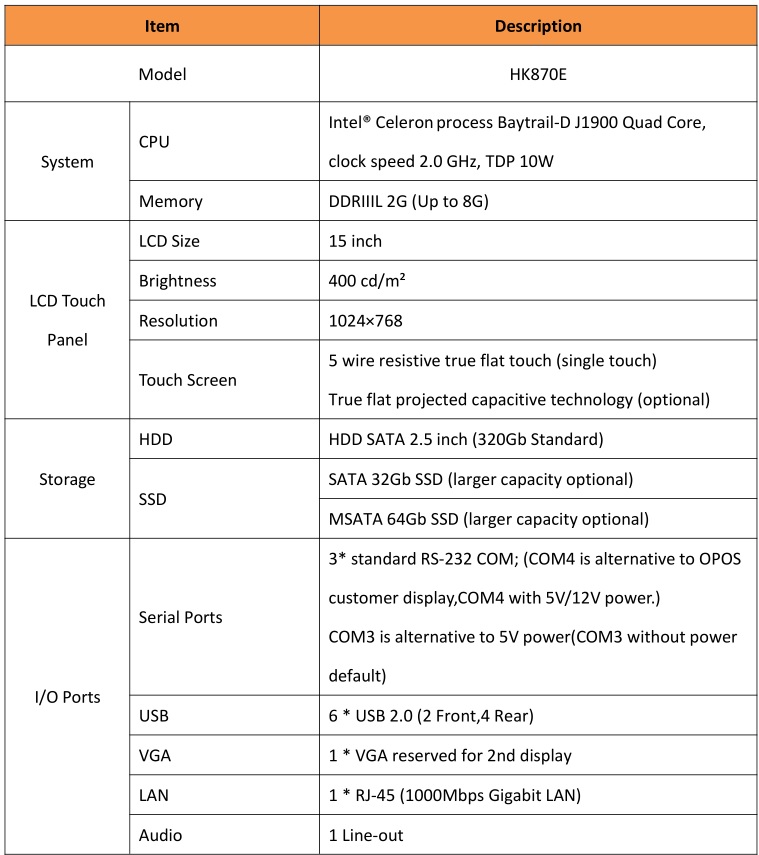
Table 24. HK870E Specifications
Appendix A. Basic Input and Output System (BIOS) Set Up Information
This section provides information about the Basic Input and Output System (BIOS) that will drive the main board.
Understanding BIOS
Basic Input and Output System (BIOS) provides configuration and set-up information for driving the main board. BIOS values are saved in CMOS ROM on the main board. BIOS Set-Up is a menu-oriented software utility which enables a user to configure the system’s environmental set-up, system hardware, power saving functions, etc. BIOS Set-Up values can seriously affect how the system works. Therefore, users should determine all options regarding BIOS Set-Up and configure the system accordingly.
Entering the Setup for HK870 series
- Turn on the system and press [F2] to enter the SETUP screen.
- Turn on the system and press [F11] to enter the boot menu.
Scenarios of when to use a BIOS Setup
Use the BIOS setup software utility when:
- Checking HDD type and capacity after HDD replacement
- Changing the booting sequence
- Reflecting the users need on the setup
Appendix B. Input/Output Information
This section provides input/output information for the HK870 All-in-One POS System.
Input / Output information for the HK870 series
HK870 (D2550) Super I/O Information (BIOS default settings)
COM1:3F8/4COM2:2F7/3COM3:3E8/7COM4:2E8/7
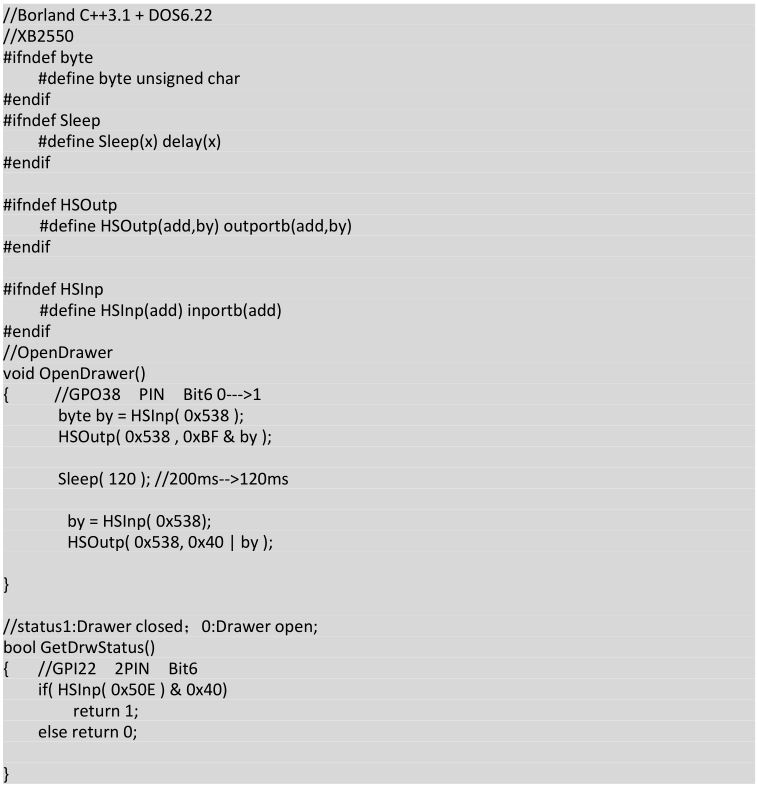
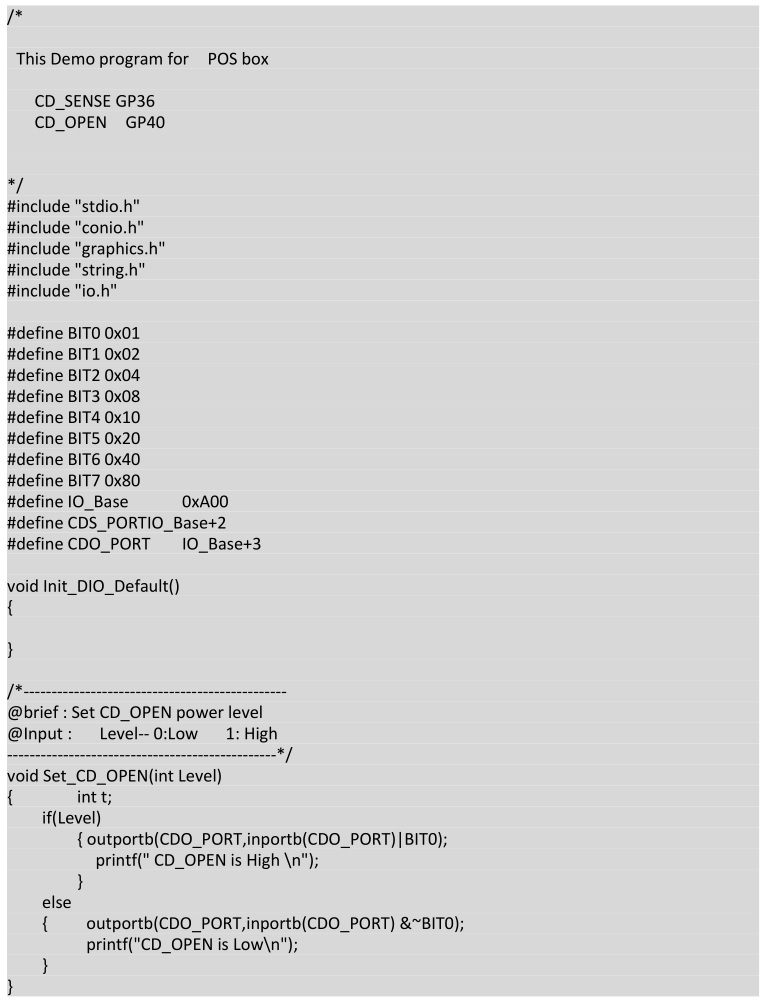
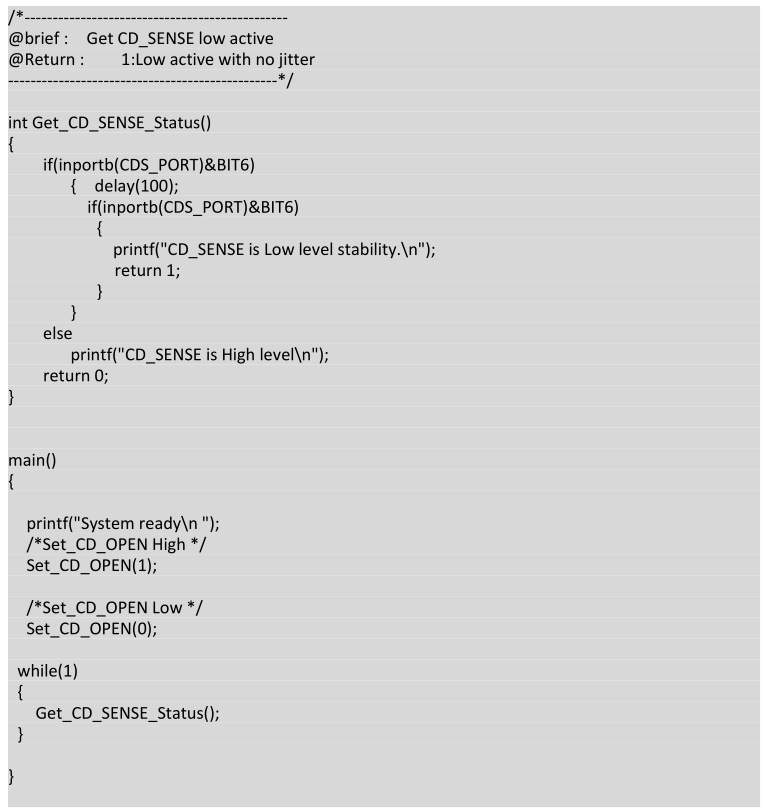
HK870 (D2550) Cash Drawer
HK870E (J1900) Super I/O Information (BIOS default settings)
COM1:3F8/4COM2:2F7/3COM3:3E8/7COM4:2E8/7COM5:2F0/5
HK870E (J1900) Cash Drawer
Hisense HK870 Series All-in-One Point of Sale System Integration Manual – Hisense HK870 Series All-in-One Point of Sale System Integration Manual –
[xyz-ips snippet=”download-snippet”]