
User Manual

Hisense HK950 All-in-One POS Service
HISENSE INTELLIGENT COMMERCIAL SYSTEM CO. LTD.
Product Introduction
Basic introduction
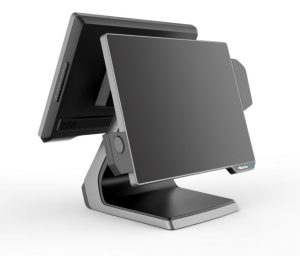
The all-in-one POS HK950 is a new commercial POS with features of high performance, rich configuration, low power consumption and easy maintenance. It provides more choices for customers. HK950 fits for commercial department stores, restaurants, boutiques, cosmetics stores and other industries, to provide a complete set of solutions.
Basic configuration:
- Mainboard system platform:
- Intel® Celeron® processor 3955U (Skylake) SOC 2.0Ghz dual-core dual-thread power consumption 15W
- Intel® Core® processor i3-6100U (Skylake) SOC 2.3Ghz dual-core four-thread power consumption 15W
- Memory DDR4L 4G maximum support 8GB
- Hard disk:
- HDD SATA 2.5 inch (500Gb Standard)
- SATA 64 Gb SSD (larger capacity optional) or Larger
- 15 inch touch one machine, resistive screen, capacitive screen optional
- 2* 20 VFD guest, structure and HK900 / HK870 compatible
- Second screen off, 15 inch (optional)
- Wireless network optional
- Multi-function card reader, support for MSR, RFID, USB interface fingerprint reader
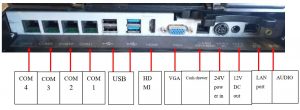
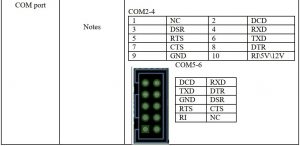
- 4* R550 serial port; (COM2, COM3, COM4 can be connected to customer’s display 5V/12V power supply optional.)
- 4* USB 2.0 (2 Side, 2Rear), 2 * USB3.0
- 1 * RJ45, support 1000M Ethernet
- 1 * cash drawer interface
The composition of whole machineThe whole machine is composed by LCD screen, touch screen, multi-card reader, customer display, base composition.


IO panel
Use environment
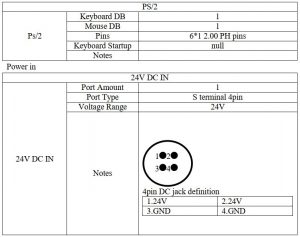
- Voltage: DC 24V bipolar with ground
- Current: 2.5A.
- Operating temperature: -10 ℃ ~ 50 ℃. (Suggestion: 15 ℃ ~ 30 ℃)
- Working humidity: 10% ~ 90%. (Suggestion: 40% ~ 70%)
- Storage temperature: -30 ℃ ~ 70 ℃. (Suggestion: 15 ℃ ~ 30 ℃)
- Storage humidity: 10% ~ 90%. (Suggestion: 40% ~ 70%)
Machine size and rotation angle

Product main hardware configuration and specifications
Power
The whole machine adopts FSP060-DAAN2 24V DC power supply, input voltage range: AC 100V ~ 240V; input frequency: 50Hz ~ 60Hz; output current: 2.5A; rated power: 60W;

Mainboard
The Mainboard can use the following two types of system platforms:
- Intel® Celeron® processor 3955U (Skylake) SOC 2.0Ghz dual-core dual-thread power consumption 15W.
- Intel® Core® processor i3-6100U (Skylake) SOC 2.3Ghz dual-core four-thread power consumption 15W.
Mainboard appearance is as follows:
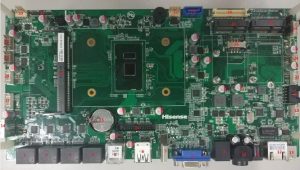

Mainboard rear IO ports panel

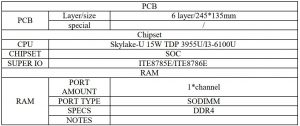
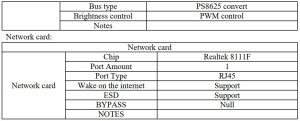
Mainboard basic parameters
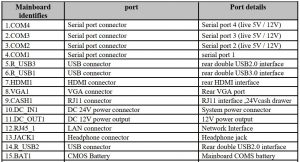
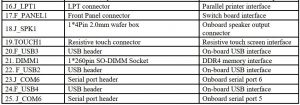
Ports definition

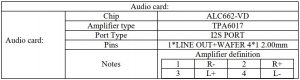
Audio card:
COM Port

Cash drawer:

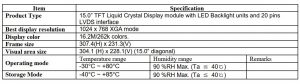
LCD Display
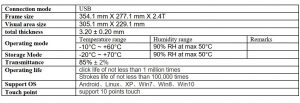
Capacitive touch screen

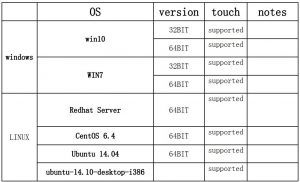
OS supported
Product disassembly and replacement of major parts
Disassemble tool
The main tools:
- Phillips screwdriverSpecifications: Length 150-200mm (not included)Uses: When used to disassemble parts, unscrew or install the fixing screws.
- screw box:Uses: used to place the screws removed.
- Flathead screwdriverUses: used to remove the drawing chassis.
Machine disassemble and replacement steps
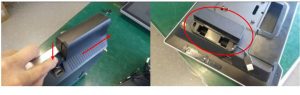
MSR removal and replacementStep 1: Remove the card reader USB cable and the fixed card under pressure;Step 2: According to the direction of construction plans to promote the magnetic card reader to remove it for replacement;
Hard disk removal and replacement
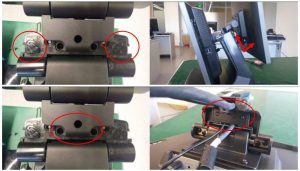
Step 1: Press both sides of the hard disk with plastic fixing bracket and pull the bracket in the direction of the arrow to remove the hard disk.Step2: Remove the hard disk from its mounting bracket and replace it;

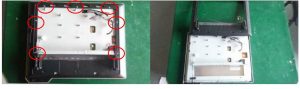
Second screen LCD disassembly and replacement
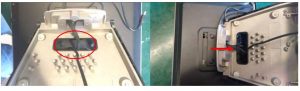
- Step 1: Dial the lock to “
 ” as shown, remove the front bezel as the picture shows;
 - Step 2: Remove the second screen from the base by removing the three screws on the second screen mounting bracket (base end) and the two fixing screws on the pressboard.
- Step 3: Remove the second screen of the four screws (monitor side) after the second screen to be replaced;

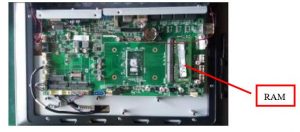
Mainboard and memory removal and replacement
- Step 1: repeat the action of 3.2.3, remove the base front cover and unplug the connection cable on the Mainboard side;
- Step 2: Remove the two fixing screws of the mainframe to remove it from the base as shown in the figure;
- Step 3: Remove the two fixing screws of the rear case of the main body and remove it.
- Step 4: Remove the hard disk bracket, heat sink, Mainboard screws, remove all kinds of cables on the Mainboard, Mainboard and memory replacement;
LCD screen (main screen) removal and replacement
- Step 1: Repeat the actions of 3.2.3 and 3.2.4, remove the main frame and remove the cable between the LCD panel and the Mainboard;
- Step 2: The LCD panel metal shield 10 fixed removed and removed;
- Step 3: Remove the cable and touch panel (glue) from the LCD panel;
- Step 4: Remove theLCD fixing screws (two on each side) on the fixing bracket to replace the LCD panel;

Touch screen removal and replacement
- Step 1: Repeat the actions of 3.2.4 and 3.2.5 to remove the components of the touch screen and the front shell kit;
- Step 2: Take a new touch screen and front shell kit, installed on the host;

Notes: touch panel is pasted to front shell by 3M tape tightly, so it is hard to disassemble the touch screen and front shell, so we suggest you may replace front shell and touch panel assy to avoid part damage. The parts needed as below:

Common Fault Analysis And Solution
Possible Cause of Common Faults
- Normal malfunctions: mainly caused by normal wear and end of service life, or natural aging;
- Human-caused malfunctions: components are damaged due to not complying with the operating rules such as insert and pull the plug in a working condition etc.
- Hardware malfunctions: problems of manufacturing process or material quality problem;poor contact between boards and connectors;board solder joint is broken or unstable、the connecting wires break down etc.
- Software malfunctions:it can be divided into the fault caused by the human reason、the fault caused by system software and the application itself, and the fault caused by virus;
- Impact caused by the environment:it mainly includes voltage anomaly fluctuation, temperature and humidity, dust, electromagnetic radiation, electrostatic and other factors ;
Principle of handling faults
- From software to hardware:The fault should be analyzed first from the operating system and software,for example: The partition table is missing、COMS is improperly set up、the virus destroy the system.The error of hard disk main boot sector or the register file. After eliminating the errors of software, we can start diagnosis the cause of the failure from the hardware aspect.
- From the outside to the inside:We should diagnosis the peripheral first ,then turn to the host, fault diagnosis should be based on the system error;
- Power supply first:Power supply is the key to whether the machine can work normally, so we should check the power supply first and then diagnosis the other parts.
- From general to special:Consider the most likely cause of failure, for example: If the hard disk cannot work normally, we should check if the power cable and the data line is loose, reconnecting them can solve the problem.5)From simple to complex:First eliminate some faults that are easy to work out, then eliminate those faults that are not easy to solve.
Common methods of eliminating the faults
- ObservationChoose what to observe based on the specific situation,use your eyes、ears、nose and other organs to judge the failure, observe if there is charred、variant、abnormal sound、falling off and other phenomena;The principles of observation are as follows:From outside to inside:observe the environment of the outside and inside of the machine;From simple to complex:look、listen and smell;then have a measurement or test.
- Re-install methodRemove the board which may have a fault,wipe it clean with rubber and then re-insert to make sure it is in a good contact.
- Replacement methodReplace the defective part with a similar one which have the same functions to find out if the failure is gone.
- Minimum system method Remove all the peripheral components and host hardware remaining power supply Mainboard、cpu these three components,plug in and observe if it works normally, if there is no faults we can install other parts step by step until the whole machine cannot work normally, find out the error part and repair it.
- Heating and cooling methodUse finger to touch the heating part and observe if there is overheating; cool the abnormally heating part with an absorbent cotton swab containing absolute ethanol, if the failure eliminates, it can proves that the failure is caused by the overheating stability.
Common Troubleshooting
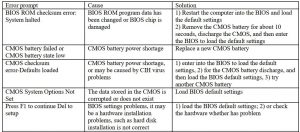
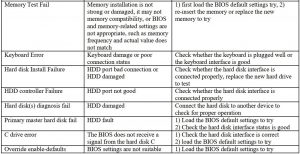
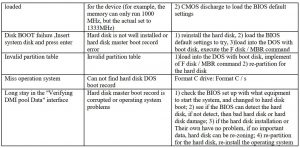
- Common error message tips and solutions when the boot
2. Common error message tips and solutions of LCD

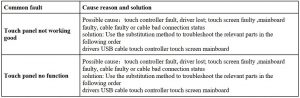
3. Common error message tips and solutions of Touch panel
4. Common error message tips and solutions of Mainboard

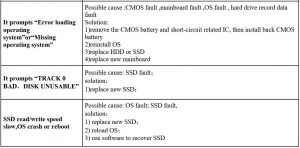
5. Common error message tips and solutions of HDD or SSD

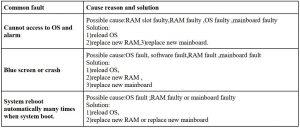
6. Common error message tips and solutions of RAM
Hisense HK950 All-in-One POS Service Manual – Hisense HK950 All-in-One POS Service Manual –
Questions about your Manual? Post in the comments!
[xyz-ips snippet=”download-snippet”]