Hisense Laser TV Instruction Manual
© 2020 Hisense Company Ltd. All Rights Reserved.All material in this Quick Start Guide is the property of Hisense Company Ltd. and its subsidiaries, and is protected under US, CANADA, MEXICO and International copyright and/or other intellectual property laws. Reproduction or transmission of the materials, in whole or in part, in any manner, electronic, print, or otherwise, without the prior written consent of Hisense Company Ltd. is a violation of Hisense Company Ltd. rights under the aforementioned laws.No part of this publication may be stored, reproduced, transmitted or distributed, in whole or in part, in any manner, electronic or otherwise, whether or not for a charge or other or no consideration, without the prior written permission of Hisense Company Ltd.Requests for permission to store, reproduce, transmit or distribute materials may be made to one of the following addresses:
U.S.A.Hisense USA Corporation 7310 McGinnis Ferry Road Suwanee, GA 30024MexicoHisense Mexico S. de R.L. de C.V. Blvd. Miguel de Cervantes Saavedra No 301 Torre Norte Piso 2, Col. Ampliación Granada Miguel Hidalgo, Ciudad de México, C.P. 11520CanadaHisense Canada Co., Ltd 2283 Argentia Road, Unit 16 Mississauga, ON, Canada L5N 5Z2 Hisense, and any and all other Hisense product names, logo’s, slogans or marks are registered trademarks of Hisense Company Ltd. and its subsidiaries. All other trademarks are the property of their respective holders.
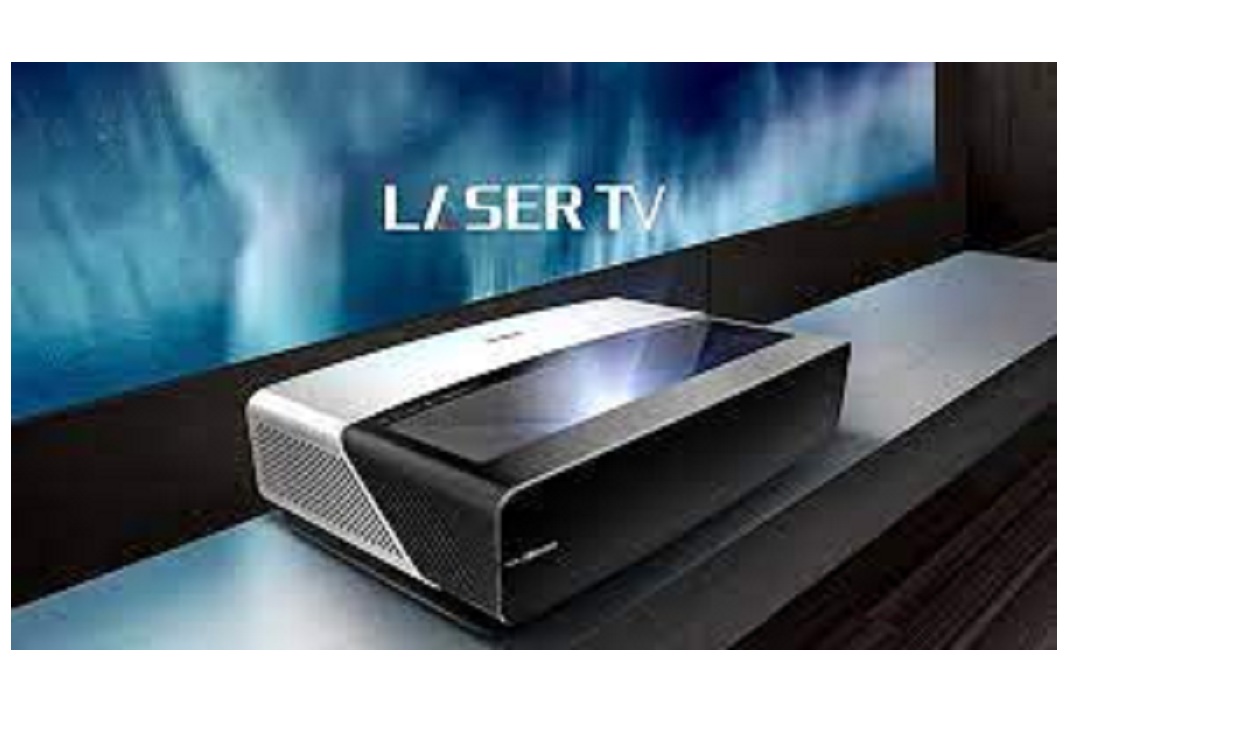
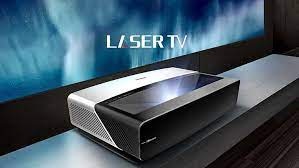
Congratulations on the purchase of your new Laser Cinema! This Quick Start Guide will walk you through a few easy steps to set up your Laser Cinema.
Register Your Laser Cinema!Because we value your business, we want to keep you in the know of ‘all things Hisense’. Using your mobile phone, scan the Registration page QR code to register your Laser Cinema. Depending on the make and model of your phone, you may need to download a QR code scanning app.
U.S.H
 http://www.hisense-usa.com/support/ register
Mexico
 https://hisense.com.mx/productregistration/Canada
 http://www.hisense- canada.com/ support/productReg.asp
Important Safety Information
![]() SAFETY WARNINGS
SAFETY WARNINGS
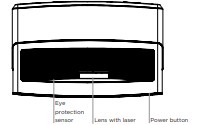
Do not look directly at the lens when this device is on because the laser light may damage your eyes!
- This product comes with a laser module. Do not tear or modify this device in any manner; otherwise, itmay result in personal injury.
LASER RADIATIONDO NOT STARE INTO BEAMCLASS 2 LASER PRODUCTMAXIMUM OUTPUT< 66.7mW = 450~460nmIEC 60825-1:2014Peak Power < 66.7mWWavelength 450~460nmAngle of Divergence 49°Class 2 Laser Product IEC 60825-1 2007
Caution–use of controls or adjustments or performance of procedures other than those specified herein may result in hazardous radiation exposure. This Device Complies with DHHS Radiation Rules, 21CFR Chapter 1, Subchapter J.
- If this device requires a repair, please wear laser eye protection with an optical density OD that is 4 or higher and has a wave length of 450-460 nm.
- Do not place any water-containing vessel on this device, such as cosmetics or liquid medicine.
- If any object or water enters this device, please unplug this device and contact the service staff of Hisense.
- Do not place any exposed fire source (e.g. burning candle) on this device. Keep away from high temperature and heat.
- Do not expose the battery to direct sunlight or candle light.
- Keep air vents on both sides clear from any objects to prevent the device from overheating inside.
- To avoid a short circuit, product damage or electric shock, do not use any sharp object or metal to touch the ports or other openings on the Laser Cinema.
- If this device has been in a warm environment, allow any built-up condensation to evaporate first BEFORE you switch the device on.
- Do not allow a child to stand on or climb up this device.
- Do NOT place any object above or in front of the lens because the laser light could cause the object to become flammable.
- Clean the lens periodically with a clean cloth and make sure the Laser Cinema is turned off before you start.
Packaged Contents
- Laser Cinema
- 1 Remote control
- 2 AAA batteries
- 2 pairs of gloves for handling the Laser Cinema
- 1 Power Cord
- 1 Wrench to adjust the bottom of the Laser Cinema
- 1 USB extension cable · Hisense 4K Laser Cinema Quick Start Guide
- Hisense 4K Laser Cinema User Manual
- Important Safety Information & Warranty Card
- Cleaning kit for the lens
ADDITIONAL ITEMS THAT COME WITH THE LASER CINEMA IN A SEPARATE PACKAGE
- A Display Screen (optional equipment)*
- A set of Wall Mount Brackets (optional equipment)*
- Additional items you receive will be based upon your order.
Laser Cinema Diagram


We strongly recommend that two people handle this device when moving it from one place to another. Be sure to protect the lens when you handle this device.
STEP 1 Mount the ScreenIf you purchased a screen from Hisense to include with your Laser Cinema, then refer to the Screen. Installation Guide that’s included in the package.
STEP 2 Set up the Laser CinemaTo begin setting up the Laser Cinema, we strongly recommend that TWO people move it from one place to another because of the weight. Be sure to protect the lens when you handle this device.
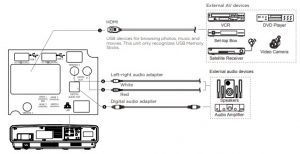
- Now, to get started, we recommend that you connect all cables to the ports on the back of the Laser Cinema before you position it. (Audio, video, Ethernet cables and external devices are not included.)
- Position the Laser Cinema so it is parallel with the screen surface. We recommend the distance from the back panel of the Laser Cinema to the wall to be 8 1/8 inches.
- Plug the power cord into a wall outlet.
- Press the POWER button to turn on the Laser Cinema.


WARNING: Insufficient ventilation space will cause this device to overheat or become damaged.
- Do not block the air vents or place any object on this device.
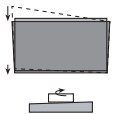
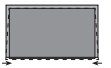
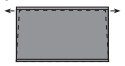
- Do not place this device in any narrow, enclosed or poorly ventilated space.At a minimum, leave the amount of space shown in the diagram below for this device to have proper ventilation.
 At a minimum, leave the amount of space shown in the diagram below for this device to have proper ventilation.
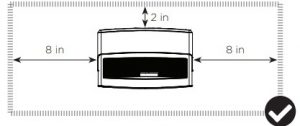
Ports to connect certain cables to
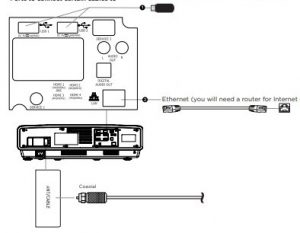


NOTE:
- Use the USB extension cable (included) for easier connection and disconnection.
- When connecting a hard disk or a USB hub, always connect the mains adapter of the connected device to the power supply. Exceeding a total current consumption may result in damage. The USB2.0 device maximum current consumption is 500mA. The USB3.0 device maximum current consumption is 1A.
- If the impulse current for an individual non-standard high-capacity mobile hard disk is greater than or equal to 1A, it may cause the Laser Cinema to reboot or lock.
- The USB port supports a voltage of 5V.Ethernet (you will need a router for Internet connectivity)
Check to ensure that you have selected the right cables for the ports and that they are connected securely. Loose connections can affect the quality of the picture image and color.
STEP 3 Adjust the Display Image and the ScreenFollow the steps in the order shown below, only if they apply to your situation. Note: Before adjusting, fold the wall-mount bracket wands so that screen is vertically level.
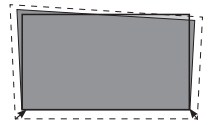
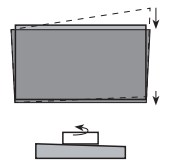
PARALLEL THE BOTTOM OF THE IMAGE WITH THE SCREENIf the bottom of the image is lower on the left and higher on the right, rotate the device counterclockwise.
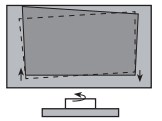
If the bottom of the image is lower on the right and higher on the left, rotate the device clockwise.

FIT THE BOTTOM OF THE IMAGE TO THE SCREEN
- If the image shifts to the left side, then move the Laser Cinema to the right.

If the image shifts to the right side, then move the Laser Cinema to the left.
- If the bottom of the image is wider than the screen, then move the Laser Cinema closer to the screen.
If the bottom of the image is narrower than the screen, then move the Laser Cinema farther from the screen.
NOTE: Make sure the bottom of the image always stays parallel with the screen. If not, rotate the Laser Cinema following previous instructions.
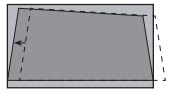
ADJUST THE UPPER-RIGHT CORNER OF THE IMAGE
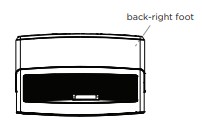
- If the top of the image is lower on the left and higher onthe right, then use the wrench to rotate the back-right foot clockwise so that the bottom of the image is also higher on the right. The upper-right corner will expand further by default. Make sure part of the image is displayed beyond the upper-right corner of the screen.
- Now, rotate the Laser Cinema counterclockwise so that the bottom of the image is parallel with the screen.
- Repeat the steps above until the top of the image is parallel with the screen.
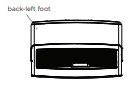
- Rotate the back-left foot to the same height as the right one and make sure the Laser Cinema sits stably.

ADJUST THE UPPER-LEFT CORNER OF THE IMAGE
- If the top of the image is higher on the left and lower on theright, then use the wrench to rotate the back-left foot of the Laser Cinema clockwise so that the bottom of the image is also higher on the left. The upper-left corner will expand further by default. Make sure part of the image is displayed beyond the upper-left corner of the screen.back-left foot
- Now, rotate the Laser Cinema clockwise so that the bottom of the image is parallel with the screen.
- Repeat the steps above until the top of the image is parallel with the screen.
- Rotate the back-right foot clockwise to the same height as the left one and make sure the Laser Cinema sits stably.

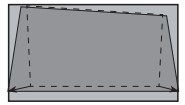
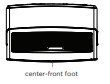
FILL THE TOP OF THE IMAGE TO THE SCREEN If the top of the image is wider than the screen, then use the wrench to rotate the center-front foot of the Laser Cinema clockwise.
 If the top of the image is narrower than the screen, then use the wrench to rotate the left- and right-back feet of the Laser Cinema clockwise, until the left and right borders of the image are parallel with the screen borders. Next, move the projector further from the screen to fill the image to screen width. If the
Rotate the back feet clockwise
Rotate the center-front foot counterclockwise
back feet are already at their maximum height, rotate the the center-front foot counterclockwise. After you’ve completed adjusting the image position, rotate the left and right front feet to the same height as the center one to make sure the Laser Cinema sits stable.
Do not look directly at the lens when this device is on because the laser light may damage your eyes!
STEP-4 Use Your Remote
|
BUTTON |
DESCRIPTION |
| Power on / off | |
|
INPUT |
Change Laser Cinema input source |
|
Number |
Enter Channels / input numbers |
|
Dash button / Select a digital sub channel |
|
|
|
Special function buttons |
|
TV |
Return to the previous source |
|
The button for the Quick setup men |
|
 |
Power Indicator and Microphone |
|
OK |
Confirmation button |
|
˄ / ˅ / ˂ / ˃ |
D-pad (up/down/left/right navigation buttons) |
|
Return to the previous place in the menu or app |
|
|
Display the Home screen |
|
|
APPS |
All Apps |
|
|
Volume (up/down) |
|
Google Assistant of Laser Cinema |
|
|
Mute and restore sound |
|
|
Media content control function buttons |
|
|
NRT |
Quick access to Accessibility menu |
NOTE: The button descriptions are only provided as a reference. The actual appearance of your remote may differ from the buttons that are listed.
- Press and slide the back cover to open the battery compartment of the remote control.
- Insert two AAA size batteries. Make sure to match the (+) and (-) ends of the batteries with the (+) and (-) ends indicated in the battery compartment.
- Restore the battery compartment.
IMPORTANT INFORMATION ABOUT THE REMOTE AND BATTERIES ·
- Discard batteries in a designated disposal area. Do not throw them into a fire.
- Remove old batteries immediately to prevent them from leaking into the battery compartment.
- If you do not intend to use the remote control for a long time, then remove the batteries.
- Battery chemicals can cause a rash. If the batteries leak, clean the battery compartment with a cloth. If chemicals touch your skin then wash it immediately.
- Do not mix old and new batteries.
- Do not mix alkaline, standard (carbon-zinc) or rechargeable (NiCd, NiMH, etc.) batteries.
- Do not continue using the remote if it gets warm or hot.
- Call our Support Center immediately on the support website.
REMOTE CONTROL RANGE INFORMATION
- The remote control can work at a distance of up to 26 feet in front of the Laser Cinema set.
- It can work at a 30 degree horizontal or 15 degree vertical angle.( This angle is used by infrared means in an unpaired state.)
PAIRING THE REMOTE CONTROL
- Pair the remote to the Laser Cinema after you power it on. Keep the remote control within 10 feet from the Laser Cinema. Press and hold the [ ] button at least 3 seconds to start pairing.
- If the remote paired successfully then a confirmation will display on the screen. If it did not pair successfully then an unsuccessful message will display. Repeat step 1.
NOTE
- If an unknown error occurred with the remote then it could have been caused by interference. Try to remove what’s causing the interference and pair it again.
- If an unknown error occurred in the remote control while the battery power is normal, you can take out the batteries and press any key for 1~2 seconds, then the remote control can work normally.
- The remote cannot be paired to the Laser Cinema while the Laser Cinema is in standby mode.
STEP-5 Proceed through the Screen Setup Menu
PROJECTION MODE
If you need to flip the image over top-to-bottom and/or left to-right, select the Projection Mode and press the LEFT/RIGHT buttons.
AUTO GEOMETRIC CORRECTION
- Ensure that the Laser Cinema and your mobile device are connected to the same Wi-Fi network.
- Position the Laser Cinema and use the leveling feet as needed to fit the entire display border within the screen area.
- Click Next to continue.
GEOMETRIC CORRECTION
- Select a point for adjustment using the UP/DOWN/LEFT/RIGHT buttons. Adjust eight main points at the corners and midpoints first, then adjust the six smaller points on the top border.
- Adjust the position of the point by pressing the UP/DOWN/ LEFT/RIGHT buttons, then press the Back button to view and select other points. Your changes will apply automatically.

NOTE: To return the picture position to the factory default, select the Reset button on the screen.
EYE PROTECTIONIn order to protect your eyes, do not look into the lens. This projector is shutting down in 5 seconds, the Laser Cinema screen is closed immediately.
Begin to Enjoy Your Laser Cinema
Your Smart Laser Cinema is easy to use and brag-worthy!After you’ve completed setting up the language, time and network connection, the Home screen will be your starting point for navigating the Laser Cinema. Gone are the days where your Laser Cinema only provides one way for you to be entertained. This showpiece provides you the convenience of watching a program on a live channel, accessing Video on Demand to watch a movie and many other entertainment options. Using your remote, press the Home button to begin enjoying your Laser Cinema.
Text-to-Speech(TTS) and Video Description functionalities on Laser Cinema
Text-to-Speech (TTS) and Video Description can help you to navigate the menus on the screen and hear an audio description of relevant programs. Text-to-Speech can convert written text into voice text to help visually impaired people listen to the information they are unable to read. In addition, the Video Description has an audio narration added to certain programs that will describe the main visual elements which visually impaired users may not be able to see. Follow the steps below to enable the functions:
- Press the [] button to access the Menu.
- Next, select Settings to enter the Settings Menu.
- Select Accessibility > Menu Audio or Video Description to turn the Menu Audio or Video Description ‘On’ or ‘Off’. When Menu Audio is turned On, then the contents of each menu displayed can be broadcasted out. When Video Description is turned On, then you can hear the introduction of relevant programs.

https://www.hisense-usa.com/text-to-speech-and-videodescription-functionalities-on-tv
Note: The Menu Audio feature is not available in some regions and countries outside of the United States.
Disclaimer: Subscriptions or other payments may be required to access content through some applications. Some or all of the included or downloaded application services in this Hisense device may not function depending on the Internet connection, local limitations of included applications or other reasons outside of Hisense’s control. HISENSE EXPRESSLY DISCLAIMS RESPONSIBILITY FOR ANY APPLICATION SERVICE FROM FUNCTIONING AT ANY TIME, FOR CONTENT IN ANY APPLICATION SERVICE, FOR DISRUPTIONS OF SERVICE, LOCAL OR REGIONAL LIMITATIONS, WARRANTIES OF TITLE, NO INFRINGEMENT, AND FOR IMPLIED WARRANTIES OF MERCHANTABILITY OR FITNESS FOR A PARTICULAR PURPOSE. By purchasing this device, you accept such Disclaimer without any claim on Hisense at any time.
Maintenance
- Do not touch this device when it is running or just turned off because it may be hot.
- Do not wipe this device with oil because it may deteriorate the exterior or damage the paint. Contact with rubber or ethylene products for a long time may cause stains on this device.
- If the outside of the Laser Cinema is dirty, turn off the Laser Cinema and wipe with a damped soft cloth.
- Do not touch the lens with your hands.
- Do not touch or wipe the lens with ordinary cleaning cloth. Use a dust blower to remove the dust on the lens. Grease, dirt and fingerprints should be cleaned carefully by the professional by using optical cleaning cloth, lens wiping paper or professional cleaning solutions to avoid destroying the optical filming and affecting the image quality.
- To turn off this device, press the Power button on the remote control. Do not cut off the power directly when the device is working.
Quick Problem-Solving TipsWhen you experience an issue with your Laser Cinema, turn it off and on again. If this does not resolve the problem, then refer to the tips below.
When I turn on my Laser Cinema, there is a delay for a few seconds before the picture appears. Is this normal? Yes, this is normal. The Laser Cinema is initializing and searching for previous setting information.
No sound or picture
- Check if the power cord is plugged into a powered AC outlet.
- Press thePower button on the remote control to activate the unit from ‘Standby’ mode.
- Check to see if the LED light is on or not. If it is, then the Laser Cinema is receiving power.
I have connected an external source to my Laser Cinema and I get no picture and/or sound
- Check for the correct output connection on the external source and for the correct input connection on the Laser Cinema.
- Make sure you have made the correct selection for the input mode for the incoming signal.
The picture is normal but there i sound
- Check the volume settings.
- Check if ‘Mute’ mode is set to On.
Sound but no picture or black and white picture
- If the picture is black and white, unplug the Laser Cinema from the AC outlet and replug it after 60 seconds.
- Check that the Color is set to 50 or higher.
- Try different Laser Cinema channels.
The sound and/or picture is distorted or appears wavy
- An electric appliance may be affecting the Laser Cinema. Turn off any appliances that are nearby and move it farther away from the Laser Cinema.
- Insert the power plug of the Laser Cinema set into another power outlet.
The sound and picture is blurry or cuts out
- If using an external antenna, check the direction, position and connection of the antenna.
- Adjust the direction of your antenna or reset or fine tune the channel.
The plastic cabinet makes a “clicking” type of sound
The ‘click’ sound can occur when the temperature of the television changes. This change causes the television cabinet to expand or contract, which makes the sound.
This is normal and the Laser Cinema is OK.The remote control does not work
- Confirm that Laser Cinema still has power and is operational.
- Change the batteries in the remote control.
- Check if the batteries are correctly installed.
NEED MORE HELP? Additional help is available online at support links. You will find answers to frequently asked questions, downloadable firmware and more. If the problem is still not resolved, then contact us at one of the phone numbers below.
U.S.Ahttp://www.hisense-usa.com/support/
Phone:1-888-935-8880 Monday – Friday 9 AM to 9 PM ESTSaturday – Sunday 9 AM to 6 PM EST Email: [email protected]
MEXICOhttps://hisense.com.mx/support/
Phone:1-800-008-8880 Monday – Friday 9:00-18:00
Email:[email protected]
CANADAhttp://www.hisense-canada.com/support/
Phone:1-855-344-7367 Monday – Friday 8 AM to 8 PM EST
Email:[email protected]
Product Specifications
| MODEL NAME | 100L5F |
| DIMENSION (W × H × D) | 21.5 × 6.2 × 13.6 inches (547 × 158 × 346 mm) |
| WEIGHT | 24.3 lbs (11 kg) |
| ACTIVE SCREEN SIZE (DIAGONAL) | 100 inches |
| SCREEN RESOLUTION | 3840 × 2160 |
| AUDIO POWER | 2 × 15 W |
| POWER CONSUMPTION | 348W |
| POWER SUPPLY | 120 V ~60 Hz |
| CONNECTIVITY | Built-in Wireless feature (2×2 dual band) |
| PORTS | 4 HDMI ports, 2 USB ports, 1 LAN port for Ethernet, 1 Digital Audio Output (SPDIF), 1 RF Input, 1 left/right Audio Output |
| ENVIRONMENTAL CONDITIONS | Temperature: 41°F to 95°F (5°C to 35°C) Humidity: 20% to 80% RH Atmospheric pressure: 86 kPa to 106 kPa |
| STORAGE TEMPERATURE | 5°F to 113°F (-15°C to 45°C) |
| STORAGE HUMIDITY | 10% to 70%, non-condensing |
| RECEIVING CHANNELS | VHF: 2 – 13, UHF: 14 – 69, CATV: 1 – 125 Digital Terrestrial Broadcast (8VSB): 2 – 69 Digital cable (64/256 QAM): 1 – 135 |
| TUNER TYPE | Frequency synthesized |
| RECEIVING SYSTEM | Analog: NTSC Digital: ATSC/QAM |
Disclaimer: All products, product specifications, and data are subject to change without notice to improve reliability, function, design otherwise
Certification and Compliance
FCC NoticeThis device has been tested and found to comply with the limits for a Class B digital device pursuant to Part 15 of the FCC Rules. These limits are designed to provide reasonable protection against harmful interference in a residential installation. This device generates, uses, and can radiate radio frequency energy and, if not installed and used in accordance with the instructions, may cause harmful interference to radio communications. However, there is no guarantee that interference will not occur in a particular installation. If this device does cause harmful interference to radio or television reception, which can be determined by turning the device off and on, the user is encouraged to try to correct the interference by one or more of the following measures:
- Reorient or relocate the receiving antenna.
- Increase the separation between the device and receiver.
- Connect the device into an outlet on a circuit different from that to which the receiver is connected.
- Consult the dealer or an experienced radio/Laser Cinema technician for help.
NOTE: THE MANUFACTURER IS NOT RESPONSIBLE FOR ANY RADIO OR LASER CINEMA INTERFERENCE CAUSED BY UNAUTHORIZED MODIFICATIONS TO THIS EQUIPMENT. SUCH MODIFICATIONS COULD VOID THE USER’S AUTHORITY TO OPERATE THE EQUIPMENT.
The Wi-Fi Module complies with FCC radiation exposure limits set forth for an uncontrolled environment. This device should be installed and operated with a minimum distance of 20 centimeters between the radiator and your body.
Declaration of ConformityTrade Name: Hisense Model: 100L5F Responsible Party: Hisense USA Corporation Address: 7310 McGinnis Ferry Road, Suwanee, GA 30024 Telephone Number: 678-318-9060 This device complies with Part 15 of the FCC Rules. Operation is subject to the following two conditions: (1) this device may not cause harmful interference, and (2) this device must accept any interference received, including interference that may cause undesired operation.
![]() Manufactured under license from Dolby Laboratories. Dolby, Dolby Audio, and the double-D symbol are trademarks of Dolby Laboratories.
Manufactured under license from Dolby Laboratories. Dolby, Dolby Audio, and the double-D symbol are trademarks of Dolby Laboratories.
![]() The terms HDMI and HDMI High-Definition Multimedia Interface, and the HDMI Logo are trademarks or registered trademarks of HDMI Licensing LLC in the United States and other countries.
The terms HDMI and HDMI High-Definition Multimedia Interface, and the HDMI Logo are trademarks or registered trademarks of HDMI Licensing LLC in the United States and other countries.
![]() Manufactured under license from THAT Corporation. THAT Corporation, dbx-tv, Total Sonics, Total Surround and Total Volume are registered trademarks of THAT Corporation.
Manufactured under license from THAT Corporation. THAT Corporation, dbx-tv, Total Sonics, Total Surround and Total Volume are registered trademarks of THAT Corporation.
Total Technology is a trademark of THAT Corporation.
References
[xyz-ips snippet=”download-snippet”]