WiFi Video Doorbell TL-WF02 User Manual
Introduction
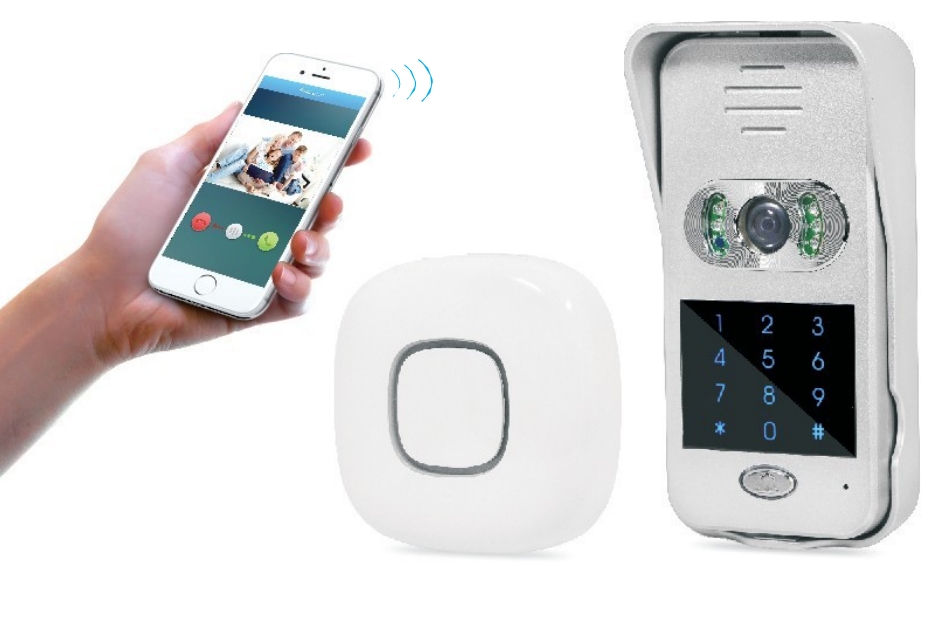
With Hisilicon Hi3518E processor and H.264 compression technology, this Wifi video intercom provides smooth realtime video transmission while keeps power consumption very low.This video doorbell is easy and safe to operate. Original unlock password is “123456”.Keypad coded access can only work after a new unlock password is set.This product has below user friendly designs:
- Restoring factory setting is not necessary. If one monitoring device is lost, just change the admin password from another monitoring device and the lost one will be disconnected.
- All events, including visitor calls, video message, motion detection, tamper alarm, unlock and illegal unlock, are recorded in TF card.
- All recorded activities can be viewed and downloaded remotely by smart phones from APP.
- Fast push notification; full duplex video intercom with smooth transmission.
- Realtime video display on mobiles for each call;
- 150° wide view angle with clear and no distortion pictures.
Notes: Once powered on, this video intercom will alarm continuously; please fix it well in rain cover till it detects the magnet.
Product Introduction
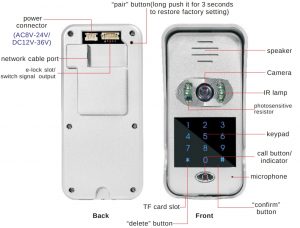
Product Diagram
APP Installation
a. For Android users, please log in Google Play, search, download and install “idoorphone”b. For iOs users, please log in APP Store, search, download and install “idoorphone“.
APP Main Interface
APP Main Interface on Android Devices APP Main Interface on iOs Device
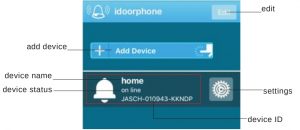
Red area introduction: when device is online, click red area into live view video. When device is offline, click this area to refresh APP.Push notification introduction of iOs devices:
- When APP is running at background and device status online, for any visitor call, iOs device has push notification.
- When APP is running and device status online, double click iOs device’s “Home” key, drag APP, slide it up and stop APP working. Then push notification of intercom calls will be sent to iOs device.
If APP is exited on APP’s “About” interface, push notification will not be sent.
Pairing and Settings
LED indicator:
- Slowly blink from red to blue: Wi-Fi connection not set up;
- Fast blink from red to blue: in pairing or Wi-Fi connecting mode;
- Blue light: connected to router;
- Red light: visitor calling
1. Connect to Power Supply
a. Connect the video intercom to the supplied power supply (red = positive and black = negative) or other DC12V-36V/AC8-24V power source. Please refer to power connector in Product Diagram.b. Fit the video intercom inside the rain cover, power on, in around 30 seconds, the LED blinks slowly from red to blue after the beep. It is ready to be configured.
2. Pair Operation
2.1 for Android devices:
a. Use a pin to push the “pair” button (”reset”), the LED blinks very fast (approximately 5 times/sec), and intercom alerts “pairing”; this mode lasts 100 seconds, if not successful, the intercom alerts “pairing failure”.b. Make sure the Android device is connected to Wi-Fi, run the “idoorphone” APP, click “Add Device” (see APP main interface), APP will auto detect the video intercom and device status settings device ID connect to it, the intercom alerts “paring success” (view image 1). LED blinks slowly from red to blue.c. Wi-Fi setting interface auto appears on APP, select the Wi-Fi router (see image 3) and enter the security details (if enabled in the router).Notes: in rare cases where the Wi-Fi setting interface does not auto appear, you can always restart the APP, then click the “setting” button – “WiFi setting” -”Scan”, then select the Wi-Fi router (see image 3) and enter the security details (if enabled).d. The intercom’s LED changes to blue, and paring is successful.
2.2 for iOS devices:
a. Use a pin to push the “pair” button (”reset”) and the LED blinks very fast (approximately 5 times/sec), and intercom alerts “pairing”; this mode lasts 100 seconds, if not successful, the intercom alerts “pairing failure”.b. Open “Setting” then “Wi-Fi” setting on your iOs device, the video intercom should be listed as a Wi-Fi hotspot, click it to connect to it (see image 2).c. Run “idoorphone” APP and click “Add Device” (see image 1). The video intercom alerts “paring success” and its status changes to “on line” (see image 5).d. The video intercom LED blinks slow from blue to red. The paring is successful.Note: before pairing, if outdoor unit is connected with WLAN by network cable, make smartphone’s Wi-Fi linked to this WLAN, click intercom’s “pair” button and APP’s “Add Device”, and do pairing.
3. Setting up Wi-Fi connection
In the “idoorphone” APP (device status is online), click “Settings”-“WLAN”(after successful paring, Android APP will auto jump to this setting )-“Scan” (as image 3), select the Wi-Fi router and enter security details. Touch “done” in top right corner.Then APP will be auto back to main interface. Intercom alerts “password setting correct”. And blue indicator light is on. After this, intercom’s Wi-Fi hotspot will be hidden.If Wi-Fi setting is wrong, intercom alerts “password setting incorrect”, APP returns to main interface and LED blinks slowly from red to blue.
4. Add Additional Device
a. When intercom is not connected to router: use a pin to push the “pair” button (”reset”), connect extra device’s Wi-Fi to intercom’s hotspot and click APP’s “Add Device” on the additional device. Video intercom alerts “paring success” and appears on APP interface (see image 5).b. After intercom is connected to router: use a pin to push the “pair” button (”reset”); connect smartphone’s Wi-Fi to router, which must be same one that intercom is linked to; click “Add device” on additional device’s APP.Note: one doorbell can add 4 smartphones and one smartphone supports connection with max 6 video intercoms.
image1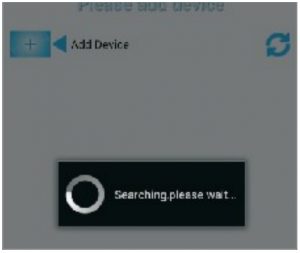 image2
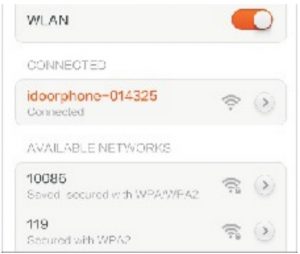 image3
 image4
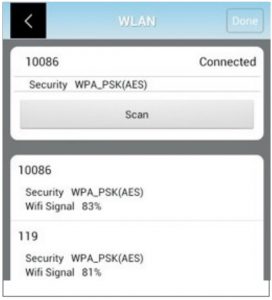 image5
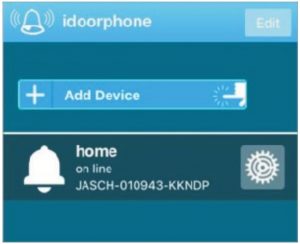
APP Function Introduction (Android Example)
1. Main Settings
Tap “settings” for each basic function setting( as shown image 6). Click “Done” button after each revision. Please note below settings can only be done when device is online.a. User settings: revise device’s admin password. The initial password “admin” (as image 7 shows).Note: after admin password is revised, device status will be offline. Enter the new password in “Edit” then device status will be online.
image6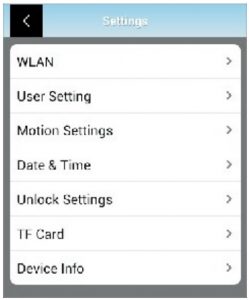 image7
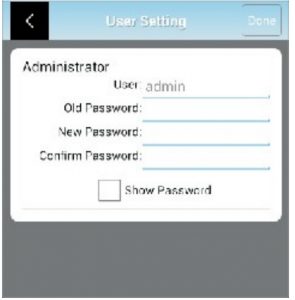
b. Motion Settings: enable or disable motion detection function and select sensitivity. (see image 8). “High” option is recommended.c. Date & Time: synchronize device’s time with mobile time. Click “Done” button after revision. ( view image 9)
image8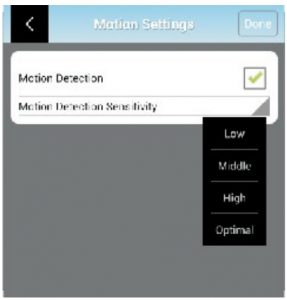 image9
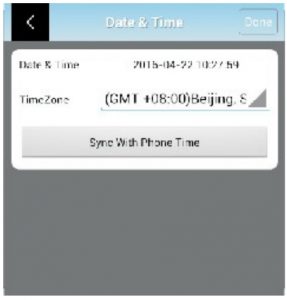
d. Unlock Settings: unlock password and unlock duration can be revised here. Click “Done” button after change. “Enable Pairing” button works as the “pair” button on the video intercom.e. TF Card: check capacity of TF card and reformat it.f. Image Setting: optional frequency 50Hz and 60Hz; if camera’s video flicks on mobile, please select 60Hz frequency.g. Device info: check doorbell software info and manually upgrade latest version.In device info, iOs APP has additional “Reset Push”. Click this button after each software upgrade to ensure push notification workable.
2. Edit
Device can be deleted(view image 10), name revised(view image 11) and new admin password input (see image 12).Note: admin password can only be revised on “User Setting”.
image10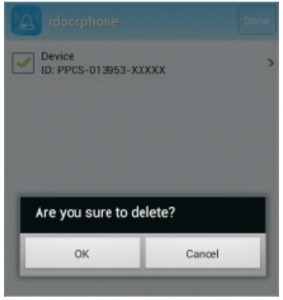 image11
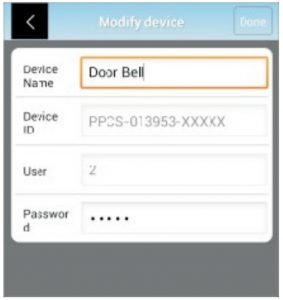 image12
3. Video Intercom
(see image 13)
An intercom dialog lasts 2 minutes. Each visitor ring lasts 30 seconds; if no response, the video intercom will prompt the visitor to leave a message.Sound button should be activated before unlock is enabled.
image13
4. Activity
Click ”Activity”and all activities can be previewed (included call, tamper alarm, motion detection, visitor messages, unlock and illegal unlock). Photos/videos can be directly browsed and videos be downloaded(view image 14).
image 14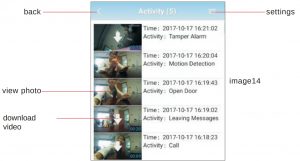
All call, tamper alarm, motion detection, visitor messages, unlock and illegal unlock will be recorded in Activity list iOs APP: if “1” appears in APP icon’s top right corner on iPhone screen, it means there is new activity. Check event details into Activity list; then “1” on icon will disappear.
Coded Access by Keypads
- This intercom supports two unlock ways via password inputa. Remote unlock by APP;b. Coded access by keypads.Only one unlock password exits. Unlock by APP works with original password(123456); but coded access by keypads is disabled with it.Note: a new unlock password should be set before keypad coded access works. Please refer to APP’s “Unlock Setting”.
- Unlock door by APPIn video intercom status, touch “unlock” icon(see image 13), input unlock password and click “ok” for confirmation; “lock opened” appears on APP. (In mute mode, unlock is disabled.)
- Unlock by Outdoor Unit.Enter unlock password on intercom’s keypads and confirm with “#” key.If password is correct: “lock opened” push notification will be sent to smart phone.If password is wrong: intercom alerts “password incorrect”. In case wrong password is continuously input 3 times, “illegal unlock” push notification will be sent to APP. If wrong password is continuously input 5 times, keypads coded access is disabled in 10 minutes before it normally works.
- Hidden Password InputCode access via keypads is hidden. For instance, if password is 888888, user can input “xxxxxx888888xxxxxx” (x can be random Arabic number; max 20 numbers can be identified) and confirm with “#” key. Intercom will auto recognize validpassword. If it is correct, then unlock is enabled.
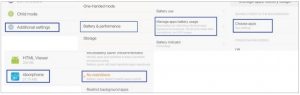
Mobile Settings
If phone screen is off and into long-time standby status, APP may stop running. Below settings may help.

- Disable “save battery” on APP idoorphone
- Enable “Allow notification” and “display on the lock screen”; disable “hide notification content when locked” and enable “ringtone and vibrate”.
- Enable “trust this APP”, “App auto-launch”, “record audio”, “access list of installed apps”
- Enable “microphone” and “storage” on APP idoorphone.
- Enable “mobile data”, “WLAN”, “background data”, “roaming data” and “ignore data usage” on APP idoorphone.
- Enable “APP auto-launch”; disable “power-intensive prompt” and “close after screen locked” on APP idoorphone.
- . Enable “memory cleanup whitelist” on APP idoorphone.


Installation
Installation Guide
Outdoor camera should be installed 1.4-1.7 meter above floor and avoided from direct sunshine.

Installation Instruction

a. Punch suitable holes on wall, put screw stopper and fix rain cover on the wall with screw;b. Connect power cable. Make power cable out from wall hole (ideal hole diameter: 16mm-30mm); pass cable from rain cover bottom and connect it to intercom’s power fconnetor.c. As above image, put outdoor camera from the top into rain cover, then push camera bottom and confirm its top tightly in rain cover. Fix intercom bottom with matching screws&driver and install screw cap.
Outdoor Unit Wire Connection with E-lock
 Switch signal output is optional. It works when intercom’s “call” button is pressed.Circuit must be revised by manufacturer if wired indoor chime is required to be connected to. Remark: max work current of e-lock can not exceed 2A
 Negative Unlock Signal
Connection with Wireless Chime
wireless chime(optional)

- Pairing with Wifi doorbel(1). In power off state, long press chime’s “right” key, and connect chime with power supply via USB cable. Indicator flashes fast from blue to red. It means chime is in paring state (pairing status lasts for 30 seconds).(2). Press call button of Wifi doorbell. Chime indicator flashes slowly from blue to red and music play. Pairing between chime and doorbell is finished.
- Melodies options and volume adjustment(1). Press “M” button and music will play; select melodies with “left” and “right” button.(2). Press “M” button. When chime beeps “gu~gu~gu”, chime volume can be adjustedby “left” and “right” button.
- Standby status and low battery statusIn standby state, blue indicator flashes every 10 seconds; red indicator is on when battery is low.
- Charge indicatorDuring charging, blue indicator is on then off. After full charge, blue indicator is on.
Installation Attention
- Avoid sheltering or covering camera’s light sensor;
- Protect camera from direct sunshine;
- Ensure correct wiring otherwise device can’t work normally.
Package List
1×video intercom, 1× wireless chime(option), 1×user manual, 1×warranty card, 1×quality certificate, 1×DC12V/1A charger, 1×DC cable, 1×power cable, 1×e-lock terminal pin, 1×install screws package
FAQ
- Paring failurea. iOs devices and some Android devices do not support Wifi auto search and link; manually connecting smartphone to intercom’s Wifi hotspot is necessary(see image 2). Then do pairing again.b. When additional mobiles need pairing to a same intercom, they must be connected with the WLAN that intercom links to.c. After intercom is connected to internet via network cable, smartphone’s Wi-Fi must be manually connected to the same WLAN before paring.
- Device status is offline or disconnected.a. Check whether intercom is connected with router (see if blue indicator is on) and confirm that wifi/3G/4G signal is available on smartphone.b. Ensure network speed about 50k/s under intercom. Poor network will cause disconnection and delay.c. Check whether network is available on router.
- Intercom status appears”user name or password incorrect”Admin password is revised and need log in with new admin password(see image 12).
- No response or notification from smartphone for visitor calls.a. Android devices: check whether network is available to both intercom and smartphone; and whether APP is running.b. iOs devices: check whether network is available to intercom and smartphone.
- Frequent alerts from motion detectionTap “settings” on APP, select “Alarm Setting”, then choose “High” sensitivity.
- No push notification for iOs devicesa. Click “settings” button on iphone/ipad, click “notification” button and enable “allow notifications” for APP “idoorphone”.b. After intercom’s software upgrade, resetting push notification is necessary .Detailed steps as below: tap APP’s “setting” button, click “device info” and “reset push”button. It will take about 10 seconds to finish resetting.
- Activity list is not available normallyTF card works abnormally. Format TF card and re-boot intercom
WiFi Video Doorbell TL-WF02 User Manual – WiFi Video Doorbell TL-WF02 User Manual –
[xyz-ips snippet=”download-snippet”]