
Hobo MX Gateway MXGTW1
Download the app
If you are using an iPhone® or iPad®:Download HOBO-mobile® from the App Store®![]()
If you are using an Android™ phone or tablet:Download HOBO-connect® from Google Play™.![]()
Power up the gateway.
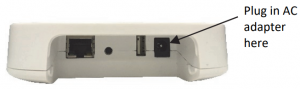
- Insert the appropriate plug for your region into the AC adapter. Connect the AC adapter to the gateway and plug it in.

- Wait for the gateway to boot up and appear in the app. While the gateway boots up, the LED on the gateway will start as solid yellow and then switch to blinking yellow. It will take 4 to 5 minutes before the gateway appears in the app.
Create a HOBOlink® account.
Go to www.hobolink.com and create an account if you don’t already have one. You will receive an email to activate the new account.
Set up the gateway with the app.
HOBOconnect instructions
- Tap the Settings icon.
- If your HOBOlink account is not already connected to HOBOconnect, tap Connect Account. Enter your HOBOlink username and password and tap Connect.
- Make sure the Upload Data toggle is enabled.
- Plug in the Ethernet cable if you device is using Ethernet.
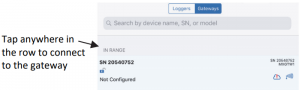
- In HOBOconnect, tap Devices and find the gateway by searching or scrolling through the tiles. If the gateway does not appear, make sure it is completely powered up as described in step 2 and within range of your phone or tablet.
- Tap the gateway in the app to connect to it.
- Once connected, tap at the bottom of the screen to configure the gateway.
- Enter a name for the gateway. The gateway serial number will be used if no name is entered.
- If the Ethernet connection is using DHCP (dynamic IP addresses), then skip to step g.
- To set up Ethernet with static IP addresses, tap Ethernet Configuration, tap DHCP toggle to disable DHCP. Fill in the
- networking fields and tap Save. Consult your Network Administrator as needed. k.
- To set up Wi‐Fi, tap Wi‐Fi Configuration, tap Current Network or type a network name. Enter the password for the network and tap Save.
- Tap to save the new configuration settings to the gateway.
 at the bottom of the screen to configure the gateway.
 to save the new configuration settings to the gateway.
HOBOmobile instructions
- Tap the Devices icon and then tap Gateways at the top of the screen.
- Tap Use MX Gateways (or go to Settings and then tap HOBOlink).
- Enter your HOBOlink username and password and tap Done. (Enable Upload Data if you are not prompted for the username and password.)
- Select “from a Gateway” for the default HOBOlink upload setting.
- Tap Devices and then tap Gateways at the top of the screen. Tap the gateway to connect to it. If the gateway does not appear, make sure it is completely powered up as described in step 2 and within range of your phone or tablet.
- To set up WiFi:i. Tap Network Settings.ii. Tap WiFi and then the arrow to open WiFi Settings.iii. Select Use Current WiFi Network to use your phone or tablet’s existing WiFI SSID and then type your password. Tap Save.iv. The gateway will automatically test the network connection after saving the settings. The cloud icon in HOBOmobile will display a green checkmark once the network settings have been successfully configured. If a message appears in the app prompting you to cycle the power on the gateway, follow the instructions and remove the power cord and then plug it back in after a couple of seconds. If the test is not successful and this icon still appears , make sure all your settings are entered correctly and saved.
- To set up Ethernet:Plug in an Ethernet cable. The network settings are automatically configured if your Ethernet connection is using DHCP (dynamic IP addresses). The cloud icon inHOBOmobile will display a green checkmark.If your Ethernet uses static IP addresses and this icon appears :i. Tap Network Settings. Tap Ethernet and then thearrow to open Ethernet Settings.ii. Disable DHCP.iii. Tap IP Address, Subnet Mask, and Router to edit the addresses (consult your Network Administrator). Tap Add DNS Server and enter an address. Repeat if necessary (the app can store up to three DNS server addresses).iv. Tap Save.
- Tap Configure (connect to the gateway again if needed).
- Enter a name for the gateway. The gateway serial number will be used if no name is entered).
- Tap Start.
Set up and start loggers.
MX series loggers must be configured to use them with the gateway. If any of your loggers are already logging, you will need to reconfigure them as described in the following steps.Note: MX100 series loggers are not supported by the gateway. Contact Onset Technical Support for questions on MX100 logger compatibility with the gateway. MX2001 and MX2501 loggers are only supported by HOBOmobile.
To configure a logger for use with the gateway
- Tap the Devices icon in the app. (In HOBOmobile, tap Loggers at the top of the screen.)
- Tap the logger in the app to connect to it.
- Tap Configure in HOBOmobile or tap in HOBOconnect.
- Make sure “from a Gateway” is checked under Upload Data to HOBOlink In HOBOmobile or select Gateway for the “Upload Data via” configuration setting in HOBOconnect.
- Choose other logger settings keeping in mind the following:i. A logging interval of 5 minutes or slower is optimal for the gateway, although it can support a logging interval down to 1 minute.ii. If you select a logging interval faster than 1 minute, the data logged at the faster rate will not be available for the gateway to upload. Use the app to read out the logger and retrieve this data.iii. Burst logging and statistics are not supported by the gateway. Use the app to read out the logger and retrieve this data.iv. For MX1104, MX1105, MX2200, and MX2300, and MX2501 loggers, Bluetooth is automatically enabled to ensure regular gateway uploads can occur.v. The gateway uses Bluetooth Low Energy to communicate over the air with loggers within range. If MX2200 or MX2501 loggers or the top end of an MX2001 logger is deployed in water, the gateway will not be able to communicate with them.
- Tap Start. For additional help with the app, refer to the user’s guide available from About or at www.onsetcomp.com/support/manuals.
Deploy the gateway.
- Select a location for the gateway that is near an AC outlet and an Ethernet port (if using Ethernet) or within range of your WiFi router (if using WiFi).
- The gateway can support up to 100 loggers within transmission range, which is approximately 30.5 m (100 ft) with full line‐of‐sight. If there are obstacles between the gateway and the loggers, such as walls or metal objects, the connection may be intermittent and the range between loggers and the gateway will be decreased. Test the range by positioning your phone or tablet where you want to deploy the gateway. If the phone or tablet can connect to a logger with HOBOmobile from that location, then the gateway should be able to connect to the logger as well.
- Use the enclosed mounting kit to mount the gateway to a flat surface. See the full product manual for details on installing the mounting hardware as well as additional deployment guidelines.
Export and view data in HOBOlink.
After you set up your gateway and loggers, the gateway will regularly check loggers within range and upload data to HOBOlink. Log into your account at www.hobolink.com to export and view data.
To export data collected with the MX Gateway:
- In HOBOlink, select Data and then Exports.
- Select Create New Export.
- Select to the right of Devices and Sensors to see any available data.
- Choose the data you want to export (and choose any other settings) and select Export Data.
To view data collected with the MX Gateway:
- In HOBOlink, select Dashboards.
- Select Create new dashboard.
- Select under Devices to see any available data channels.
- Select the data channel you want to view for a sample Line Chart dashboard.
- Select Save at the top to save the new dashboard.
To create other dashboard types on the same page:
- Select a dashboard type icon at the top of the page.
- Select on the new blank dashboard widget.
- Type one or more data channel names.
- Select Save to populate the new dashboard widget with data.
- Select Save again at the top to save the dashboard.

![]() 00353(0)61603742
00353(0)61603742
References
[xyz-ips snippet=”download-snippet”]