![]() DJI FPV versionUser Manual & Setup Guidev1.0
DJI FPV versionUser Manual & Setup Guidev1.0
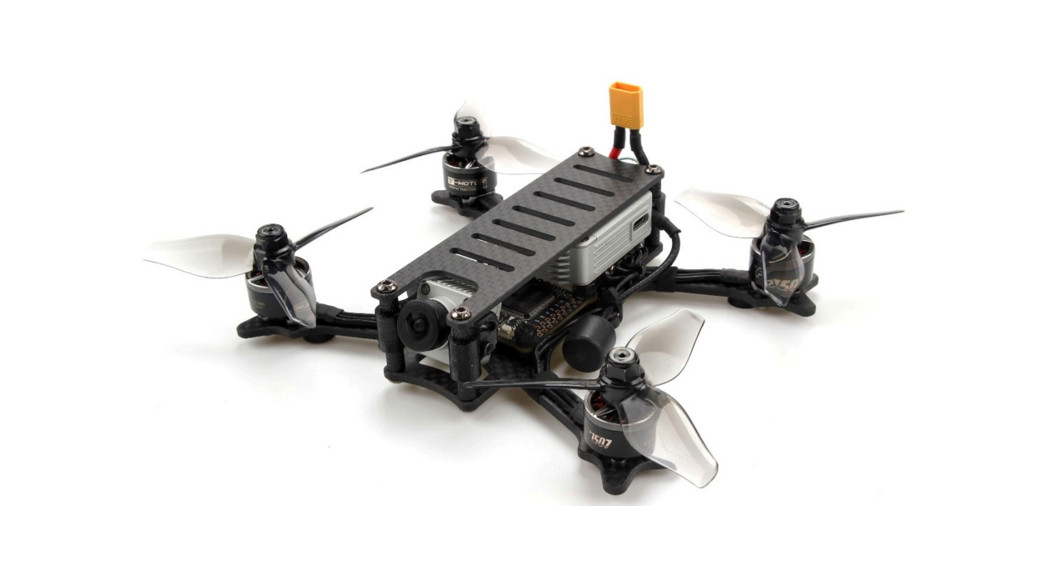
Overview
Features
- Frame:3mm 3k carbon fiber
- Flight Controller:Kakute F7 HDV
- ESC:Tekko32 F3 4in1 45A mini ESC
- VTx:DJI FPV Air Unit
- Motor:F1507 KV3800
- Propeller :T3140
- Buzzer included.
- Battery plug: XT30
- Wheelbase: 148.6mm
- Weight:198g(included DJI air unit )
- Recommend battery: 650mah~1300mah 4s
Specifications
- MCU: STM32F745 32-bit processor
- IMU: MPU6000 (SPI)
- Barometer: BMP280
- USB VCP Driver (all UARTs usable simultaneously; USB does not take up a UART)
- 6 hardware UARTS (UART1,2,3,4,6,7)
- All UARTS support hardware inversion. SBUS, SmartPort, and other inverted protocols work on any UART without “uninvent hack”.
- Supports serial receivers (SBUS, iBus, Spektrum, Crossfire) only. PPM and PWM receivers are not supported.
- TF card for Blackbox logging
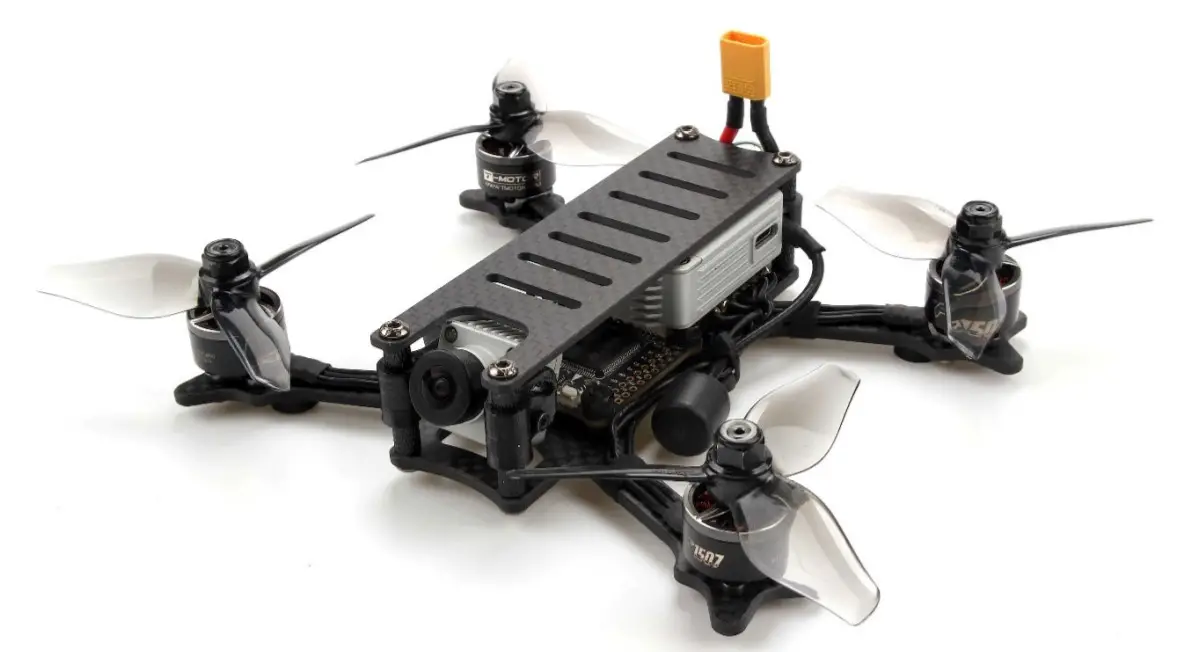
Includes:
- 1x Kopis mini FPV racing drone
- DJI FPV Air Unit(Optional)
- 4x T3140 Propeller
- 1x Carrying case
- 1x Battery strap(installed)
Warranty and Return Policy
If you believe that your KOPIS is defective, please contact us. If we determine that the board is defective, it will be repaired or replaced at no charge to you. We may ask you to send your KOPIS to our service center for examination or repair. Shipping costs are your responsibility. Returned items shouldinclude the original packaging and all accessories.If the product is damaged or defective, we will repair or replace it. Refunds are only given when a product is lost by the shipping company. The refund amount is limited to the price of the product. Shipping costs are never refundable.Contact us at:
- Email: [email protected]
- Facebook Page: Holybro
- Facebook Group: Holybro Shuriken Owner Group
SPARE PART LIST
DJI FPV Air Unit(Optional)
The DJI FPV Air Unit is an advanced video transmission module that supports a 5.8GHz digital video signal and 720p 120fps image transmission, with a transmission range of up to 4 km and a minimum end-to-end latency within 28 msActivationWhen powered on, connect the air unit to your computer and run DJI ASSISTANT 2 for activation.Download DJI Assistant 2 at https://www.dji.com/fpv/info#downloadsLinkingThe air unit support three linking methods: A, B, and A+B (Must link A before B)
- Power on the air unit and the DJI FPV Goggles.
- Press the link button on the air unit and the goggles.*
- The linking status indicator of the air unit turns solid green.The goggles stop beeping when successfully linked and the video display is normal.
- Power on the air unit and the DJI FPV Remote Controller.
- Press the link button on the air unit and then press the record button, C button, and right dial on the remote controller simultaneously.*
- Both the linking status indicators turn solid green when successfully linked.*When ready to link, the devices will give the following indication: Air unit: the linking status indicator turns solid red.Goggles: the goggles beep continually.Remote controller: the remote controller beeps continually and the status indicator blinks blue.
Please refer to the DJI QSG for more details.
Install Betaflight
Although your KOPIS comes from the factory nearly completely ready to fly, you still need to install the Betaflight configurator on your computer so that you can make sure your transmitter is configured correctly. If you purchased the Plug-N-Fly version of the KOPIS, you also may need to use the configurator to bind your receiver.
Install BetaflightAlthough your KOPIS comes from the factory nearly completely ready to fly, you still need to install the Betaflight configurator on your computer so that you can make sure your transmitter is configured correctly. If you purchased the Plug-N-Fly version of the KOPIS, you also may need to use the configurator to bind your receiver.Installing DriversIn order to connect to your KOPIS, you must get the Betaflight drivers installed on your computer. If you are on MacOS or Linux, Your O/S comes with the drivers you need pre-installed. You do not need to perform this step. You may skip directly to “Installing Betaflight Configurator”.If you are on Windows, you must install the drivers manually. This is a place where beginners often struggle. We’re going to present the steps here, and if you can follow them, then great, but many people won’t be able to follow them. If you need a more personal approach, here is a link to a video that walks you through the process in more detail.
In order to connect to your KOPIS, you must get the Betaflight drivers installed on your computer. If you are on MacOS or Linux, Your O/S comes with the drivers you need pre-installed. You do not need to perform this step. You may skip directly to “Installing Betaflight Configurator”. If you are on Windows, you must install the drivers manually. This is a place where beginners often struggle. We’re going to present the steps here, and if you can follow them, then great, but many people won’t be able to follow them. If you need a more personal approach, here is a link to a video that walksyou through the process in more detail.
All About Betaflight Drivers, Including How to Install Themhttps://www.youtube.com/watch?v=m4ygG6Y5zXI
The video linked above shows a process of using Zadig to replace the VCP driver. The impulse Driver Fixer is an easier way of doing the same thing. The instructions below will show how to use the ImpulseRC Driver Fixer.Here are the steps you will perform:
- Download the Virtual COM Port (VCP) driver installer from here. Unfortunately, you must either create a login or give them your email address, then wait for them to email you a link, to download the actual installer. We recommend that you create a user login because the “send you a link in an email” method sometimes takes a long time to go through.a. To create a login at the STM site, first go to this URL.b. Click “Create an Account”c. Enter your information on the next page and click “Register”d. You will receive a confirmation email. Complete the confirmation process.e. Log in to the STM site using the login you just created and download the VCP driver the installer from the link in step 3.
- Run the VCP installer and let it finish.
- Download the ImpulseRC Driver Fixer from here.
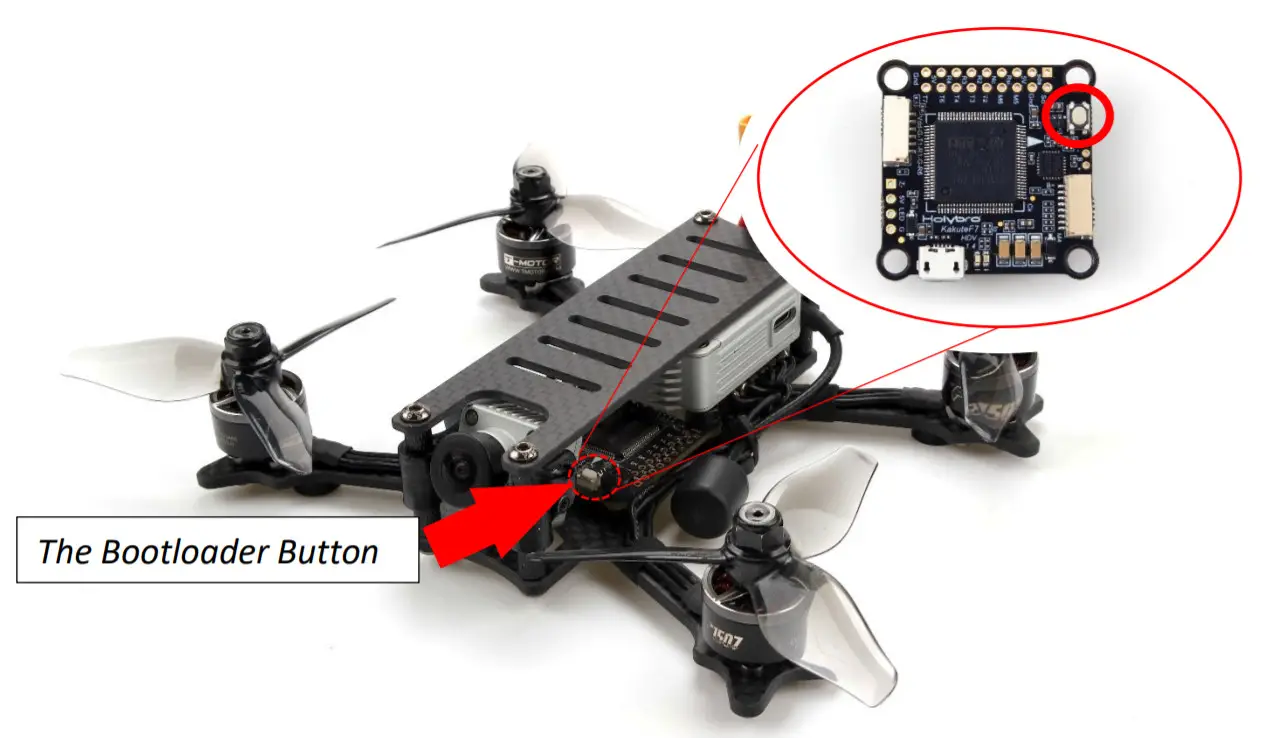
- Run the ImpulseRC Driver Fixer. It will instruct you to plug in your flight controller.
- While holding down the bootloader button on the Kakute F7, plug it into your PC via USB. The ImpulseRC Driver Fixer should complete successfully. The bootloader button is quite small. Use a plastic tool to press it. If you use a metal tool like a screwdriver tip, be careful not to damage it. Use the flat of the tool and not the tip.
Is It Over Yet?
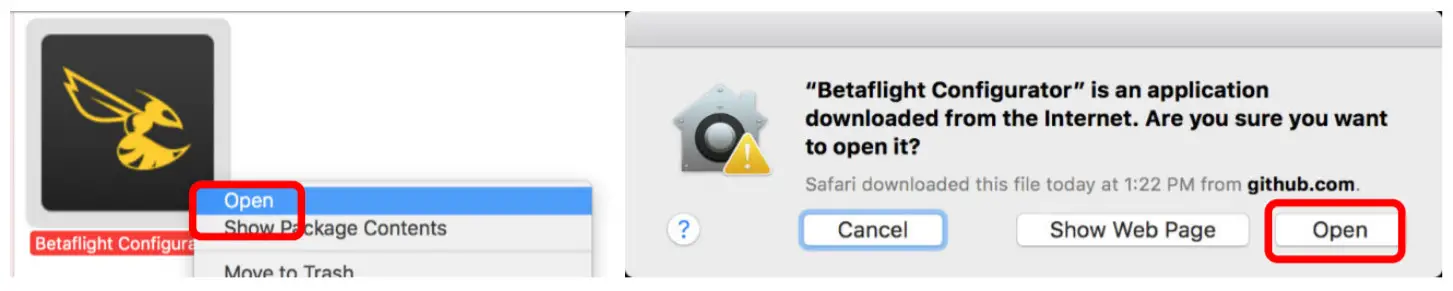
THAT WAS SUPER ANNOYING WASN’T IT. Yes… we know.The good news is, you do not need to repeat this process again. Sort of. You never need to install the drivers again on this computer, unless you reinstall the operating system for some reason. If you use another computer for the first time, you will need to install those drivers on it. Also, you may need to rerun the ImpulseRC Driver Fixer sometimes when you go to flash the board. If you try to flash the board and it fails, repeat steps 4 and 5 above.Installing Betaflight ConfiguratorBetaflight is managed using the Betaflight Configurator application, also known for short as the Betaflight GUI, or just, “The GUI”. (GUI is pronounced “gooey” in case you wondered. Only weirdos say, “Gee You Eye”.) Download the Betaflight Configurator application here:https://github.com/betaflight/betaflight-configurator/releases This is a standard application package for Windows, MacOS, or Linux. After you download it, install and run it the same as any other application.On macOS you must give the application permission to run and access the network. The simplest way to do this is to right-click the installer and choose Open. A security prompt will appear asking, “Are you sure you want to open it?” Click Open on this prompt and the relevant configuration changes will be made automatically.
Set up Aux Mode in Betaflight
- REMOVE THE PROPS FROM YOUR KOPIS. Seriously. DO NOT SKIP THIS STEP.
- In Betaflight Configurator, go to the Modes tab. Click “Add Range” next to the Arm tab. The screen will change to look as shown below. Change the pull-down menu from “AUTO” to “AUX 1” as shown below.

- Turn on your transmitter. Plug in a LiPo. The small yellow indicator will move to indicate the current position of the Aux1 channel.
- Put your arm switch in the position you intend to use as “armed”. You should see the yellow indicator move as you move the switch. (This won’t work if you haven’t bound your transmitter, of course.) The common standard is to use “switch pushed away from you” as the neutral position on a transmitter. By this logic, “switch pulled towards you” should be armed. My personal preference is to use “switch pulled towards you” as disarmed because it’s easier to slap the switch that direction if you are trying to disarm in a hurry.
- With the switch in the “armed” position, drag the yellow range marker to the end of the channel where the yellow indicator is.
- Click “Save” in the lower-right of the window. YOUR MOTORS MAY NOW START SPINNING I SURE HOPE YOU REMOVED YOUR PROPS!
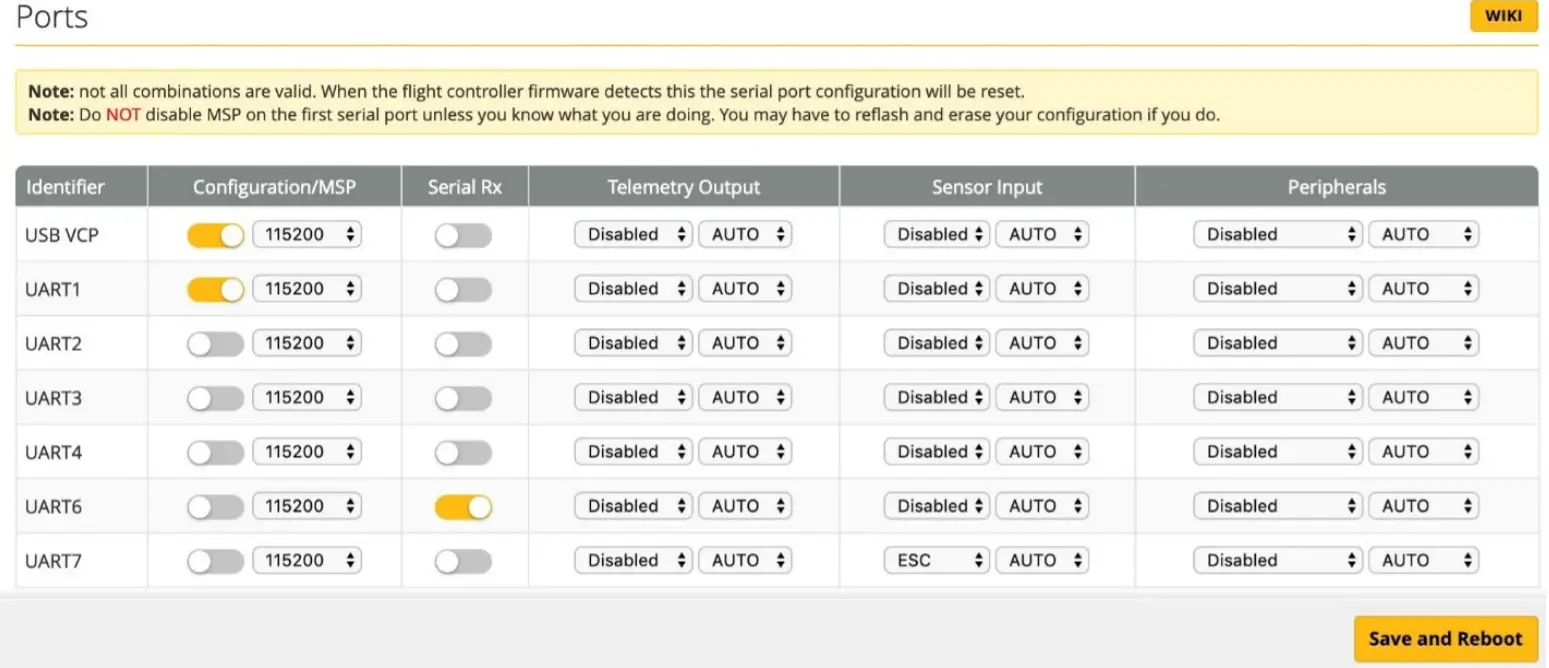
PortsClick on the “Ports” tab on the left side of the window.
Install the Props
If the props are not installed correctly on a quadcopter, it will FLIP OUT when you try to fly. This can damage the quadcopter. It can also damage property and injure people. Here is how to install the props correctly.Props for a quadcopter come in clockwise (CW) and counter-clockwise (CCW) directions. The prop must be installed on the motor that is spinning in the correct direction. Props have a top side and a bottom side. The top side must face up.Finding the top side of a prop is easy. The prop will have lettering embossed on it, such as “5x4x3”. The lettering is always on the top side. With practice, you can come to recognize the shape of the airfoil and identify the top of the prop without looking for the lettering.The lettering on the prop will also indicate its direction. Props labeled with an “R”, such as, “T3140R” are clockwise rotation (CW). Props labeled without an “R”, such as “T3140” are counter-clockwise rotation (CCW). Instead of memorizing (and then forgetting) this fact, we strongly advise you to learn to recognize a prop’s direction from its structure.If you look at a prop blade, you will see that there is a high edge and a low edge. The blade is designed to spin in the direction that the high edge is facing. Think about a fan-blade pushing air. The prop is going to push air down so that thrust is generated to push the quadcopter up. Think about which way the prop is going to push air if it spins one way vs. the other. Seriously. Go get a prop right now and spend some time looking at it and thinking about which way it will push air depending on which way it spins.The default motor directions for a Cleanflight or Betaflight quadcopter are shown to the left. Based on this, the correct way to install the props is as shown. Notice that the high edge of the prop blade faces the direction that the prop is spinning. Notice that the high edge of the prop blade faces the center-line of the quad on the front and back of the quad. This is the simplest way to remember how to install the props correctly.
Saving Your Configuration
Once you have finished building, configuring, and tuning your multirotor, it’s a good idea to back up your configuration so that you can restore it later. This is useful if you lose your quad, or if you damage your flight controller, or if you accidentally lock yourself out of your flight controller and must reset it to get back in.Before we show you the right way to save and restore your configuration, let us warn you about the wrong way. Betaflight and Cleanflight have “save configuration” and “restore configuration” buttons. Without going into too much detail, they have some significant drawbacks that mean we don’t recommend that you use them.The correct way to save your configuration is as follows.
- Connect your Kakute to your PC by plugging in a USB.
- Start the Betaflight GUI app.
- Go to the CLI tab.
- In the text box at the bottom of the CLI, type “diff all” and hit enter. This will cause the flight controller to display all configuration options that you have changed from the default values.
- In the lower-right corner of the configurator, click the “Save to File” button.
- Save the file somewhere you won’t lose it.
To restore your configuration, do this:
- Open the text file in your text editor.
- Highlight the entire contents of the file.
- Right-click in the text editor window and choose “Copy”.
- Connect your Kakute to your PC by plugging in a USB.
- Start the Betaflight GUI app.
- Go to the CLI tab.
- Click the mouse once in the text box at the bottom of the CLI tab to place the cursor there.
- Instead of typing any commands, right-click in the text box and choose “Paste”.
- Press the Enter key on your keyboard. The pasted-in text will rapidly scroll past.
- Type “save” in the text box at the bottom of the screen.
- Press Enter. The flight controller will reboot and the configuration will be restored.
Pre-Flight Check
For safety, here are steps that you should perform before EVERY pack you fly. Yes, there are a lot of them. There are a lot of steps before a fighter pilot takes off in his jet, or an F1 driver starts up his car. This is no different.
- Turn on your controller.
- If the controller has multiple model memories, confirm that the correct model is selected.
- If you use switch arming, confirm that the arming switch on the transmitter is in the “disarmed” position and throttle is all the way down.
- If you crashed last time you flew, perform a physical inspection of the quad for damage.
- If you just installed any props, confirm that props are installed correctly. Yes, I know you’re sure you put them on correctly. CHECK IT AGAIN. Trust me.
- Confirm that prop nuts are tight enough that a prop cannot spin without some effort. They don’t need to be gorilla-tight. Just tight enough that the prop doesn’t slip in flight.
- Check LiPo battery voltage. A fully-charged LiPo should be about 4.2 volts per cell, or about 12.6 volts for a 3S, or 16.8 volts for a 4S.
- Install the LiPo on the bottom of your KOPIS using the battery strap.
- Secure the balance lead so that it can’t be struck by the props. For example, twist the balance lead around the discharge lead and tuck the balance plug between the red and black wires of the discharge lead.
- Route the main LiPo discharge lead so that it cannot be struck by the props. This might involve twisting it to take up the slack or wrapping it in the battery strap. The exact way of doing this will vary depending on the length of your battery lead.
- Look in your FPV goggles or screen to see if anybody is transmitting on your channel. If they are, stop. Do not power up.
- Scan the flight area for any safety issues that might be present, such as people or dogs. A spotter should always be watching the flight area while you fly.
- Plug in the LiPo. Imagine that, the instant you plugged in the battery, the motors went to full power. How would you want to be holding the quad when that happened? One approach is to turn the quad upside down while plugging in the battery. This works especially well for bottom-mounted batteries like the KOPIS. 14. After plugging in the LiPo, set your KOPIS down and do not move it for a few seconds until you hear the three beeps that indicate the gyro has calibrated.
- Verify that you have clean, strong video in your FPV goggles or screen. If you see interference or you see another pilot’s feed, resolve this issue before flying.
- Arm the quad. Listen for the props hitting anything like an antenna or the battery wire. Check your video for any signs of issue like increased noiseor degraded video quality.
- Take off and fly. If you have just performed a repair on the quad, or if this is a new build, fly conservatively until you have verified that everything is working as intended. Fly low o the ground and close-in. Be prepared to disarm immediately if you lose video or lose control of the quad for any reason.
Quadcopter Safety
Quadcopters are incredibly powerful machines. Their props can seriously injure you. Operating your quadcopter safely is up to you! This isn’t intended as a complete safety manual, but here are a few guidelines we think are worth mentioning.Arming SwitchWe firmly believe that a switch is the safest way to arm and disarm your quadcopter because it allows you to quickly and confidently disarm the quad when you need to. However, arming switches have a risk: you can very easily bump the switch and arm the quad when you didn’t intend to. The most common way this happens is if you have your transmitter dangling around your neck as you pick up your quad after a flight.
Taranis Safer Switch Arminghttps://www.youtube.com/watch?v=bv3VJ1jznw8
The best way to avoid this is to set up a two-stage arming switch. A video showing how to do this on Taranis has been linked above. There are various other ways to accomplish the same thing on other transmitters.If you don’t want to set up a two-stage arming switch, the next best thing is to raise your throttle immediately after you disarm. Betaflight will not let the quad arm if the throttle is raised. So raising the throttle is like your safety switch. Make a habit of, “Flip the switch, then raise the throttle,” every time you disarm.There is one catch with this technique. If you raise the throttle, then flip the arm switch, the quad won’t arm. However, if you then lower the throttle, the quad will arm immediately, as soon as the throttle touches bottom. The workaround for you should be that your “arming procedure” is always: verify switch disarmed, lower throttle, flip switch to arm. If you watch old-timers who have been doing this forever, you may even see them carry their transmitters with their finger resting on the arm switch, holding it in the disarmed position. This is a great habit to develop.
Safe Handling
It’s easy to become complacent when handling quads. They usually don’t do anything unexpected. But they are incredibly powerful and dangerous and can cause serious injuries. EVERY SECOND THAT YOUR BATTERY IS PLUGGED IN, you should treat your quad like the dangerous machine that it is. Keep your fingers out of the props. Think about what way the quad would fly if the props suddenly spun up. Carry the quad by the bottom plate or battery, facing away from yourself. Always unplug the battery before picking up the quad, or immediately afterward. Always plug the battery in just before setting the quad down. And for goodness sake, if your quad is doing something weird, don’t “test-fly” it in your living room. Your ceiling will thank you.FailsafeFailsafe is what happens when you fly too far away or your receiver gets disconnected from your flight controller. If you don’t configure failsafe, the quad could fly away, or it could crash into something… or someone.
 report this ad
Failsafehttps://www.youtube.com/watch?v=dikr9oDzQqc
References
STSW-STM32102 – STM32 Virtual COM Port Driver – STMicroelectronics
Cleanflight Failsafe Configuration Overview – YouTube
Betaflight / Cleanflight Flight Controller Won\’t Connect | FIXED – YouTube
impulserc.blob.core.windows.net/utilities/ImpulseRC_Driver_Fixer.exe
Releases · betaflight/betaflight-configurator · GitHub
DJI Digital FPV System – Product Information – DJI
my.st.com
Safer Switch Arming on FrSky Taranis – YouTube
[xyz-ips snippet=”download-snippet”]