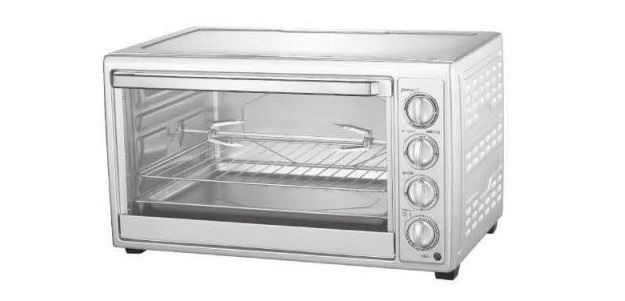
home CO 45L Convection Oven
User Manual

IMPORTANT SAFEGUARDS
When using electrical appliances, basic precautions should always be followed, which includethe following:
- Read all instructions before use or cleaning.
- Close supervision is necessary when any appliance is used near children.
- Do not immerse cord, plug, or any prn1 of the appliance in water or other liquids.
- Do not let cord hang over edge of table or counter, or touch hot surfaces.
- Do not operate appliance with damaged cord or plug or a Her the appliance malfunctions, or has been damaged in any manner. If the appliance is damaged or broken, do not repair yourself; if the power cord or the plug is broken or damaged. do not repair or change yourself, please send the appliance to qualified service centre for repair or service.
- When operating the oven, keep at least 10c m of space on al l sides of the oven to allow for adequate air circulation.
- To disconnect, tum the Heating selector di al (3 ) and the Timer selector dial (4) to OFF position. before disconnecting from mains power.
- Unplug from outlet when not in use and before cleaning. Always hold the plug, never pull from power the cord.
- A I low the appliance to cool before pulling on or taking off parts, and before cleaning.
- Extreme caution must be used when moving an appliance containing hot oil or food.
- Do not cover any part or the oven with metal or cloth, it may cause overheating or the oven.
- Do not place any item on the oven or cover the oven.
- Us e extreme caution when removing tray or disposing of hot grease or other hot liquids.
- Never leave the appliance unattended when in use.
- Do not place oversized foods or metal utensils into the appliance as they may cause a fire or increase the risk of an electric shock.
- Extreme caution should be exercised when using containers constructed of anything other than metal or ceramics.
- Do not place any or the following materials in the oven: plastic, paper, or anything similar.
- Do not use any accessories other than the accessories supplied with the oven.
- Always wear protective, insulated oven gloves when inse1ting or removing items from the hot oven.
- Do not use this appliance for any use other than its intended use.
- This appliance is for HOUSEHOLD USE only, not for commercial use.
- The glass door is heavy, please hold the handle until the door is completely open, do not let the door fall itself or it can cause the glass 10 shatter.
- Children should be supervised lo ensure that they do not play with the appliance
- This appliance is not intended for use by person (including children) with reduced physical, sensory or mental capabilities. or lack of experience and knowledge, unless they have been given supervision or instruction concerning use of the appliance by a personresponsible for their safety.
- If the supply cord damaged, it must be replaced by qualified electrical person in order to avoid a hazard or the product must be disposed.
- CAUTION! The temperature of accessible surfaces may be high when the appliance is operating.
- This appliance is not intended to be operated by means of an external timer or separate remote-control system.
- CAUTION! hot surface. Care must be taken. The surfaces are liable to get hot during USC.
ACCESSORIES:
* BAKE PAN* BAKE RACK* ROTISSERIE SPIT & HANDLE* PAN HANDLE
LIST OF COMPONENTS
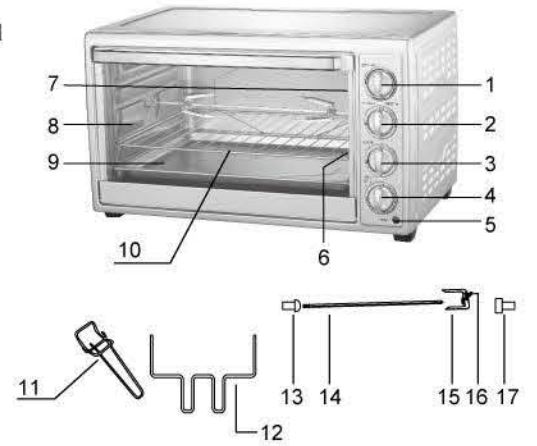
1. Thermostat dial2. Rotisserie & Convection selector dial3. Heating selector dial4. Timer5. Power light6. Convection (Inside)7. Lamp (Inside)8. Glass door9. Bake pan10. Hake rack11. Pan handle12. Rotisserie handle13. Spit support14. Spit15. Skewer16. Thumbscrew17. Drive socket
ROTISSERIE & CONVECTION DIAL
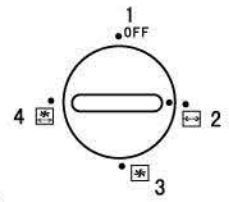
1. OFF2. Rotisserie3. Convection4. Rotisserie & Convection
HEATING SELECTOR DIAL
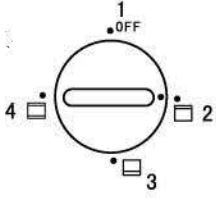
1. OFF2. Top heating3. Bottom heating4. Top & Bottom heating
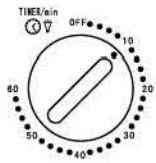
TIMER DIAL (INSIDE LAMP)
When timer is turned on, the inside lamp is ON .When timer is turned off: the inside lamp is OFF.
BEFORE USE
- Ensure that there is enough ventilation around the oven.
- Ensure that the oven is completely dry before use.
- The oven should not be placed on untreated wooden surface or surfaces that can get damaged from heat. Place the oven on a heat resistant surface.
- The feet of the oven can leave so me marks on the table. If this happens, remove the marks with a damp cloth.
OVEN USE
- Turn the thermostat di al clockwise to the desired temperature.
- Turn the Rotisserie/convection selector dial 10 the desired position.
- Turn the Heating selector dial to the desired position.
- Turn the timer dial clockwise to the desired cooking time.
- The power light will light up after timer is turned on, and will go out when the timer is turned to Off.
- When the cooking time is over. the timer will auto shut off and the bell will ring.
- If the cooking is finished earlier than the set cooking time, please turn back the timer to OFF to tum off the oven.
- In the first use of this oven, there might be some light smoke/odour coming out from the oven. This is normal. After 5-10 minutes of use, the smoke/odour will disappear.
- In order to get better cooking performance, it is recommended to pre-heat the oven for about 10-15 minutes with the them10stat set to half position.
ROTISSERIE USE
- Put one skewer through the pointed end of the spit, making sure the points of skewerface towards the spit’s pointed en d. Slide the skewer towards the square end of the spit.
- Insert the spit directly through the center of the food which you want to roast.
- Put the other skewer through the pointed end of the spit, making sure the points or skewer face the spit’s square end.
- Put the two skewers into the food. then secure both skewers with the thumbscrews.
- Make sure the food is centered on the spit.
- Insert the pointed end of the spit into the drive socket, make sure the square end of the spit rests on the spit support.
- Plug in the oven to a mains power outlet.
- Set the thermostat to 250°C.
- Turn the timer to the desired cooking time, the power indicator will light up. Normally, it takes approximately 30 minutes to roast a 2.5Kg (5.51b) chicken.
- Set the selector to Rotisserie or Rotisserie & Convection setting, and the rotisserie will start rotating.
- When roasting is completed, tum bac k the timer selector dial to OFF position.
- Aller the oven has cooled down, place the hooks of the rotisserie handle under the grooves on both sides or the spit. Lift the right side or the spit first, move towards right side a little bit, so that the left side of the spit goes om of the drive socket. Then carefully move out the roasted food from the oven.
- Take the food off the spit.
GRILL COOKING
- Leave the oven door at half open.
- Turn the Heating selector dial to GRILL setting.NOTE: For GRILL setting, tum the Heating selector dial to position 2 top heating setting, and Rotisserie & Convection dial to position 3 Convection selling.
- Turn the temperature dial 10 250° C.
- Turn the timer dial to the desired grill time.
- When the grill cooking is done, turn back the timer lo OFF to turn OFF the oven.
AFTER USE
- Turn back the Timer to OFF.
- Turn the Heating Selector Dial to OFF.
- Turn the Rotisserie & Convection Dial to OFF.
- Unplug the appliance from the outlet.
- Wait until the oven is completely cooled down before any cleaning or maintenance.
MAINTENANCE AND CLEAN ING
- Disconnect the oven from mains power outlet and allow it to cool down completely before cleaning.
- Do not immerse the appliance in water or other liquid. All surfaces can be cleaned with a clean damp cloth.
- If stains still appear, it is recommended to use soap.
- Do not use abrasive cleaners or sharp utensils to clean the appliance.
- Clean the interior chamber with a clean damp cloth.
TECHNICAL SPECIFICATION
Voltage: 220-240V- 50/ 60 1-lzPower: 2000\VCapacity: 45L
12 Month Warranty
Thank you for your purchase from Kmart.
Kmart Australia Ltd warrants your new product to be free from defects in materials and workmanship for the period stated above, from the date of purchase, provided that the product is used in accordance with accompanying recommendations or instructions where provided. This warranty is in addition to your rights under the Australian Consumer Law.
Kmart will provide you with your choice of a refund, repair or exchange (where possible) for this product if it becomes defective within the warranty period. Kmart will bear the reasonable expense or claiming the warranty. This warranty will no longer apply where the defect is a result of alteration, accident, misuse, abuse or neglect.
Please retain your receipt as proof of purchase and contact our Customer Service Centre on 1800 124 125 (Australia) or 0800 945 995 (New Zealand) or alternatively, via Customer Help at Kmart.com.au for any difficulties with your product. Warranty claims and claims for expense incurred in returning this product can be addressed to our Customer Service Centre at 690 Springvale Rd , Mulgrave Vic 3170.
Our goods come with guarantees that cannot be excluded under the Australian Consumer Law. You arc entitled to a replacement or refund for a major failure and compensation for any other reasonably foreseeable loss or damage, You are also entitled to have the goods repaired or replaced if the goods fail to be of acceptable quality and t he failure does not amount to a major failure.
For New Zealand customers. this warranty is in addition to statutory rights observed under New Zealand legislation.
[xyz-ips snippet=”download-snippet”]