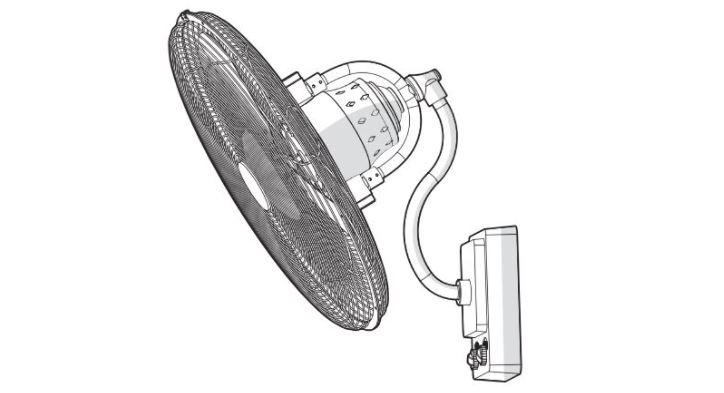
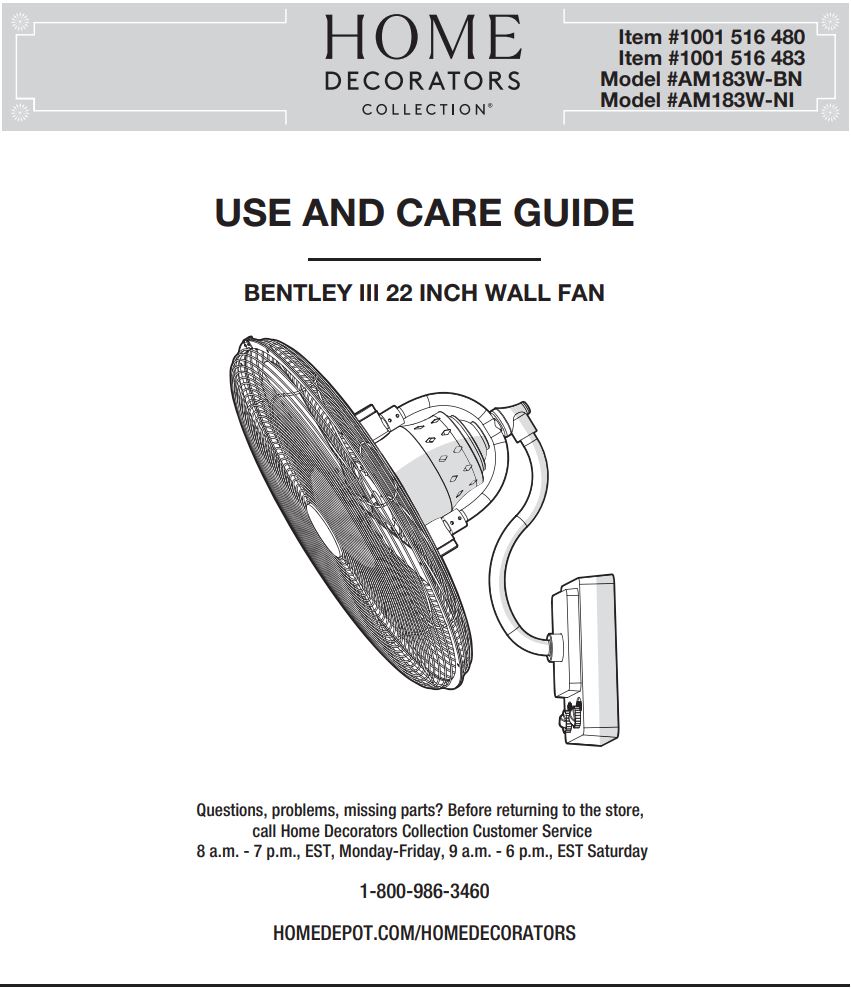
HOME DECORATORS COLLECTION AM183W-BN Bentley
III 22 Inch Wall Fan User Guide
THANK YOU
We appreciate the trust and confidence you have placed in Home Decorators Collection through the purchase of this wall fan, We strive to continually create quality products designed to enhance your homes. Visit us online to see our full line of products available for your home improvement needs. Thank You for Choosing Home Decorators Collection!
Safety Information
READ AND SAVE THESE INSTRUCTIONS
![]() WARNING: Do not insert foreign objects between rotating fan blades.
WARNING: Do not insert foreign objects between rotating fan blades.![]() WARNING: Risk of fire. Do not replace attachment plug. Contains a safety device (fuse, AFCI, LCD) that should not be removed. Discard product if the attachment plug is damaged.
WARNING: Risk of fire. Do not replace attachment plug. Contains a safety device (fuse, AFCI, LCD) that should not be removed. Discard product if the attachment plug is damaged.![]() CAUTION: Do not operate any fan with a damaged cord or plug. Discard fan or return to an authorized service facility for examination and/or repair.
CAUTION: Do not operate any fan with a damaged cord or plug. Discard fan or return to an authorized service facility for examination and/or repair.![]() CAUTION: Do not run cord under carpeting. Do not cover cord with throw rugs, runners, or similar coverings. Do not route cord under furniture or appliances. Arrange cord away from traffic area and where it will not be tripped over.
CAUTION: Do not run cord under carpeting. Do not cover cord with throw rugs, runners, or similar coverings. Do not route cord under furniture or appliances. Arrange cord away from traffic area and where it will not be tripped over.
- To reduce the risk of electric shock, ensure electricity has been turned off at the circuit breaker or fuse box before beginning.
- Avoid placing objects in the path of the blades.
- To avoid personal injury or damage to the fan and other items, be cautious when working around or cleaning the fan.
- Do not use water or detergents when cleaning the fan or fan blades. A dry dust cloth or lightly dampened cloth will be suitable for most cleaning.
- This product employs overload protection (fuse). A blown fuse indicates an overload or short-circuit situation. If the fuse blows, unplug the product from the outlet. Replace the fuse as per the user servicing instructions (follow product marking for proper fuse rating) and check the product. If the replacement fuse blows, a short-circuit may be present and the product should be discarded or returned to an authorized service facility for examination and/or repair.
Warranty
The manufacturer warrants the fan motor to be free from defects in workmanship and material present at time of shipment from the factory for a period of lifetime after the date of purchase by the original purchaser. The manufacturer warrants the light kit (excluding any glass), to be free from defects in workmanship and material present at time of shipment from the factory for a period of five years after the date of purchase by the original purchaser. The manufacturer also warrants that all other fan parts, excluding any glass or acrylic blades, to be free from defects in workmanship and material at the time of shipment from the factory for a period of two years after the date of purchase by the original purchaser. We agree to correct such defects without charge or at our option replace with a comparable or superior model if the product is returned. To obtain warranty service, you must present a copy of the receipt as proof of purchase. All costs of removing and reinstalling the product are your responsibility. Damage to any part such as by accident, misuse, improper installation or by affixing any accessories, is not covered by this warranty. Because of varying climatic conditions this warranty does not cover any changes in brass finish, including rusting, pitting, corroding, tarnishing or peeling. Brass finishes of this type give the longest useful life when protected from varying weather conditions. A certain amount of “wobble” is normal and should not be considered a defect. Servicing performed by unauthorized persons shall render the warranty invalid. There is no other express warranty. We hereby disclaim any and all warranties, including but not limited to those of merchantability and fitness for a particular purpose to the extent permitted by law. The duration of any implied warranty which cannot be disclaimed is limited to the time period as specified in the express warranty. Some states do not allow limitation on how long an implied warranty lasts, so the above limitation may not apply to you. The retailer shall not be liable for incidental, consequential, or special damages arising out of or in connection with product use or performance except as may otherwise be accorded by law. Some states do not allow the exclusion of incidental or consequential damages, so the above exclusion or limitation may not apply to you. This warranty gives specific legal rights, and you may also have other rights which vary from state to state. This warranty supersedes all prior warranties. Shipping costs for any return of product as part of a claim on the warranty must be paid by the customer.
Contact the Customer Service Team at 1-800-986-3460 or visit www.HOMEDEPOT.COM/HOMEDECORATORS
Pre-Installation
SPECIFICATIONS

TOOLS REQUIRED

HARDWARE INCLUDED
NOTE: Hardware not shown to actual size.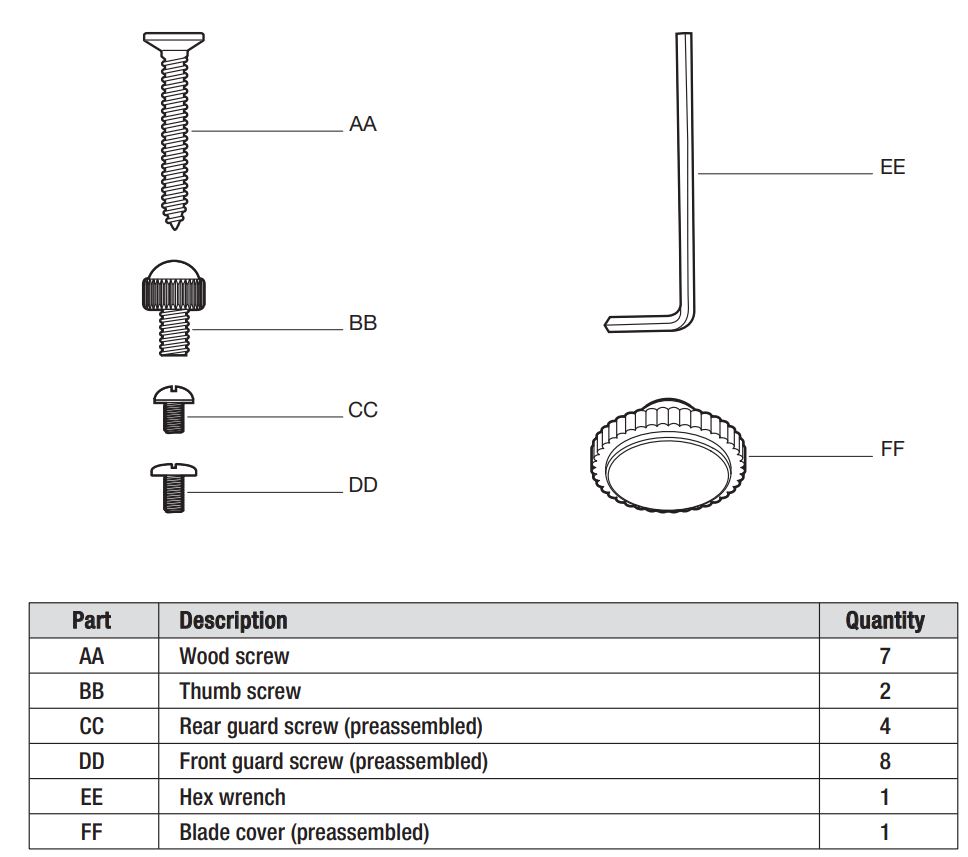
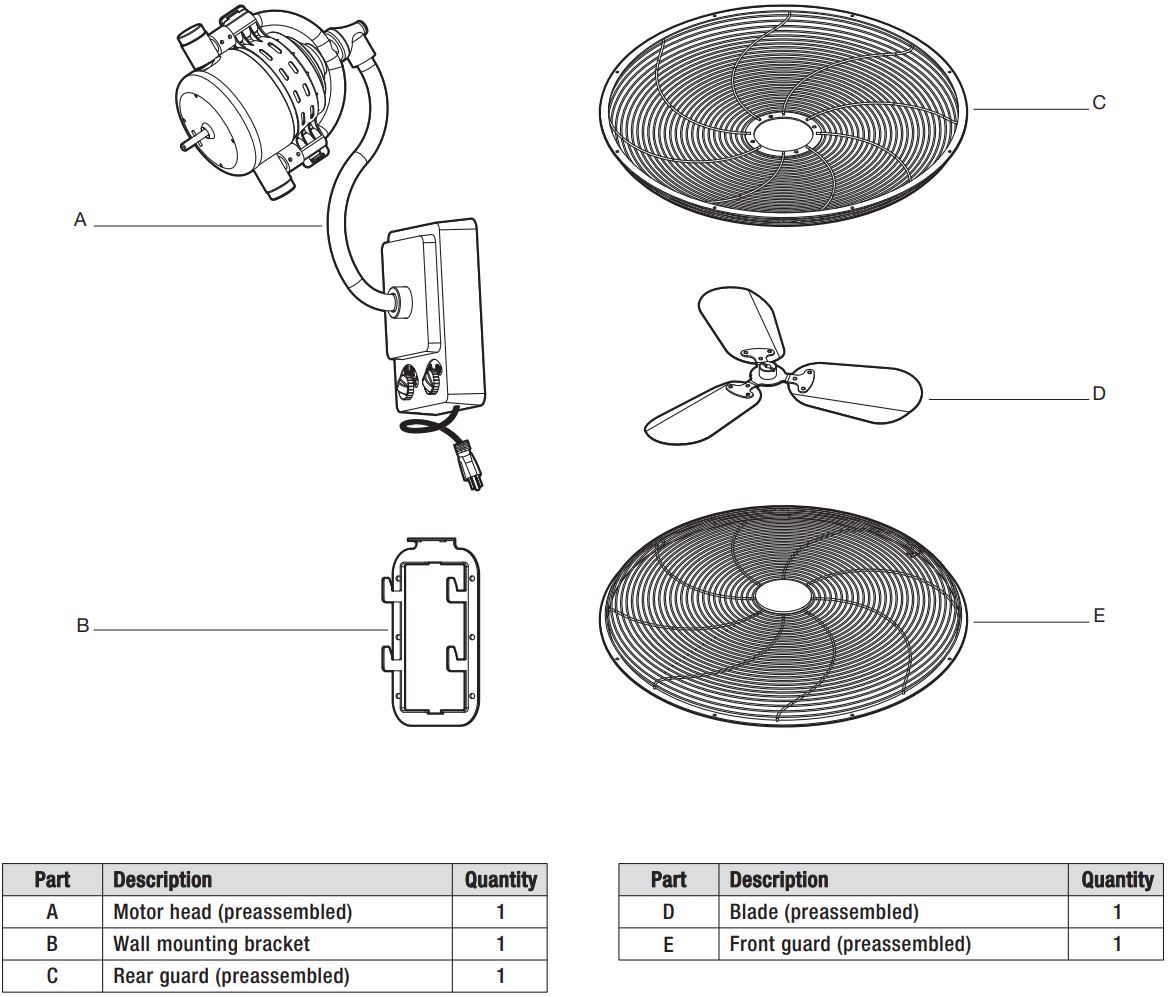
PACKAGE CONTENTS
Installation
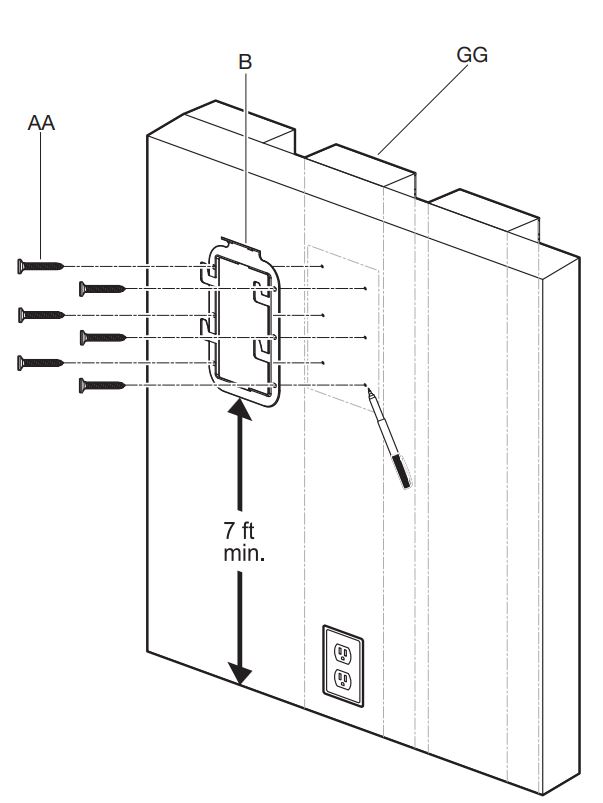
1 Installing the wall mounting bracket to the wall
![]() CAUTION: Carefully open the packaging and take out items from Styrofoam. Please lift the motor head with two hands by gooseneck arm and base, and DO NOT remove the plastic binder from the motor head until fan installation is completed. Removing the plastic binder from the motor head before or during installation will damage the oscillating mechanism.
CAUTION: Carefully open the packaging and take out items from Styrofoam. Please lift the motor head with two hands by gooseneck arm and base, and DO NOT remove the plastic binder from the motor head until fan installation is completed. Removing the plastic binder from the motor head before or during installation will damage the oscillating mechanism.
![]() CAUTION: If you are going to attach the fan assembly (A) to a wood stud or wood post, the stud or wood post must be at least 4 inches wide and thick enough to sustain the wall mounting bracket (B) and the weight of the fan assembly (A).
CAUTION: If you are going to attach the fan assembly (A) to a wood stud or wood post, the stud or wood post must be at least 4 inches wide and thick enough to sustain the wall mounting bracket (B) and the weight of the fan assembly (A).
![]() WARNING: To reduce the risk of the fan falling, use all six mounting holes in the wall mounting bracket (B) when installing the wall mounting bracket (B).
WARNING: To reduce the risk of the fan falling, use all six mounting holes in the wall mounting bracket (B) when installing the wall mounting bracket (B).
![]() WARNING: It is very important that you use the proper hardware when installing the wall mounting bracket (B) as this will support the fan assembly (A).
WARNING: It is very important that you use the proper hardware when installing the wall mounting bracket (B) as this will support the fan assembly (A).
□ Determine the approximate position of where you want the fan to be located on the wall. Then, locate the stud (GG) in the wall. Position the wall mounting bracket (B) on wood stud or wood post and mark the location of the six holes using a pencil or a marker (not included).
□ Use 3/32-in. drill bit (not included) to drill pilot holes at marked locations. Then, install wall mounting bracket (B) to the wall with wood screws (AA).
If your stud is not wide enough to support the bracket (B) then install using the following instructions:
□ Secure a 2×6-in. wood block (F) (not included) directly between two studs (GG). Use appropriate fasteners and materials (not included).
□ Position the wall mounting bracket (B) on wood block (F) and mark the location of the six holes using a pencil or a marker (not included).
□ Use 3/32-in. drill bit (not included) to drill pilot holes at marked locations. Then, install wall mounting bracket (B) to the wall with wood screws (AA).

Assembly — Hanging the Fan
2 Hanging the fan to the wall mounting bracket
![]() WARNING: Ensure the four slots in the back of the base are completely engaged with four hooks (HH) on the mounting bracket (B), and the fan assembly (A) sits securely on the mounting bracket (B), or else the fan may fall and result in injury or death.
WARNING: Ensure the four slots in the back of the base are completely engaged with four hooks (HH) on the mounting bracket (B), and the fan assembly (A) sits securely on the mounting bracket (B), or else the fan may fall and result in injury or death.
□ Remove the thumb screw (BB) at the base of the fan assembly (A).
□ Grab the fan assembly (A) firmly with two hands. Align the four slots (II) in the back of the base with the four hooks (HH) on the wall mounting bracket (B), and then place the fan assembly (A) firmly on the wall mounting bracket.
□ Secure the base to the wall mounting bracket with thumb screw (BB) previously removed.

3 Removing the plastic binder from the fan assembly
NOTE: The plastic binder (JJ) must be removed before operating your fan.
□ Remove two straps (NN) from the binder.□ Press down the clip and loose it from the plastic binder (JJ).□ Remove the plastic binders (JJ) from the fan assembly before operating your fan.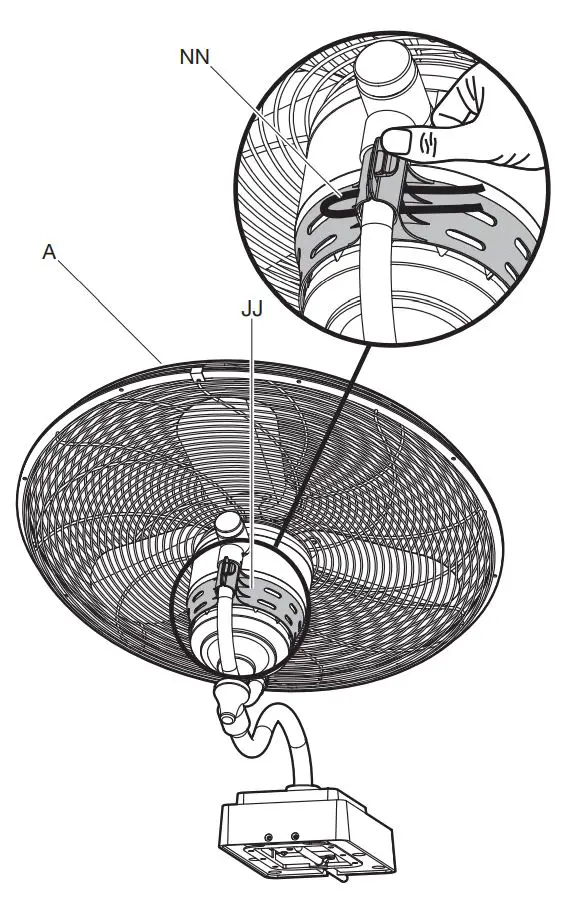
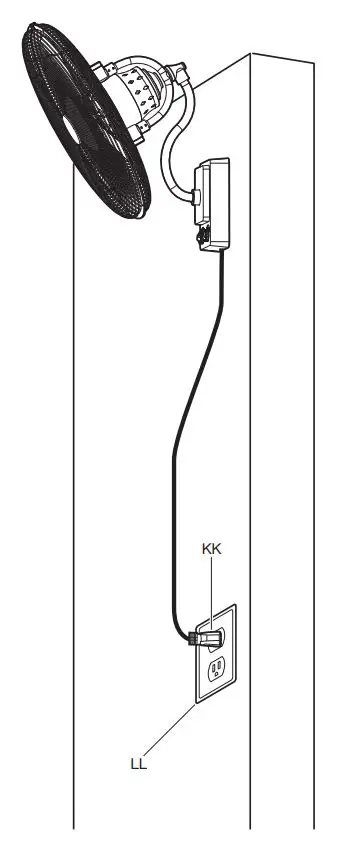
4 Attach the plug to the wall outlet
![]() WARNING: If using this fan in a DAMP location, this fan must be connected to a supply circuit that is protected by a Ground Fault Circuit interrupter (GFCI) to reduce the risk of personal injury, electrical shock or death.
WARNING: If using this fan in a DAMP location, this fan must be connected to a supply circuit that is protected by a Ground Fault Circuit interrupter (GFCI) to reduce the risk of personal injury, electrical shock or death.
![]() WARNING: The power cord is equipped with a three-prong grounded plug that must be inserted into a matching receptacle. Under no circumstances must the grounding prong be cut off the plug (KK). Where a two-prong wall receptacle is encountered, it must be replaced with a properly grounded three-prong receptacle installed in accordance with the National Electrical Code and all applicable local codes and ordinances. This work must be done only by a qualified electrician, using copper wire only.
WARNING: The power cord is equipped with a three-prong grounded plug that must be inserted into a matching receptacle. Under no circumstances must the grounding prong be cut off the plug (KK). Where a two-prong wall receptacle is encountered, it must be replaced with a properly grounded three-prong receptacle installed in accordance with the National Electrical Code and all applicable local codes and ordinances. This work must be done only by a qualified electrician, using copper wire only.
![]() WARNING: Risk of fire. Do not replace attachment plug. Contains a safety device (fuse, AFCI, LCD) that should not be removed. Discard product if the attachment plug is damaged.
WARNING: Risk of fire. Do not replace attachment plug. Contains a safety device (fuse, AFCI, LCD) that should not be removed. Discard product if the attachment plug is damaged.
![]() CAUTION: Do not operate any fan with a damaged cord or plug. Discard fan or return to an authorized service facility for examination and/or repair.
CAUTION: Do not operate any fan with a damaged cord or plug. Discard fan or return to an authorized service facility for examination and/or repair.
![]() CAUTION: Do not run cord under carpeting. Do not cover cord with throw rugs, runners, or similar coverings. Do not route cord under furniture or appliances. Arrange cord away from traffic area and where it will not be tripped over.
CAUTION: Do not run cord under carpeting. Do not cover cord with throw rugs, runners, or similar coverings. Do not route cord under furniture or appliances. Arrange cord away from traffic area and where it will not be tripped over.
□ Insert the power cord preassembled on fan assembly (A) into proper wall outlet (LL).
Disassembling Your Fan
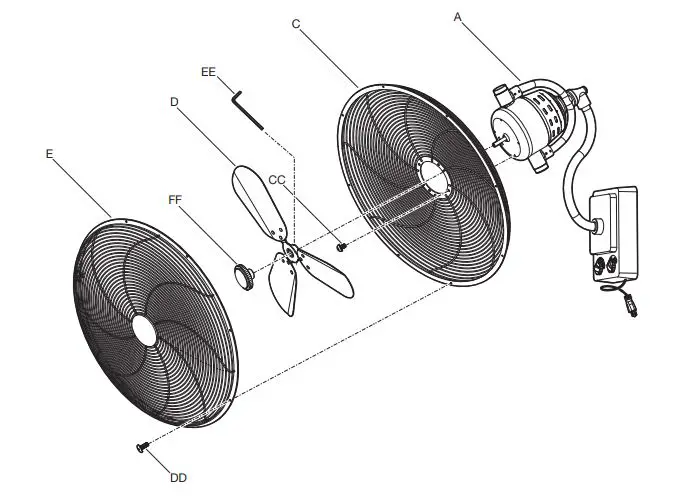
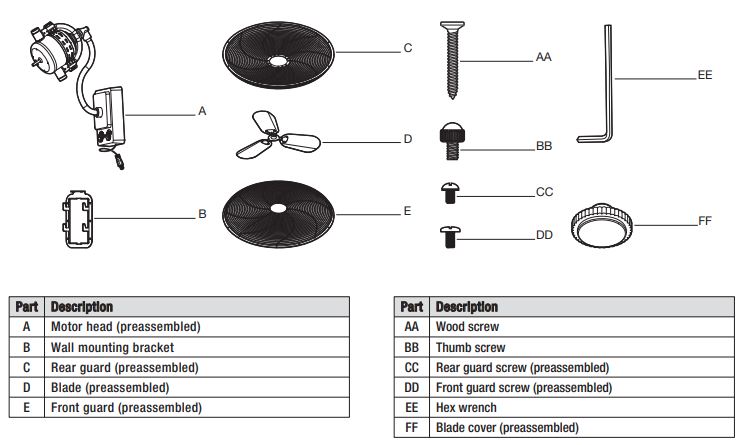
This fan comes with a pre-assembled rear guard (C), blade (D), and front guard (E) for your easy installation. Check that all screws are tight and securely in place.
If you need to disassemble the fan for any reason such as cleaning, follow these steps below:
- Loosen the front guard screws (DD) to disassemble the front guard (E) from the rear guard (C).
- Remove the blade cover (FF) from the blade (D) by turning the blade cover (FF) clockwise.
- Loosen the setscrew at the top of the blade head (D) by using the hex wrench (EE).
- Remove the blade (D) from the motor shaft.
- Remove the rear guard (C) from the motor head (A) by loosing the rear guard screws (CC) from the motor head (A).
Operation
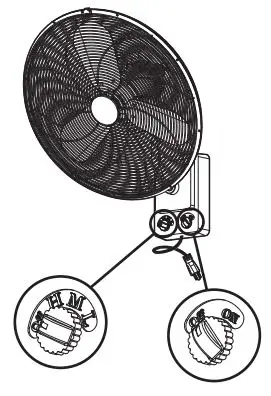
SWITCH OPERATING INSTRUCTIONS
![]() WARNING: Do not manually move the fan head. Doing so will destroy the gears in the oscillating mechanism.
WARNING: Do not manually move the fan head. Doing so will destroy the gears in the oscillating mechanism.
It is recommended you test the fan before finalizing installation. Restore power to the circuit box. Test fan speeds with the wall control on the left side of fan assembly.
OFF = Turns the fan off.H = High speed.M = Medium speed.L = Low speed.
Test the oscillation function with the wall control on the right side of the fan assembly.
OFF = Oscillation off.ON = Set the fan to oscillation.
If fan doses not function properly, please refer to “Troubleshooting” section.
User Servicing Instructions
REPLACING THE FUSE
![]() WARNING: Risk of fire. Do not replace attachment plug. Contains a safety device (fuse, AFCI, LCD) that should not be removed. Discard product if the attachment plug is damaged.
WARNING: Risk of fire. Do not replace attachment plug. Contains a safety device (fuse, AFCI, LCD) that should not be removed. Discard product if the attachment plug is damaged.
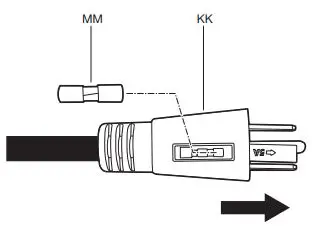
The three-prong plug is installed with a fuse (MM) that is a vital safety device. A filament inside the fuse (MM) is designed to melt and cut the circuit if the current gets too high. This prevents damage to your fan and the person using it and stops the power cord from overeating to the point where it could catch fire.
If you should need to replace the fuse, grasp plug and remove from the receptacle or other outlet device. Do not unplug by pulling on cord. Locate the fuse cover at the end of the plug on the power cord. Slide the fuse cover open to expose the fuse. Using needle-nose pliers (not included), remove the fuse. Inspect the fuse — the small, glass tube with metal on each end — to determine whether it will need to be replaced. If the fuse is blown, it will look dark and smudged or the visible wire inside will be broken. Use a replacement the fuse with a rating of 5 amps, 125 volts only, and insert the fuse in between the metal brackets inside the fuse housing. Slide the fuse cover shut.
Care and Cleaning
Do
- Check the support connections, brackets, and blade attachments twice a year. Make sure they are secure. Because of the fan’s natural movement, some connections may become loose over time. It is not necessary to remove the fan from the ceiling.
- Clean your fan periodically. Use only a soft brush or lint-free cloth to avoid scratching the finish. The plating is sealed with a lacquer to minimize discoloration or tarnishing.
- (Optional) Cover small scratches with a light application of shoe polish.
Do not
- Use water when cleaning. Water could damage the motor, or the wood, or possibly cause an electrical shock.
- Apply oil to your fan or motor. The motor has permanently-lubricated sealed ball bearings.
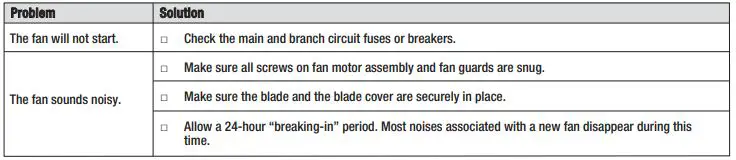
Troubleshooting
![]() WARNING: Make sure the power is off at the electrical panel box before you attempt any repairs. Refer to step 7 “Making the electrical connections” on page 10.
WARNING: Make sure the power is off at the electrical panel box before you attempt any repairs. Refer to step 7 “Making the electrical connections” on page 10.
Service Parts
![]()
Questions, problems, missing parts? Before returning to the store,call Home Decorators Collection Customer Service8 a.m. – 7 p.m., EST, Monday-Friday, 9 a.m. – 6 p.m., EST Saturday1-800-986-3460HOMEDEPOT.COM/HOMEDECORATORSRetain this manual for future use.
References
[xyz-ips snippet=”download-snippet”]