the bright way to do home security.
 Model: ES00780G
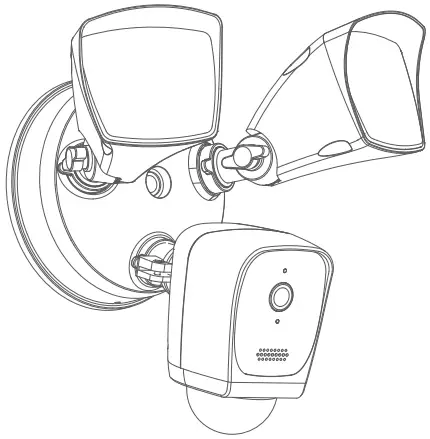
Welcome
Thank you for choosing our Floodlight Camera. Getting started is easy.
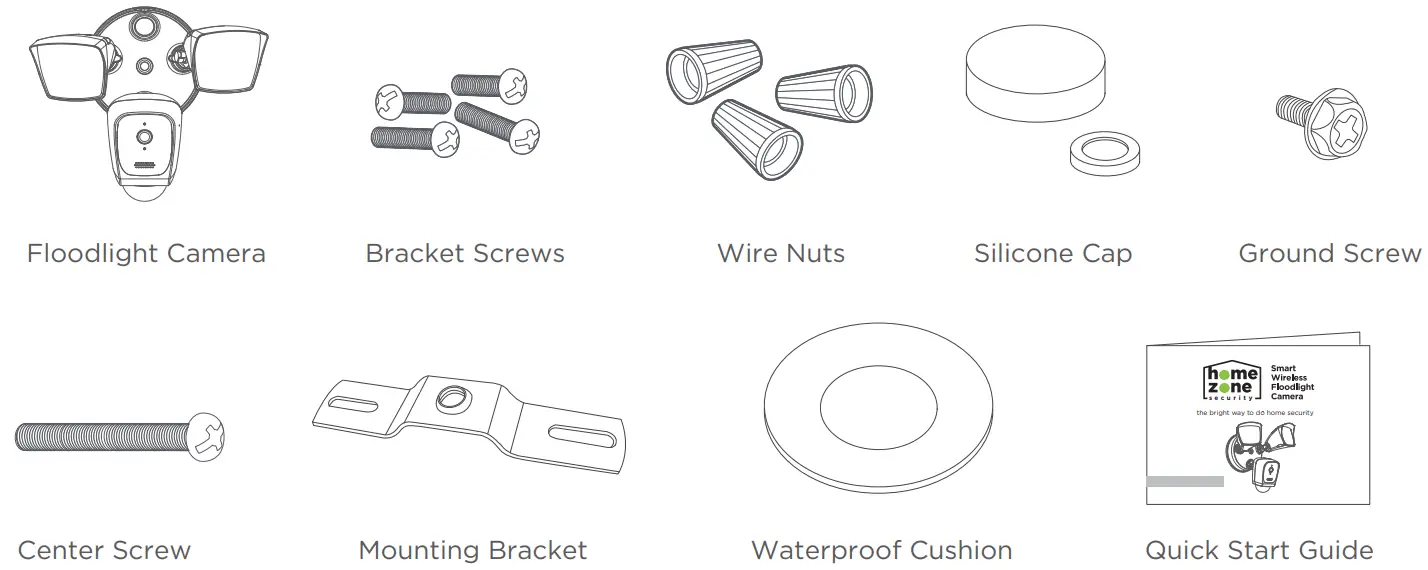
What’s Included.
Turn off power at fuse or circuit breaker.
WARNING:Risk of electrical shock. Disconnect power at the fuse or circuit breaker before installing or servicing.Service and maintenance of this fixture should be performed by a qualified and licensed electrician.
- Verify that the supply voltage is correct. Connect fixture to an AC100V-240V, 50/60 Hz power source.
- This fixture is intended to be connected to a properly installed and grounded UL-listed junction box.
- The light fixture must be powered directly off a circuit box.
- The fixture can’t be used with a dimmer switch, motion occupancy sensor, and other electronic switching devices unless otherwise designated.
- All wiring connections should be capped with UL-listed wire connectors.
CAUTIONRisk of Fire, do not mount the unit against flammable surfaces.NOTICEMotion Sensor will not work correctly if it is installed:
- Near the outlet of a central heating boiler
- Near an air conditioning unit
- Pointing directly at moving vehicles
- Within sight of the reflection of moving water
- Where other lamps could shine on the detector
Install mounting bracket to the junction box.
Fix the mounting bracket to the junction box using the bracket screws.
Install floodlight to the mounting bracket.
Connect floodlight wires through the sponge cushion:a. Connect the white wires together with the wire nutsb. Connect the black wires together with the wire nutsc. Connect the green/yellow wires together using the ground screw onto the bracket
Fix the light on the junction using the center screw and insert a silicon cap to cover the screw head. Caulk around the light fixture using waterproof glue to seal the rear cover and the light to make sure the lamp is waterproof.
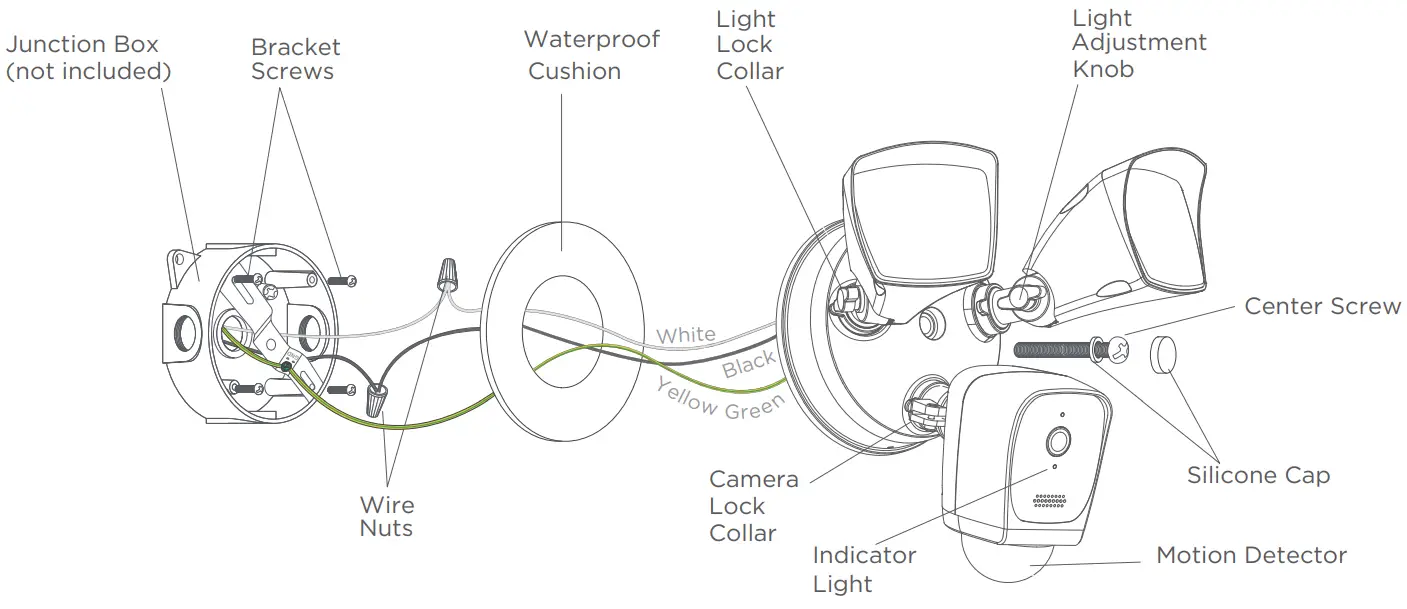
Europe/Australia gauge power cord colorBlue, Brown, Yellow-green. Connect Floodlight Camera cables with same color junction box cables.
Turn on power at the breaker.
After restoring power, the lights will turn on and your Floodlight Camera will make a prompt sound to let you know it’s in setup mode. If the light is connected to a light switch, turn on the light switch.
Connection Preparation.
Please install the Floodlight Camera within WiFi covered area to ensure the best performance.
Note: Make sure the smartphone is connected to your wireless router. Please note the camera only supports 2.4G Wi-Fi, not 5G Wi-Fi.
Get the APP and create an account.
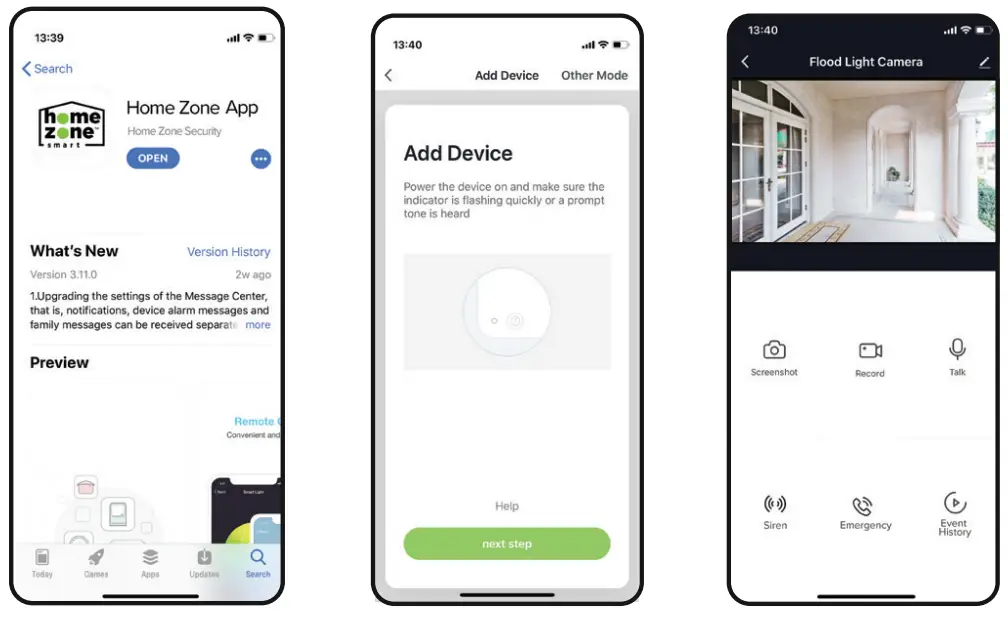
Launch the app from your smartphone and create an account. Follow the on-screen instructions.
Set up your floodlight camera.
- Make sure the indicator is blue and flashing quickly.
- If the indicator light is not blue and flashing, press the Reset button on the camera head for 5 seconds then release. The indicator light on the front of the camera will then blink blue.
- Open the App and click on the top right “+” icon to sync new products.
- Follow App’s instructions to complete the network pairing process.
- If the indicator light is solid blue, the camera is connected and ready for viewing.
You’re done!
Basic Device Controls
|
|
Save screenshots of live view to mobile device | 
Event History |
View saved recordings on local storage(Requires Micro SD card) |
|
|
Save recordings of live view to mobile device | 
motion settings |
Customize motion detection settings |

talk |
Enable microphone for one-way or two-way talk | 
light settings |
Control light and set lighting schedules |
|
emergencies |
Dial 911 for emergencies |
cloud settings |
Subscribe to the cloud storage package |
Appendix: Camera LED Guide
| NO. | LED Status | Camera Status |
| 1 | Red LED on | System starting up |
| 2 | Blue LED blinks | Standby for configuration |
| 3 | Red LED blinks | Network pairing |
| 4 | Blue LED on | Camera online |

FCC INFORMATION:
This device complies with Part 15 of the FCC Rules. Operation is subject to the following two conditions: (1) This device may not cause harmful interference, and (2) This device must accept any interference received, including interference that may cause undesired operation. Warning: Changes or modifications to this unit not expressly approved by the party responsible for compliance could void the user’s authority to operate the equipment.NOTE: This equipment has been tested and found to comply with the limit for Class B digital devices, pursuant to Part 15 of the FCC Rules. Their limits are designed to provide reasonable protection against harmful interference in a residential installation. This equipment generates, uses, and can radiate radio frequency energy and, if not installed and used in accordance with the instructions, may cause harmful interference to radio communications. However, there is no guarantee that interference will not occur in a particular installation. If the equipment does cause harmful interference to radio or television reception, which can be determined by turning the equipment off and on, the user is encouraged to try to correct the interference by one or more of the following measures:-Reorient or relocate the receiving antenna.-Increase the separation between the equipment and the receiver.-Connect the equipment into an outlet on a circuit different from that to which the receiver is connected.-Consult the dealer or an experienced radio/TV technician for help.
Register & Subscribe today to protect your investment and join our email list! Scan below for the link:
Why Register?
- Receive your extended warranty
- Get professional warranty support
- Be the first to hear the latest product news.
- Get exclusive deals delivered to your email.
Scan below for the link:

http://homezonesecurity.com/warrantyhomezonesecurity.com[email protected]US: +1 888-782-5618
 report this ad
Get exclusive offers and deals when you subscribe!
Thank you for choosing Home Zone Security! We are here to support you every step of the way. Please be sure to contact our customer support for troubleshooting and register your product for additional benefits. Products must be sold by an authorized reseller or distributor to be valid.
References
[xyz-ips snippet=”download-snippet”]