ENVIRASTATION Weather Station Wireless Operation
Instruction ManualDWS-100
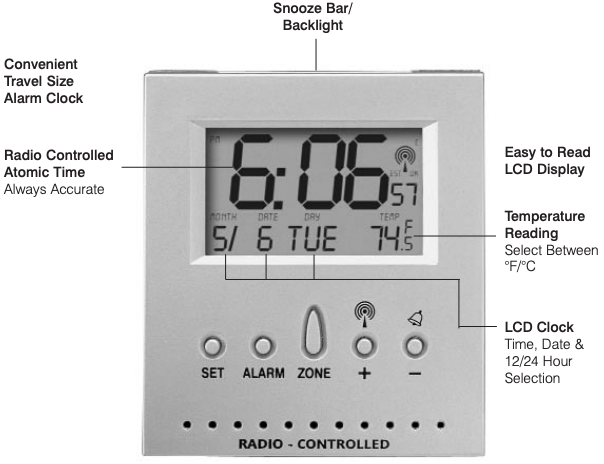
BATTERY INSTALLATION
Lift off the battery cover on the back of the unit. Install 1 AA alkaline battery according to the polarity indicated. Close the battery cover.
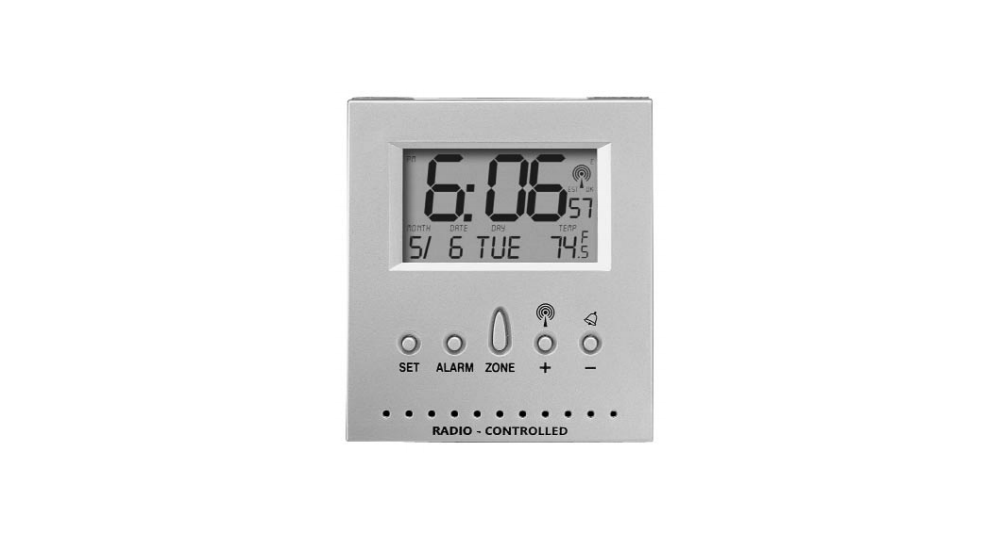
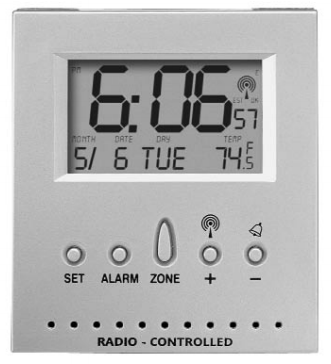
After battery installation, the unit will beep then display 12:00 p.m. 1/1/2000 and the room temperature. The time zone will default to PST – Pacific Standard Time.
SETTING TIME
About the Atomic Clock
The National Institute of Standard and Technology (NIST) in Fort Collins, Colorado broadcasts the time signal (WWVB at 60kHz AM radio signal) with an accuracy of 1 second per every 3,000 years. The signal will able to cover over a distance up to 2,000 miles from the source. Like a typical AM radio, your Atomic Clock will not able to receive the WWVB signal in places surrounded by heavy concrete or metal panels. The reception of the time signal can be affected by mobile phones, tv, electrical appliances or other electronic interference. To get the best performance of the Atomic clock, please install the home receiver near a window and away from large metallic objects. If the unit is not working properly, change the unit position. There may be some interference at this location.
TIME ZONE
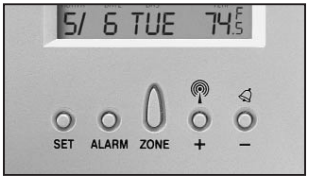
Press “ ZONE” button to select from the following time zones in the U.S.PST – Pacific Standard TimeMST – Mountain Standard TimeCST – Central Standard TimeEST – Eastern Standard Time
- Once a Time Zone is selected, your atomic clock will start to receive the signal.
- While the atomic clock is searching, the icon will change gradually indicating the seek condition.
- If a valid signal is available, the atomic clock will display the correct local time in about 3 – 5 minutes. The tower icon and “OK” will appear on the display.
- If the first reception is not successful, the clock will attempt every hour until successful.
- Try setting the unit in multiple locations for best reception. Remember to place the unit away from sources of interference such as mobile phones, appliances, TV etc.
- If signal is not available when setting up, you may need to enter the time manually.
MANUAL SETTING FOR CLOCK & CALENDAR
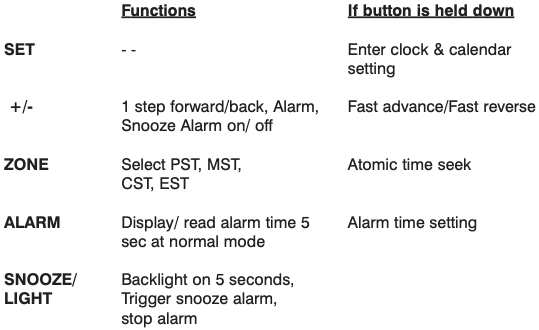
- Hold “SET ” button for 3 seconds to enter clock set.
- Select Year – Use the “ + , – ” buttons located on the back of the home receiver to adjust year setting. Press “ SET ” button to confirm your selection.
- Select Month – Use the “ + , – ” buttons located on the back of the home receiver to adjust month setting. Press “ SET ” button to confirm your selection.
- Select Day – Use the “ + , – ” buttons located on the back of the home receiver to adjust day setting. Press “ SET ” button to confirm your selection.
- Select 12 hour or 24 hour setting – Use the “ + , – ” buttons located on the back of the home receiver. Press “ SET ” button to confirm your selection.
- Select Hour – Use the “ + , – ” buttons located on the back of the home receiver to adjust hour setting. Press “ SET ” button to confirm your selection.
- Select Minute – Use the “ + , – ” buttons located on the back of the home receiver to adjust minute setting. Press “ SET ” button to confirm your selection.
Fahrenheit/Centigrade Selection – You can now select either Centigrade or Fahrenheit temperature readings. Press “ SET ” button to select between centigrade or fahrenheit readings.
TO TURN DST (Daylight Savings Time) ON/OFF
Hold the “ZONE” button for 2 seconds to switch from DST or ST (Standard Time)*
*In parts of Arizona and Indiana where Daylight Savings Time is not applicable, set to DST off (DST icon will appear on display when DST function is turned on, the clock is ready to get daylight saving time).
SETTING ALARM TIME
- Hold the “ALARM” button for 2 seconds. Press “+ , – ” to enter the desired Hr/ Min values and press “ALARM” to confirm setting.
- To view alarm time – Press “ALARM” button. Alarm time will display for 5 seconds and then resume to normal clock thereafter.
- To select between daily alarm and snooze alarm – Press “ – ” button to turn daily alarm or snooze alarm on/off.
- The unit will provide either a daily alarm, which last for 2 minutes or a snooze mode where the alarm will repeat every 8 minutes until manually cleared (see SNOOZE/LIGHT section below.)

SNOOZE/ LIGHT
- Press the SNOOZE/ LIGHT button (on top of unit) for an extended backlight.
- In snooze alarm mode, press this button to trigger a repetitive 8 minute snooze alarm.
- When normal alarm mode is selected, press the button to turn off alarm for one day.
MAINTENANCE AND CARE INSTRUCTIONS
- Extreme temperatures, shock or areas of unusual vibration should be avoided to prevent damage to the unit.
- Clean the unit using only a soft, damp cloth to wipe. Do not use solvents, abrasives, detergents or other strong cleaning agents. After cleaning, wipe surfaces with a dry cloth.
- Do not submerge unit in water or other liquids.
- Do not subject the unit to extremely severe temperatures – DO NOT PLACE UNITS INTO OVENS, FREEZERS or MICROWAVE UNITS.
NOTE: Opening the housing of the Unit will invalidate your warranty. Do not attempt to repair this unit – There are no consumer serviceable parts.
TROUBLE SHOOTING
What is the recommended battery type?
Your unit will come with 1 “AA” alkaline battery. We recommend using only alkaline batteries for replacements.
NOTE: Keep the remote sensor out of direct sunlight and rain. Do not set on or next to metal surface.
NOTE: There are no consumer serviceable parts. All questions or service request should directed to our consumer relations department. (See Warranty section for contact information).
SPECIFICATIONS
Indoor temp : +32 F to +122 F (-5 C to + 50 C)Resolution: 0.1 degree for temperatureClock: WWVB Radio-controlledBattery: 1 AA alkaline battery
Name and Functions of Buttons:
Homedics DWS-100 ENVIRASTATION Weather Station Wireless Operation Instruction Manual and Warranty Information – Homedics DWS-100 ENVIRASTATION Weather Station Wireless Operation Instruction Manual and Warranty Information –
[xyz-ips snippet=”download-snippet”]