

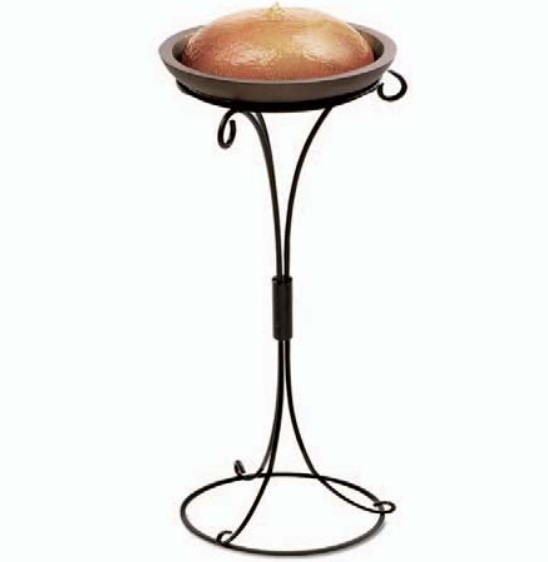
ILLUMINATED FLOORSTAND RELAXATION FOUNTAIN
![]()
TRANQUIL TOWER
WFL -TRTW
Instruction Manual and Warranty Information
1 Year Limited Warranty
The soothing sounds of natureThank you for purchasing EnviraScape, HoMedics’ floors and relaxation fountain. This, like the entire HoMedics product line, is built with high-quality craftsmanship to provide you with years of dependable service. We hope that you will find it to be the finest product of its kind.
EnviraScape enables you to create an all-encompassing environment with sound. The sound of flowing water enhances your environment by releasing negative ions and promoting relaxation. Only EnviraScape offers you the luxury of these vital benefits with its creative design which adds beauty to any indoor environment.
EnviraScape Features
- Innovative, artistic design enhances the environment at home or at work.
- Special effect lighting illuminates the fountain for a more dramatic effect.
- The soothing sound of cascading waters creates a stress-free ambiance.
- Improves concentration by masking distractions so you can stay focused.
- Durable electrical water pump can be operated from any indoor electrical outlet.
- Floorstand size-fountain measures 11.75″L x 11.75″W x 32″H.
IMPORTANT SAFETY INSTRUCTIONS:
When using an electrical appliance, basic precautions should always be followed, including the following: READ ALL INSTRUCTIONS BEFORE USINGDANGER – T o reduce the risk of electric shock:
- Always unplug the appliance from the electrical outlet immediately after using and before cleaning.
- Do not reach for an appliance that has fallen into the water. Unplug it immediately.
- Do not place or store an appliance where they can fall or be pulled into a tub or sink. Do not place in or drop into water or other liquid.
- Do not connect to any voltage other than that shown on the pump.
- Do not pump flammable liquids.
- Do not use water above 86o Fahrenheit.
CAUTION: The pump must be completely submerged in water. If the pump is making noises, most likely it is not completely submerged in water.CAUTION: Only set the fountain and fountain parts on waterproof surfaces
WARNING – To reduce the risk of burns, fire, electric shock, or injury to persons:
- An appliance should never be left unattended when plugged in. Unplug from outlet when not in use and before putting on or taking off parts or attachments.
- Close supervision is necessary when this appliance is used by or near children, invalids or disabled persons.
- Use this appliance only for its intended use as described in this manual. Do not use attachments not recommended by HoMedics; specifically, any attachments not provided with the unit.
- Never operate this appliance if it has a damaged cord, plug, pump, cable or housing. If it is not working properly, if it has been dropped or damaged, return it to Homedics Service Center for examination and repair.
- Keep the cord away from heated surfaces.
- Never drop or insert any object into any opening.
- Do not operate where aerosol (spray) products are being used or where oxygen is being administered.
- Do not carry this appliance by the power cord or use cord as a handle.
- T o disconnect, remove the plug from the outlet.
- This appliance is designed for indoor use only. Do not use the outdoors.
SAVE THESE INSTRUCTIONS
Caution – Please read all instructions carefully before operating.
- Never leave the appliance unattended, especially if children are present.
- Never cover the appliance when it is in operation.
- This unit should not be used by children without adult supervision.
- Connect the pump with the proper voltage as indicated on the pump label.
- Always keep the cord away from high temperature and fire.
- Unplug the pump from the power source before cleaning, maintenance, or disassembling.
- To get the best flowing effect, the product must be placed on a flat surface and should never be placed on an electrical appliance.
- Never let the pump run dry, as this will shorten the life of the pump.
- Do not lift, carry, hang, or pull the pump by the power cord.
- Operate with tap or distilled water only.
- Operate pump completely submerged for proper cooling.
- The electrical cord of this product cannot be replaced. If it sustains damage, you must stop using this product immediately and return it to the HoMedics Service Center for repair. (See the warranty section for HoMedics address.)
- Disconnect the appliance from the outlet before putting hands into the water.
- HoMedics has provided the optimum length power cord for this product to reduce the risks resulting from becoming entangled in or tripping over a longer cord. We do not recommend the use of an extension cord.
Assembly and Instructions for Use
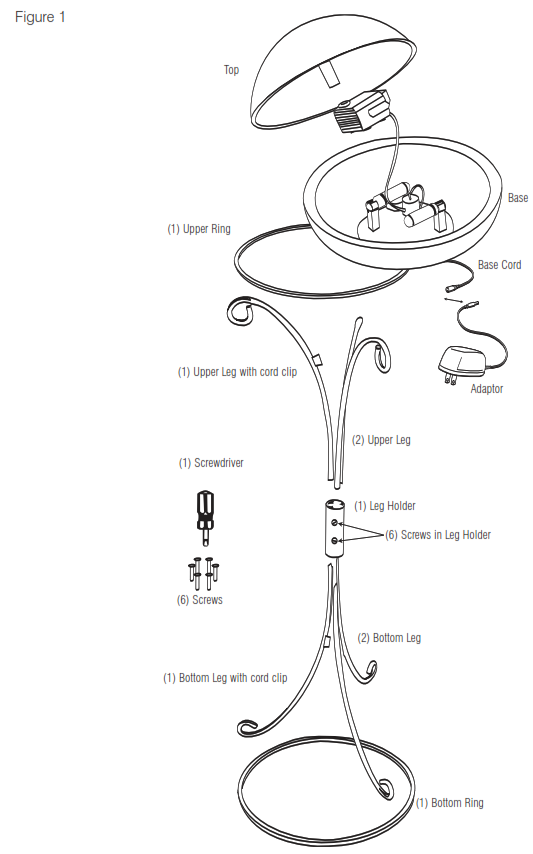
- Unpack the product. Wipe off dust with a damp cloth. (Fig 1)

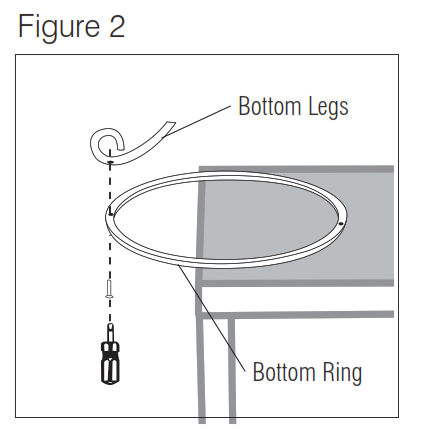
- Assemble the fountain stand:NOTE: For easy reference, each leg is labeled.a. Place the Bottom Ringon on a flat surface allowing the ring to slightly hangover for easy alignment and tightening of screws as shown in Figure 2. Align the holes of the Bottom Ring with the holes on the Bottom Legsand P ARTIALL Y secure by tightening the screws using the screwdriver provided. Repeat until all three of the Bottom Legsare partially secure. (Fig 2)NOTE: DO NOT tighten completely at this point.b. Insert the Bottom Legsinto the Leg Holder and adjust so they sit evenly. Now, completely tighten the three screws in the Leg Holder and the three screws in the Bottom Ring. (Fig 3)NOTE: Before inserting legs, you may need to unscrew the screws from the Leg Holder to allow for the legs to slide in the holder properly.
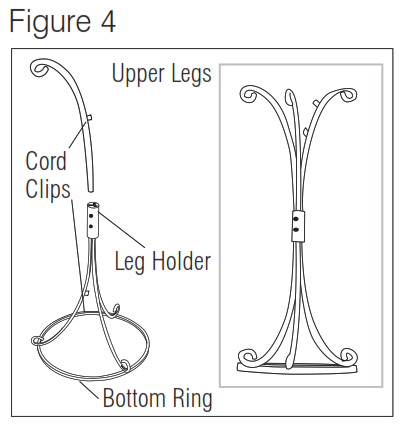
c. Insert the Upper Legsinto the other end of the Leg Holder.NOTE: The Bottom Leg with the cord clip should be positioned on the same side of the Leg Holder as the Upper Leg with the cord clip. DO NOT tighten screws in Leg Holder at this point. (Fig 4)
d. Align the holes of the Upper Ring with the holes on the Upper Legs and adjust so they sit evenly. Now, completely tighten the three screws located on the Upper Ring. (Fig 5)e. Tighten the remaining three screws located on the Leg Holder. (Fig 5)f. Check to be sure ALL screws are tightened completely. Now the stand is fully assembled. (Fig 6)
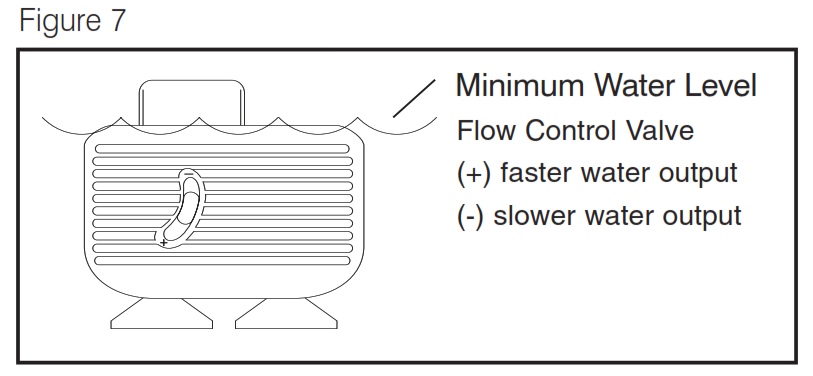
- Assemble the fountain top:a. Familiarize yourself with the pump. The switch located at the front of the pump controls the pump speed. The speed is indicated by a plus (+) and minus (-) sign. To increase the speed, move the switch slowly downward in the direction of the plus sign. You will hear a click as the switch moves to each speed level. At its highest speed level, the switch will cease to move any further. To decrease the pump speed, move the switch upward toward the minus sign. Similarly, at its lowest speed, the switch will cease to move any further (Fig 7). NOTE: It is recommended the pump be set at its highest speed during assembly and later adjusted to a lower setting if desired. Be sure to unplug the pump before adjusting the speed setting.Attention: In order to get the best results, please operate the pump completely submerged. Keep the water level above the minimum water level ALLTHE TIME.b. Insert the rubber end of the waterproof lights into the light clips located inside the base while keeping the light cords in the position shown in Figure 8. (Fig 8) Slight twisting may help to push the rubber end through the clip more easily. NOTE: Be gentle with the bulb cover since it is made of glass.c. Insert the small end of the connector into the pump. (Fig 9)d. Insert LED light into the water inlet attached to the top of the fountain. (Fig 10)e. Insert the large end of the connector into the water inlet attached to the top of the fountain. (Fig 10)NOTE: You must first slide the LED light through the water inlet.
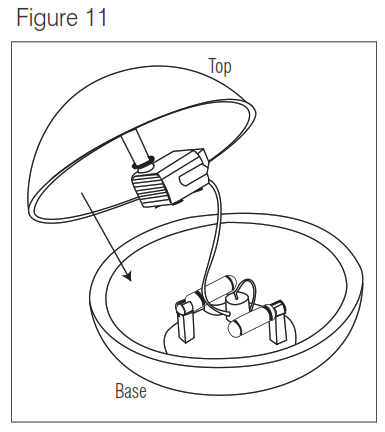
f. Place the fountain top; with a pump attached, on the fountain base. (Fig 11)
- Set the assembled fountain top onto the metal stand. Align cord so it runs down the Upper and Lower Legs that contain the cord clips.NOTE: You may need to carefully bend open the cord clips to allow room for the cord to be inserted. Place cord in clips to minimize the appearance. (Fig 12)
- Fill the base with 50 oz. of clean water. Add enough water so that the top of the pump is completely submerged. (Fig 13)
- Attach the A/C adaptor jack to the base power cord. DO NOT plug into the outlet at this time. (Fig 1)
- Set the fountain on a level, waterproof surface.
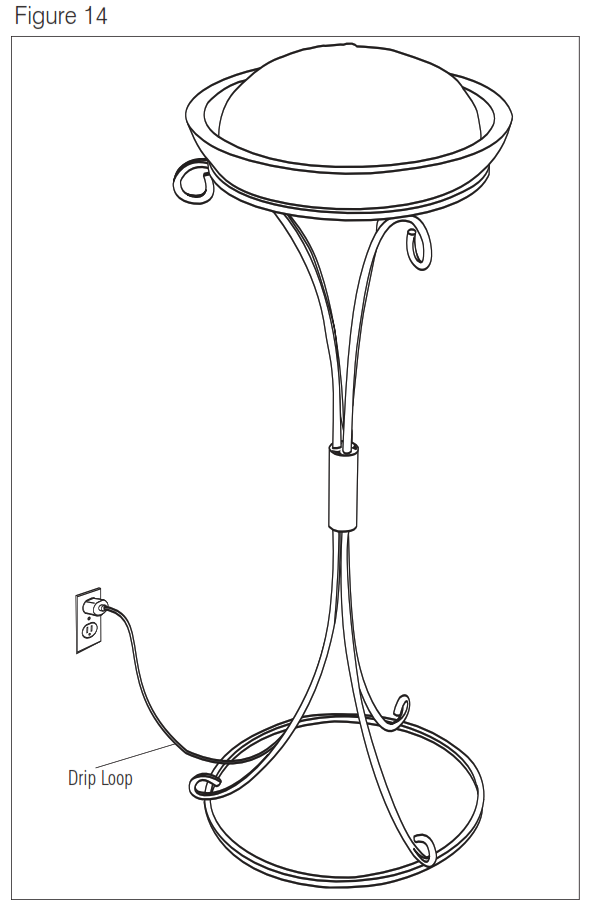
- Plug the cord into a 120V household outlet. The switch located on the power cord controls the fountain. If the pump doesn’t operate, rotate the in-line switch once to turn “on” and once more to turn “off”. Monthly maintenance will add to your pump’s life.NOTE: Ensure that the electrical cord loops below the electrical outlet to form a ‘Drip Loop’ (Fig 14). This will prevent water from running down the cord into the electrical outlet.
 b. Insert the Bottom Legsinto the Leg Holder and adjust so they sit evenly. Now, completely tighten the three screws in the Leg Holder and the three screws in the Bottom Ring. (Fig 3)NOTE: Before inserting legs, you may need to unscrew the screws from the Leg Holder to allow for the legs to slide in the holder properly.
 d. Align the holes of the Upper Ring with the holes on the Upper Legs and adjust so they sit evenly. Now, completely tighten the three screws located on the Upper Ring. (Fig 5)
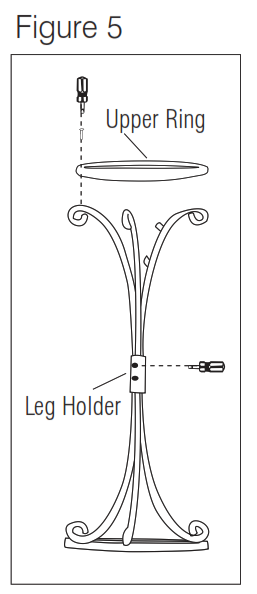 e. Tighten the remaining three screws located on the Leg Holder. (Fig 5)
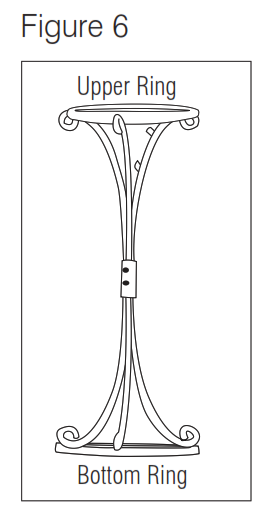
 b. Insert the rubber end of the waterproof lights into the light clips located inside the base while keeping the light cords in the position shown in Figure 8. (Fig 8) Slight twisting may help to push the rubber end through the clip more easily. NOTE: Be gentle with the bulb cover since it is made of glass.
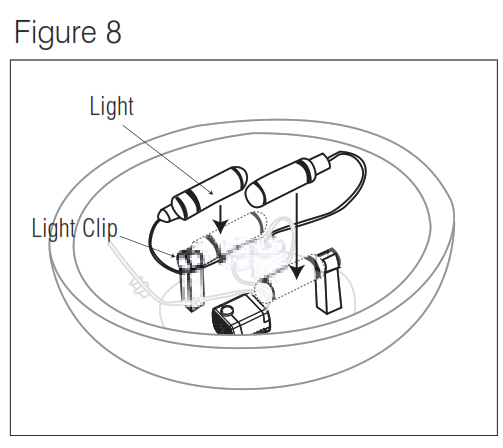 c. Insert the small end of the connector into the pump. (Fig 9)
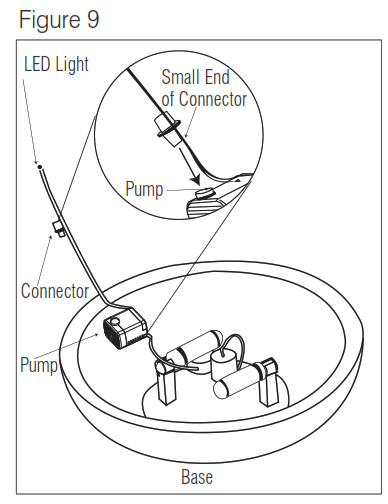 d. Insert LED light into the water inlet attached to the top of the fountain. (Fig 10)
 e. Insert the large end of the connector into the water inlet attached to the top of the fountain. (Fig 10)NOTE: You must first slide the LED light through the water inlet.


Maintenance
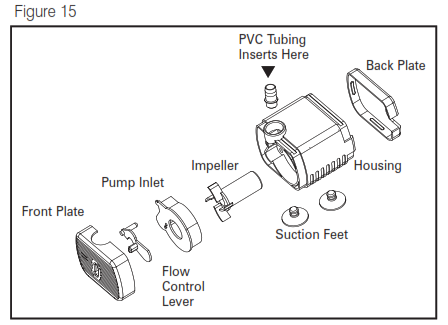
- To clean the pump:Unplug from the electrical outlet. Remove it from the base of the fountain. Use a small brush or stream of water to remove any debris (Fig 15).
- To keep the water clean:Periodically change the water and clean the product according to the water condition. Keeping the water clean prevents the water from becoming sticky and forming micro-organisms. We recommend distilled water to prevent mineral build-up.
- To clean off hard water deposits on the base:Soak the container in a mixture of vinegar and water to clean and remove any mineral build-up.
- Keeping the water at an optimum level:Add water periodically to keep the water level at an optimum level to avoid shortening the life of the pump.NOTE: Never let the pump run dry, as this will shorten the life of the pump.
- Fountain StorageUnplug the fountain from the electrical outlet, empty the water, and store the fountain in a dry, cool place.
- Changing Light BulbFirst, unplug the fountain and let the bulb cool down. Remove the bulb cover by holding the glass bulb cover in a dry hand and rubberneck with other hands. Slowly pull apart. Slight twisting may help to loosen. Be gentle with the bulb cover since it is glass. Never pull on the cord. Next, pull the bulb straight out and replace it with a new bulb, inserting prongs into the holes. Replace bulb cover securely.
Caution: All servicing of this fountain must be performed by authorized HoMedics service personnel only.
Troubleshooting
- If the pump fails to operate, check the following:Check the circuit breaker, or try a different outlet to make sure the pump is getting electrical power.NOTE: Always disconnect from the electrical outlet before handling the pump.
- If the pump gurgles, spews, or “burps”:Check the water level to make sure the pump has enough water to function.
- Obtaining the desired water level:Check the water level daily the first week to measure the rate of evaporation; refill with water as needed.
- If water is splashing outside the fountain:Adjust the flow control valve to a lower setting on the pump.

anquil Tower Fountain Manual WFL-TRTW – Homedics EnviraScape Tranquil Tower Fountain Manual WFL-TRTW –
[xyz-ips snippet=”download-snippet”]