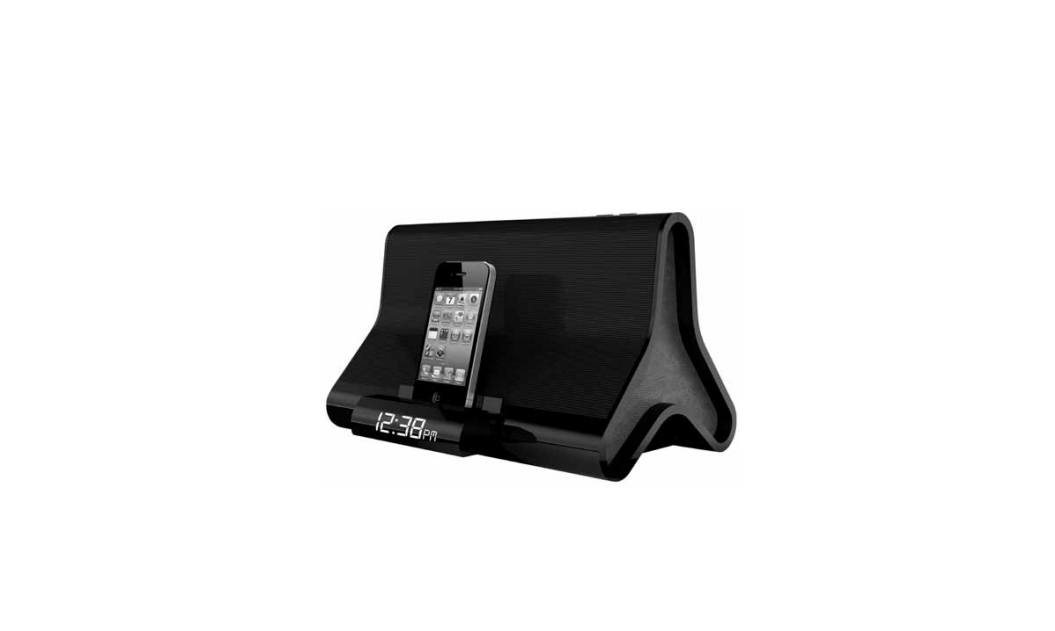
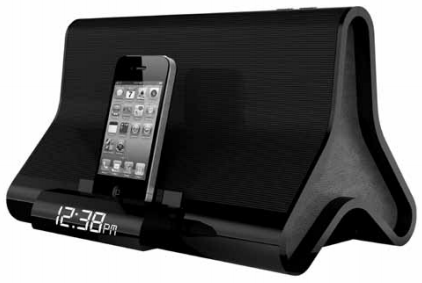
WAVE Docking Speaker
Instruction Manual and Warranty Information
HX-A142
WAVE: The ultimate speaker system for your iPad, iPhone, and iPod
Thank you for purchasing WAVE Speaker System for iPad, iPhone and iPod from HMDX Audio. This product, along with the entire HMDX lineup, connects high-tech innovation with design to provide you with years of dependability and enjoyment.
WAVE Speaker Dock Main Features
- Simple docking to charge and play your iPad/iPhone/iPod
- Superior speaker quality with integrated passive subwoofer for enhanced bass
- Motorized dock
- Video-out capability
- Remote Control for your convenience
Remote Control battery
The battery is already installed. Simply pull tab out to activate battery power. To replace remote battery, open the battery door by pressing the two tabs together. Remove the old battery and replace with a CR2025 battery.
Battery Precautions
- Use only the size and type of batteries specified.
- When installing batteries, observe proper +/- polarities. Incorrect installation of battery may cause damage to the unit.
- Do not mix different types of batteries together (e.g., alkaline with carbon-zinc or old batteries with new ones).
- If the unit is not going to be used for a long period of time, remove batteries to prevent damage due to possible battery leakage.
- Do not dispose of batteries in fire. Batteries may explode or leak.
This product contains small parts that may present a choking hazard for young children.
Getting Started
Unpack the unit carefully. Remove all the accessories from the display carton. Do not remove any labels or stickers on the rear of the unit and adaptor. Before setting up the unit, verify that the following accessories are present:
- Instruction manual x 1
- AC power adaptor x 1
- Main unit x 1
- Remote control x 1
Power Source
This unit is supplied with an AC adaptor; take the following steps to connect the adaptor.
- Unwind the power cord of the AC adaptor to its full length.
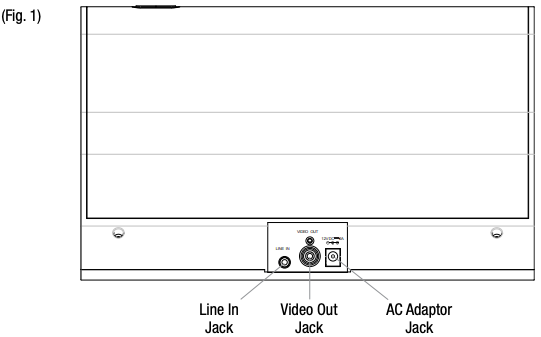
- Connect the DC plug of the AC adaptor to the DC Jack (Fig. 1).
- Plug the AC adaptor to the AC outlet (110v – 240v AC. 60 Hz). Connecting this system to any other power source may cause damage to the system. For sufficient ventilation, keep other objects at least 4 inches away from the unit.
- To switch the unit off completely, withdraw the AC adaptor from the wall outlet.
Setting Clock Time
AUTOSET CLOCK
The Wave speaker system is equipped with an autoset clock, meaning the clock will automatically set itself when plugged in. Please note: the clock will automatically default to Eastern Standard Time, but can be adjusted by pressing the TIME ZONE button on the remote control (fig. 3) and scrolling through the different time zone until the proper time is set.
MANUALLY SETTING THE CLOCK (Fig. 2 & 3)
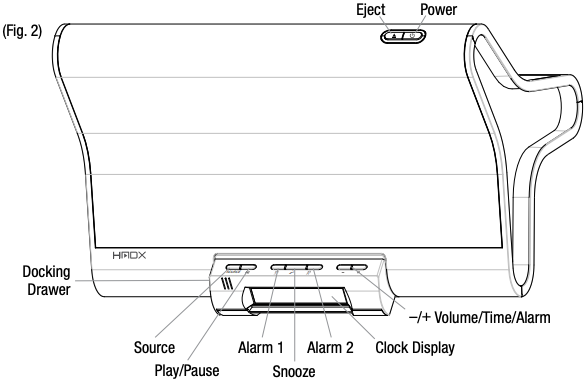
- While the unit is powered OFF press EJECT on the top of the unit to expose the dock and buttons.
- Press and hold the SOURCE button on the unit (press TIME SET button on remote control). The time zone will begin flashing, use the + and – buttons on the speaker or the VOL+ and VOL buttons on the remote control to set the desired time zone, using the list below for reference: A1. AST A3. CST A5. PST A7. HST A2. EST A4. MST A6. AKST
- Press the SOURCE button again (or TIME SET button on the remote control) and the hour will begin flashing. Use the + and – buttons on the unit or on the remote control to set the hour, paying attention to the PM indicator.
- Press the SOURCE button again (or TIME SET button on the remote control) and the minute will begin flashing. Use the + and – buttons on the speaker or the VOL+ and VOL- buttons on the remote control to set the minute.
- Press the SOURCE button (or TIME SET button on the remote control) again to set the day of the week, using 1 for Monday, 2 for Tuesday, 3 for Wednesday, 4 for Thursday, 5 for Friday, 6 for Saturday, and 7 for Sunday. The 7-5-2 alarm feature allows you to set an alarm for seven days a week, Monday through Friday, or Saturday and Sunday. So, for instance, setting a 5-day alarm means it will go off at the same time Monday through Friday, which is why properly setting the day of the week is important. Once the day of week is set, press the SOURCE button again to exit Clock Setting mode.
DAYLIGHT SAVINGS TIME (Fig. 3)
The Wave is equipped with a DST function to adjust the time for Daylight Savings. To adjust the time, while the unit is powered OFF, press the DST button on the remote control until the clock is adjusted to the proper time. When observing Daylight Savings Time, the DST icon will appear on the display.
Setting and Using the Alarms
SETTING ALARM 1 or ALARM 2 (Fig. 2 & 3)
- While the power is OFF, press EJECT on the top of the unit to expose the dock and buttons.
- Press and hold the desired alarm button (alarm 1 or alarm 2) located on the top of the unit or on the remote control. The hour will begin flashing.
- Use the plus and minus buttons on the unit or Vol +/– on the remote to adjust the hour, paying attention to the PM indicator.
- Press the alarm button again and the minute will begin flashing. Use the plus and minus buttons on the unit or Vol +/– on the remote control again to adjust the minute.
- Press the alarm button again to select the source. The Wave can be set to Beep or iPod/iPhone/ iPad. Use the plus and minus buttons on the unit or Vol +/– on the remote control to select which source you want to wake to. Please note: If you set the source to Apple Device and your device is not docked, the alarm will default to Beep. If you do not select your source when prompted to do so, the alarm will also default to Beep.
- Press the alarm button again and use the Forward and Reverse to select a 7, 5, 2 day alarm setting. 7-day will sound at the same time 7 days a week, 5-day will sound at the same time Monday through Friday, 2-day will sound at the same time Saturday and Sunday.
- Press the alarm button again to exit Alarm Setting mode.
TURNING OFF THE ALARM / SNOOZE OPERATION (Fig. 2 & 3)
The Unwind alarm clock is equipped with gradual wake, which means that the alarm begins soft and slowly gets louder over the course of two minutes to ensure a non-jarring wakeup.
- To turn off the alarm, press any button on the unit.
- Press the snooze button located on the top of the drawer or on the remote control and the alarm will sound again in nine minutes.Please note: You may only press the Snooze button during the Alarm mode for one hour (7 times). After the seventh time, the alarm will turn off and will not sound again until the next set time.
Dimmer Control
Press the SNOOZE button to adjust the backlight intensity of clock display. This can be done at power off stage.
Volume Control
To adjust the volume, press the “+” and “-” controls on the drawer of the unit or on the remote control.
iPad/iPhone/iPod Operation
Listening to Music from your iPad/iPhone/iPod
- Press the POWER button, located on top of the unit to turn the speaker ON.
- Press the OPEN button to eject the motorized dock drawer.
- Fit iPad/iPod/iPhone carefully onto the docking pin. Note that once your device is docked the open/close function of the drawer is disabled so the drawer does not try to close when the device is docked.Please Note:To avoid damage, do not force the device onto the docking pinWARNING: The dock connector is designed for Apple iPad, iPhone, and iPod devices. Attempting to attach a non-iPad/iPhone/iPod music player will damage or destroy your device and/or the product.
- Press the SOURCE button on the unit or on the remote control until the iPad/iPhone/iPod source is selected.
- Press the PLAY button on the device or the remote control to play and again to pause.
- To skip forward and backward through tracks, press the FORWARD and REVERSE buttons on the device or the remote control.
- To turn the unit OFF, press the POWER button. Note: For your convenience, your device will continue charging on the dock while the unit is plugged in, even if the power is turned off.
Sending Movies & Videos from your iPad/iPhone/iPod touch to an external video source (Fig. 1-3)
- Press the POWER button, located on top of the unit, to turn ON.
- Open the dock door(s). To play iPod touch or iPhone only the center door needs to be opened. To play the iPad, open both dock doors.
- Fit iPad/iPod/iPhone carefully onto the docking pin.Please Note:
- If docking an iPad, be sure to pull up on the stabilizing drawer on the back of the unit to add stability when the iPad is docked.
- To avoid damage, do not force the device onto the docking pin.WARNING: The dock connector is designed for Apple iPad, iPhone, and iPod devices. Attempting to attach a non-iPad/iPhone/iPod music player will damage or destroy your device and/or the product.
- Press the SOURCE button on the unit or on the remote control until the iPod icon appears on the display.
- Connect a standard AV cable (not included) to the back of the unit and connect the other end to the external video source (TV, projector, etc.)
- Select the desired video or movie on the device and press play.
- Once the video begins playing, hold the PLAY button on the unit or on the remote control down for five seconds.
- If playing from the iPad, the video will stop playing on your device and will return to the opening screen of the video. Press the play button again on the unit, the remote or the iPad and the video will be sent to the external video source.
- If playing from the iPhone or iPod touch, the video will stop playing on your device and will return to the main movie/video list on your device. Press PLAY/PAUSE on the remote or press the desired video again from the list on your iPhone/iPod touch and the video will be sent to the external video source.
- To return your movie or video back to your iPad/iPhone/iPod, press the PLAY/PAUSE button again on the unit or the remote.
- Press and hold the PLAY/PAUSE button for five seconds. The screen of your device will then show the movie/video homescreen. Press PLAY/PAUSE on the device, the unit, or the remote control and the video will stop playing on the external video source and will resume play on your device.
Listening to a non-docking iPod or other portable audio devices (Fig. 1-3)
- Using the 3.5mm audio cable (not included), plug in the device via the LINE IN input located on the back of the unit.
- Plug the other end of the audio cable into the LINE OUT or headphone jack of the device.
- Press the POWER button located on top of the dock or on the remote control.
- Press the SOURCE button on the unit or on the remote control until the AUX icon appears on the display.
- Press play on the connected device.NOTE: You may need to adjust the volume on the device to achieve proper volume.
- Press the POWER button to turn unit off.
Remote Control

(Fig. 3)
This equipment has been tested and found to comply with the limits for a Class B digital device, pursuant to Part 15 of the FCC Rules. These limits are designed to provide reasonable protection against harmful interference in a residential installation. This equipment generates, uses and can radiate radio frequency energy and, if not installed and used in accordance with the instructions, may cause harmful interference to radio communications. However, there is no guarantee that interference will not occur in a particular installation. If this equipment does cause harmful interference to radio or television reception, which can be determined by turning the equipment off and on, the user is encouraged to try to correct the interference by one or more of the following measures:
- Reorient or relocate the receiving antenna.
- Increase the separation between the equipment and receiver.
- Connect the equipment into an outlet on a circuit different from that to which the receiver is connected.
- Consult the dealer or an experienced radio/TV technician for help.
NOTE: THE MANUFACTURER IS NOT RESPONSIBLE FOR ANY RADIO OR TV INTERFERENCE CAUSED BY UNAUTHORIZED MODIFICATIONS TO THIS EQUIPMENT. SUCH MODIFICATIONS COULD VOID THE USER AUTHORITY TO OPERATE THE EQUIPMENT.
Homedics HX-A142 HMDX WAVE Docking Speaker Instruction Manual and Warranty Information – Homedics HX-A142 HMDX WAVE Docking Speaker Instruction Manual and Warranty Information –
[xyz-ips snippet=”download-snippet”]