
PDM-200B1 year limited warranty
INTRODUCTION
This digital pedometer displays steps taken, distance traveled, Calories burned, average speed, total exercise time, and 30-day memory storage, among many other useful features. Please read this manual carefully before using this pedometer. We suggest you keep this manual for future reference.For promoting good health, including weight-loss, it is recommended that adults should walk 10,000 steps a day.*When you start to walk or run, this pedometer will automatically begin displaying your steps taken, distance traveled, Calories burned, average speed, and exercise time.*(American Heart Association)
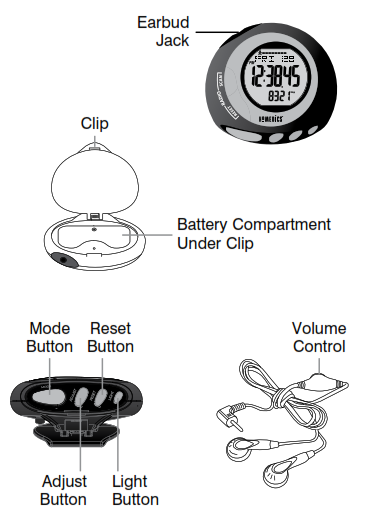
NAME/FUNCTION OF EACH PART
INSTALLING THE BATTERIES
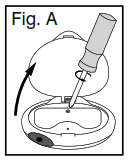
1. The battery cover is located under the clip section of this pedometer.Lift up the clip, unscrew the battery compartment and remove the cover. Fig. A
2. Replace the batteries according to the polarity indications inside the compartment. Battery Type: One 3V Lithium CR2032 and two 1.5V alkaline LR44 batteries. Fig. B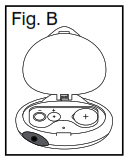
3. Replace the battery compartment cover and fasten the screw. Fig. C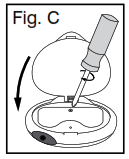
Important Notes:
- The batteries that are used for the FM radio are located on the left of the battery compartment. The battery that is used for the pedometer is located on the right side of the battery compartment.
- Replace the pedometer battery when nothing appears on the display.
- Replace the radio batteries when the radio is not functioning.
- Batteries are hazardous waste. Do not dispose of them together with the household garbage.
- LR44 batteries are also known as AG13 or L1154 button cell batteries.

Use only CR2032 Lithium and Alkaline LR44 batteries for this pedometer. Remove the batteries when the unit is not in use for the extended periods of time. All user information, including the date and time, will need to be reset if the pedometer battery is removed or replaced. Clean contact on batteries and in battery compartment with a soft dry cloth each time you install the batteries.
PEDOMETER MODES
This pedometer has 7 operational modes and are in the following sequence:Press Mode button to scroll through modes:
- Time Mode: Displays the time of the day, STEPS TAKEN, CALORIES BURNED, DISTANCE TRAVELED, AVERAGE SPEED, % of GOAL COMPLETED and EXERCISE TIME for the current day.
- Walk & Run Modes: Displays the number of STEPS TAKEN, % of GOAL COMPLETD, EXERCISE TIME, DISTANCE TRAVELED, CALORIES BURNED, AVERAGE SPEED, that day while walking and running.
- Pacer Mode: Optional function that will beep to help the user keep up their desired pace.
- Alarm Mode: Optional function for an alarm to go off at the user’s desired time.
- Stopwatch Function: Function that allows the user to track how long workouts take.
- User Information: Displays the user’s AGE, WEIGHT, RUN and WALK STRIDE LENGTHS and DAILY STEP GOAL.
- Memory Mode: Displays the number of STEPS TAKEN, CALORIES BURNED, DISTANCE TRAVELED, AVERAGE SPEED and % of GOAL COMPLETED for the past 30 days.
CALCULATING STRIDE LENGTH
In order to display accurate DISTANCE traveled, you need to measure and input your stride length in inches.How to calculate your Stride Length:To properly calculate your stride length, measure a predetermined distance in feet. Once completed, either walk or run that distance, counting each step you take, and divide your predetermined distance in feet by the number of steps. Convert this number into inches.Example:If your predetermined distance is 15 feet and you had walked or ran 10 steps in that distance, then the stride length is 1½ feet = 18 inches.Formula:distance traveled (in feet) = stride length (in feet)# of steps takenConversion:1 foot = 12 inches
Record your walking stride length here:Record your running stride length here:
SETTING THE DATE & TIME
Note: To start, please remove the protective sticker from the display and install the batteries. For more information, refer to the INSTALLING THE BATTERIES section of this manual. The pedometer should turn ON and display the TIME mode. If the pedometer does not automatically display this mode, press the MODE button until the TIME and STEPS are displayed on the screen.1. While in TIME mode, press and hold the ADJUST button for 2 seconds. The word ADJUST will be displayed, followed up the number representing the HOUR will start to blink.2. To increase the HOUR, press the ADJUST button. Each press will increase the number by one in a cycling manner. Pressing the MODE button will confirm the entry.3. Change the MINUTE, YEAR, MONTH, DAY and 12/24 HOUR MODES as described in step 2 above, using the ADJUST button to increase the selection and the MODE button to confirm the entries.
SETTING USER INFORMATION
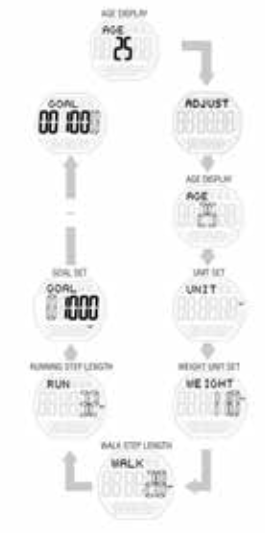
1. Press the MODE button until the word INFO is displayed on the screen. Press and hold the ADJUST button for 2 seconds until the number representing the AGE starts to blink.2. To increase the AGE, press the ADJUST button. Each press will increase the number by one in a cycling manner. Pressing the MODE button will confirm the entry.3. Next, the screen will display UNIT, followed by LB. LB represents all of the information in the pedometer being in Imperial format. To change to metric format, press the ADJUST button. To confirm the entry, press the MODE button.Note: By selecting LB, all information will be displayed in the Imperial format. By selecting KG, all information will be displayed in Metric format.4. After selecting the unit format, the number representing the WEIGHT will start to blink. Press the ADJUST button to increase the selection in a cycling manner, and press MODE button to confirm entry.5. Next, the word WALK will be displayed on the screen, followed by the number representing the WALK STRIDE LENGTH will start to blink. Adjust this number in the same way as described in step 2.6. The display will show RUN and the number representing the RUN STRIDE LENGTH will start to blink. Change this value in the same way as described in step 2.Note: For more information on how to calculate STRIDE LENGTH, see the CALCULATING STRIDE LENGTH section.7. Next, GOAL will be displayed on the screen, and the daily goal value for the ten-thousandth value will start to blink. Change the rest of the values in the same way as mentioned in step 2. Press the MODE button to confirm your entry.
OPERATING THE PEDOMETER
Press the MODE button to scroll through the different modes of the pedometer.TIME MODEDisplays the time in 12-Hour or 24-Hour format. (HH:MM.SS) The STEPS TAKEN is displayed at the bottom of the screen.Note:
- This information automatically resets at midnight.
- By pressing the ADJUST button, you can toggle through the following the information beneath the time:> STEPS TAKEN: How many steps you have taken in the current day.> % OF GOAL COMPLETED: How much of your daily goal you have accomplished during the current day.FORMULA:(#of Run steps + # of Walk steps)= % of Goal CompletedDaily goal target> CALORIES BURNED: How many Calories have been burned during the current day.> DISTANCE TRAVELED: How many Miles or Kilometers traveled during the current day.> EXERCISE TIME: The length of time you were active during the current day.> AVERAGE SPEED: The average speed at which you had walked or ran during the current day.
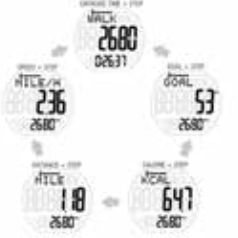
WALK & RUN MODESDisplays the number of STEPS TAKEN while in RUN and WALK modes. Press and hold the ADJUST button to switch between the different options:WALK MODE: The pedometer uses the WALK STRIDE LENGTH* to determine CALORIES BURNED and DISTANCE TRAVELED. Before walking, make sure your pedometer is set to WALK mode. RUN MODE: The pedometer uses the
RUN STRIDE LENGTH* to determine CALORIES BURNED and DISTANCE TRAVELED. Before running, make sure your pedometer is set to RUN mode. *Refer back to the SETTING USER INFORMATION section of this manual to set your STRIDE LENGTHS.Note:• By pressing the ADJUST button, you can toggle through the following information:> WALK or RUN: STEPS TAKEN is on the middle line, and EXERCISE TIME is on the bottom line.> % OF GOAL COMPLETED: How much of your daily goal you have accomplished during the current day. STEPS TAKEN will be on the bottom line.FORMULA:(#of Run steps + # of Walk steps)= % of Goal CompletedDaily goal target> KCAL: CALORIES BURNED is on the middle line, and STEPS TAKEN is on the bottom line.> MILE: DISTANCE TRAVELED is on the middle line, and STEPS TAKEN is on the bottom line.> ML/H or KM/H: AVERAGE SPEED is on the middle line, and STEPS TAKEN is on the bottom line.• While on any of the above screens, pressing and holding the RESET button for 3 seconds will clear all of the following information for the current day: STEPS TAKEN, CALORIES BURNED, DISTANCE TRAVELED, AVERAGE SPEED, % of GOAL COMPLETED and EXERCISE TIME.
PACER MODEThis function will help motivate you to keep walking or running at the same pace you want during exercising, by using a repeating beep sound. This beeping represents the number of beeps/steps per minute. The default is 80 beeps per minute. To turn this feature ON, press the ADJUST button.To customize this setting, press and hold the ADJUST button for 2 seconds. You will see the number representing the beeps per minute start to blink. Press the ADJUST button to increase the selection in a cycling manner. Press the MODE button again to confirm entry. Note: You can continue to use PACER mode while using other modes.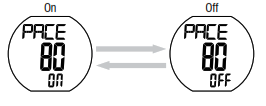
ALARM MODEUse this ALARM feature to remind yourself of when to be active. To turn this feature ON, press the ADJUST button (or to turn OFF, press the ADJUST button again).To customize the ALARM, press and hold the ADJUST button for 2 seconds. You will see the number representing the HOUR start to blink. Pressing the ADJUST button will increase this number by 1 in a cycling manner. Press the MODE button to confirm entry. Repeat this step for the MINUTES.
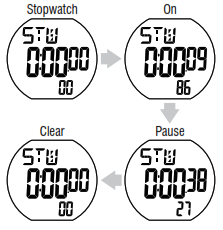
STOPWATCH FUNCTIONTo use the stopwatch during your workouts, Press the ADJUST button to START and PAUSE the clock. Press the RESET button to RESET the clock.
USER INFORMATION MODEIn this mode, you will be able to customize this pedometer with your personalized information, such as AGE, WEIGHT, RUN and WALK STRIDE LENGTHS and DAILY GOAL.
MEMORY MODEAt midnight, the information recorded during the day will be stored into this device, for up to 30 days. In this mode, you can review how many steps you took each day, for the past 30 days.Note:• Press the ADJUST button to scroll through the days. The top of the display will show the date from which the information is being displayed.
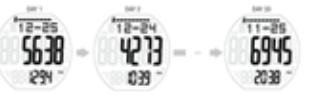
• When the 30 days of memory is full, the pedometer will automatically delete day 30 (30 days in the past) and continue doing so each day the memory is full.• While viewing the information from past days, other information such as CALORIES BURNED, DISTANCE TRAVELED, AVERAGE SPEED, EXERCISE TIMER and % OF GOAL COMPLETED can be accessed in a cycling manner by pressing the RESET button.• To clear the memory, press and hold the MODE and RESET buttons for 3 seconds to erase all data stored in memory.BACKLIGHT FEATURETo help view the pedometer screen in darker lighting conditions, this pedometer comes equipped with a backlight function. Press the Light button and the display will be illuminated for 4 seconds. Note: The backlight can be used in any mode.SLEEP MODEThe pedometer display will turn off after 3 minutes of inactivity. Pressing a button, plugging in the earbuds or moving around will wake the pedometer.
USING THE FM RADIO
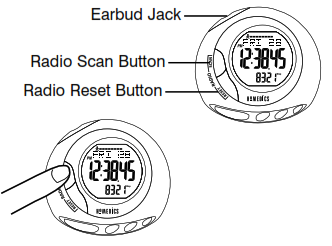
To use the FM Radio, simply insert the earbud connector into the jack located on the device. The radio station will automatically be displayed on the screen indicating that the radio is ON.To control the volume, use the dial located on the earbuds to make the sound louder or softer.Press the RADIO SCAN button located on the front of the device to increase FM frequency to the next FM station with reception. Continue to press the RADIOSCAN button to get the desired station. To reset the stations back to the lowest FM frequency, press the RADIO RESET button located on the front of the device.Note:• By removing the earbuds connector from the jack on the pedometer, the radio will automatically turn OFF.• If at any time, you insert the earbuds and you don’t hear any sound, follow the below steps:> Make sure the volume is loud enough for you to hear.> Press the RADIO SCAN button to check if you hear the radio changing from station to station, or if the station is displayed on the LCD screen.• If after doing both of the above steps, you still don’t hear any sound, you may need to change the batteries for the radio. As noted in the INSTALLING THE BATTERIES section, the batteries for the FM Radio are located on the left side of the battery compartment. See INSTALLING THE BATTERIES section for more details.
CARE, MAINTENANCE & CLEANING
- Do not disassemble the pedometer. If in need of repair, refer to the warranty section of this manual.
- Do not subject the device to extreme shocks (do not drop on the floor).
- Do not subject the device to extreme temperatures, humidity, moisture, or direct sunlight. Protect from dust.
- Do not expose the device to strong chemicals such as gasoline, clean solvents, acetone, alcohol, or insect repellents as they may damage the device’s seal, case, or finish.
- Leaky batteries can damage the unit. Remove the battery when the unit will not be used for a long time.
- Follow local ordinances and recycling instructions regarding disposal or recycling of the device and device components, including batteries.
- If the unit is stored near freezing, allow it to acclimate to room temperature before use.
- Do not immerse the unit in water as this will result in damage to the unit.
- Do not wrap the earbuds around any part of the body.
- To avoid accidental strangulation, keep this product away from children. Do not drape around the neck.
- This device may not meet its performance specifications if stored or used outside of these temperature and humidity ranges:
- Storage/Transportation Environment Temperature:41°F~95°F (5°C~35°C)Humidity: less than 70%
- Operating Environment Temperature: 32°F~122°F (0°C~50°C)Humidity: less than 90%
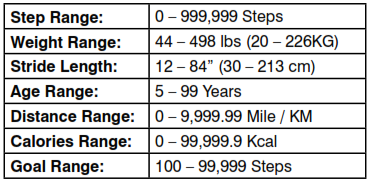
SPECIFICATIONS
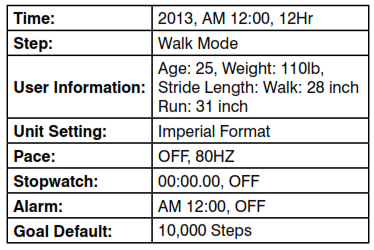
DEFAULT SETTINGS
POTENTIAL FOR ELECTROMAGNETIC INTERFERENCE
To avoid inaccurate results caused by electromagnetic interference between electrical and electronic equipment, do not use the device near a cell phone or microwave oven. This device complies with Part 15 of the FCC Rules. Operation is subject to the following two conditions: (1) this device may not cause harmful interference, and (2) this device must accept any interference received, including interference that may cause undesired operation.
Note: The manufacturer is not responsible for any radio or TV interference caused by unauthorized modifications to this equipment. Such modifications could void the user authority to operate the equipment.
Note: This equipment has been tested and found to comply with the limits for a Class B digital device, pursuant to Part 15 of the FCC Rules. These limits are designed to provide reasonable protection against harmful interference in a residential installation. This equipment generates, uses and can radiate radio frequency energy and, if not installed and used in accordance with the instructions, may cause harmful interference to radio communications. However, there is no guarantee that interference will not occur in a particular installation. If this equipment does cause harmful interference to radio or television reception, which can be determined by turning the equipment off and on, the user is encouraged to try to correct the interference by one or more of the following measures:
- Reorient or relocate the receiving antenna.
- Increase the separation between the equipment and receiver.
- Connect the equipment into an outlet on a circuit different from that to which the receiver is connected.
- Consult the dealer or an experienced radio/TV technician for help.
LIMITED ONE YEAR WARRANTYHoMedics sells its products with the intent that they are free of defects in manufacture and workmanship for a period of one year from the date of original purchase, except as noted below. HoMedics warrants that its products will be free of defects in material and workmanship under normal use and service. This warranty extends only to consumers and does not extend to Retailers.To obtain warranty service on your HoMedics product, contact a Consumer Relations Representative by telephone at 1-800-466-3342 for assistance. Please make sure to have the model number of the product available.HoMedics does not authorize anyone, including, but not limited to, Retailers, the subsequent consumer purchaser of the product from a Retailer or remote purchasers, to obligate HoMedics in any way beyond the terms set forth herein. This warranty does not cover amage caused by misuse or abuse; accident; the attachment of any unauthorized accessory; alteration to the product; improper installation; unauthorized repairs or modifications; improper use of electrical/power supply; loss of power; dropped product; malfunction or damage of an operating part from failure to provide manufacturer’s recommended maintenance; transportation damage; theft; neglect; vandalism; or environmental conditions; loss of use during the period the product is at a repair facility or otherwise awaiting parts or repair; or any other conditions whatsoever that are beyond the control of HoMedics. This warranty is effective only if the product is purchased and operated in the country in which the product is purchased. A product that requires modifications or adoption to enable it to operate in any other country than the country for which it was designed, manufactured, approved and/ or authorized, or repair of products damaged by these modifications is not covered under this warranty.THE WARRANTY PROVIDED HEREIN SHALL BE THE SOLE AND EXCLUSIVE WARRANTY. THERE SHALL BE NO OTHER WARRANTIES EXPRESS OR IMPLIED INCLUDING ANY IMPLIED WARRANTY OF MERCHANTABILITY OR FITNESS OR ANY OTHER OBLIGATION ON THE PART OF THE COMPANY WITH RESPECT TO PRODUCTS COVERED BY THIS WARRANTY. HOMEDICS SHALL HAVE NO LIABILITY FOR ANY INCIDENTAL, CONSEQUENTIAL OR SPECIAL DAMAGES. IN NO EVENT SHALL THIS WARRANTY REQUIRE MORE THAN THE REPAIR OR REPLACEMENT OF ANY PART OR PARTS WHICH ARE FOUND TO BE DEFECTIVE WITHIN THE EFFECTIVE PERIOD OF THE WARRANTY. NO REFUNDS WILL BE GIVEN. IF REPLACEMENT PARTS FOR DEFECTIVE MATERIALS ARE NOT AVAILABLE, HOMEDICS RESERVES THE RIGHT TO MAKE PRODUCT SUBSTITUTIONS IN LIEU OF REPAIR OR REPLACEMENT.This warranty does not extend to the purchase of opened, used, repaired, repackaged and/or resealed products, including but not limited to sale of such products on Internet auction sites and/or sales of such products by surplus or bulk resellers. Any and all warranties or guarantees shall immediately cease and terminate as to any products or parts thereof which are repaired, replaced, altered, or modified, without the prior express and written consent of HoMedics.This warranty provides you with specific legal rights. You may have additional rights which may vary from state to state. Because of individual state regulations, some of the above limitations and exclusions may not apply to you.For more information regarding our product line in the USA, please visit: www.homedics.com.
For service or repair, do not return this unit to the retailer. Contact HoMedics Consumer Relations at:Email: Phone: 1-800-466-3342Business Hours: 8:30am-7pm ETMonday-FridayHoMedics, LLC.3000 Pontiac TrailCommerce TownshipMI 48390Printed in ChinaHoMedics is a registered trademark of HoMedics, LLC.© 2013 HoMedics, LLC. All rights reserved.IB-PDM200B
Homedics PDM-200 3D Deluxe Pedometer User Manual – Homedics PDM-200 3D Deluxe Pedometer User Manual –
[xyz-ips snippet=”download-snippet”]