![]()

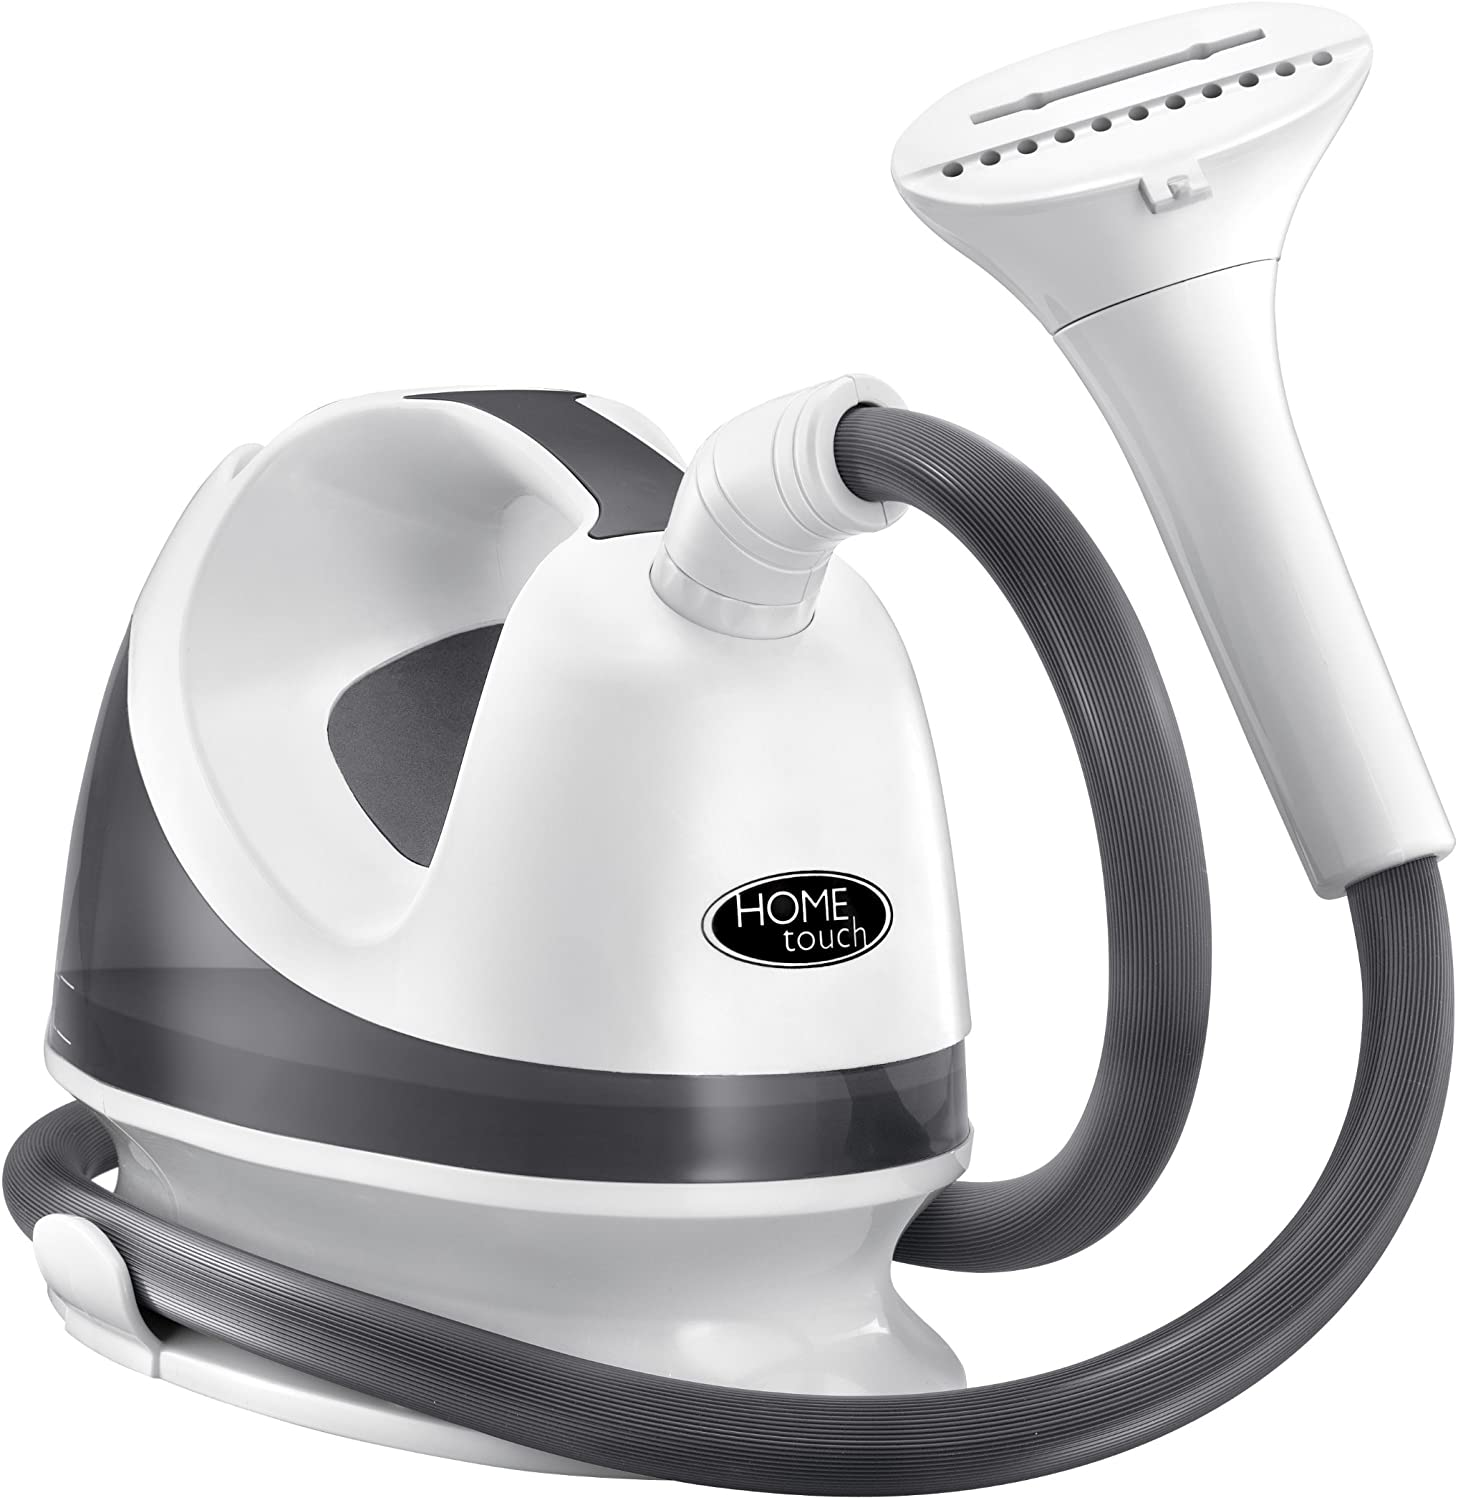
PS-150Instruction Manual and Warranty Information2 year limited warranty
IMPORTANT SAFETY INSTRUCTIONS:
WHEN USING ELECTRICAL PRODUCTS, BASIC SAFETY PRECAUTIONS SHOULD ALWAYS BE FOLLOWED, INCLUDING THE FOLLOWING:
READ ALL INSTRUCTIONS BEFORE USING.WARNING – To reduce the risk of burns, fire, electric shock, or injury to persons:
- Burns could occur from touching hot metal parts, hot water, or steam. Use care when you turn a steam appliance upside down – there may be hot water in the reservoir.
- To reduce the risk of contact with hot water emitting from steam vents, check appliance before each use by holding it away from body and operating the steam button.
- Use appliance only for its intended use.
- To reduce the risk of electric shock, do not immerse the appliance in water or other liquids.
- Never yank cord to disconnect from outlet; instead, grasp plug and pull to disconnect.
- Do not allow cord to touch hot surfaces. Let appliance cool completely before putting away. Loop cord loosely around appliance when storing.
- Always disconnect appliance form electrical outlet when filling with wateror emptying, and when not in use.
- Do not operate appliance with a damaged cord, or if the appliance has been dropped or damaged. To reduce the risk of electric shock, do not disassemble or attempt to repair the appliance, take it to a qualified service person for examination and repair. Incorrect reassembly or repair could cause a risk of fire, electric shock, or injury to persons when the appliance is used.
- Close supervision is necessary for any appliance being used by or near children. Do not leave appliance unattended while connected.
- To reduce the likelihood of circuit overload, do not operate another high wattage appliance on the same circuit.
- If an extension cord is absolutely necessary, a 10 ampere rated cord should be used. Cords rated for less amperage may overheat. Care should be taken to arrange the cord so that the cord cannot be pulled or tripped over.
- To reduce the risk of electric shock, this appliance has a polarized plug (one blade wider than the other). This plug will fit in a polarized outlet only one way. If the plug does not fit fully in the outlet, reverse the plug. If it still does not fit, contact a qualified electrician to install the proper outlet. Do not change the plugin anyway.
SAVE THESE INSTRUCTIONS
SAVE THESE INSTRUCTIONS
PRODUCT INFORMATION
PerfectSteam® Features
- Safe for use on all types of fabrics
- Quick heat-up
- Easy fill water tank provides 30 minutes of continuous steam
- Conveniently integrated steam nozzle and hose storage
- Convenient cord wrap
- 5-foot flexible steam hose
- Includes fabric brush, lint brush, crease clamp, and door hook
- For household use only.
INSTRUCTIONS FOR USE
Before Beginning
- Read all instructions including Important Safety Instructions and Warnings before use.
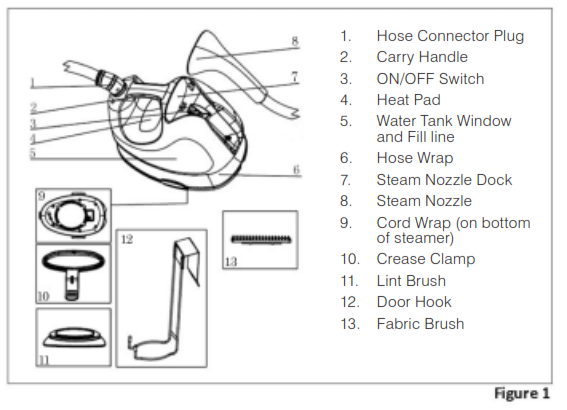
- Carefully remove all contents from the packaging and inspect the product to make sure all components have been received (Fig 1).
- Completely unwind the power cord from the bottom of the appliance.NOTE:• Do NOT attach the steam hose connector plug onto the steamer.• Do NOT plug in or turn on the unit until assembly is complete.
Filling the Water Tank
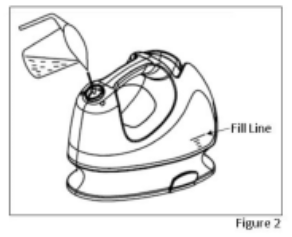
- Be sure the unit is off and unplugged.
- Fill the water tank through the Hose Connector Opening with cold water to the desired level (Fig 2). Do NOT fill past the maximum fill line.
 NOTE: Only fill the water tank with cold water. Do NOT use hot water.
 - When you have finished filling the tank, align the arrow on the steamer hose connector plug with the unlock symbol on the steamer housing, firmly push the connector down and turn clockwise so the arrow points to the locked symbol to securely lock the hose onto the steamer housing (Fig 3).
 NOTE: Only fill the water tank with cold water. Do NOT use hot water.
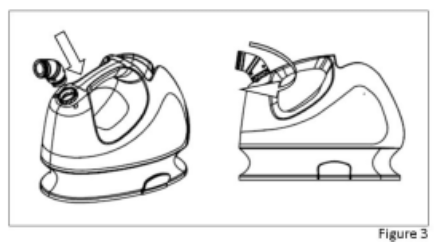
Using the SteamerAlways check fabric labels for recommendations before steaming. Test colorfastness in an inconspicuous spot. Some fabrics can be steamed better from the underside of the material. Heavy fabrics may require repeated steaming. Never steam a garment while it is being worn.
- Place the steamer on the floor.
- Hang the door hook on the top of a door and place the steam nozzle on the door hook with the steam vents pointing away from the door (Fig 4).
- Plug the steamer cord into a 120V AC electrical outlet.
- Press the ON/OFF switch to the ON position. The switch will illuminate to indicate the garment steamer is on (Fig 5). Steam will emit in approximately 5-6 minutes from the steam nozzle.NOTE: Keep the steam nozzle on the door hook until steam forms.
- Remove the steam nozzle from the door hook with the steam vents pointing away from you. Hang the garment on a hanger and hang on the door hook (Fig 6).
- Lightly touch the garment with the steam nozzle and steam in an up/down vertical motion starting from the top of the garment to the bottom. Always keep the hose and nozzle elevated above the steamer (Fig 6).NOTE: The steamer may make a gurgling sound during operation. This is a normal result of condensation. If this happens, extend the hose up and out so the excess moisture can drain back into the water tank.
- When you have finished steaming, place the steam nozzle on the door hook (Fig 4) and turn the ON/OFF switch to the OFF position (Fig 5).
- Use caution when handling until the steamer has fully cooled.

 NOTE: Keep the steam nozzle on the door hook until steam forms.
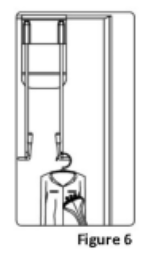
Using AttachmentsWhen attaching or changing attachments, be sure the unit is off, unplugged, and completely cool to avoid contact with hot water.
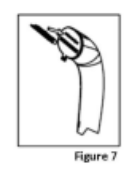
Fabric BrushThe fabric brush opens the weave of fabrics for better steam penetration.
- Attach the fabric brush to the steam nozzle by lining up the back of the fabric brush with the steam nozzle slot and gently push into the slot (Fig 7).
- Move the fabric brush in a downward motion from top to bottom gently brushing the fabric.
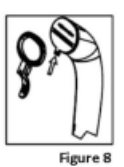
Crease Clamp
The crease clamp helps create straight creases.
- Slide the crease clamp onto the steam nozzle by aligning the crease clamp slot with the steam nozzle tab (Fig 8).
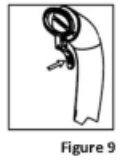
- Push the crease clamp trigger to open the crease clamp (Fig 9).
- Place the garment between the crease clamp and steam nozzle.
- Release the trigger.
- Move the crease clamp in a downward motion from top to bottom to set a crease.
Lint BrushThe lint brush removes lint and pet hair from garments.
- Attach the lint brush to the steam nozzle by lining up the back of the lint brush with the steam nozzle slot and gently push into the slot (Fig. 10).
- Move the lint brush in a downward motion from top to bottom to remove lint and pet hair.
- Clean the lint brush by brushing in the opposite direction on an old cloth.
After Use and Storage
- Be sure the steamer is turned OFF and unplugged.
- Allow the steamer to cool for at least 30 minutes.
- Hold the steam hose in a vertical position so any condensation can flow back into the water tank.
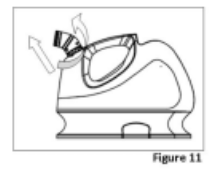
- Remove the steam hose by turning the hose connector plugin a counterclockwise direction so the arrow points to the unlock symbol and pull up (Fig 11).
- Empty the water from the tank by pouring into a sink (Fig 12).
- Reattach the steam hose to the steamer.
- Wrap the steam hose around the steamer and insert the steam nozzle into the nozzle dock (Fig 13).
- Wrap the power cord in its storage area on the bottom of the unit (Fig 13).NOTE: Do not turn the steamer upside down unless all water has been emptied from the water tank.

Cleaning and Maintenance
- Disconnect steamer from electric outlet.
- Do not attempt to clean when hot.
- Clean exposed parts with a soft, slightly damp cloth. To remove stains, use a mild soap.
- Never use detergents, excess water, treated cloths, harsh cleaning agents, or spray cleaners.
- Do not immerse the steamer in water.
- Do not attempt to disassemble, or open the steamer casing as this will void your warranty.
- Follow the Removing Mineral Build-Up procedure every 100 hours of operation to help avoid mineral build-up.
- Water mineral content and conditions will vary in different areas. To ensure continued operation of the steamer, never store without cleaning and removing excess water from the water tank.
- In areas where the voltage exceeds 120V, it may be necessary to clean your unit more frequently.
Removing Mineral Build-Up
One common problem with steamers is mineral build-up caused by the high mineral content of many municipal water supplies. Mineral residue inside of the internal pipes and heater can cause intermittent steaming or in severe cases, no steaming at all.The best way to avoid this is to use demineralized or distilled water in the unit. The following procedure can be used to remove mineral build-up. If you are unable to use demineralized or distilled water, we recommend you use this procedure every 100 hours of use to help avoid mineral build-up.
- Turn the unit off and unplug the power cord. Allow the steamer to cool for 30 minutes.
- Remove the steam hose from the unit.
- Fill the water tank with 7 oz. of white vinegar and 13 oz. of water.
- Connect the steam hose onto the unit and hang the steam nozzle on the door hook.
- Plug the steamer into a 120V AC electrical outlet.
- Let the steamer run for 3 minutes with this mixture.NOTE: Do NOT steam any fabric with this mixture.
- Turn the unit off and unplug the power cord.
- Allow the steamer to cool for at least 30 minutes.
- Remove the steam hose and empty the water tank over the sink.
- Rinse the water tank with fresh water and pour out.
- Fill the steamer with fresh water and repeat steps 4-9.
- Reassemble the steamer and operate normally.
Problem Solving
| PROBLEM | CAUSE | SOLUTION |
| There is no steam | Steamer not plugged in | Plug into electrical outlet |
| ON/OFF switch not in “ON” position | Remove the steam nozzle and hang on door hook. Push the switch to the “ON” position. Switch will illuminate. | |
| Water tank is low or empty | Check water tank to be sure it is full. See Filling the Water Tank on page 5. | |
| The hose is kinked | Be sure the steam hose is fully extended. | |
| There is low or intermittent steam | Mineral build-up | Follow the Removing Mineral Build-Up procedure on page 9. |
| Water tank is low | Check water tank to be sure it is full. See Filling the Water Tank on page 5. | |
| Water runs through the steam holes in the nozzle | Condensation in steam hose | Hold the hose vertically to allow the water to run back into the water tank. |
| The steam hose and nozzle are not being used in a a vertical position | Hold the hose vertically to allow the water to run back into the water tank. | |
| Nozzle gurgles | Condensation in steam hose | Hold the hose vertically to allow the water to run back into the water tank. |
| The steamer takes a long time to heat | Mineral build-up | Follow the Removing Mineral Build-Up procedure on page 9 |
| The water tank is filled above the fill line | Unplug the steamer, allow it to cool for 30 minutes, remove the steam hose and empty the water water tank to the maximum fill line. |
Limited Two Year Warranty
HoMedics sells its products with the intent that they are free of defects in manufacture and workmanship for a period of two years from the date of original purchase, except as noted below. HoMedics warrants that its products will be free of defects in material and workmanship under normal use and service. This warranty extends only to consumers and does not extend to Retailers.To obtain warranty service on your HoMedics product, mail the product and your dated sales receipt (as proof of purchase), postpaid, to the following address:Home Touch ProductsDept. 168, Suite 343155 West Nine Mile RoadNovi, MI 48375No COD’s will be accepted.
HoMedics does not authorize anyone, including, but not limited to, Retailers, the subsequent consumer purchaser of the product from a Retailer or remote purchasers, to obligate HoMedics in any way beyond the terms set forth herein. This warranty does not cover damage caused by misuse or abuse; accident; the attachment of any unauthorized accessory; alteration to the product; improper installation; unauthorized repairs or modifications; improper use of electrical/power supply; loss of power; dropped product; malfunction or damage of an operating part from failure to provide manufacturer’s recommended maintenance; transportation damage; theft; neglect; vandalism; or environmental conditions; loss of use during the period the product is at a repair facility or otherwise awaiting parts or repair; or any other conditions whatsoever that are beyond the control of HoMedics.
This warranty is effective only if the product is purchased and operated in the country in which the product is purchased. A product that requires modifications or adoption to enable it to operate in any other country than the country for which it was designed, manufactured, approved, and/or authorized, or repair of products damaged by these modifications is not covered under this warranty.
THE WARRANTY PROVIDED HEREIN SHALL BE THE SOLE AND EXCLUSIVE WARRANTY. THERE SHALL BE NO OTHER WARRANTIES EXPRESS OR IMPLIED INCLUDING ANY IMPLIED WARRANTY OF MERCHANTABILITY OR FITNESS OR ANY OTHER OBLIGATION ON THE PART OF THE COMPANY WITH RESPECT TO PRODUCTS COVERED BY THIS WARRANTY. HOMEDICS SHALL HAVE NO LIABILITY FOR ANY INCIDENTAL, CONSEQUENTIAL, OR SPECIAL DAMAGES. IN NO EVENT SHALL THIS WARRANTY REQUIRE MORE THAN THE REPAIR OR REPLACEMENT OF ANY PART OR PARTS WHICH ARE FOUND TO BE DEFECTIVE WITHIN THE EFFECTIVE PERIOD OF THE WARRANTY. NO REFUNDS WILL BE GIVEN. IF REPLACEMENT PARTS FOR DEFECTIVE MATERIALS ARE NOT AVAILABLE, HOMEDICS RESERVES THE RIGHT TO MAKE PRODUCT SUBSTITUTIONS IN LIEU OF REPAIR OR REPLACEMENT.
This warranty does not extend to the purchase of opened, used, repaired, repackaged, and/or resealed products, including but not limited to sale of such products on Internet auction sites and/or sales of such products by surplus or bulk resellers. Any and all warranties or guarantees shall immediately cease and terminate as to any products or parts thereof which are repaired, replaced, altered, or modified, without the prior express and written consent of HoMedics.
This warranty provides you with specific legal rights. You may have additional rights which may vary from country to country. Because of individual country regulations, some of the above limitations and exclusions may not apply to you.For more information regarding our product line in the USA, please visit: www.homedics.com
Mail To:Home Touch ProductsDept. 168, Suite 343155 W. Nine Mile Rd.Novi, MI 48375E-mail: [email protected]Phone:Monday – Friday8:30am – 5:00pm (EST)1.800.466.3342
© 2009-2010 HoMedics, Inc. and its affiliated companies, all rights reserved. HoMedics®,Home Touch®, and PerfectSteam®, are registered trademarks of HoMedics, Inc.and its affiliated companies. All rights reserved.IB-PS150C
2 year limited warranty
Homedics PS-150 Perfect Steam Portable Compact Garment Steamer Instruction Manual and Warranty Information – Homedics PS-150 Perfect Steam Portable Compact Garment Steamer Instruction Manual and Warranty Information –
[xyz-ips snippet=”download-snippet”]