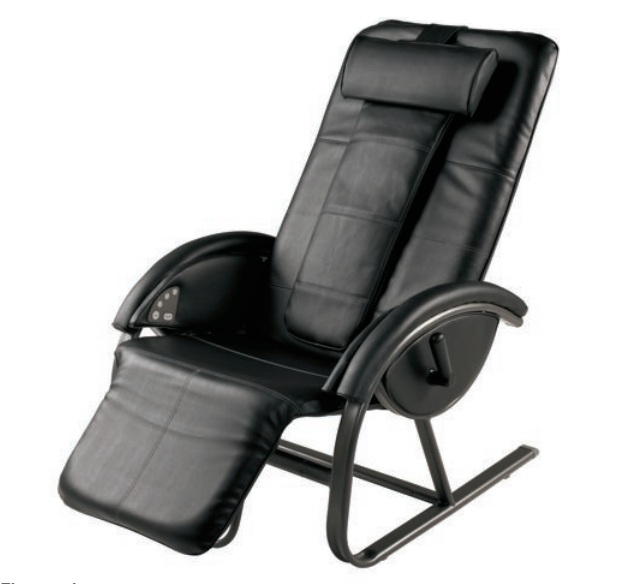

Asiento reclinable AntiGravityASIENTO RECLINABLE DE LUJO CONMECANISMO DE MASAJE MÓVIL
TWO YEAR LIMITED WARRANTY(Valid in USA only)
HoMedics sells its products with the intent that they are free of defects in manufactureand workmanship for a period of two years from the date of original purchase, exceptas noted below. HoMedics warrants that its products will be free of defects in materialand workmanship under normal use and service. This warranty extends only to consumersand does not extend to Retailers.To obtain warranty service on your HoMedics product, mail the product and yourdated sales receipt (as proof of purchase), postpaid, to the following address:HoMedics Consumer RelationsService Center Dept. 1683000 Pontiac TrailCommerce Township, MI 48390No COD’s will be accepted.HoMedics does not authorize anyone, including, but not limited to, Retailers, the subsequentconsumer purchaser of the product from a Retailer or remote purchasers, toobligate HoMedics in any way beyond the terms set forth herein. This warranty doesnot cover damage caused by misuse or abuse; accident; the attachment of any unauthorizedaccessory; alteration to the product; improper installation; unauthorizedrepairs or modifications; improper use of electrical/power supply; loss of power;dropped product; malfunction or damage of an operating part from failure to providemanufacturer’s recommended maintenance; transportation damage; theft; neglect;vandalism; or environmental conditions; loss of use during the period the product isat a repair facility or otherwise awaiting parts or repair; or any other conditions whatsoeverthat are beyond the control of HoMedics.This warranty is effective only if the product is purchased and operated in the countryin which the product is purchased. A product that requires modifications or adoptionto enable it to operate in any other country than the country for which it wasdesigned, manufactured, approved and/or authorized, or repair of products damagedby these modifications is not covered under this warranty.THE WARRANTY PROVIDED HEREIN SHALL BE THE SOLE AND EXCLUSIVE WARRANTY.THERE SHALL BE NO OTHER WARRANTIES EXPRESS OR IMPLIEDINCLUDING ANY IMPLIED WARRANTY OF MERCHANTABILITY OR FITNESS OR ANYOTHER OBLIGATION ON THE PART OF THE COMPANY WITH RESPECT TO PRODUCTSCOVERED BY THIS WARRANTY. HOMEDICS SHALL HAVE NO LIABILITY FORANY INCIDENTAL, CONSEQUENTIAL OR SPECIAL DAMAGES. IN NO EVENT SHALLTHIS WARRANTY REQUIRE MORE THAN THE REPAIR OR REPLACEMENT OF ANYPART OR PARTS WHICH ARE FOUND TO BE DEFECTIVE WITHIN THE EFFECTIVEPERIOD OF THE WARRANTY. NO REFUNDS WILL BE GIVEN. IF REPLACEMENTPARTS FOR DEFECTIVE MATERIALS ARE NOT AVAILABLE, HOMEDICS RESERVESTHE RIGHT TO MAKE PRODUCT SUBSTITUTIONS IN LIEU OF REPAIR ORREPLACEMENT.This warranty does not extend to the purchase of opened, used, repaired, repackagedand/or resealed products, including but not limited to sale of such products onInternet auction sites and/or sales of such products by surplus or bulk resellers. Anyand all warranties or guarantees shall immediately cease and terminate as to anyproducts or parts thereof which are repaired, replaced, altered, or modified, withoutthe prior express and written consent of HoMedics.This warranty provides you with specific legal rights. You may have additional rightswhich may vary from country to country. Because of individual country regulations,some of the above limitations and exclusions may not apply to you.For more information regarding our product line in the USA,please visit: www.homedics.com
Mail To: HoMedics Service Center Dept. 1683000 Pontiac Trail Commerce Township, MI 48390Email:
IMPORTANT SAFEGUARDS
WHEN USING ELECTRICAL PRODUCTS, ESPECIALLY WHENCHILDREN ARE PRESENT, BASIC SAFETY PRECAUTIONS SHOULDALWAYS BE FOLLOWED, INCLUDING THE FOLLOWING:
READ ALL INSTRUCTIONS BEFORE USINGDANGER- TO REDUCE THE RISK OF ELECTROCUTION:
- ALWAYS unplug the appliance from the electrical outlet immediately after using andbefore cleaning.
- DO NOT reach for an appliance that has fallen into water. Unplug it immediately.
- DO NOT use while bathing or showering.
WARNING – TO REDUCE THE RISK OF BURNS,ELECTROCUTION, FIRE OR INJURY TO PERSONS
- An appliance should NEVER be left unattended when plugged in. Unplug from outletwhen not in use and before putting on or taking off parts or attachments
- Close supervision is necessary when this appliance is used by, on or near children,invalids or disabled persons.
- Use this appliance only for its intended use as described in this manual. DO NOT useattachments not recommended by HoMedics; specifically any attachments notprovided with the unit
- NEVER operate this appliance if it has a damaged cord or plug, if it is not workingproperly, if it has been dropped or damaged, or dropped into water. Return it toHoMedics Service Center for examination and repair
- NEVER use pins or other metallic fasteners with this appliance.
- Keep cord away from heated surfaces
- NEVER use while sleeping or fall asleep while using the massager.
- NEVER drop or insert any object into any opening.
- DO NOT operate where aerosol (spray) products are being used or where oxygen isbeing administered. 2
- DO NOT carry this appliance by supply cord or use cord as handle.
- To disconnect, turn all controls to the “OFF” position, then removeplug from outlet.
- This appliance is designed for household use only.
- This appliance is designed for personal, non-professional use only.This appliance should be used only for personal, non-professionaluses.
Caution : All servicing of this massager must be performedby authorized HoMedics service personnel only
SAVE THESE INSTRUCTIONSCaution—Please read all instructions carefullybefore operating.
- If you have any concerns regarding your health consult yourdoctor before using this product.
- Individuals with pacemakers should consult a doctor before use.
- NEVER leave the appliance unattended, especially if children arepresent.
- NEVER cover the appliance when it is in operation.
- DO NOT use this product for more than 15 minutes at a time.
- Extensive use could lead to the products excessive heating andshorter life. Should this occur, discontinue use and allow the unitto cool before operating.
- NEVER use this product directly on swollen or inflamed areas orskin eruptions.
- This product is a non-professional appliance designed to providesoothing massage to worn muscles. DO NOT use this product asa substitute for medical attention.
- DO NOT use this product before bed. The massage has astimulating effect and can delay sleep.
- This product should NEVER be used by any individual sufferingfrom any physical ailment that would limit the user’s capacity tooperate the controls.
- This product should never be used by any individual sufferingfrom any ailments that would limit or altogether inhibit the user’scapacity to feel or have any sensation in the body part that theproduct is being used on.
- This unit should not be used by children or invalids without adultsupervision.
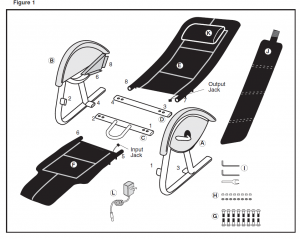
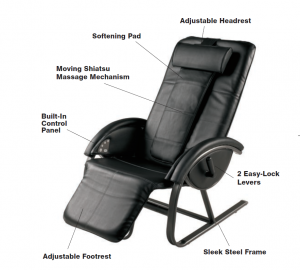
ComponentsCarefully remove all contents from packaging and inspect the productto make sure all components of the chair have been received. These should include:
- Left armrest A
- Right armrest with control panel B
- Front cross bar C
- Bottom cross bar D
- Back frame with attached cushion and massage mechanism E
- Seat frame with attached cushion F
- Large bolts and bolt sleeves for crossbars (8) G
- Washers and Caps/Nuts (8) H
- Small Allen wrenches I
- Optional softening pad J
- Detachable headrest K
- AC adaptor LSee Figure 1.
Easy to Follow Guide to Chair Assembly1. Assemble Chair Base
- Attach the front cross bar C to left armrest A by lining up the labeled “1” on the cross bar with the “1” onthe left armrest. Secure with the provided large bolts and bolt sleeves G using the allen wrench I . Attach thebottom cross bar D to the left armrest ensuring the labeled “3” on the crossbar lines up with the “3” on thearmrest. Secure with the provided large bolts and bolt sleeves using the allen wrench.DO NOT FULLY TIGHTEN BOLTS AT THIS POINT. See Figure 2.
- Attach right armrest B to cross bars C D making sure to line up the labeled “2” and “4” on the cross barswith the “2” and “4” on the armrest. Secure with large bolts and bolt sleeves using the allen wrench.See Figure 3.
- Tighten all bolts, ensuring the base sits level without wobbling.
NOTE: ASSEMBLE BASE ON ITS SIDE.

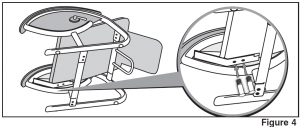
2. Attach Seat Cushion/Frame to Base
- Align the seat with pre-attached bolts. From the bottom side add washer and caps/nuts to secure theSeat frame to the base. See Figure 4.
- Use the provided allen wrench to tighten partially.
NOTE: IT MAY BE EASIER TO TURN THE BASE ON ITS SIDE TO INSERT THE BOLTS.
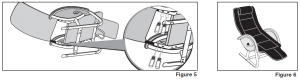
3. Attach Back Cushion/Frame to Base
- Align the back with the pre-attached bolts to the frame. From the back side, add washer and caps/nuts to secure toBack frame to Chair Base. See Figure 5.
- Attached correctly, the back frame will form a concave shape and fabric stitching should face up. See Figure 6.
- Tighten all caps/nuts using the allen wrench.
4. Connect Power Source
- Locate the output jack behind the AntiGravity chair in the lower right corner of the back cushion. The input jackwill also be found behind the AntiGravity chair on the right side of the seat cushion. See Figure 7. Firmly insertthe output jack into the input jack to connect the massage mechanism with the control panel.
- To attach the softening pad J align the loop strip located on the softening pad strap to the hook strip onthe back of the chair cushion to secure into place. See Figure 8.
- To attach the headrest K to the back cushion, align the loop strip on the strap of the headrest with thehook strip on the softening pad or back of the chair cushion to secure in place. See Figure 9.
- Ensure the AC power adaptor cord and extends through the back of the frame. Be sure the AC adaptorcord is not twisted or crimped between the mat and the metal frame.

Instructions for Shiatsu AntiGravity Recliner Use
Your Shiatsu AntiGravity recliner is designed to provide relaxation in a variety of positions utilizing the easylocklevers on each side of the armrests. The ideal position for optimum relaxation is one in which the feet areabove the heart. This position will reduce pressure on the spine and help relieve muscle tension.NOTE: The Shiatsu AntiGravity recliner design has a weight limit of 300 pounds. Persons exceeding thisbody weight should not use this recliner.
- Before sitting in the Shiatsu AntiGravity recliner, be sure it is in the complete upright position by pushing thelevers forward toward the footrest.
- Sit in the chair and lean back slowly. Sitting all the way back in the seat will make it easier to recline. Toadjust the angle of the chair, hold on to the armrests and lean back or forward until you reach the desiredposition. Lock the position into place by pulling the levers back.
- The AnitGravity recliner’s ergonomic design ensures proper spine alignment in any of its reclining positions.
- The footrest may be raised by pulling it upward. Each position will sound with a click. To lower the footrest,raise it until it stops and then push it back towards the floor.
- Before getting out of the AntiGravity recliner, be sure to return it to its full upright position and lock into placeby pulling the easy-lock levers back.
- Stand up using the armrests for support.
Tip: To help you recline, unlock the levers and slowly raise your hands above your head and lean back. Lockin your desired position by pulling the levers back. To sit upright, unlock the levers and move hands slowlytowards your knees while leaning slightly forward. This will bring the recliner back to its full upright position.
Power Adaptor Instructions
Connect the adaptor jack to the massage chair power receptacle located along the right side ofthe chair. Once inserted, plug the other end into an AC power outlet. Use only the AC poweradaptor provided with this unit.
AC Power Adaptor InformationYour massage chair is powered by an attached custom AC home adaptor. Use only the suppliedAC home adaptor as other similar-looking adaptors may cause irreparable damage to the unitand will void your warranty.
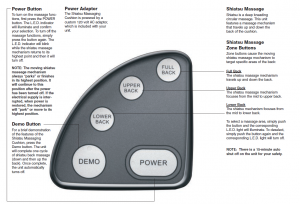
Massage Chair and Control Panel InstructionsPress the POWER button once to activate the control panel. The LED indicator will illuminate.To deactivate, press again. For complete instructions, please see pages 8-9.NOTE: The intensity of the massage will change with the angle of the chair back. Generally,the more the chair is reclined, the more intense the massage will be. You can adjust thechair angle to suit your personal comfort level. You may also soften the massage force byplacing a towel between yourself and the unit.Caution: Do not jam or force any part of your body in the movingmassage mechanism.
Automatic Shut OffThe Shiatsu AntiGravity recliner has been designed for convenience and safety. As a specialprecaution against falling asleep while using the unit, or leaving the unit on while it is still inoperation, we’ve programmed it to automatically stop working after 15 minutes. This specialfeature should not be considered as a substitute for OFF. Always remember to turn your unit offwhen not in use.
Shiatsu AntiGravity Recliner™LUXURY RECL INER WI THMOV ING MAS SAGE MECHANI SM
MaintenanceTo Store: Avoid contact with sharp edges or pointed objects which mightdamage/puncture the fabric.To Clean: Disconnect massage cushion from power source before cleaning.The massage cushion and control panel may be cleaned with a soft, dampcloth only.
- The massage cushion is not machine washable and must not come intocontact with water or any other liquids.
- Do not immerse into liquids to clean.
- Never use abrasive cleaners, brushes, gasoline, kerosene, polish or paintthinner to clean.
- Do not attempt to repair your AntiGravity recliner. There are no user serviceableparts. For service, send the unit to the HoMedics service address listed in thewarranty section.
Frame: Periodically, the frame should be checked to ensure the screws are tight.If the frame is found to be loose, tighten screws with the tools provided.The AntiGravity recliner and massage cushion are designed for indoorapplications only. Use of this product for outdoor applications may causeirreparable damage and void your warranty.
Back Cushion/Frame Removalfor Warranty ServiceIf you experience a problem with the massage mechanism located in the backframe/cushion of the Shiatsu AntiGravity Recliner within a two year period, sendthis component to the HoMedics Service Center for repair as noted in thewarranty on page 12.To disassemble the back cushion/frame, first disconnect the power sourcelocated behind the chair at the back cushion base and seat cushion. See figure7 on page 6 for an illustration. Now completely unscrew the bolts located alongthe base of the back cushion to detach from the chair. See figure 5 on page 5.Once removed, please see the warranty on page 12 for further instruction.
Do not use the chair or connect it to a power sourcewhile disassembled.
Shiatsu AntiGravityReclinerLUXURY RECL INER WI THMOV ING MAS SAGE MECHANI SM
NOTE: Color of fabric and chair components may differ from colors shown above
Read More About This Manual & Download PDF:
Homedics Shiatsu AntiGravity Recliner Manual AG-3002 – Homedics Shiatsu AntiGravity Recliner Manual AG-3002 –
[xyz-ips snippet=”download-snippet”]