Homedics SS-5010 SoundSpa Premier Instruction Manual and Warranty Information
Create your perfect sleep environment.Thank you for purchasing SoundSpa Premier, the HoMedics acoustic relaxation machine. This, like the entire HoMedics product line, is built with high-quality craftsmanship to provide you years of dependable service. We hope that you will find it to be the finest product of its kind. SoundSpa helps create your perfect sleep environment. Fall asleep to any of its six calming sounds, then wake to sound, radio or alarm. SoundSpa Nature Sounds can also mask distractions to improve your concentration while you read, work or study.
IMPORTANT SAFETY INSTRUCTIONS:When using an electrical appliance, basic precautions should always be followed, including the following:
READ ALL INSTRUCTIONS BEFORE USING
DANGER – To reduce the risk of electric shock:
- Always unplug the appliance from the electrical outlet immediately before cleaning.
- Do not reach for an appliance that has fallen into water. Unplug it immediately.
- Do not place or store appliance where it can fall or be pulled into a tub or sink. Do not place in or drop into water or other liquid.
WARNING – To reduce the risk of burns, fire, electric shock or injury to persons:
- Close supervision is necessary when this appliance is used by or near children, invalids or disabled persons.
- Use this appliance only for its intended use as described in this manual. Do not use attachments not recommended by HoMedics; specifically any attachmentsnot provided with the unit.
- Never operate this appliance if it has a damaged cord, plug, cable or housing. If it is not working properly, if it has been dropped or damaged, return it to Homedics Service Center for examination and repair.
- Keep cord away from heated surfaces.
- Never drop or insert any object into any opening.
- Do not operate where aerosol (spray) products are being used or where oxygen is being administered.
- Do not carry this appliance by power cord or use cord as handle.
- To disconnect, remove plug from outlet.
- This appliance is designed for indoor use only. Only the remote sensor should be used outdoors.
- Only set on dry surfaces. Do not place on surface wet from water or cleaning
SAVE THESE INSTRUCTIONS
Caution – Please read all instructions carefully before operating.
- Never leave the appliance unattended, especially if children are present.
- Never cover the appliance when it is in operation.
- This unit should not be used by children without adult supervision.
- Always keep the cord away from high temperature and fire.
- Do not lift, carry, hang, or pull the product by the power cord.
- If the adaptor sustains damage, you must stop using this product immediately and contact the HoMedics Service Center. (See thewarranty section for the HoMedics address.)
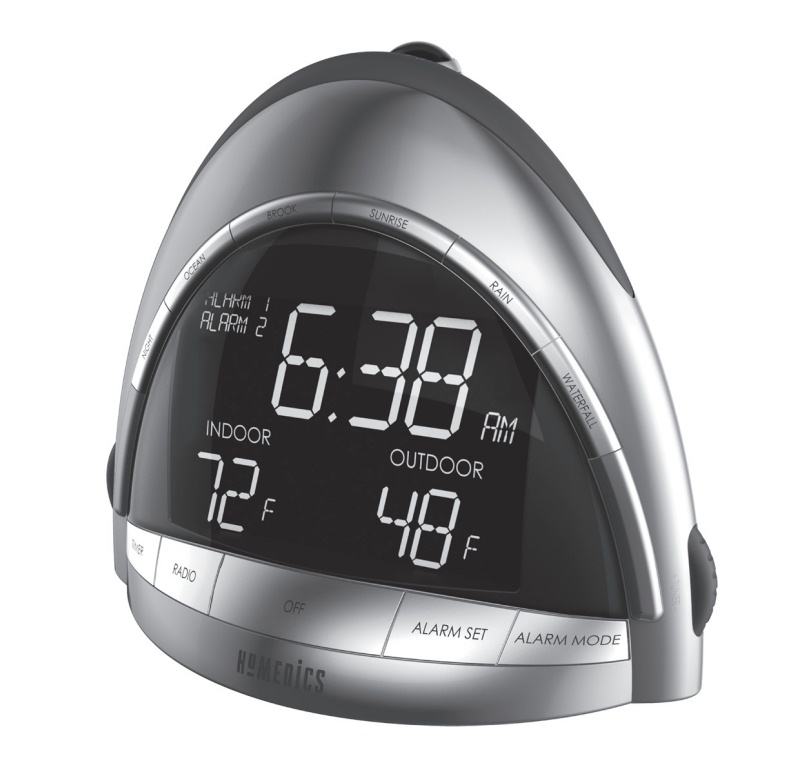
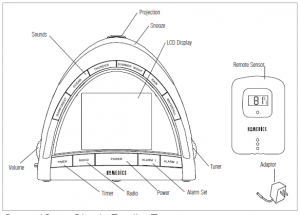 Figure 1
SoundSpa Clock Radio Features
- 6 Nature Sounds: rain forest, ocean, thunder, summer night, rain, and waterfall
- Automatic Daylight Savings Time Adjustment
- Indoor and outdoor temperature
- Dual alarm
- AM/FM radio with alarm and snooze
- Three gentle-wake options – radio, alarm or soothing sound
- Easy-to-read LCD display
- Projection feature projects time and temperature on the ceiling or wal
- Auto-timer lets you choose how long you listen – 15, 30, 45 or 60 minutes
- Volume control adjusts the volume of the radio, beep, or sounds
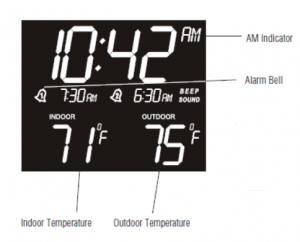 Figure 2
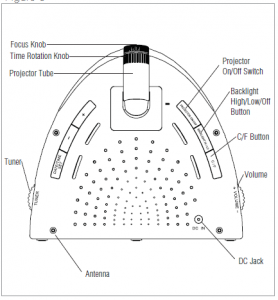 Figure 3
 Figure 4
Assembly and Instructions for Use
- Unpack the product and check to make sure everything is included (Fig. 1).
- This unit is powered by a DC adaptor.
- The battery power is designed only to provide MEMORY BACK-UP for the clock and alarm settings. One CR2032 battery (included) is inserted into the batterycompartment if memory back-up is desired (in the event of power outages or if the unit is unplugged). The memory back up will keep track of the time and assoon as the power supply returns, the display will indicate the correct time, and the functions will become available again.
- Attach the adaptor into the DC jack on the base of the unit (Fig. 3) and insert the cord into a 120V household outlet.
Setting TimeSETTING THE CLOCK (Fig. 3):
- Slide the Time Zone switch to the correct zone. (P=Pacific/M=Mountain/ C=Central/E=Eastern)
- Slide the 12/24 switch to the desired setting (24 indicates Military time).
- Slide the DST switch to either ON or OFF to set your clock to automatically adjust for the Daylight Savings Time (DST).
To set the DATE/TIME (Fig 1):Press and hold the DATE/TIME SET button.
- The year will flash. Use the +/- buttons to set year.
- When year is set, press DATE/TIME SET button. Month and day will flash. Press the +/- buttons to set month. When month is set, press the DATE/TIME SET anduse the +/- buttons to set day.
- When month and day are set, press DATE/TIME SET. Hour will flash. Use the +/- buttons to set hour. NOTE: AM/PM choice will be made at this time.
- When hour is set, press the DATE/TIME SET button. Minutes will flash. Use the +/- buttons to set minutes. Minutes will flash for 10 seconds and then stop.Your clock is set.Note: A PM indicator will appear in the upper left hand corner of the LCD display during the PM hours. Be sure to set the time for the correct 12-hour period – AM (morning) or PM (evening).
Listening to Nature Sounds
- Select the sound you wish to listen to and press the corresponding button (Fig. 1).
- To adjust the volume, turn the VOLUME knob (Fig. 1) to your desired level.
- When finished listening to the sounds you may turn them off by pressing the POWER button, or switch to the radio by pressing RADIO (Fig. 1).Note: When the unit is turned on it will always default to the last mode used.
Listening to the Radio
- Press the RADIO button (Fig. 1).
- Press the RADIO button to choose AM/FM.
- Rotate the TUNER (Fig. 1) to select a radio station.
- To adjust the volume turn the VOLUME knob (Fig. 1) to your desired level.
- When finished listening to the radio you may turn it off by pressing the POWER button. (Fig. 1)Note: Adjust the antenna on the back of the unit to better the radio reception if needed. (Fig. 3)
Using the Auto-TimerWhen the power is on and you are listening to a nature sound or the radio you may set a timer so the unit will automatically turn off.
- Toggle through the TIMER button (Fig. 1) until you find the time of your choice, 15, 30, 45 or 60 minutes.
- To cancel the timer, toggle through the TIMER button until the LED light says “OFF” or press POWER (Fig. 1).
Setting and Using The AlarmSetting and using Alarm 1 or Alarm 2 (Individually)
- Press and hold the Alarm 1 button. The hour will flash (Fig. 1)
- Using the +/- buttons on the back (Fig. 3), set the hour.
- Press the Alarm 1 button again and the minutes will flash. Use the +/- keys to set the minutes.
- The Alarm 1 time will show under the main clock display.
- To activate the alarm and choose a wake tone, press the Alarm 1 button to scroll through the wake tone options: Beep, Radio or Sound. (Fig. 1)NOTE: When using the sound mode, the unit will set to the last sound you listened to. If you wish to change it press the sound you wish to wake to and then press the POWER button (Fig 1).
- Once your choice is made, a (%) will appear next to the Alarm 1 time. Your alarm is set.
- To set a second alarm, repeat steps 1-6 above, using the Alarm 2 button.
- When the alarm sounds you may:a. Press the SNOOZE button (Fig. 1). Your sleep time will be extended by 9 minutes. You may use this feature until you turn the alarm off.b. Turn OFF: Press the POWER button to turn off the alarm. Your alarm will turn off but remain set for the next day. If you wish to turn the alarm off completely orchoose a different wake tone, repeat steps 1-6 in “SETTING AND USING THEALARM”NOTE: If the alarm sounds for 30 minutes continuously it will automatically turn off.
Using the “Nap” Feature
- Press the snooze button to toggle through your choice of nap length (15, 30, 45 or 60 minutes). (Fig. 1)
- Once set, the clock will display the time and indicate “nap” on the LCD screen.
- When nap alarm sounds, press the power button to turn off. (Fig. 1)
Using the Projection Feature
- To turn the projection feature on, press the projector ON/OFF button (Fig. 3) on the back of the unit. The time & outdoor temperature is now projected on the wallor ceiling.NOTE: If the projection feature is OFF, you may hit the SNOOZE button (Fig. 1) to trigger 5 seconds of projection.
- The angle of the projector can be adjusted to angle on the ceiling or wall by moving the PROJECTOR TUBE (Fig. 3) forward or backward.
- To turn the angle of the time & temperature that appears on the wall or ceiling, rotate the TIME ROTATION KNOB (Fig. 3) until you have reached your desired result.NOTE: The TIME ROTATION KNOB will rotate up to 350 degrees.
- To focus the time & temperature on the wall or ceiling rotate the FOCUS KNOB (Fig. 3) until you have reached your desired result.
Using Indoor TemperatureThe unit will begin reading indoor temperature when it is plugged in. Allow a few minutes for the correct temperature to register on the LCD display. (Fig. 2)Using Outdoor Temperature Be sure the SoundSpa unit is plugged in prior to the remote sensor battery installation.
Remote Sensor Battery Installation:
- Loosen the 4 screws securing the battery cover with a small screwdriver (included) and remove. Insert 2 alkaline AAA batteries according to the polaritydirection indicated.
- Place the home receiver (SoundSpa Premier) as close as possible to the remote sensor. This will help with synchronization between the two units.NOTE: Once you are ready to position your remote sensor and home receiver, ensure that the distance is not outside the effective transmission range (100 feet). Some building materials and location of the home receiver or remote sensor can affect transmission quality and range. Try various locations for best results.
- Press the C/F button inside the remote sensor to change between ºC and ºF. (The remote sensor is preset on ºF.)
- Press the TX button inside of the remote sensor to verify the reception.
- Replace the cover and tighten the 4 screws.NOTE: It is recommended to test the units next to each other to ensure that both the remote sensor and home receiver are properly synchronized.
Remote Sensor Mounting InstructionsThe Remote Sensor comes with a table stand or can be wall mounted. Table Stand – Simply fold out the attached stand from the mounting bracket.Wall Mounting – Set a screw in the desired hanging location and mount. A screw and wall anchor have been included for your convenience.NOTE: Keep the remote sensor out of direct sunlight and rain. Do not mount on metal surface.
Remote Sensor Low Battery IndicationLow battery indication is available for the main unit and the remote sensor. A battery life “ ” icon will display on both. Replace the batteries as necessaryand follow the setup procedure.MAINTENANCE AND CARE INSTRUCTIONS
- Extreme temperatures, shock or areas of unusual vibration should be avoided to prevent damage to the units.
- Clean the units using only a soft, damp cloth to wipe. Do not use solvents, abrasives, detergents or other strong cleaning agents. After cleaning, wipesurfaces with a dry cloth.
- Do not submerge units in water or other liquids.
- Do not subject the units to extremely severe temperatures – DO NOT PLACEUNITS INTO OVENS, FREEZERS or MICROWAVE UNITS.NOTE: Opening the housing (other than the battery compartment) of the Remote Sensor or the SoundSpa Unit will invalidate your warranty. Do not attempt to repair this unit – There are no consumer serviceable parts.
TROUBLE SHOOTINGIndoor and Outdoor temperatures do not match when placed next to each other – The sensor is manufactured to be +/- 2 degree in accuracy under normalconditions. So it is possible to have up to four degrees difference shown on the separate temperature sensors (one could be “+2 degree” and the other “-2 degree”. Additionally, the calibration curve is different between the two units because of the greater temperature range of the outdoor sensor. Errors are usually noted on the extreme ends of the temperature ranges. SoundSpa unit is not accepting remote transmissions – The units may not be properly synchronized or the batteries may need tobe replaced. See “USING OUTDOOR TEMPERATURE” section for detailed instructions. With the two units next to each other, attempt synchronization.Remember to always place the remote sensor within the effective transmission range and away from large metal surfaces.
What is the recommended battery type?We recommend using only alkaline batteries.Where can I mount the remote sensor?To get accurate readings and to prolong the life of your sensor, we recommendthat you mount it out of direct sunlight and rain. Fog and mist will not affect the sensor, but large volumes of soaking rain may. To guard against this,we recommend that you mount it under the eve of your house, your garage or any other suitable place that will keep it out of direct sun and rain.Modifications not authorized by the manufacturer may void users authority to operate this device. Outdoor Temperature Reading shows “- -” This may indicate a low battery or out of transmission range.
SPECIFICATIONSRange of temperature measurement: Indoor temp : +32º F to +122º F (0º C to + 50º C) Remote sensor: -4º F to +140º F (-20º C to +60º C)Transmission: max. 100 ft. (30 m) open area, RF434 MHz
FCC DISCLAIMERThis device complies with part 15 of the FCC rules. Operation is subject to thefollowing two conditions:
- This device may not cause harmful interference, and
- This device must accept any interference received, including interference that may cause undesired operation. Freq. 434 MHzFCC ID: TG3SS-5000TX (Transmitter) Modifications not authorized by the manufacturer may void users authority to operate this device.
Note: This equipment has been tested and found to comply with the limits for a Class B digital device, pursuant to Part 15 of the FCC Rules. These limitsare designed to provide reasonable protection against harmful interference in a residential installation. This equipment generates, uses and can radiateradio frequency energy and, if not installed and used in accordance with the instructions, may cause harmful interference to radio communications.However, there is no guarantee that interference will not occur in a particular installation. If this equipment does cause harmful interference to radio ortelevision reception, which can be determined by turning the equipment off and on, the user is encouraged to try to correct the interference by one or more ofthe following measures:
- Reorient or relocate the receiving antenna.
- Increase the separation between the equipment and receiver.
- Connect the equipment into an outlet on a circuit different from that to which the receiver is connected.
- Consult the dealer or an experienced radio/TV technician for helpNote: The manufacturer is not responsible for any radio or TV interference caused by unauthorized modifications to this equipment. Such modifications could void theusers authority to operate the equipment.
Limited one Year Warranty
HoMedics sells its products with the intent that they are free of defects in manufacture and workmanship for a period of one year from the date of original purchase, except as noted below. HoMedics warrants that its products will be free of defects in material and workmanship under normal use and service. This warranty extends only to consumers and does not extend to Retailers. To obtain warranty service on your HoMedics product, mail the product and your dated sales receipt (as proof of purchase), postpaid, to the following address: HoMedics Consumer RelationsService Center Dept. 1683000 Pontiac TrailCommerce Township, MI 48390No COD’s will be accepted.HoMedics does not authorize anyone, including, but not limited to, Retailers, the subsequent consumer purchaser of the product from a Retailer or remote purchasers, to obligate HoMedics in any way beyond the terms set forth herein. This warranty does not cover damage caused by misuse or abuse;accident; the attachment of any unauthorized accessory; alteration to the product; improper installation; unauthorized repairs or modifications; improper use of electrical/power supply; loss of power; dropped product; malfunction or damage of an operating part from failure to provide manufacturer’s recommended maintenance; transportation damage; theft; neglect; vandalism; or environmental conditions; loss of use during the period the product is at a repair facility or otherwise awaiting parts or repair; orany other conditions whatsoever that are beyond the control of HoMedics. This warranty is effective only if the product is purchased and operated in the country in which theproduct is purchased. A product that requires modifications or adoption to enable it to operate in any other country than the country for which it was designed, manufactured, approved and/or authorized, or repair of products damaged by these modifications is not covered under this warranty.THE WARRANTY PROVIDED HEREIN SHALL BE THE SOLE AND EXCLUSIVE WARRANTY. THERE SHALL BE NO OTHER WARRANTIES EXPRESS OR IMPLIED INCLUDING ANY IMPLIED WARRANTY OF MERCHANTABILITY OR FITNESS OR ANY OTHER OBLIGATION ON THE PART OF THE COMPANY WITH RESPECT TO PRODUCTS COVERED BY THIS WARRANTY. HOMEDICS SHALL HAVE NO LIABILITY FOR ANY INCIDENTAL, CONSEQUENTIAL OR SPECIAL DAMAGES. IN NO EVENT SHALL THIS WARRANTY REQUIRE MORE THAN THE REPAIR OR REPLACEMENT OF ANY PART OR PARTS WHICH ARE FOUND TO BE DEFECTIVE WITHIN THE EFFECTIVE PERIOD OF THE WARRANTY. NO REFUNDS WILL BE GIVEN. IF REPLACEMENT PARTS FOR DEFECTIVE MATERIALS ARE NOT AVAILABLE, HOMEDICS RESERVES THE RIGHT TO MAKE PRODUCT SUBSTITUTIONS IN LIEU OF REPAIR OR REPLACEMENT.This warranty does not extend to the purchase of opened, used, repaired, repackaged and/or resealed products, including but not limited to sale of such products on Internet auction sites and/or sales of such products by surplus or bulk resellers. Any and all warranties or guarantees shall immediately cease and terminate as to any products or parts thereof which are repaired, replaced, altered, or modified, without the prior express and written consent of HoMedics.This warranty provides you with specific legal rights. You may have additional rights which may vary from state to state. Because of individual country regulations, some of the above limitations and exclusions may not apply to you. For more information regarding our product line in the USA, please visit: www.homedics.com
Read More About This Manual & Download PDF:
Homedics SS-5010 SoundSpa Premier Instruction Manual and Warranty Information – Homedics SS-5010 SoundSpa Premier Instruction Manual and Warranty Information –
[xyz-ips snippet=”download-snippet”]