
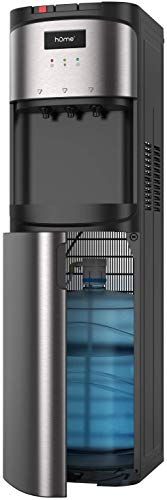
homelabs Water Dispenser
BEFORE FIRST USE:To prevent any internal damage, it is very important to keep refrigeration units (like this one) upright throughout their journey. Please leave it standing upright and outside the box for 24 HOURS before plugging it in.
IMPORTANT SAFETY INSTRUCTIONS
To reduce the risk of injury and property damage, the user must read this entire guide before assembling, installing, operating, and maintaining the dispenser. Failure to execute the instructions in this manual can cause personal injury or property damage. This product dispenses water at very high temperatures. Failure to use properly can cause personal injury. Children should always be supervised when around and using this appliance. When operating this dispenser, always exercise basic safety precautions, including the following:
- Do not touch hot surfaces. Use handles or buttons of control panel instead. The body of your appliance will become very hot during long-time usage, so please handle it carefully.
- Prior to use, this dispenser must be properly assembled and installed in accordance with this manual.
- This dispenser is intended for water dispensing only. Do NOT use other liquids.
- Do NOT use for other purposes. Never use any other liquid in the dispenser other than known and microbiologically safe bottled water.
- For indoor use only. Keep water dispenser in a dry place away from direct sunlight. Do NOT use outdoors.
- Install and use only on a hard, flat and level surface.
- Do NOT place dispenser into an enclosed space or cabinet.
- Do NOT operate dispenser in the presence of explosive fumes.
- Position the back of the dispenser no closer than 8 inches from the wall and allow free airflow between wall and dispenser. There must be at least 8 inch clearance on the sides of the dispenser to permit airflow.
- Use only properly grounded outlets.
- Do not use an extension cord with your water dispenser.
- Always grasp plug and pull straight out from outlet. Never unplug by pulling on the power cord.
- Do NOT use dispenser if the cord becomes frayed or otherwise damaged.
- To protect against electric shock, do NOT immerse cord, plug, or any other part of the dispenser in water or other liquids.
- Ensure the dispenser is unplugged prior to cleaning.
- Never allow children to dispense hot water without proper and direct supervision. Unplug unit when not in use to prevent unsupervised use by children.
- Service should be performed only by a certified technician.
- WARNING: Do not damage the refrigerant circuit.
- This appliance is not intended for use by persons (including children) with reduced physical, sensory or mental capabilities, or lack of experience and knowledge, unless they have been given supervision or instruction concerning use of the appliance by a person responsible for their safety.
- Children should be supervised to ensure that they do not play with the appliance.
- This appliance is intended to be used in households and similar applications such as staff kitchen areas in shops, offices and other working environments; farmhouses; and use by clients in hotels, motels, bed and breakfast inns, and other residential type environments; catering and similar non-retail applications.
- If the supply cord is damaged, it must be replaced by the manufacturer, its service agent or similarly qualified persons in order to avoid a hazard. Do not use the dispenser if any damage or leakage from the condenser tube of back side.
- The appliance must not be cleaned by a water jet.
- The appliance is suitable for indoor use only.
- WARNING: Keep ventilation openings, in the appliance enclosure or in the built-in structure, clear of obstruction.
- WARNING: Do not use mechanical devices or other means to accelerate the defrosting process, other than those recommended by the manufacturer.
- Do not store explosive substances such as aerosol cans with a flammable propellant in this appliance.
IMPORTANT SAFETY INSTRUCTIONS
- This appliance should be operated in environments with temperatures from 38°F~100°F and humidity ≤ 90%.
- This appliance is not suitable for installation in an area where a water jet could be used.
- Never turn the machine upside down or lean it at more than 45°.
- When the machine is under the ice point and blocked by ice, the cooling switch must be closed for 4 hours before turning it on again to continue its operation.
- This machine should not be turned on again until 3 minutes after turning off the power switch.
- It is recommended to use pure water. If you need tubes cleaned or scale removed you will need to seek the help of a certified professional technician.
- This product is not recommended to use at an altitude above 3000 meters (9842 feet).
SAVE THESE INSTRUCTIONS
For Indoor Use Only
PARTS DESCRIPTION
NOTE: This machine is suitable for a 3- or 5-gallon bottle. Do NOT use hard water as it can cause scale inside of boiler, and influence the heating speed and performance.This unit has been tested and sanitized prior to packing and shipping. During transit, dust and odors can accumulate in the tank and lines. Dispense and dispose at least one quart of water prior to drinking any water.
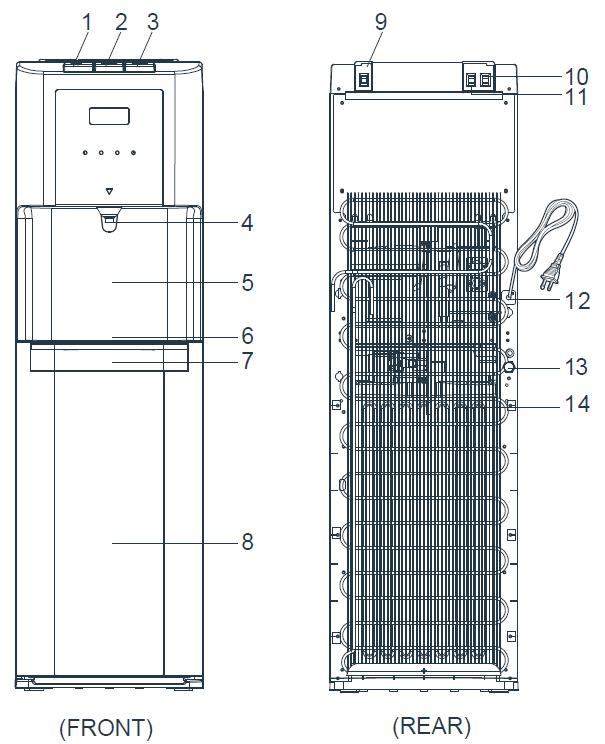
| No. | PART NAME | No. | PART NAME |
| 1 | Push button of hot water (with
child lock) |
8 | Dispenser door |
| 2 | Push button of lukewarm water | 9 | Nightlight Switch |
| 3 | Push button of cold water | 10 | Heating switch |
| 4 | Water spout | 11 | Cooling switch |
| 5 | Front cover | 12 | Power cord |
| 6 | Grid | 13 | Hot water outlet |
| 7 | Water collector | 14 | Condenser |
OPERATION
LOCATING DISPENSER
- Place the dispenser upright.
- Place the dispenser on a hard, level surface; in a cool, shaded location near a grounded wall outlet.Note: Do NOT plug in the power cord yet.
- Position the dispenser so the back is at least 8 inches from the wall and there is at least 8 inches of clearance on both sides.
ASSEMBLING
- Remove the Drip tray from the Water collector and place the grid on top for water collecting.
- Snap the Grid and Water collector into the Dispenser door.
- Open the Dispenser door to install the water bottle.
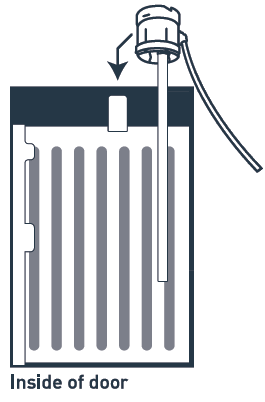
- Place probe assembly on probe hanger. See Figure on the right.
- Place fresh bottle outside of the cabinet.
- Remove entire plastic cap from the top of the bottle.
- Clean the outside of the new bottle with a cloth.
- Place the probe into the bottle.
- Slide collar down until it clicks in place.
- Push head down until tubes hit the bottom of the bottle.
- Slide the bottle into the cabinet and close the Dispenser door.
- Plug the Power cord into a properly grounded wall outlet. The pump will begin to move water to the hot and cold tanks. It takes up to 12 minutes to fill the tanks for the first time. During this period, the pump will run continuously.
ACTIVATING HEATING & COOLINGNote: This unit will not dispense hot or cold water until the switches are turned on. To activate, push the top side of the power switches in to start heating and cooling water.
- If you do not want to heat water, push the bottom side of the red switch in.
- If you do not want to cool water, push the bottom side of the green switch in.
ACTIVATING NIGHTLIGHTPush the top side of the Nightlight switch in to turn the nightlight on. Push the bottom side in to turn the nightlight off.
DISPENSING COLD WATER
- It takes approximately 1 hour from the initial setup until water is completely chilled. Cooling light will turn off once it has been completely chilled.
- Press the Push button of cold water to dispense cold water.
- Release the Push button once the desired level is reached.
DISPENSING HOT WATER
- It takes approximately 12 minutes from the initial set up until water reaches its maximum temperature. Heating light will turn off once it has been fully heated.
- This water dispenser is equipped with a child safety feature in order to prevent accidental dispensing of hot water. To enable dispensing of hot water, slide and hold the red child lock button on the Push button of hot water when pressing the button.
- Release the Push button once desired level is reached.
CAUTION: This unit dispenses water at temperatures that can cause severe burns. Avoid direct contact with hot water. Keep children and pets away from the unit while dispensing. Never allow children to dispense hot water without proper direct supervision. If there is a risk of children having access to the water dispenser, ensure the heating feature is disabled by switching the heating switch to the off position.
CHANGING BOTTLESA flashing red light alerts you when your bottle is empty. Replace the bottle as soon as possible.CAUTION: Do not dispense hot or cold water if the red light is flashing as you could empty the tanks and cause the dispenser to overheat.
- Open the Dispenser door.
- Slide the empty bottle out of the cabinet.
- Remove the probe assembly from the empty bottle. Place the probe assembly on the probe hanger. See Figure on Page 9.
- Set the empty bottle aside.
- Place the new bottle outside of the cabinet. Remove the entire plastic cap from the top of the bottle. Clean the outside of the new bottle with a cloth.
- Place the probe into the bottle. Slide the collar down until it clicks in place. Push the head down until the tubes hit the bottom of the bottle.
- Slide the bottle into the cabinet and close the door.
To avoid an accident, cut off the power supply before cleaning according to the following instructions. The cleaning must be under the guidance of professional staff.
Cleaning:We suggest that you contact professional cleaning service for cleaning.CAUTION: This unit dispenses water at temperatures that can cause severe burns. Avoid direct contact with hot water. Keep children and pets away from the unit while dispensing.
Sanitizing: The unit was sanitized before leaving the factory. It should be sanitized every three months with a disinfectant purchased separately. Follow the instructions on the disinfectant and then clean it with water.
Removing mineral deposits: Mix 4 liters of water with 200g citric acid crystals, inject the mixture into the machine and make sure the water can flow out of the hot water tap. Switch on the power and heat it about 10 minutes. 30 minutes later, drain off the liquid and clean it with water two or three times. Generally, this should be done every six months. To avoid damage and potential danger, never disassemble this dispenser by yourself.
WARNING! Failure to install the appliance according to instructions could be hazardous and may result in injury.
The packaging material used is recyclable. We recommend that you separate plastic, paper, and cardboard and give them to recycling companies. To help preserve the environment, the refrigerant used in this product is R134a(Hydrofluorocarbon – HFC), which does not affect the ozone layer and has little impact on the greenhouse effect.
TROUBLESHOOTING
|
PROBLEM
Water is leaking. |
SOLUTION
•Unplug the dispenser, remove the bottle and replace with another bottle. |
| No Water is coming from the spout. | •Make sure the bottle is not empty. If it is empty, replace it.
•Make sure to slide and hold the red child lock button on the Push button of hot water for hot water. |
|
Cold water is not cold. |
•It takes up to one hour after setup to dispense cold water.
•Make sure the power cord is properly connected to a working outlet. •Make sure the back of the dispenser is at least 8 inch from the wall and there is free airflow on all sides of the dispenser. •Make sure green power switch on the back of the dispenser is turned ON. •If water hasn’t been cold yet, please contact a service technician or hOme™ support team for assistance. |
|
Hot water is not hot. |
•It takes 15-20 minutes after setup to dispense hot water.
•Make sure the power cord is properly connected to a working outlet. •Make sure red power switch on the back of the dispenser is turned ON. |
| Nightlight isn’t working. | •Make sure the power cord is properly connected to a working outlet.
•Make sure the nightlight power switch on the back of the dispenser is ON. |
| Dispenser is noisy. | •Make sure the dispenser is positioned on a leveled surface. |
WARRANTY
hOme™ offers a limited two-year warranty (“warranty period”) on all of our products purchased new and unused from hOme Technologies, LLC or an authorized reseller, with an original proof of purchase and where a defect has arisen, wholly or substantially, as a result of faulty manufacture, parts or workmanship during the warranty period. The warranty does not apply where damage is caused by other factors, including but without limitation:(a) normal wear and tear;(b) abuse, mishandling, accident, or failure to follow operating instructions;(c) exposure to liquid or infiltration of foreign particles;(d) servicing or modifications of the product other than by hOme™; (e) commercial or non-indoor use.
The hOme™ warranty covers all costs related to restoring the proven defective product through repair or replacement of any defective part and necessary labor so that it conforms to its original specifications. A replacement product may be provided instead of repairing a defective product. hOme™’s exclusive obligation under this warranty is limited to such repair or replacement.
A receipt indicating the purchase date is required for any claim, so please keep all receipts in a safe place. We recommend that you register your product on our website, homelabs.com/reg. Although greatly appreciated, the product registration is not required to activate any warranty and product registration does not eliminate the need for the original proof of purchase.
The warranty becomes void if attempts at repair are made by non-authorized third parties and/or if spare parts, other than those provided by hOme™, are used. You may also arrange for service after the warranty expires at an additional cost.
These are our general terms for warranty service, but we always urge our customers to reach out to us with any issue, regardless of warranty terms. If you have an issue with a hOme™ product, please contact us at 1-800-898-3002, and we will do our best to resolve it for you.
This warranty gives you specific legal rights and you may have other legal rights, which vary from state to state, country to country, or province to province. The customer may assert any such rights at their sole discretion.
WARNING
Keep all plastic bags away from children.
For Indoor Use Only
© 2018 hOme Technologies, LLC 37 East 18 Street, 7th Floor New York, NY 10003
homelabs.com/chat1-(800)-898-3002[email protected]
Additional Documents [pdf]: ,
References
[xyz-ips snippet=”download-snippet”]