![]()
HomeTroller SEL Getting Started Guide
Congratulations on your purchase! Your HomeTroller SEL is ready to put you in control of your home. Please take a few minutes to read through this guide to familiarize yourself with the steps required to set up your Z-Wave network and your HomeTroller.
STEP #1 HomeTroller SEL Setup
To begin using HS3 you must setup your HomeTroller SEL. Follow these steps:
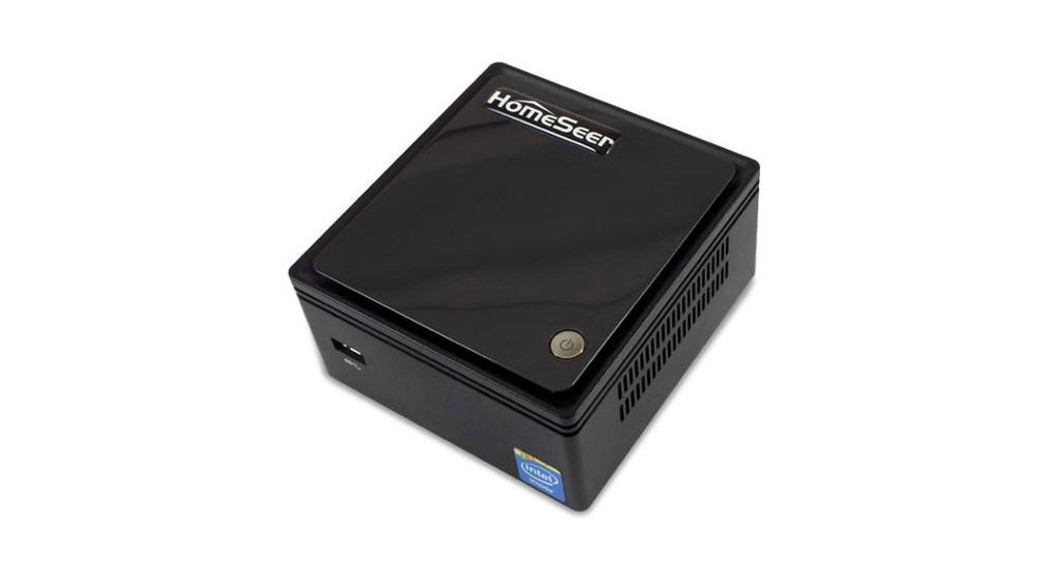
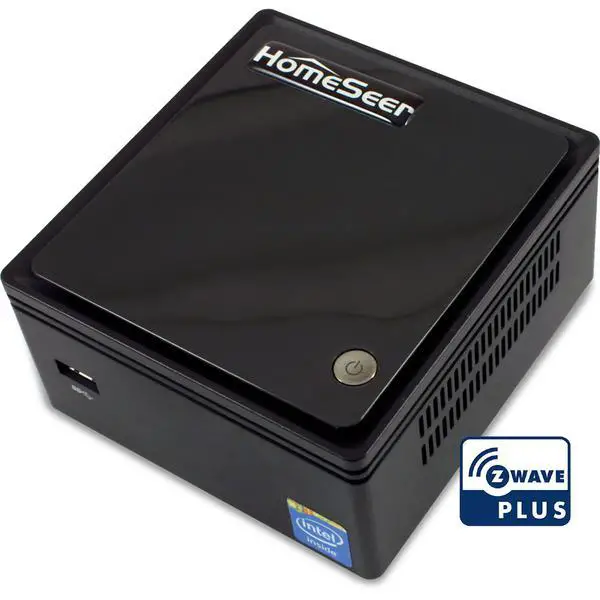
HomeTroller Hardware Installation
a) Unpack the HomeTroller and AC power supply.b) Connect an Ethernet cable to your HomeTroller and to a network port on your internet router.c) Connect the AC power adapter to your HomeTroller to begin the boot process. Turn on the HomeTroller on and allow the unit to boot fully.
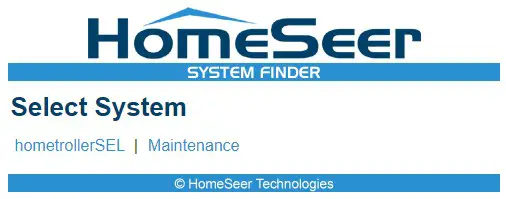
Accessing the HomeTroller Web InterfaceOnce the hardware is set up you will want to access the web interface to set up HS3.The method below should work with any browser on any device (mobile or desktop).
a) Navigate to http://find.homeseer.comb) Click the “Search” button. Your HomeSeer system should now appear at the bottom.c) Click the IP address hyperlink to access your system’s web interface.
Set Your System PasswordThe system password screen will appear the first time you run your HomeTroller SEL. You MUST set a system password to prevent unauthorized access to your unit. Please do this now by following the prompts on your screen. The default system password is `hsthsths3′.
Registering your HomeTrollerYou must register your unit to allow HS3 to boot up fully and automatically every time a restart occurs. Your licenseID and password is located on the bottom of the unit.Note: License codes are included on a sticker on the bottom of your HomeTroller SEL.
a) Go to the Tools dropdown navigation at the top and click on Setup.b) Once the setup page loads, at the very top there is a License section. Click Register Online.c) Enter your License ID and Password located on the bottom of the unit.d) Once completed fill out the form and proceed to your next step.
Changing the Username and Password for HS3 UsersThe default username is: default and the default password is: default. It is highly recommended that you change the username and password to something more secure. Please make sure to save this information.
a) Go to the Tools menu and click Setup.b) Click on the Network tab at the top and you will see a list under Web User Settings.c) Enter a User Name and Password in to the respected fields and then choose the User Rights.d) Click Add User once all fields have been completed. Click Delete to remove a User.
Updating Your HomeTroller SELBe sure to check for updates and install any that are available. To do this, follow these steps:
a) From the HomeTroller SEL web interface, use the pull down menus to navigate to the General Tab of the Setup Area (TOOLS > Setup).b) If an update is available, click the update button near to top of the page and wait for the update to download and install. Your HomeTroller SEL will automatically reboot once the update is installed.
Configuring the Wi-FiWi-Fi is included with your SEL, follow these instructions for setting it up: (You must have HS set up with the Ethernet cable first). A monitor and keyboard is necessary.
a) Once logged into the graphical interface of your SEL.b) In the right hand corner there will be two arrows. Click on that. c) Select your Wifi SSID and enter your password.
STEP #2 Local/Remote Remote Access via MyHS
MyHS Remote is a free remote tool that will allow you to access the HS3 interface of the HomeTroller from any remote computer via home network (LAN) or the internet (WAN). The HomeTroller can also be accessed locally via IP address and/or computer name. See below for instructions.
Accessing Your HomeTroller LocallyHS3 can be accessed from any computer on the same local network just by typing in the IP Address (i.e. 192.168.1.10) of your HomeTroller.
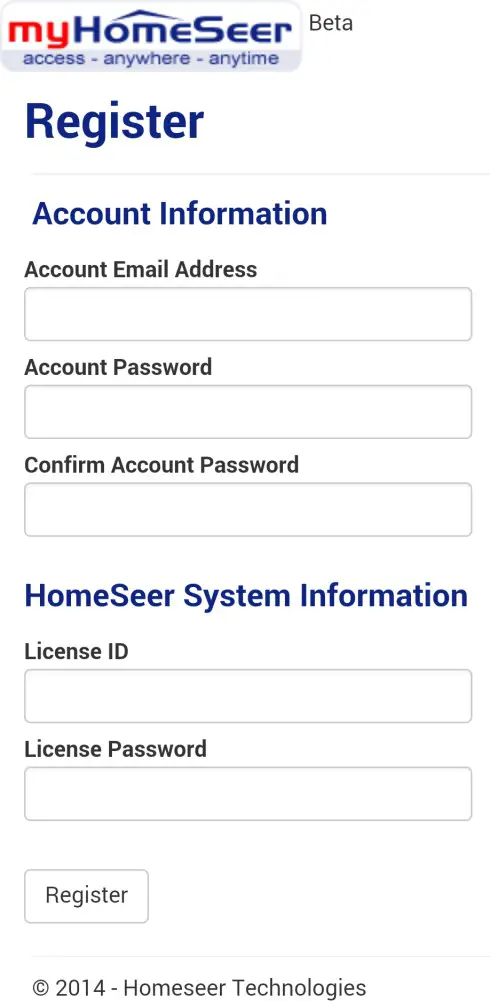
Using HomeSeer MyHS ServiceWelcome to the MyHS. The MyHS service is FREE and will allow you to access your HS3 system from anywhere without having to access your router. HSTouch is required to access via our mobile app, which is enabled by default. It is recommended that you uninstall the application and then reinstall it from the Play Store/iTunes Store to ensure you have the latest. Now, let’s get started!To begin using MyHS you will need to register your HS3 software with the connected service.
 Registration
a) Once the HSTouch has finished installing, go ahead and open it up. You will be prompted with a Log In to MyHS screen.b) Click Register. Your default browser will come forward and load the registration page.c) Enter in the preferred email address you would like to use to be tied to your MyHS for the Account Email Address. This will later be used as your MyHS username.d) Enter a preferred Account Password. You will use this as the password to enter in your MyHS settings.e) The License ID you are asked for is your HS3 licenseID. The same goes for your License Password. (For HomeTroller HS3 users, this is located on the bottom of your unit. For HS3 Software users, this information was emailed to you.)f) Click Register. You will receive a confirmation on the next screen unless errors are detected. You will also be emailed an email that requires a confirmation. Click the link in the email to confirm. You can now use your mobile phone to access your HS3 system. See step 8 and 9 for further HSTouch configuration.

STEP #3 Installing Plug-ins
HomeSeer works with many different protocols. All of these protocols require a plug-in to be installed. There are HomeSeer Tech plug-ins and many 3rd Party plug-ins. Please follow the instructions below on installing a plug-in or you can click here to watch a video tutorial.
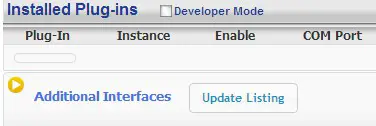
- Locate the Plug-Ins drop down at the top of the screen. With that dropdown click Manage.
- Click the yellow circle to right of the Additional Interfaces. This will present you with a list of categories. Each category has a list of plug-ins that can be installed.
- Click on the circle next to the category that you wish to expand.
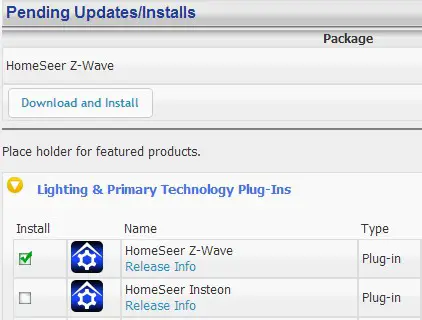
- Once you see the list of plug-ins, click the check box to the left of the plug-ins that you want to install. (You may check more than one at a time.)
- After you have selected the plug-ins you wish to install, a Download and Install button will appear. Click this button to proceed with the install.
- You will be given a progress bar under the Installed Plug-ins section indicating the status of the install.
- You must now Enable your plug-ins to use them. Once they are enabled they will be available to configure. Some plug-ins will require you to enter a COM port before going into the configuration pages.
- To get to the configuration pages, go back to the top where the plug-ins menu is and you will see a list of your installed plug-ins. Within each plug-in there is another menu that has a link to the configuration pages.

STEP #4 Adding a Z-Wave Controller
In order to control Z-Wave devices, such as light switches, thermostats, door locks and sensors, they must be added into a Z-Wave “network”. Follow the steps below to add your Z-Wave controller and create a Z-Wave network.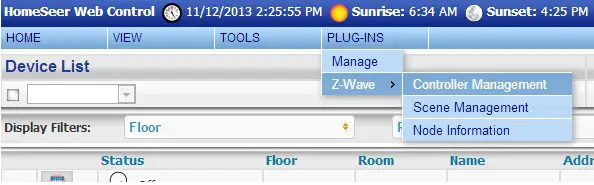
a) Go to the Plug-ins drop down menu and hover over Z-Wave. Select Controller Management.b) Click the Add Interface button to begin the management process.c) You will now be prompted to add an interface name, interface type, and the COM port of the interface.* A good naming scheme is either the name of the interface you are using or the location of your Z-Wave controller (if you have multiple). The interface type corresponds to the type of Z-Wave controller you are using. If you have using an IP2SL/WF2SL, select the Ethernet option.d) Go ahead and click Add and let HomeSeer initialize the unit. Once initialized, you will be brought to a new screen.e) You must now enable the controller. Click the red circle with a line through it (“No symbol”) to enable it. You will see a green checkmark if the interface enabled correctly.*Note: The SmartStick+ will use port /dev/ttyACM0f) To add another Z-Wave interface simply follow these instructions again.

STEP #5 – Z-Wave Network Setup
In order to control Z-Wave devices, such as light switches, thermostats, door locks and sensors, they must be added into a Z-Wave “network”. Follow the steps below to create your Z-Wave network and to add devices.Note: the steps below assume you’ve already physically installed Z-Wave devices in your home.
Via Z-Tool+ (requires HS3 version 3.0.0.194 and Z-Wave version 3.0.1.23)To begin using Z-Tool+, the app must be downloaded from within your App Store. Open either the Play Store, iTunes Store, or Windows Store and search for `Z-Tool+’. The search will return the app and then just click Install. Click here for a more comprehensive guide to using Z-Tool+.
a) Z-Tool+ will automatically find your system(s). Click Select a System if you have more than one local system.b) Select the Add or Remove action you wish you complete.c) Activate the network button (or button sequence) on your Z-Wave device and observe the inclusion process in the log window. Once removed a confirmation will show in the log.d) Once the Add process is finished a window will pop up to name and change the location attributes of the device.e) Your device can now be controlled via HSTouch or HS3 Web Control.
Via Web Control Page
Adding Z-Wave Devices (wall switches, receptacles, plug-in modules, sensors, door locks, etc)
a) From the web interface, use the pull down menus to navigate to the Z-Wave Controller Management page (PLUG-INS > Z-Wave > Controller Management).b) Locate the “Z-Wave Interfaces” area and expand your Z-Wave Controller section. Open the “Actions:” menu and choose “Add/Include a Node”.c) Click the `Start’ button below the Actions menu. Your HomeTroller is now in Add mode and is ready to communicate with your device.d) Activate the network button (or button sequence) on your device and observe the adding process in the green log window. When done, you’ll receive an acknowledgement such as “Finished.”. Your Z-Wave device is now removed from your Z-Wave network!
Battery operated devices should be right next to the Z-Wave controller when adding. Door Locks should be no more than 10 feet away when being added and should be removed first.
Removing Z-Wave DevicesFollow the procedure below to (a) reset the device to its factory settings or (b) remove the device from your Z-Wave interface.
e) From the web interface, use the pull down menus to navigate to the Z-Wave Controller Management page (PLUG-INS > Z-Wave > Controller Management).f) Locate the “Z-Wave Interfaces” area and expand your Z-Wave Controller section. Open the “Actions:” menu and choose “Remove/Exclude a Node”.g) Click the `Start’ button below the Actions menu. Your HomeTroller is now in add mode and is ready to communicate with your device.h) Activate the network button (or button sequence) on your device and observe the adding process in the green log window. When done, you’ll receive an acknowledgement such as “DONE – Remove Node Operation is Complete.” Your Z-Wave device is now removed from your Z-Wave network!
STEP #6 Importing, Editing and Controlling Your Z-Wave Devices
Importing devices is only necessary if you are using the Aeon Labs Z-Stick to configure your Z-Wave network, otherwise that step can be skipped. You’ll need to import that network into your HomeTroller, so that your devices can be monitored and controlled. Here’s how to do that:
Importing Z-Wave Devices
e) From the web interface, use the pull down menus to navigate to the Z-Wave Controller Management page (PLUG-INS > Z-Wave > Controller Management).f) Locate the “Z-Wave Interfaces” area and expand the section of your Z-Wave Controller. Open the “Actions:” menu and choose “Import Node Info from Controller and Scan Devices”.g) Click the `Start’ button below the Actions menu. Your HomeTroller will now import your device information from the Z-Stick. When done, you’ll receive an acknowledgement such as “Finished with Z-Wave device synchronization”. Your Z-Wave devices may now be monitored and controlled from the HomeTroller!
Editing and Controlling Your Z-Wave devices
a) From the web interface, use the pull down menus to navigate to the Device Management Page (VIEW > Device Management). Click the “Show All” button in the upper right hand area of the page. A list of all your devices will now be displayed.b) To edit the name, location and other properties of any device, click the Name.c) To control the device, use the buttons in the Control column.

Configuring Device Settings
a) From the web interface, go to your Device Management page and click on the device you wish to configure.b) Click on the Z-Wave tab.c) Here you can Rescan, Remove, Test, Optimize, and Audit the node. Associations can also be set here.d) Expanding the Settings section will allow you to change the wake-up interval for battery operated devices. Here you will also see many settings for different parameters depending on the device.e) Below the settings will be Associations which will be available for devices that support associations. Here you can set up companion switches to work with Z-Wave associated master switches.

STEP #7 Creating Automation Events
Simply put, an automation event consists of an action (or actions) that are set into motion by one or more triggers. Example: Turning on lights at sunset. Trigger = sunset, Action = turning lights on. With HomeSeer, you can quickly and easily create all the events you need. Here’s how to create the sunset event above: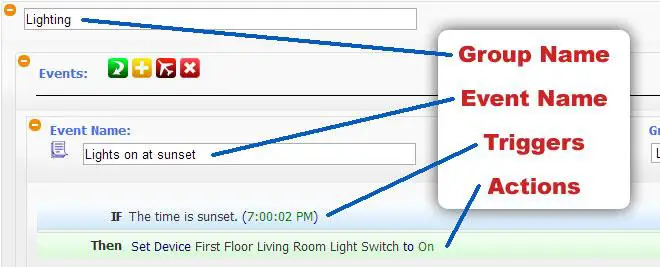
Creating Events
a) From the web interface, use the pull down menus to navigate to the Events page (VIEW > Events).b) Change the event group name from “New Group” to “Lighting”.c) Now expand the “New Event” section and rename the new event to “Lights on at Sunset”d) In the shaded blue “Trigger” section, choose “The Time Is…” and then select “The Time is Sunset”e) If the shaded green “Actions” section, choose “Control a Device” and then select the device you wish to control and the method of control (on / off) you wish to use. See image above for resulting view.
STEP #8 HomeSeer Mobile
After you have successfully created a MyHS account and have the unit on your local network, you can connect to your unit via our mobile application. HomeSeer Mobile is required to access your HS3 system via a mobile device. HomeSeer Mobile is not required to connect via the MyHS website. In order to use the latest HS Mobile app, first visit the Play Store on Android or the App Store on iOS. You can use the buttons below to quickly find the app or open up your App Store and search for “HomeSeer Mobile”
 Figure 1: Android
REQUIRES VERSION 3.0.0.500 OR HIGHER OF HS3
Once HS Mobile is installed and opened, you will be prompted to enter your MyHS account name and password. If you do not already have an account, please view this guide or go back to Step 2, which will walk you through the process of setting that up. Once you have your account credentials, tap Log In, and you will be connected to your HomeSeer system. Select Remember me if you wish to have your credentials saved. If you have a premium MyHS subscription, you will see a list of your systems that you can connect to. If you would like to learn more about the Premium MyHS subscription, please click here.For a more customized experience, check out HSTouch Designer at homeseer.com.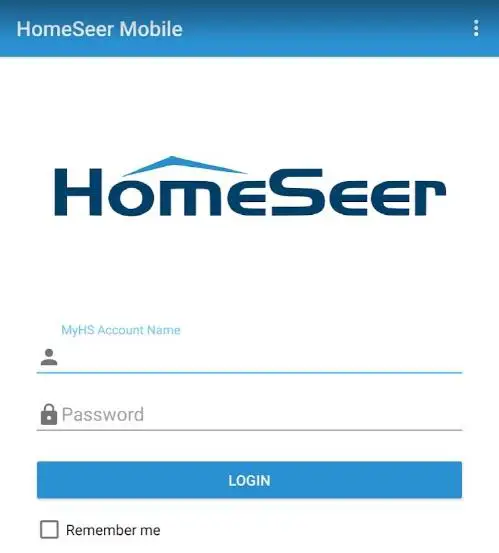
 Cloud Service IntegrationAmazon Alexa Please visit https://homeseer.com/amazon-alexa-integration for instructions on integrating your Alexa devices. Step 2 is required in order to utilize Alexa.
Google HomePlease visit https://homeseer.com/google-home-integration for instructions on integrating your Google devices. Step 2 is required in order to utilize Google Assistant.
IFTTTPlease visit https://homeseer.com/ifttt-integration for instructions on integrating IFTTT recipes. Step 2 is required in order to utilize IFTTT.
More HelpHomeSeer Helpdesk (walkthroughs, guides, product help)HomeSeer Help Files (JSON, Scripting, in-depth HS3)YouTubeContact Us
Icon Legend for HS3This is a list of the icons that are found in HS3 with a description of their function. Note: Some buttons are multi-functional.
|
ICON |
DESCRIPTION |
|
Add / Delete |
|
|
Copy Event |
|
|
Standard Editing / Advanced Editing |
|
|
Toggle Edit Mode |
|
|
Enabled / Disabled |
|
|
Error communicating |
|
|
Expand / Collapse Section |
|
|
Marked Devices Shown/Header and Menus Shown –Marked Devices Hidden/Header and Menus Not Shown |
|
|
Access Log Settings |
|
|
Poll Devices for Status |
|
|
Reset Layout to Default |
|
|
Run Event |
|
|
Devices Ungrouped / Grouped |
|
|
Add a Keyword or Pair |
|
|
Group Conditions are used / not being used |
|
|
Expand Device Management Page / Collapse Device Management Page |
*If you want to know what that button will do, just hover your cursor over the icon and small text will appear to provide definition.
Trouble Shooting Your HomeTroller
All customers have lifetime support. Initially you have 30 Day Priority Phone Support and after that you have support through our Help Desk (helpdesk.homeseer.com) and our community based Message Board (board.homeseer.com).
| Symptom | Cause | Solution |
| Unit Won’t Power On | Ac Adapter Unplugged | Plug-In Adapter |
| AC Adapter Bad | Contact HomeSeer | |
| Power Cable Bad | ||
| Unit Powers On But Won’t Boot | USB Hardware Conflict | Detach USB Device And Reboot |
| Software Failure | ||
| Hardware Failure | Contact HomeSeer | |
| Z-Wave Devices Cannot Be Added Into Z-Wave Network | Device Was Previously Installed On Another Z-Wave Network | Use “Remove A Device” Procedure To Reset Device, Then Try To Add |
| Device Failure | Replace Device | |
| Z-Stick Failure | Contact HomeSeer | |
| Find HomeSeer Cannot Locate SEL | HomeTroller Not Powered On | Power Unit On |
| HomeTroller Not Fully Booted | Wait 60 seconds For Unit To Boot | |
| HomeTroller Not Connected To LAN | Connect Unit To Router And Reboot | |
| Door Locks Won’t Add Or Can’t Be Controlled | Adding Process Incorrect Or Incomplete | Remove Devices and Repeat Procedure Outlined In “Add Devices” Section |
| Sensors Won’t Add Or Can’t Be Monitored | ||
| All Other Problems | Contact HomeSeer |
*Note that Add = Include, Remove = Exclude, and Copy = Replicate
HomeSeer Technologies10 Commerce Park North, Unit #10Bedford, NH 03110www.homeseer.com603-471-2816
 report this ad
This product employs or practices certain features and/or methods of the following U.S. Patents: U.S. Patent Nos.6,891,838, 6,914,893 and 7,103,511.Rev. 5 · 9/9/2020
References
HomeSeer HS3 Tutorial: How to Install a Plug-in –
HomeSeer Message Board
Amazon Alexa Smart Speaker Integration | HomeSeer
Google Assistant Integration | HomeSeer
Forums –
HomeSeer Message Board
IFTTT Integration | HomeSeer
Smart Home Systems For Every Need & Budget | HomeSeer
Amazon Alexa Smart Speaker Integration | HomeSeer
find.homeseer.com
HomeSeer – YouTube
HomeSeer Mobile – Apps on Google Play
Smart Home Systems For Every Need & Budget | HomeSeer
HomeSeer Mobile on the App Store
Contact Us | HomeSeer
MyHS Plans – HomeSeer
HomeSeer Docs – Home – HomeSeer Docs
Smart Home Systems For Every Need & Budget | HomeSeer
HomeSeer Docs – Home – HomeSeer Docs
[xyz-ips snippet=”download-snippet”]