
![]()
HS-WS100+ Z-Wave Wall Switch

OVERVIEW
HS-WS100+ is a Z-Wave wall switch that’s designed for wireless on-off control of connected lighting and appliance loads.See HomeSeer.com/lighting for a complete list of features and applications.
WARNING RISK OF FIRE | RISK OF ELECTRICAL SHOCK | RISK OF BURNSDO NOT USE THIS SWITCH TO CONTROL DEVICES OR APPLIANCES THAT MAY PRESENT A HAZARD WHEN CONTROLLED REMOTELYOR USED IN AN UNATTENDED FASHION. DO NOT USE WITH MEDICAL AND LIFE SUPPORT INSTRUMENTS.
INSTALLATION
Tools required: medium standard and Phillips head screwdrivers, wire strippers/cutters
- Shut off power to the circuit at the circuit breaker or fuse box. VERIFY power is OFF before continuing!
- Remove existing switch’s wall plate and mounting screws. Carefully remove the existing switch from the electrical box but leave the wires connected.
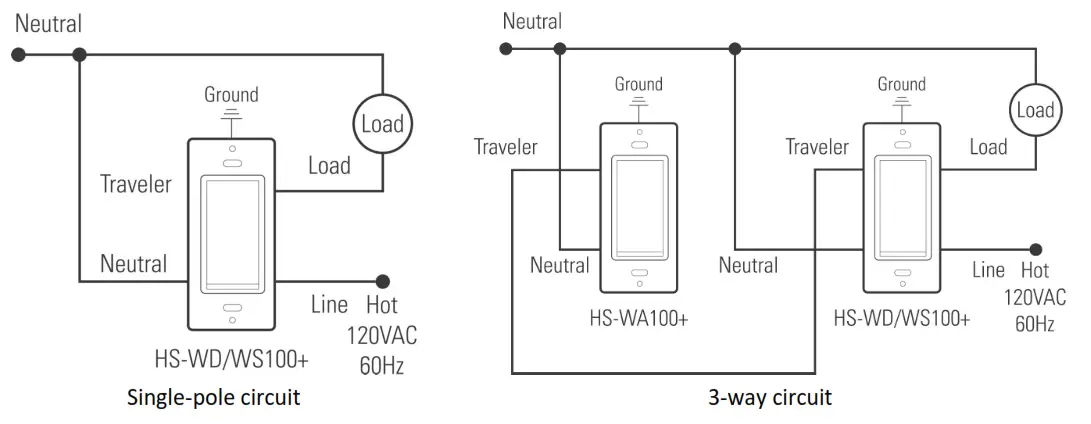
- There may be up to five wires connected to the existing switch. Make note of these wires and label, if necessary, to ensure correct installation of the HS-WS100+. You will need to match these wires with the corresponding screw terminals on the HS-WS100+. Note: LINE, NEUTRAL, and LOAD wires are required for every installation• LINE (Hot) – Black (connected to power)• NEUTRAL – White (this wire is often tied to other neutral wires and may require a jumper to connect ith the HS -WS100+)• LOAD – Black (connected to load)• GROUND — Green or Bare• TRAVELER — Red/Other (only used in 3-way circuits)
- Disconnect the wires from the existing switch and attach those wires to the HS-WS100+ using the screw terminal connectors on the back with the following procedure:1 Strip 16 mm (5/8”) insulation from each wire*.2 With a screwdriver, loosen each screw terminal by rotating the screw counter-clockwise a few turns until resistance is felt.3 There are two holes on the back of the switch near each screw terminal. Insert the stripped wire into one of these holes and tighten the screw terminal to secure the connection. Connections should be snug. *all wires should be 14 AWG or larger rated at 80°C or higher. Tightening torque should be 12 lbs-in (14kgf-cm).
- Carefully install the wired switch back into the electrical box and reattach the trim plate.
HomeSeer | 10 Commerce Park North, Unit 10 | Bedford, NH 03110 | HomeSeer.com | Doc: HS-WS100-en-v7
COMPATIBILITY
Your new HomeSeer switch is Z-Wave certified and is ready to be used with a wide variety of home automation hubs and control-less. All features are fully supported by HomeSeer systems but some ADVANCED FEATURES (see below) may not be fully supported by other controllers. If you’re using another brand of controller, be sure to check with that company to determine compatibility.
Z-WAVE INCLUSIONFollow this 2-step procedure to add your new HomeSeer switch to your Z-Wave network:
- Put your Z-Wave controller into inclusion mode. Consult your controller manual if you’re unsure how to do this.HomeSeer users: press “Add Device” on your Z-Tool+ mobile app
- Tap the paddle of your new HomeSeer switch to begin the inclusion process. This will take a few moments to complete.HomeSeer users: Be sure to name the switch and assign it to a location using Z-Tool+ when inclusion is done MANUAL RESET – To be used only in the event that the network primary controller is lost or otherwise inoperable.(1) Turn the switch on by tapping the top of the paddle once. (2) Quickly tap the top of the paddle 3 times. (3) Quickly tap the bottom of the paddle 3 times. (4) If the light turns off and then on again, the switch is reset. If not, repeat the manual reset.
ASSOCIATION – This product supports association group #1 for lifeline communication. Refer to your controller manual for instructions on setting the lifeline association.OPERATIONYour new HomeSeer switch may be operated locally (manually) or remotely using a Z-Wave compatible controller or home automation system.
Local Control:
- Press (tap) the top of the paddle to power the load
- Press (tap) the bottom of the paddle to cut power to the loadRemote Control:
- On / Off control is available remotely. Consult your controller manual for details.HomeSeer users: this switch creates 3 devices; a rooted device, central scene device, and control device. The root device may be used to manage Z-Wave settings. The central scene device may be used as a trigger for events. The control device will send on / off commands to the switch.
ADVANCED FEATURESYour new HomeSeer switch includes advanced features that may be accessed with HomeSeer (and other*) systems.
Multi-tap triggering – Tapping the top or bottom of the paddle 1, 2, or 3 times in rapid succession may be used as a trigger to launch HomeSeer events. In the example below (using HomeSeer HS3 software), the trigger is set to the top of the paddle is pressed 3 times. You must use the trigger “device had its value set to” and apply it to the “Central Scene” device. Note that “Scene 001” refers to the top of the paddle.

Note that pressing the top or bottom of the paddle once will also control the attached load. COMPATIBILITY (with Non-HomeSeer systems) The special features of this switch are supported using a number of different Z-Wave technologies. HomeSeer systems are designed to support these technologies and will provide the most seamless operation of these features. However, other systems may also provide satisfactory results depending on the level of support they provide for these same technologies. If you’re using a nonHomeSeer system, use the information below and consult with your system manufacturer to determine the level of compatibility.
Multi-tap Triggers: This feature uses the Z-Wave CENTRAL SCENE command class. If the system supports this command class AND utilizes a general interrogation process for inclusion, this feature should work. However, if the system employs an inclusion process based on the Z-Wave product ID, then specific product support would need to be implemented.Instant Status: This feature is supported using a Z-Wave MULTILEVEL REPORT and the CENTRAL SCENE command class. All Z-Wave certified systems should support the MULTILEVEL REPORT feature.S2 Security / SmartStart: S2 security is an advanced encryption technology. SmartStart is a pre-previsioning technology that provides easier inclusion with compatible controllers*.*Be sure to check our support page (https://homeseer.com/support-home/) for more detailed information regarding features and integrations with other smart hubs and controllers.
|
Z-Wave Parameters |
||||
|
Parameter |
Description | Byte | Value |
Default |
| 3 | Sets LED indicator behavior | 1 | 0 = Indicator OFF when the load is ON1 = Indicator ON when the load is ON2 = Indicator Always OFF | 0 |
| 4 | Sets paddle’s load orientation | 1 | 0 = Top of Paddle turns load O1 = Bottom of Paddle turns to load ON | 0 |
SPECIFICATIONS
| SPECIFICATIONSPowerMax LoadZ-WaveCertifications | RequirementsIncandescent | LED| Resistive | MotorFrequencyRangeUL (US, Canada), FCC/IC, Z-Wave Plus | 120VAC / 60 Hz900 watts | 200 watts | 1800watts | 1/2 Horsepower908.4 / 916 MHz100 ft. (open-air) |
Certifications UL (US, Canada), FCC/IC, Z-Wave Plus
WARRANTY
HomeSeer warrants to the original purchaser that this product, for the warranty period, will be free from material defects and workmanship. This warranty is subject to the proper installation and operation of the product. HomeSeer’s sole obligation, under this warranty, is to repair, replace or correct any defect that was present at the time of delivery. This warranty does not extend to consequential or incidental damage to other products that may be used with this product. Warranty claims must be submitted inwriting directly to HomeSeer at HomeSeer.com. Warranty period: Limited 1 year from date of purchase
FCC statements:This device complies with part 15 of the FCC rules. Operation is subject to the following two conditions: (1) this device may not cause harmful interference, and (2) this device must accept any interference received, including interference that may causeundesired operation.
NOTE: The manufacturer is not responsible for any radio or TV interference caused by unauthorized modifications or changes to this equipment. Such modifications or changes could void the user’s authority to operate the equipment.
IC statements:This device complies with Part 15 of the FCC Rules and with RSS of Industry Canada. Operation is subject to the following two conditions: (1) This device may not cause harmful interference, and (2) this device must accept any interference received, including interference that may cause undesired operation.
This Class B digital apparatus complies with Canadian ICES‐003.
 report this ad
This product employs or practices certain features and/or methods of the following U.S. Patents: U.S. Patent Nos.6,891,838, 6,914,893, and 7,103,511.
HomeSeer | 10 Commerce Park North, Unit 10 | Bedford, NH 03110 | HomeSeer.com | Doc: HS-WS100-en-v7
References
[xyz-ips snippet=”download-snippet”]