
HomeSeer HT-PLUS Smart Home Hub User Guide
Overview
This guide will briefly cover the following essential steps
- Setup & Registration
- Navigation Overview
- Installing Plugins
- Creating Devices
- Creating Events
- MyHS (Remote Access Service)
- HomeSeer Mobile App
Setup & Registration
- Unpack the HomeTroller and AC power supply. Connect an Ethernet cable to the unit and attach that to your router or network switch.
- Connect the AC power supply to the unit and plug it in. The unit will power on by itself and HS4PRO will launch automatically.
- You’ll need to access the web interface to register your controller and to set it up. From another device on your network, open a browser and navigate to find.homeseer.com. This will access our System Finder. Under Select System, click the link HomeTrollerPlusG1. Note: If you system does not appear, please wait 5 minutes and refresh the page.If it still does not appear, please check the Alternate Ways to Access Your System near the end of this guide.
- Enter your HS4 License ID & Password. Create your HS4 web user account. Follow the prompts and click FINISH at the end. Note: if you’re upgrading from HS3, you will also be prompted for your HS3 software codes.
HS4 is a mobile friendly web application that’s designed to be used on any browser equipped device. All of the essential functions of the program may be accessed from the main navigation bar at the top of the screen.

- Devices: Click here to add, remove and edit your smart home devices. Learn More
- Events: Click here to manage your smart home events (automations). Learn More
- Cameras: Click here to view live camera feeds and to watch recordings. Learn More
- Setup: Click here manage various system settings. Learn More
- Tools: Click here to access or manage timers, counters, backup, log and more. Learn More
- Plugins: Click here to manage HS4 integration plugins. Learn More
Installing Plugins
Plugins are software programs that allow HS4 to integrate with smart devices and technologies. For example, if you’re using Philips HUE smart bulbs, you’ll need to install the Philips HUE plugin. Learn More About Plugins
- Open the HS4 web interface and navigate to the Plugins/Add page. All plugins will appear. Click the plugin you wish to install and then click the INSTALL button.
- After installation is complete, click the button in the lower right corner to enable the plugin. Check the plugin documentation for more information about setup.
Creating Devices
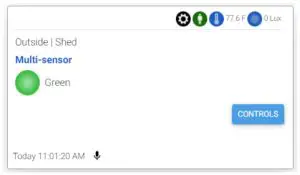
Devices are the fundamental building blocks for any HS4 system. When you add any smart product to your system, a corresponding device is added to the software. Device attributes will display as Features Some features are controllable and some will simply display values or status. When you turn the device on or off, your smart product will turn on or off. Here is what a multisensor device would look like in the HS4 device grid & list views:
 Grid View or HSM200 Multisensor
List View or HSM200 Multisensor
Since devices are added by using the controls and procedures engineered into each plugin, you will need to refer to the plugin documentation for more information regarding this. Learn More About Devices
Creating Events
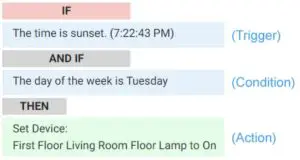
Events are rules that work to automate the smart devices in your home. Each event is comprised of at least one Trigger and one Action. You may also apply Conditions to any trigger. In the example here, a living room lamp is turned on at sunset on Tuesdays.For a more details, Learn More About Events
Using MyHS for Remote Access & Integrations
Our MyHS service provides remote access to your HS4 system and it works with other cloud services such as Amazon Alexa, Google Home and IFTTT. MyHS Basic is free to all users. Premium paid plans are also available for users who need additional features. Learn More About MyHS Premium.
Registering a New Account
- Visit myhs.homeseer.com and click Register. Use the SAME email address & password as your HS4 web user account. Enter your HS4 license ID and password. This will become your primary license.
- You will receive a verification email with a link inside. Once you click this link, you will be able to log in and connect via the MyHS web page. If you do not receive the email check your SPAM folder.
Updating an Existing Account
If you already have a MyHS account (for HS3), you can update that account for HS4 with the steps below.
- Visit myhs.homeseer.com, enter your credentials, then select Manage Account.
- Click Change Primary System. Select this and you will be prompted for your old license ID and password combo as well as the new one. If you do not recall your license ID and password, that information can be recovered in the Software Licensing Issues section.
HomeSeer Mobile App
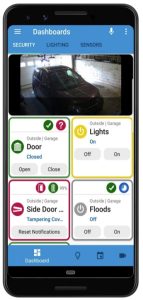


Download and install our HomeSeer Mobile app onto your Android or iOS mobile device. With HomeSeer Mobile, you’ll be able to control your smart devices, launch your HS4 events and access your cameras. You’ll also be able to create custom dashboards for easy access to your most commonly used devices.
Connecting to HS4
- Launch HomeSeer Mobile and select the option to Log in to MyHS
- Enter your MyHS account credentials and tap Remember Me if you don’t wish to log in each time you run the app.
- Tap Log In and you will be connected to your system.
Learn More About HomeSeer Mobile
Alternate Ways to Access Your System
Our System Finder is designed to detect any HomeSeer system running on your local network (LAN). This usually works without issue. However, some networks may block the operation of System Finder. If that happens, here are 2 alternate ways to access your HomeTroller Plus.
- Use a Remote Desktop Protocol (RDP) ConnectionHomeTroller Plus units are shipped with RDP enabled and may be accessed from another computer on your network. To do this, open the Remote Desktop Connection app on your Windows PC and connect to HomeTrollerPlusG1. Username is homeseer, password is hsthsths4.Not using Windows? RDP works on Macs too. Check out the instructions here: https://docs.homeseer.com/display/HSPRODKB/Remote+Desktop+Connection+on+LAN
- Use a Keyboard, Mouse & MonitorWhen all else fails, you can connect HomeTroller Plus to a keyboard, monitor and mouse to access HS4 and everything else. While accessing the HS4 web interface, create a browser bookmark for your system to allow for easier future access.
This product employs or practices certain features and/or methods of the following U.S. Patents: U.S. Patent Nos.6,891,838, 6,914,893 and 7,103,511.
 report this ad
HomeSeer | 10 Commerce Park N, Suite 10, Bedford, NH 03110 | homeseer.com | DOC: HT-PLUS-QS-1
References
Safeguard & Supercharge Your HomeSeer System with MyHS Premium
HomeSeer Mobile – Apps on Google Play
Support Home Page | HomeSeer
Devices – HS4 – HomeSeer Docs
Amazon Alexa Smart Speaker Integration | HomeSeer
Google Assistant Integration | HomeSeer
HomeSeer Mobile on the App Store
Smart Home Systems For Every Need & Budget | HomeSeer
Remote Desktop Connection on LAN – HomeSeer Products – HomeSeer Docs
Log in – MyHS
IFTTT Integration | HomeSeer
Events – HS4 – HomeSeer Docs
Cameras – HS4 – HomeSeer Docs
Setup – HS4 – HomeSeer Docs
find.homeseer.com
Tools – HS4 – HomeSeer Docs
Log in – MyHS
find.homeseer.com/findhomeseer/
Plugins – HS4 – HomeSeer Docs
[xyz-ips snippet=”download-snippet”]