
![]()
High Speed BlenderInstruction ManualModel: NY-8608 AC120V, 50/60Hz, 1450W
IMPORTANTPlease feel free to check out our website www.homgeek.com for more information. Most customer has useful discover there, you probably will, too.
IMPORTANT SAFEGUARDS
WARNING: This unit contains electrical connections and moving parts that potentially present risk to the user. To avoid the risk of serious injury when using your blender. basic safety precautions should be followed, including but not limited to following:
READ ALL INSTRUCTIONS, SAFEGUARDS, AND WARNINGS BEFORE OPERATING BLENDER.The failure to follow any of the important safeguards and instructions for safe use is a misuse of your blender, which can create the risk of serious injure and void your warranty.
- Read all instructions.
- Carefully observe and follow all warnings and instructions.
- Take your time and exercise care during unpacking and appliance setup. This appliance contains sharp blades that can cause injury if mishandled.
- Take inventory of all contents to ensure that you have all parts needed to properly and safely operate your appliance.
- This appliance is not intended for use by persons (including children) with reduced physical, sensory, or mental capabilities, or lack of experience and knowledge unless they are closed supervised and instructed concerning use of the appliance by a person responsible for their safety. Close supervision is necessary when any appliance is used by or near children. Children should be supervised to ensure that they do not play with the appliance.
- Do not allow children to operate this appliance or use as a toy. Close supervision is necessary when any appliance is used near children.
- To protect against the risk of electric shock, DO NOT submerge the appliance or allow the power cord to contact any form of liquid.
- Turn the appliance OFF, then unplug from the outlet when not in use, before assembling or disassem-bling parts and before cleaning. To unplug, grasp the plug and pull from the out let. Never pull from the power cord.
- To avoid a hazard due to inadvertent resetting of the thermal cut-out, power to this blender must not be supplied through an external switching device, such as a timer, or connected to a circuit that is regularly switched on and off by the utility.
- Do not operate any blender with a damaged cord or plug or after the blender malfunctions, or is dropped or damaged in any manner. Email [email protected] at once for information on examination, repair, or adjustment.
- GFI circuit breakers might be installed in your kitchen. Look for them in outlets near sinks. If the blender won’t operate, unplug the blender. Reset the wall outlet or circuit breaker. If the circuit breaker continues to trip, unplug the blender from the outlet. Allow the blender to sit for 24 hours before attempting to use it again. Contact Customer Service if the problem persists.
- This appliance has a polarized plug (one prong is wider than the other). To reduce the risk of electric shock, this plug will fit in a polarized outlet only one way. If the plug does not fit fully in the outlet, reverse the plug. If it still does not fit, contact a qualified electrician. DO NOT modify the plug in any way.
- This appliance has important information on the plug prong. The power cord is not suitable for replacement. If damaged, contact homgeek for servicing in order to avoid a hazard.
- Before use, wash all parts that may come into contact with food. Follow washing instructions covered in this instruction manual.
- ALWAYS use the appliance on a dry and level and firm surface. Never operate the appliance on soft surfaces.
- Avoid touching moving parts.
- Alteration or modification of any part of the blender base or container, including the use of any part or parts that are not genuine authorized homgeek parts, may cause fire, electric shock, or injury.
- The use of attachments, including canning jars, not expressly authorized or sold by homgeek for use with this blender, including container, may cause fire, electric shock, or injury.
- Do not use outdoors.
- THIS PRODUCT IS INTENDED FOR HOUSEHOLD USE ONLY. Do not use blender for other than intended use.
- Check if the voltage you are using matches the voltage listed on the machine.
- Do not let cord hang over edge of table or counter.
- Do not let cord come into contact with hot surface, including the stove.
- DO NOT operate this appliance on or near any hot surfaces (such as gas or electric burner or in a heated oven). Never leave an appliance unattended when in use.
- Keep hands and utensils out of container while blending to reduce the risk of severe injury to persons or damage to the blender. A scraper may be used but must be used only when the blender is not running.
- The tamper provided must be used only when the main part of the lid is in place.
- Do not leave foreign objects, such as spoons, forks, knives or the lid plug, in the container as this will damage the blades and other components when starting the machine and may cause injury.
- Never attempt to operate with damaged blades.
- DO NOT use the appliance if blade assembly is bent or damaged.
- Before each use, inspect blades for damage. If blades are bent or damage is suspected, contact homgeek to arrange for replacement.
- Always operate blender with lid and lid plug firmly in place. The lid plug should be removed only when adding ingredients and when using the tamper.
- If you find unmixed ingredients sticking to the sides of the container, stop the appliance, remove the lid, and use a spatula to dislodge ingredients. NEVER insert your hands into the container, as you may contact one of the blades and experience a laceration.
- DO NOT attempt to remove the container and lids from the motor base while the blades are still spinning. Allow the appliance to come to a complete stop before removing lids and containers.
- Add ingredients to the container. NOTE: Do not overfill! To avoid spilling, do not add ingredients past the “MAX” fill line.
- When blending hot liquids or ingredients, use caution; spray or escaping steam may cause scalding and burns. Do not fill container over half full of the capacity. Always begin processing on the lowest speed setting, variable speed 0 and slowly increase speed. Keep hands and other exposed skin away from the lid opening to prevent possible burns.
- When making nut butters or oil-based foods, do not process for more than one minute after the mixture starts to circulate in the container. Processing for longer periods can cause dangerous overheating.
- Machines and power cords should be stored in a safe place to prevent children from pulling on the power cord. 3
- Blades are sharp-handle with care. Clean around the blades in the container with extreme care to avoid injury.
- Never attempt to operate with the centering pad removed.
- Make sure that the container and blades base are flush with the centering pad to ensure that the drive spline is engaged with the drive socket before operating.
- DO NOT attempt to Defeat the interlock mechanism.
- DO NOT use your container to heat ingredients.
- DO NOT continuously use your machine for more than 5 minutes.
- DO NOT attempt to sharpen blades.
- DO NOT expose container to extreme temperature changes.
- Appliance accessories are not intended to be used in the microwave. Do not place the container or the lid in the microwave as it may result in damage to the accessories.
- Extension cords are not recommended for use with this product.
- If the appliance overheats, a thermal switch will activate and temporarily disable the motor. To reset, unplug the appliance and allow it to cool for approximately 1 hour before using again.
- DO NOT store ingredients before or after blending them in the container with the blades attached. Some foods may contain active ingredients or release gases that will expand if left in a sealed container, resulting in excessive pressure buildup that can pose a risk of injury.
- Never handle the plug with wet hands.
- Always attach plug to appliance first, then plug cord into the wall outlet. To disconnect, turn any control to “off”, then remove plug from wall outlet.
- Flashing light indicates ready to operate. Avoid any contact with blades or moveable parts.
- Save this manual for future reference.
SAVE THESE INSTRUCTIONS Household use only
|
|
|||
| Before using the product, please read the manual and all explanations carefully. | The voltage to use should be 220V-240V. | ||
| Please don’t use the product beyond its functions. | Please don’t let children use the product. | ||
| Please stop using the product when power line or plug damage or other functions failure. | Please don’t let power line touch sharp edge or high temperature surface. | ||
| The product must be operated on stable reliable worktable. | Hold the plug tightly when pulling it, don’t pull its line. | ||
| The product is household use only. | Don’t put the product into water or any other liquids | ||
| To ensure safety, please don’t disassemble the product privately. If there is abnormal situation, please contact customer service which contact information is printed on the manual. It must be repaired by manufacturer or special technician of after-sale service center appointed by manufacturer. |
|
Specifications |
|||||
| Product Model | Voltage | Frequency | Power | Capacity | Max. Speed |
| NY-8608 | 120V | 60Hz | 1450W | 2.0L | 33000RPM |
PARTS & FEATURES
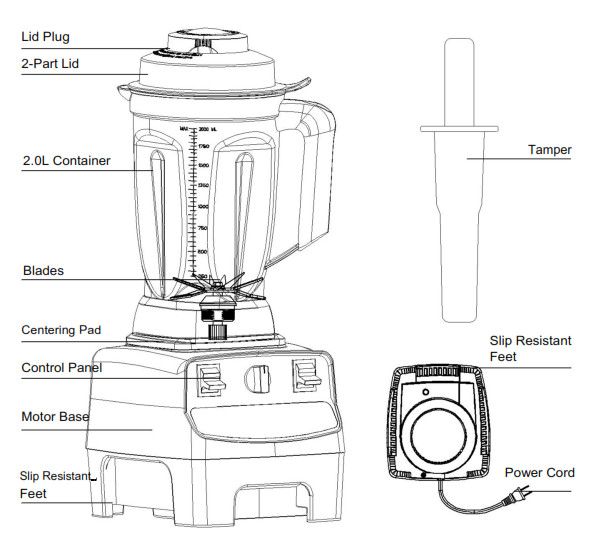 2.0L Container
2-Part Lid: The 2-part Lid is easy to put on and take off and easy to clean. Always use the complete 2-part lid when blending, especially when blending hot ingredients (unless the tamper is inserted through the lid plug opening). Never operate the blender without the lid securely latched during operation.
Lid Plug: Insert through the lid plug opening and secure by turning clockwise. Turn counterclockwise and lift it to remove the lid plug for using the tamper or adding ingredients. Container: Ounces/milliliters/cups are clearly marked. Blades: Blades are made of ultra-sharp stainless steel. The container is designed to be completely cleanable without removing retainer nut and blades. DO NOT attempt to remove the retainer nut or blades from the container.
Centering Pad: The container must be aligned over the centering pad. Never attempt to operate with the centering pad removed.Motor Base: The motor is designed with dual protection circuits to prevent overheating and an overload.
Tamper: Used to process thicker mixtures and keep ingredients moving towards and through the blades.
CAUTION1: The tamper can only be used only when the main part of the lid is in place. Hold the container while using the tamper.CAUTION 2: Lids and tampers are not interchangeable between different container styles, types, and sizes.
Power Cord: The blender is equipped with a long power cord. Store the unused portion neatly underneath.
Bottom View/Cord Wrap: Plastic cord retainers hold the cord securely. They are flexible and return to position after the cord is lifted out.Slip Resistant Feet: Prevent movement during use and prevent damaging marks on countertops or tables.
CONTROL PANEL

b. On/off keyControls power to the machinea. High/Variable SwitchHigh: The highest speed availableVariable: Activates the Variable Speed Dialc. Variable Speed DialManual control of lower speed from Variable 0 (stop) to 10e. LCD Display ScreenDisplays speed in orange number and time in white number ff. Indicator lighta. On/Off key: This key controls power to the machine. Push up to turn on the machine. Push down to turn off.b. High/Variable Switch:High: The High function can be used when a smart program is selected and when you are using Variable Speed Dial. Pushing the High/Variable Switch up to High position will cause the machine to blend at the highest speed available. High provides the best quality of refinement, breaking down ice, frozen fruit, whole fruits or vegetables, and grains to a smooth- lump-free consistency. WARNING: Do not begin processing directly on the High setting. Always make sure that the High/Variable Switch is set to Variable before pushing the On/Off Switch to the On position. Variable: Switch to Variable to activate all of the lower variable speeds by using Variable Speed Dial.c. Variable Speed Dial: Gives you manual control of lower speed from Variable 0 (stop) to 8. It is active only when the High/Variable Switch is set in the Variable position. LCD Display Screen displays speed number in orange color when turning Dial. Timer will count up and elapsed time in white color will be displayed on LCD screen.
Warning: Always make sure that the marker on Variable Speed Dial is set to 0 before pushing the On/Off Switch to the On position.
OPERATIONAL AREAS FEATURES
| Variable Speed Dial (manual) Features | ||||||
| Program | Speed | Working Time | Is Time Adjustable? | Time Range | Auto start after | Used for |
| DIAL | 0-10 | Elapsed time | Time elapses when using Variable Speed Dial | 0 second | 0 seconds | Making whole-food juices soups, shakes, frozen mixtures, purees, nut butters, and for grinding grains. |
|
4 Preset Smart Programs’ Feature |
||||||
| Program | Speed | Preset
Working Time |
Is Time
Adjustable? |
Time Range | Auto
start after |
Used for |
| SMOOTHIE | Program
controlled |
55seconds | No | Program
controlled |
0 seconds | Make silky smoothies, shakes and beverages from other drinkable
fresh or frozen fruit, milk, liquids, and ice. |
| FROZEN
DESSERT |
Program
controlled |
50seconds | No | Program
controlled |
0 seconds | Turn ice, frozen juices and fruit into icy, cold
drinks and desserts. |
| ICE CRUSH | Program
controlled |
1 minute and
20 seconds |
No | Program
controlled |
0 seconds | Crush hard ice into sorbet in a flash. |
| SOUP | Program
controlled |
5 minutes | No | Program
controlled |
0 seconds | Blend soup from hot
ingredients. |
OPERATING INSTRUCTIONSIMPORTANT: READ ALL INSTRUCTIONS IN THIS MANUAL CAREFULLY BEFORE USE. THE FAILURE TO FOLLOW ANY OF THE IMPORTANT SAFEGUARDS AND IMPORTANT SAFETY INSTRUCTIONS FOR SAFE USE IS A MISUSE OF YOUR BLENDER THAT CAN VOID YOUR WARRANTY AND CREATE THE RISK OF SERIOUS INJURY.
BEFORE FIRST USE
- Remove all packaging materials and labels from the appliance. WARNING: Blades are sharp. Use extreme caution when handling.
- Container, lids, and tamper are not dishwasher safe. If preferred, wash all parts in warm soapy water. Rinse clean under running water and dry thoroughly. Wipe the motor base with a warm, damp cloth and wipe clean with a dry, soft cloth. Allow all parts to dry completely before using.WARNING: Do not place the motor base in water or other liquids. Do not let any liquid enter the motor.
|
|
|
| Electrical Shock HazardUse grounded outlet only.DO NOT use an adapter.DO NOT use an extension cord.DO NOT remove ground.Always unplug before cleaning or when not in use. Do not put the motor base in water or any other liquids or let any form of liquid enter the motor.Failure to follow instructions in manual can cause death or electrical shock. |
IMPORTANT: This unit contains electrical connections and moving parts that potentially present a risk to the user. Read all important safeguards and instructions before operating the blender.
USE YOUR BLENDER
- Place motor base on a clean, dry, even, level and firm surface such as a countertop or table.
- Make sure the centering pad is securely aligned over the motor base before using.
- Cut food into smaller pieces for more efficient blending. Add ingredients to the container, making sure not to exceed the “MAX” fill line.WARNING:DON’T fill container with Hot ingredients over half full capacity to avoid overflow and cause injury.NOTE: If you need to add additional ingredients while the appliance is processing, open the lid plug and pour ingredients in through the lid plug opening. Make sure the main part of the lid is in place when adding ingredients.IMPORTANT: NEVER RUN THE APPLIANCE EMPTY.Tips: How to load your container according to your recipe?We suggest, liquids first, then dry goods, leafy greens, fruit & veggies and finally ice & frozen ingredients.
- With the motor off, set the container on the motor base by aligning it over the centering pad. The container can be installed in four different orientations. The handle can be aligned on either of the 4 sides of the motor base. Do not ever attempt to put a container on an operating motor base or to operate a motor base without a container properly in place. The motor will not work if the container is not installed correctly.CAUTION: Never attempt to remove the container while the appliance is still running.
- Push the lid down into container firmly with lid flaps midway between the spout and the handle. Make sure that both side clips on lid fully snap onto lip of container. Insert the lid plug into the lid plug opening and turn clockwise to lock in place.CAUTION: Never operate the blender without the lid securely latched during operation. Always use the complete 2-part lid when blending, especially when blending hot ingredients (unless the tamper is inserted through the lid plug opening).
- Check up the Variable Speed Dial. Make sure the High/Variable Switch is switched to Variable position and the marker on Variable Speed Dial is pointing to “0” before powering on. When the unit is connected to power and the container is correctly put onto the motor base, the unit will work at once under the set speed that the marker on Variable Speed Dial is pointing if the marker on Variable Speed Dial is not at “0”.
- Plug the blender into a grounded, 2-prong outlet. On will be displayed on the LCD Display Screen indicating that the appliance is ready for use. The indicator light of 4 smart programs will be on indicating that now you can select a smart program or you can also use the Variable Speed Dial.Warning: Make sure the power plug is safely connected to a grounded wall electrical socket.Warning: After plugged in, NEVER insert your hands into the container, as you may contact one of the blades and experience a laceration.
- Start to blend either using, Variable Speed Dial, or simply pressing a smart program button.IMPORTANT! Never start on speeds above 0 with hot liquids to avoid possible burns. Always start on Variable 0 and slowly increase speed. Escaping steam, or splashes from contents may scald. Lock the lid and lid plug securely in place before operating the machine.

USING VARIABLE SPEED DIAL
- Make sure the marker on Variable Speed dial is at “0” position.
- Push the On/Off Switch up to On position, then slowly increase to the desired speed between 1 and 8 during the blending cycle.
- During blending, you can push the High/Variable Switch up to High position for the highest speed of blending and turn it back to Variable position for using Variable Speed Dial again.
- To stop blending, turn the marker on Variable Speed Dial to “0” and blender will enter standby mode. Push the On/Off Switch down to Off and blender will power off.Note:Make sure that the marker on Variable Speed Dial is pointed to “0” after each use.
USING 4 SMART PROGRAMS
The speed and time for these programs are set by default. These programs have pauses or changes in speed throughout the cycle.a. Make sure the High/Variable Switch is at Variable position and the marker on Variable Speed Dial is pointing to “0”. Pushing the On/Off Switch up to On and blender will enter standby mode. On will appear on the LCD Display Screen.b. Simply press one of the 4 programs key. It will automatically start blending under selected program. Number “0” in orange color on LCD Display Screen will be running quickly during blending. Countdown time number in white color will be displayed on LCD screen.c. The High function can be used when a program is selected. Pushing down the High/Variable Switch to High position when a program is selected will cause the machine to run at the highest speed available. The timer will continue counting down under High mode. Returned to Variable position and blender will continue to work under the selected program.d. The program will automatically stop after it’s completed. Alternatively, you can press the currentlyrun-ning program button again to stop the program and blender will enter standby mode. Or simply turn the On/Off switch to Off and blender will power off.
Tips:How to switch among each smart program during blending? Method:During blending, simply press another desired program key. The newly-selected program indicator light will be on, indicating its selection. Blender will be switched to immediately blending under the newly-selected program upon its selection.How to use smart programs when using Variable Speed Dial? Method:Simply press the desired program key directly. The newly-selected program indicator light will be on and will auto-start blend at once.
How to use Variable Speed Dial when using smart program? Method:Simply turn the marker on Variable Speed Dial at least one speed range, it will auto-start blending under set speed at once.
* If ingredients are not blending properly, use a tamper to help push ingredients towards blades. If this does not work, press On/Off to Off position to power off. Remove the container from the blender base and use a rubber spatula to press the air bubble away from the blades. Add liquid if necessary. Replace the lid and lid plug. Replace container to the motor base and continue blending.
9. When blending is complete, turn off and unplug the appliance. Wait for the blades to completely stop spinning.CAUTION: Make sure that the motor base is unplugged when not in use.10. To remove the container from motor base, lift it off the motor base. WARNING: Be sure to wait for the unit to come to a complete stop before removing the container from the base or the lid from the container.11. To remove the lid, lift up on one lid flap while holding the container securely. The container can then be emptied. If hot ingredients were blended, carefully hold the container handle, then place the container on a flat surface.
|
CAUTION |
||
| Moving Parts May Become Hot with Extended Use. DO NOT touch. |  |
FAQ
- How to crush ice?homgeek Blender can crush ice cubes into sorbet.To achieve the best results, the ice must be dried instead of watery or melting. The container should be dry. Tamper is also needed.1. Place ice into the container (no more than 1/3 of the way full).2. Securely lock the lid to the container, and remove the lid plug.3. Turn on the blender and select “ICE CRUSH” program.4. Use tamper to push ice down into the blades.5. The program will stop automatically when finished. You can also manually stop blending before the ice starts melting.6. Unplug and remove the ice by turning the container upside down. Use a plastic spatula and carefully shift ice stuck underneath the blades. Note: If dry ice is not available, you can crush 1 ice: 1 water.
- How to determine the tamper is suitable for your blender? Remove the lid plug and insert the tamper through the lid plug opening. The tamper should fit easily into the opening. It should not come into contact with the blades no matter where you move the tamper inside the container.WARNING:IF THE TAMPER TOUCHES THE BLADES AT ANY ANGLE, DO NOT USE THE TAMPER WITH YOUR CONTAINER.
- How to use the tamper?IMPORTANT! The splash disk (near the top of the tamper) and lid prevent the tamper from hitting the blades when the lid is secured properly in the locked position.a. The container should not be more than two-thirds full when the tamper is used.b. If the food does not circulate, the blender may have trapped an air bubble. While ensuring that the lid remains firmly in place, carefully remove the lid plug.c. Release the air bubble by inserting the tamper through the lid plug opening.d. Holding the tamper straight down may not help the ingredients circulate. Point the tamper towards the sides or corners of the container if necessary. DO NOT try to force the tamper deeper into the container.CAUTION: The tamper can only be used when the main part of the lid is in place. Hold the container while using the tamper. To avoid overheating during blending, DO NOT use the tamper for more than 30 consecutive seconds.
CLEANING AND MAINTENANCE
![]() CAUTION:*To avoid inadvertent activation, unplug from outlet before assembling or disassembling parts, and before cleaning.* DON’T submerge the motor base into water or any other liquids.DON’T let any liquid enter the motor.
CAUTION:*To avoid inadvertent activation, unplug from outlet before assembling or disassembling parts, and before cleaning.* DON’T submerge the motor base into water or any other liquids.DON’T let any liquid enter the motor.![]() Please refer to all instructions included in this book. IMPORTANT: To ensure continued and effective performance, do not put the container, lid, or lid plug in the dishwasher. Clean the appliance after every use.1.To clean container, lid, lid plug, tamper and centering pad: Self-Cleaning:(without removing the container, lid and lid plug):(1) Fill the container half full with warm water and add a couple of drops of dishwashing liquid.(2) Make sure the 2-Part lid is securely snapped onto container.(3) Perform one of the following procedures:a. Make sure the marker on Variable Speed Dial is at 0. High/Variable Switch is at Variable position. Push the On/Off Switch up to On position.b. Slowly increase the variable speed to Variable 8.c. Run the machine for 30 to 60 seconds. For best results, using short “High” several times.d. Rotate the Variable Speed dial back to Variable 0 and turn off the machine.e. Rinse clean under running water and dry thoroughly.Hand Wash:(remove the container, lid, and lid plug)a. Wash the container, lid, and blades in warm soapy water. Rinse clean under running water and dry thoroughly. Centering pad can be removed for more thorough cleaning.CAUTION:blades with care to avoid laceration caused by contact with sharp edges.
Please refer to all instructions included in this book. IMPORTANT: To ensure continued and effective performance, do not put the container, lid, or lid plug in the dishwasher. Clean the appliance after every use.1.To clean container, lid, lid plug, tamper and centering pad: Self-Cleaning:(without removing the container, lid and lid plug):(1) Fill the container half full with warm water and add a couple of drops of dishwashing liquid.(2) Make sure the 2-Part lid is securely snapped onto container.(3) Perform one of the following procedures:a. Make sure the marker on Variable Speed Dial is at 0. High/Variable Switch is at Variable position. Push the On/Off Switch up to On position.b. Slowly increase the variable speed to Variable 8.c. Run the machine for 30 to 60 seconds. For best results, using short “High” several times.d. Rotate the Variable Speed dial back to Variable 0 and turn off the machine.e. Rinse clean under running water and dry thoroughly.Hand Wash:(remove the container, lid, and lid plug)a. Wash the container, lid, and blades in warm soapy water. Rinse clean under running water and dry thoroughly. Centering pad can be removed for more thorough cleaning.CAUTION:blades with care to avoid laceration caused by contact with sharp edges.
2. To clean motor base:Clean the motor base with a soft, damp cloth to prevent scratching. Do not submerge the motor base into water and or other liquids. Do not let any liquid enter the motorHOW TO STORE?1. Unplug the appliance.2. Make sure all parts are clean & dry and placed in a clean and dry place.3. Store the blender upright with the lid secured on top.4. Store the unused portion of the power cord neatly underneath as picture.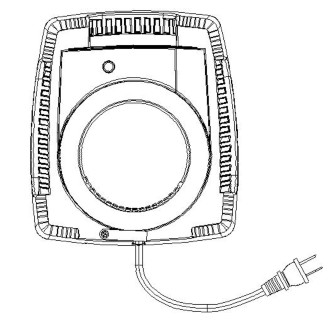 Any other servicing should be performed by an authorized service representative.
TROUBLESHOOTING
WARNING: To reduce the risk of shock and unintended operation, turn off power and unplug unit before troubleshoot-ing.
| Motor doesn’t start or blades doesn’t rotate | 1.If the blender does not start, check to make sure you have plugged the unit in and that the On/Off switch is at On.2.Make sure the container is securely placed on the motor base.3.Check the fuse or circuit breaker. The blender has dual-protection circuits.a.For overheating.b.For overloads.If the motor overheats, allow it to cool for 1 hour; if verloaded,unplug and plug again after 3 minutes. |
| Food is chopped too finely or is too watery | The food has been over-processed. Use High mode for controlled processing. Or stop blending if necessary. |
| Food collects on lid or on the sides of the blades | The mixture is too thick. Add more liquid or use the tamper to help push the ingredients toward the blades. The container should not be filled more than 2/3 (for the sake of consistency) full when the tamper is used during blending. |
| You cannot create snow from solid ice. | DO NOT use ice that has been sitting out or has started to melt. Use ice straight from the freezer. |
WARRANTY AND SERVICE
*1-Year Full Machine WarrantyThis warranty coverage applies to the owner of this blender for personal household use only and to the original product only and is not transferable. This Warranty does not apply to products for commercial, rental or re-sale purposes. homgeek warranty guarantees owner that if this blender fails within 1 year form the date of purchase due to defects in materials and workmanship under normal household conditions, homgeek will in homgeek’s sole discretion, elect to either(A)replace the Blender free of charge or(B) refund the owner, unless homgeek receives prior written notice of the owner’s preference. In the rare event that a replacement unit is issued, the warranty coverage ends six months after the receipt date of the replacement unit or the remainder of the existing warranty, whichever is greater. If the unit id replaced, homgeek reserves the right to replace the unit with one of equal or greater value. This warranty is only valid if the blender is used and maintained in accordance with the instructions, warnings and safeguards contained in the owner’s manual. This warranty only applies to product purchased through an authorized dealer. This warranty does not cover damages or wear resulting from accident, misuse, abuse, commercial use, or unauthorized adjustment and/or repair by homgeek. homgeek shall not be liable for loss of use or any other incidental, consequential or indirect costs, expenses or damages. There are no express warranties except as listed under the terms of this Limited Warranty. This warranty gives you specific legal rights, and you may have other rights which vary from state to state. If your appliance is found to be defective or fails to operate properly while in use under normal household conditions within the warranty period, please email us at Please note that proof of purchase is required.
Shenzhen TOMTOP Technology Co., Ltd.Add: G-4 Zone 5/F, No.1 Exchange Square, Huanan City, Pinghu Town, Longgang District,Shenzhen, Guangdong, CN 18111www.homgeek.com[email protected]![]()
References
[xyz-ips snippet=”download-snippet”]