![]()
PROSiXCTWireless Door/Window SensorInstallation and Setup Guide
The PROSiXCT is a two-zone wireless door/window sensor with a cover and wall tamper. It is intended for use with Honeywell Home controls that support PROM TU series devices.
The PROSiXCT can be installed with two options:
- Reed switch with magnet: Make gap is75″; Break gap is 1.30″.
- Optional wiring for external contact loop:a) surface wiringb) concealed wiring

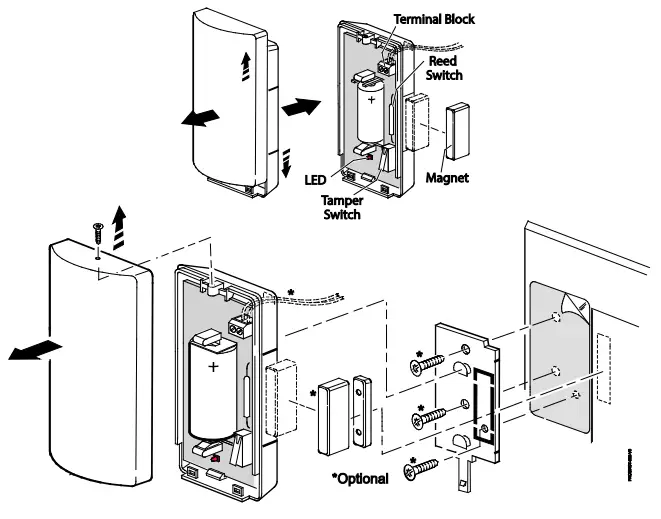
MOUNT THE PROSIXCT
- To open the case, firmly slide the front and back housings in opposite directions and pull them apart to open the device.
- Mount sensor as shown using the double-sided tape and screws provided.
- If using an external contact, connect its wires to the terminal block.NOTE: The wiring limit is 3ft.
- Secure the front cover with the #2 x 1/4″ screew.
After enrolling and before mounting, verify adequate signal strength by conducting a sensor test (see controllers instructions) with the device in its intended mounting location. Adjust the device location and orientation as necessary.
ENROLL AND SET UP
You must enroll the device in the control. Refer to the control’s programming instruction for detailed procedures
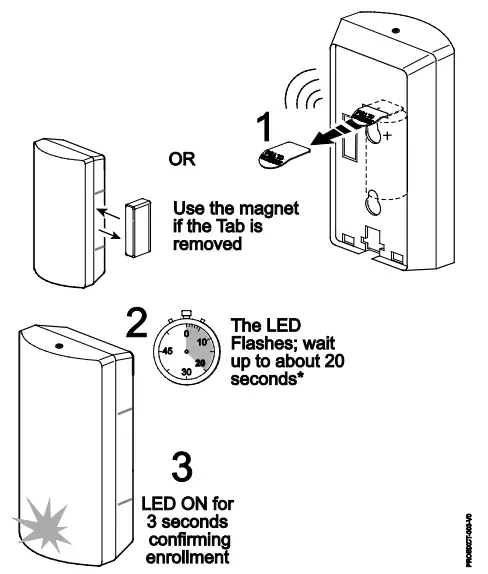
Set the controller in Programming Mode, when prompted:
- Pull the battery tab to activate the product. (Use the magnet if the battery tab is removed.)
- The LED flashes (up to about 20 seconds*) during• Both services (Reed and Terminal Block) are enrolled in sequential (or next available) zone• The device sends its unique MAC ID (Serial Number); the controller registers the device and displays the transmitter data on the screen.*NOTE: Enrollment time varies depending on the signal strength between the device and the controller.
- When done, the LED is ON for 3 seconds and the control beeps to confirm enrollment.NOTE: If the device is not successfully enrolled during the enrollment period, the LED turns off and the device powers down.Activate a tamper, wired service (loop) or the reed switch to restart the enrollment process.
- Program each zone being used.• Reed Switch Zone or Terminal Block Zone
IMPORTANT: Once enrolled in a system, the PROSiXCT cannot be used with another controller until it is removed from the current controller. See the Controller’s instructions for details.
24-HOUR ENROLLMENT DELETION AND DEFAULT
If the device is enrolled in a panel different than the intended panel, and you are unable to delete it from the unintended panel, reset the device to factory default setting:
- Open the cover and remove the battery.
- Hold down the tamper switch while reinserting the battery. Rapid LED flashing indicates successful deletion (LED flashes as if in enrollment mode). If LED does not flash, delete was not successful.
- Reattach the cover.
This procedure is available for 24 hours after enrollment with a panel and the device remains powered (battery installed). LED
INDICATIONS
| LED | Status |
| Rapid Flashes for about 20 seconds, then ON for 3 seconds |
Power Up — Enrollment |
| Slow Flashes |
Power Up — Device enrolled; Wall or Cover Tamper activated. To stop flashes, clear the tamper condition by reconnecting to the mounting plate and reattaching the cover. It also times out after 10 minutes. |
| ON(while in Programming Mode) |
Sensor LED toggles on and off when the sensor is selected. See Sensor Location Feature. |
BATTERY REPLACEMENT
- Push the bottom latch of the mounting bracket back to disengage Then slide the back housing, up and out to remove it from the mounting bracket.
- Slide the front and back housings in opposite directions and pull the housings apart.
- Remove the battery, wait 10 seconds, then insert a new battery. Recommended batteries:Duracell DL123AResideo 466Huiderui CR123APanasonic CR123A
- Place the front and back housings together and slide them together as
BATTERY CAUTION: Risk of fire, explosion, and burns. Do not recharge, disassemble, heat above 212°F (100°C), or incinerate. Dispose of used batteries properly. Keep away from children.
NOTE: Constant exposure to high or low temperature or high humidity may reduce battery life.
![]()
SPECIFICATIONS:
Battery: 1 x 3V Lithium, Resideo 466, Panasonic CR123A, Duracell DL123A or Huiderui CR123ATamper: Cover and WallRF Frequency: 2.4GHzOperating Temperature: 32° — 122° F / 0° — 50° C(Agency Compliance 32° — 120° F / 0° — 49° C)Relative Humidity: 95% max. (Agency Compliance – 93% max.), non-condensingDimensions: 1″ H x 3.13″ L x 1.61″ W 25.5 mm H x 79.5 mm L x 41 mm W
Approval Listings:FCC / ICcETLus ListedConforms to UL 634 Certified to ULC/ORD-C634 Other Standards:RoHS
| The product must be tested at least once each year |  |
FEDERAL COMMUNICATIONS COMMISSION & INDUSTRY CANADA STATEMENTS
The user shall not make any changes or modifications to the equipment unless authorized by the Installation Instructions or User’s Manual. Unauthorized changes or modifications could void the user’s authority to operate the equipment.
CLASS B DIGITAL DEVICE STATEMENT
This equipment has been tested to FCC requirements and has been found acceptable for use. The FCC requires the following statement for your information: This equipment generates and uses radiofrequency energy and if not installed and used properly, that is, in strict accordance with the manufacturer’s instructions, may cause interference to radio and television reception. It has been typing tested and found to comply with the limits for a Class B computing device in accordance with the specifications in Part 15 of FCC Rules, which are designed to provide reasonable protection against such interference in a residential installation. However, there is no guarantee that interference will not occur in a particular installation. If this equipment does cause interference to radio or television reception, which can be determined by turning the equipment off and on, the user is encouraged to try to correct the interference by one or more of the following measures:
- If using an indoor antenna, replace it with a quality outdoor antenna.
- Reorient the receiving antenna until the interference is reduced or eliminated.
- Move the radio or television receiver away from the receiver/control.
- Move the antenna leads away from any wire runs to the receiver/control.
- Plug the receiver/control into a different outlet so that it and the radio or television receiver are on different branch circuits.
- Consult the dealer or an experienced radio/TV technician for help.
INDUSTRY CANADA CLASS B STATEMENT
This Class B digital apparatus complies with Canadian ICES-003.
Cet appareil numerique de la classe B est conforme a la norme NMB-003 du Canada.
FCC / IC STATEMENT
This device complies with Part 15 of the FCC Rules, and Industry Canada’s license-exempt RSS. Operation is subject to the following two conditions: (1) This device may not cause harmful interference, and (2) This device must accept any interference received, including interference that may cause undesired operation.
RF EXPOSURE
Warning — The antenna(s) used for this device must be installed to provide a separation distance of at least 7.8 inches (20 cm) from all persons and must not be co-located or operating in conjunction with any other antenna or transmitter except in accordance with FCC and ISED multi-transmitter product procedures.
|
REFER TO THE INSTALLATION INSTRUCTIONS FOR THE CONTROL WITH WHICH THIS DEVICE IS USED, FOR DETAILS REGARDING THE LIMITATIONS OF THE ENTIRE ALARM SYSTEM. |
|
Responsible Party / Issuer of Supplier’s Declaration of Conformity: Ademco Inc., a subsidiary of Resideo Technologies, Inc., 2 Corporate Center Drive., Melville, NY 11747, Ph: 516-577-2000 |
|
The product should not be disposed of with other household waste. Check for the nearest authorized collection centers or authorized recyclers. The correct disposal of end-of-life equipment will help prevent potential negative consequences for the environment and human health.Any attempt to reverse-engineer this device by decoding proprietary protocols, de-compiling firmware, or any similar actions is strictly prohibited. |
SUPPORT & WARRANTY INFORMATIONFor the latest documentation and support, please go to: www.resideo.com
For the latest warranty information, please go to: www.secuity.honeywellhome.com/warranty
The Honeywell Home trademark is used under license from Honeywell International Inc. This product is manufactured by Resideo Technologies, Inc. and its affiliates.

2 Corporate Center Drive, Suite 100P.O. Box 9040, Melville, NY 11747© 2020 Resideo Technologies, Inc.www.resideo.com
 report this ad
[xyz-ips snippet=”download-snippet”]