![]()
![]()
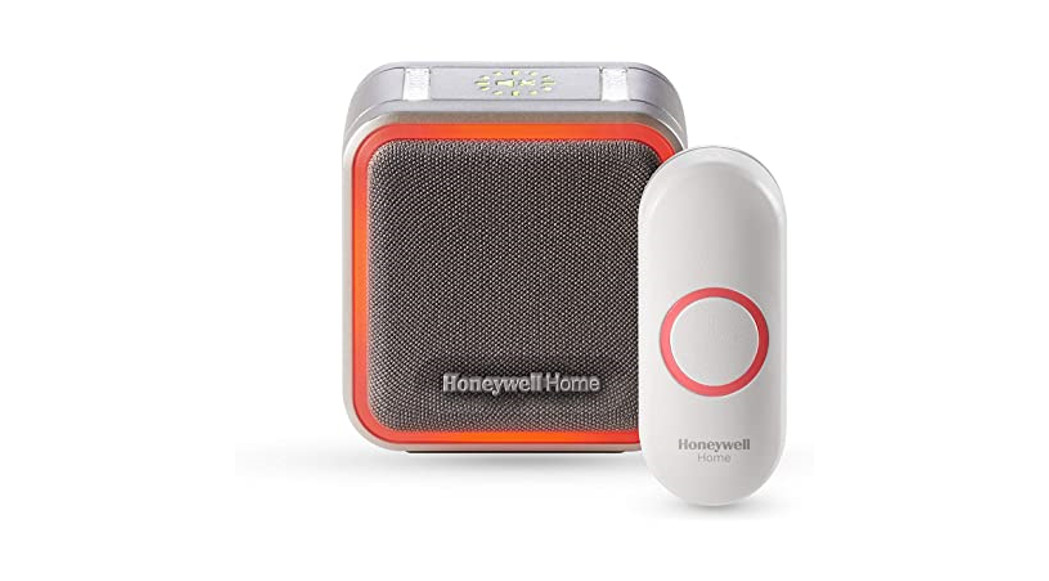
Installation and Operation GuidePortable Wireless Doorbell
RDWL515A2000Read before installing
Preparation
|
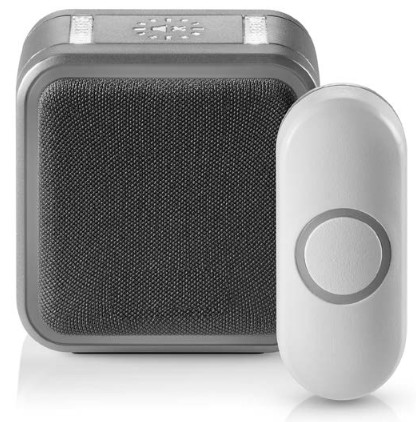
In the box you will find |
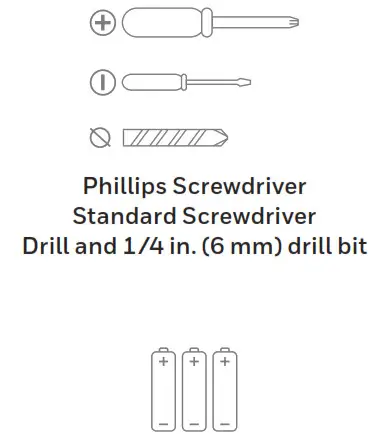
To install you will need |
 |
 |
The push-button supplied with this kit is pre-programmed to operate with the doorbell. If it is not, see “Connect a Push Button” on page 6.
Overview
Just follow these simple steps:
- Install batteries.
- Set up the doorbell and your preferences.
- Install the doorbell and the push button.
Safety
Before proceeding with the installation, please note the following safety warnings:
- Always follow the manufacturer’s advice when using power tools and wear suitable protective equipment (e.g. safety goggles) when drilling holes, etc.
- Before drilling holes in walls, check for hidden electricity cables and water pipes. The use of a cable/pipe locator is advisable if in doubt.
Install Batteries
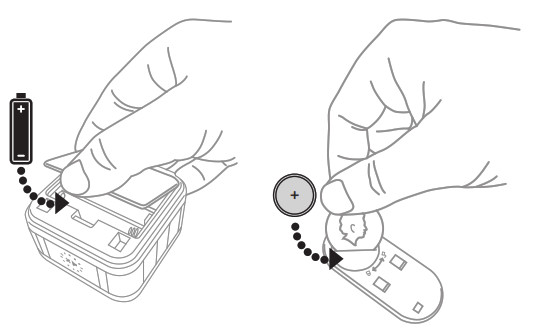
- Open the doorbell battery cover and install 3 AA alkaline batteries.
- Open the push button battery + cover and install the CR2032 battery.

Setup and OperationPress the push button to test whether it is paired with the doorbell. The doorbell will light up and ring. If it does not, see “Connect a Push Button” on page 6.
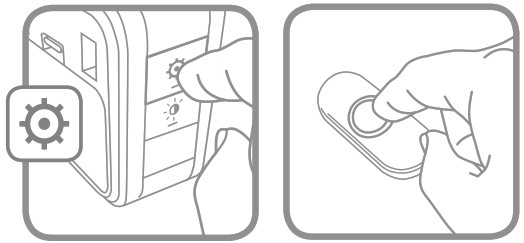
Change the TunePress the Music button to change the doorbell tune.Every time you press the Music button, the tune will change. Stop pressing the Music button when you hear the tune you want.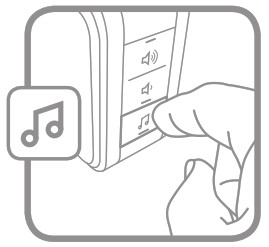 Ding Dong Westminster Piano Fantasy Soft Alert Smart Sax Glocken Clock-ding-dong Contemporary
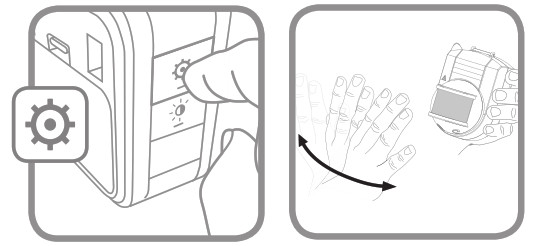
Change the Light PatternPress the Sunlight button to change the lights that flash when the doorbell rings.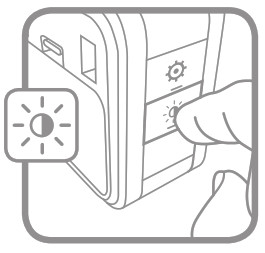 Press the Sunlight button
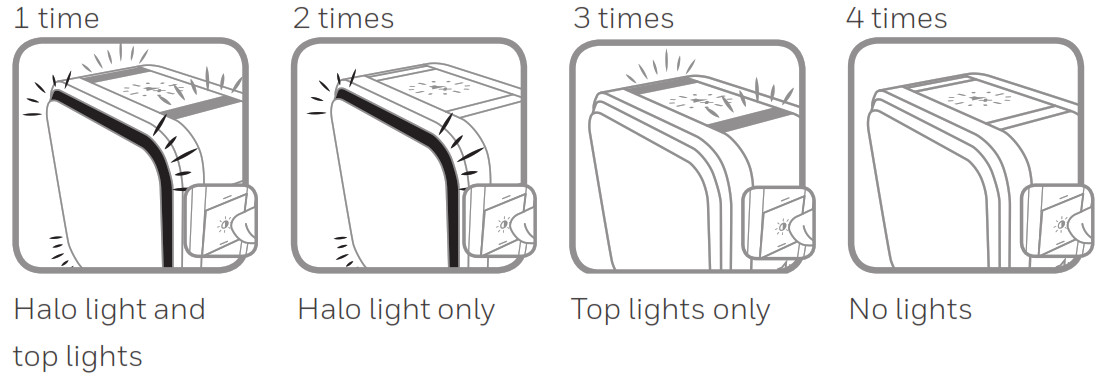
Change the Halo Light ColorPress the push button.Within 12 seconds, press the Sunlight button.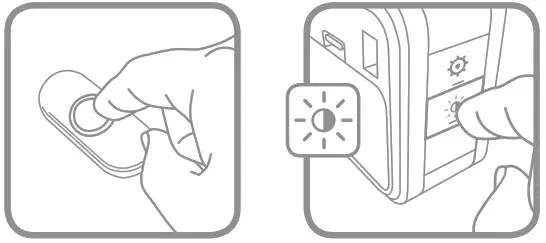
Every time you press the Sunlight button, the halo light will change colors. Stop pressing the Sunlight button when you see the color you want:
| Light Blue | Green |
| White | Purple |
| Red | Yellow |
| Dark Blue |
Operation
Adjust the Volume Press the Volume Up or Volume Down buttons to adjust the volume of the Doorbell. Mute the DoorbellPress the Mute button to silence the doorbell.
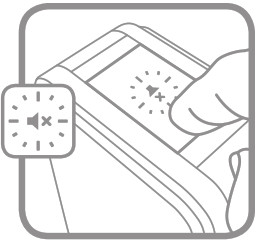 Set the MuteYou can also mute the doorbell for specific amounts of time. Press the Mute button…
|
Mute button shows |
Doorbell is mute | Mute button shows |
Doorbell is mute |
||
| 1 time | doorbell is mute | 4 times | 9 hours | ||
| 2 times | 3 hours | 5 times | 12 hours | ||
| 3 times | 6 hours | 6 times | no longer mute |
Installation
Choose a location that is not near a heat source or on something that moves (like a door). For non-mounting locations, choose a place where the doorbell will be easy to see and hear.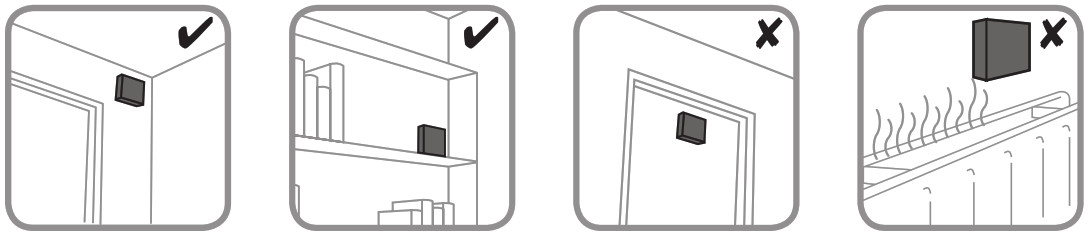 Install DoorbellIf you are not mounting the doorbell to the wall, place it where you want it.
|
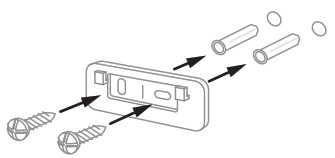
1. Screw the doorbell wall mounting bracket to the wall using the included screws and anchors (if necessary).Drill 1/4 inch holes for the anchors. |
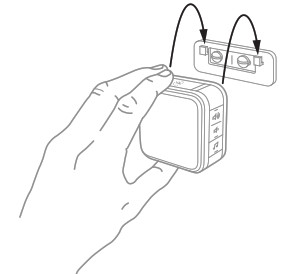
2. Hang the doorbell on the mounting bracket. |
 |
 |
- Mount the push button bracket in the desired location. Use the screws OR Use the adhesive backing. If using the adhesive backing, clean the surface first.
- Snap the push button onto the mounting bracket.Note: If you need to remove the push button, use a small screwdriver to release the tab.
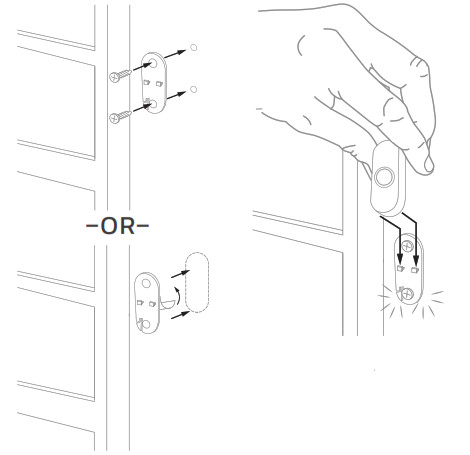 Note: If you need to remove the push button, use a small screwdriver to release the tab.
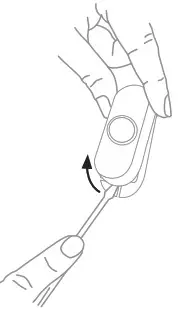
Accessories
You can connect up to 4 accessories to your doorbell, including other push buttons, window or door opening sensors, and motion sensors.If you try to connect more accessories than the max number, the doorbell will sound two beeps.
Connect a Motion Sensor
- Press and hold the Setting button on the doorbell for three seconds. The halo light will circle.
- Within 20 seconds of pressing the Setting button, wave or make some other kind of motion in front of the motion sensor.
Connect a Push ButtonFollow these steps to change the ring and halo light color for an existing doorbell, too.
- Press and hold the Setting button on the doorbell for three seconds. The halo light will circle.
- Press the push button.
- Within 12 seconds of pressing the push button, press the Music button to select the ring for that push button.
- Within 12 seconds of pressing the push button, press the Sunlight button to select a halo light color for that push button.
Secret KnockYou can set up a Secret Knock that makes a different ring and halo light color for each push button. The Secret Knock is triggered by pressing the push button quickly 3 times.
- Press the push button 3 times quickly.
- Within 12 seconds of pressing the push button, press the Music button to select the ring for the Secret Knock.
- Within 12 seconds of pressing the push button, press the Sunlight button to select a halo light color for the Secret Knock.
Maintenance
Your doorbell and push button require no maintenance except to periodically change the batteries. If using the correct batteries, battery life should be approximately:
- Up to 2 years for the doorbell; replace with 3 AA alkaline batteries
- Up to 2 years for the push button; replace with a CR2032 lithium battery
Low Battery NotificationWhen doorbell batteries are low the bottom edge of the halo light flashes yellow every 6 seconds until batteries are replaced.When the push button batteries are low, two beep sounds are heard after the normal tune.
ResetThis process removes all pairings, including the push button that came with this doorbell:
- Remove the doorbell battery.
- Press and hold the Setting button, and replace the battery at the same time.The halo light will circle, and the doorbell is returned to its factory default settings.
Specifications
| Doorbell | Push Button | |
| Operating Temperature | 23°F to 104°F (-5°C to 40°C) | -4°F to 122°F (-20°C to 50°C) |
| ActivLink” | 916.8 MHz | 916.8 MHz |
| Range (open field) | 350 ft. (106 m) | 350 ft. (106 m) |
| Sound Level (typical) | 84dBA | – |
| RF Power | – | <1.2W |
| Battery Type | Input 3 x AA (1.5 V) alkaline | CR2032 |
| Battery Life (5 activations/day) | Up to 2 years | Up to 2 years |
| Rain proof | N/A | Pass UL1598 rain test. |
Troubleshooting
| If | Then |
| The doorbell does not work | 1. Press the Mute button until all of the Mute lights are off2. Make sure the correct batteries (3 AA alkaline cells, 1 CR2032) are installed with the correct polarity.3. The doorbell might be out of range; try the doorbell in a different location.4. Reconnect the doorbell. See “Connect a Push Button”. |
| Two ‘beep’ sounds are heard after the normal tune | Replace push button battery with a new CR2032. |
| The halo light flashes yellow at the bottom edge | Replace doorbell batteries with 3 new AA alkaline batteries. |
| Range is reduced | 1. Metal structures including uPVC door frames can reduce the range. Don’t mount the doorbell or push button on or near metal structures.2. Move the doorbell closer to the push button.3. Weak batteries will reduce range. In cold conditions (below 41°F [5°0), batteries may need to be replaced more often. |
For help please visit honeywellhome.com or call 1-800-633-3991.
1-year limited warranty
Resideo warrants this product, excluding battery, to be free from defects in workmanship or materials, under normal use and service, for a period of one (1) year from the date of first purchase by the original purchaser. If at any time during the warranty period the product is determined to be defective due to workmanship or materials, Resideo shall repair or replace it (at Resideo’s option).If the product is defective,(i) return it, with a bill of sale or other dated proof of purchase, to the place from which you purchased it; or(ii) call Resideo Customer Care at 1-800-633-3991. Customer Care will make the determination whether the product should be returned to the following address: Resideo Return Goods, 1985 Douglas Dr. N., Golden Valley, MN 55422, or whether a replacement product can be sent to you.This warranty does not cover removal or reinstallation costs. This warranty shall not apply if it is shown by Resideo that the defect was caused by damage which occurred while the product was in the possession of a consumer.Resideo’s sole responsibility shall be to repair or replace the product within the terms stated above. RESIDEO SHALL NOT BE LIABLE FOR ANY LOSS OR DAMAGE OF ANY KIND, INCLUDING ANY INCIDENTAL OR CONSEQUENTIAL DAMAGES RESULTING, DIRECTLY OR INDIRECTLY, FROM ANY BREACH OF ANY WARRANTY, EXPRESS OR IMPLIED, OR ANY OTHER FAILURE OF THIS PRODUCT.Some states do not allow the exclusion or limitation of incidental or consequential damages, so this limitation may not apply to you.THIS WARRANTY IS THE ONLY EXPRESS WARRANTY RESIDEO MAKES ON THIS PRODUCT. THE DURATION OF ANY IMPLIED WARRANTIES, INCLUDING THE WARRANTIES OF MERCHANTABILITY AND FITNESS FOR A PARTICULAR PURPOSE, IS HEREBY LIMITED TO THE ONE YEAR DURATION OF THIS WARRANTY. Some states do not allow limitations on how long an implied warranty lasts, so the above limitation may not apply to you. This warranty gives you specific legal rights, and you may have other rights which vary from state to state. If you have any questions concerning this warranty, please write Resideo Customer Care, 1985 Douglas Dr, Golden Valley, MN 55422 or call 1-800-633-3991.
FCC Regulations
This device complies with part 15 of the FCC Rules. Operation is subject to the following two conditions: (1) This device may not cause harmful interference, and (2) this device must accept any interference received, including interference that may cause undesired operation.
The grantee is not responsible for any changes or modifications not expressly approved by the party responsible for compliance. Such modifications could void the user’s authority to operate the equipment.This equipment has been tested and found to comply with the limits for a Class B digital device, pursuant to part 15 of the FCC Rules. These limits are designed to provide reasonable protection against harmful interference in a residential installation. This equipment generates, uses and can radiate radio frequency energy and, if not installed and used in accordance with the instructions, may cause harmful interference to radio communications. However, there is no guarantee that interference will not occur in a particular installation. If this equipment does cause harmful interference to radio or television reception, which can be determined by turning the equipment off and on, the user is encouraged to try to correct the interference by one or more of the following measures:
- Reorient or relocate the receiving antenna.
- Increase the separation between the equipment and receiver.
- Connect the equipment into an outlet on a circuit different from that to which the receiver is connected.
- Consult the dealer or an experienced radio/TV technician for help. This transmitter must not be co-located or operating in conjunction with any other antenna or transmitter. This equipment should be installed and operated with a minimum distance of 20 millimeters between the radiator and your body.
IC Regulations
CAN ICES-3(B)/ NMB-3(B)This device complies with Industry Canada licence-exempt RSS standard(s). Operation is subject to the following two conditions: (1) this device may not cause interference, and (2) this device must accept any interference, including interference that may cause undesired operation of the device. CAN ICES-3(B)/NMB-3(B) The device meets the exemption from the routine evaluation limits in section 2.5 of RSS 102 and compliance with RSS-102 RF exposure, users can obtain Canadian information on RF exposure and compliance. This transmitter must not be co-located or operating in conjunction with any other antenna or transmitter. This equipment should be installed and operated with a minimum distance of 20 millimeters between the radiator and your body.The operation of this equipment is subject to the following two conditions: (1) this equipment or device may not cause harmful interference, and (2) this equipment or device must accept any interference, including interference that may cause undesired operation.
Resideo Technologies, Inc.1985 Douglas Drive North, Golden Valley, MN 554221-800-633-399133-00177EFS–06 M.S. Rev. 10-20 | Printed in United States | Imprimé aux États-Unis | Impreso en EE. UU.
© 2020 Resideo Technologies, Inc. All rights reserved. The Honeywell Home trademark is used under license from Honeywell International, Inc. This product is manufactured by Resideo Technologies, Inc. and its affiliates.
References
[xyz-ips snippet=”download-snippet”]