![]()
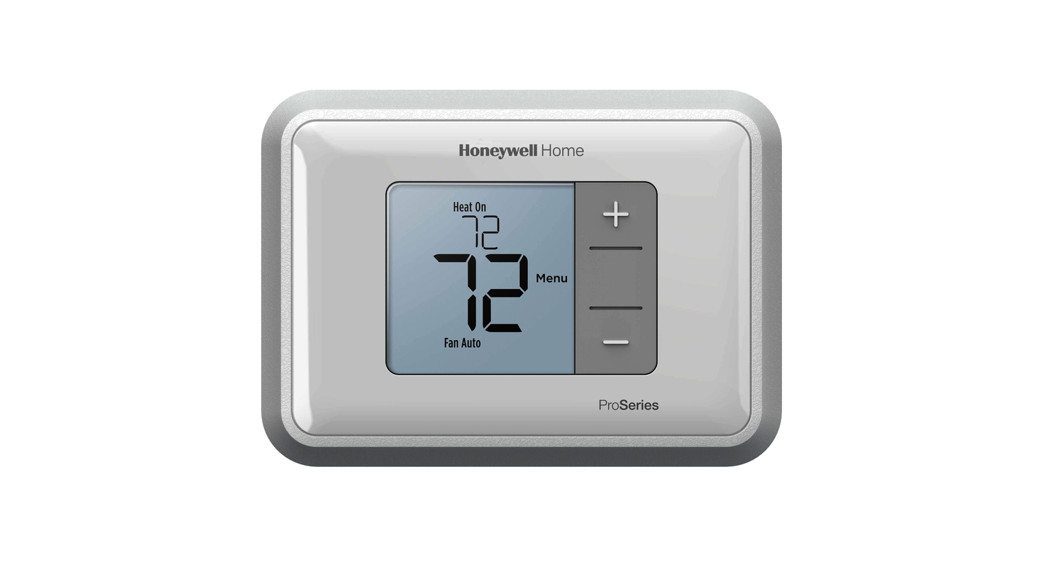
![]() T3 ProThermostatUser Guide
T3 ProThermostatUser Guide
 TH3110U2008,TH3210U2004Read before installing
Package Includes:
- T3 Pro Thermostat
- UWPTM Mounting System
- Decorative Cover Plate Small; Size 4.72″ H X 5.9″ W (120 mm H X 150 mm W)
- Screws and Anchors
- 2 AA Batteries
- Thermostat Literature
Read before installingThermostat controls
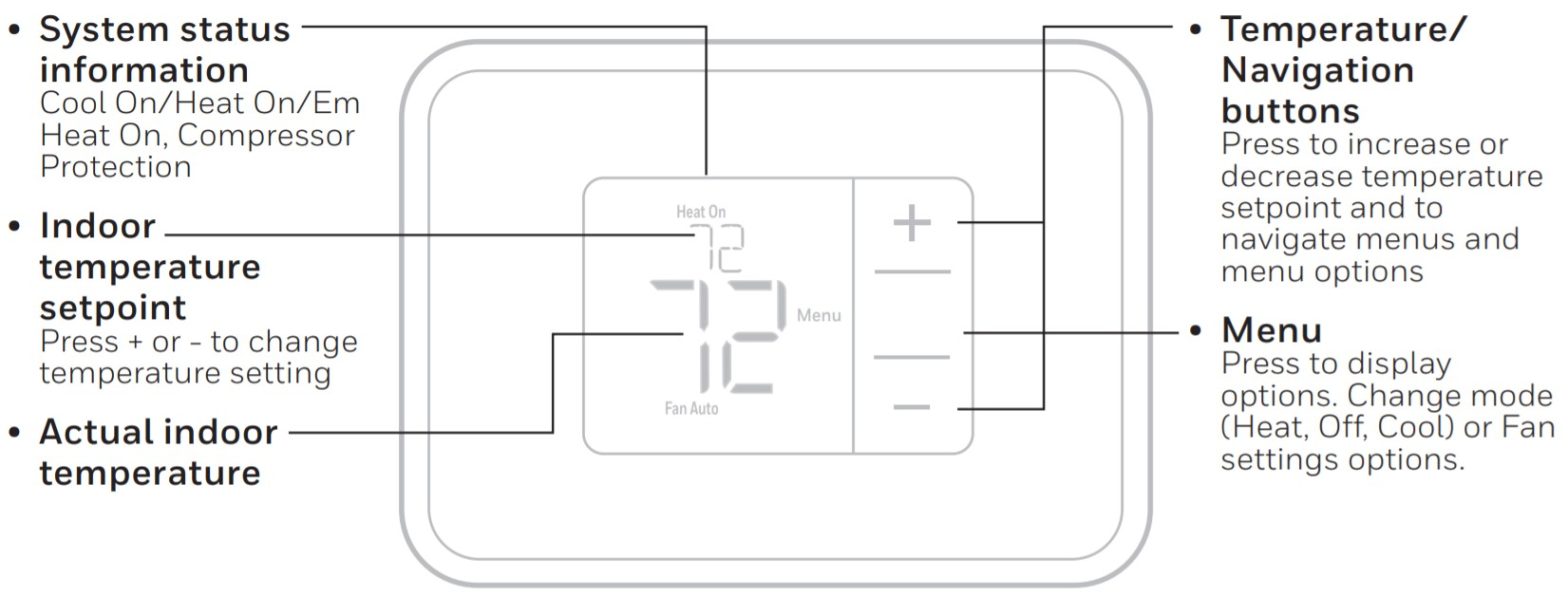
The screen will wake up by pressing any of the three buttons.If powered by the C wire, the screen stays lit for 45 seconds after you complete changes.If powered by battery only, the screen stays lit for 8 seconds.Depending on how your thermostat was installed, the screen light may always be on.Customer assistanceCall Customer Care toll-free at 1-800-468-1502.
System operation settings

- Press Menu, and then press the Mode (+) button to cycle to the next available System mode.
- Cycle through the modes until the required System mode is displayed, and then press Done.
NOTE: Available System modes vary by model and system settings.System modes:
- Auto: The thermostat selects heating or cooling as needed.
- Heat: The thermostat controls only the heating system.
- Cool: The thermostat controls only the cooling system.
- Em heat (only heat pumps with auxiliary heat): The thermostat controls auxiliary heat. The compressoris not used. (Em heat on TH3210U model only.)
- Off: The heating and cooling system is off. The fan will still operate if the fan is set to On.
NOTE: Heat On/Cool On may flash for 5 minutes due to compressor protection.Fan operation settings
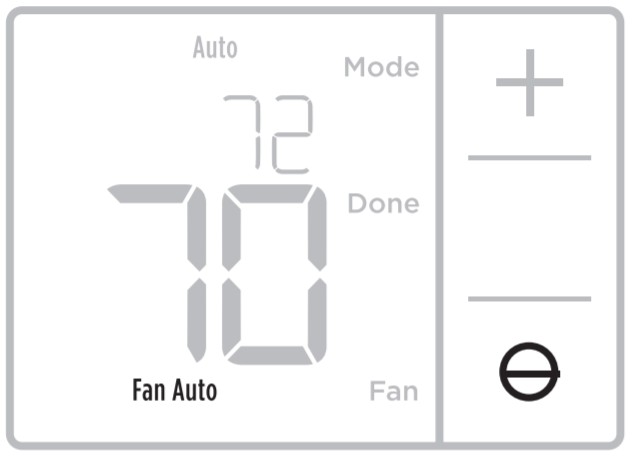
- Press Menu, and then press the Fan (-) button to cycle to the next available Fan mode.2. Cycle through the modes until the required Fan mode is displayed, then press Done.
NOTE: Available Fan modes vary with system settings.Fan modes:Auto: Fan runs only when the heating or cooling system is on.On: Fan is always on.
Battery replacement
Batteries are optional (to provide backup power) if your thermostat was wired to run on AC power when installed. If your thermostat was not wired to run on AC power, then batteries are required.Install fresh batteries immediately when the low battery icon appears. The icon appears about two months before the batteries are depleted.Even if the low battery icon does not appear, you should replace batteries once a year, or before leaving home for more than a month.If batteries are inserted within two minutes, the time and day will not have to be reset. All other settings are permanently stored in memory and do not require battery power.NOTE: When replacing batteries, alkaline batteries are recommended.When the low battery warning appears, press gently to loosen the thermostat and then carefully pull it from the wall mount.
- When the low battery warning appears, press gently to loosen the thermostat and then carefully pull it from the wall mount.
- Insert two AA alkaline batteries in the back of the thermostat as shown.

Alerts screen
- You will see the alert
 icon and the alert number on the screen.
 - Press Next (+) to see additional alerts if any. Then press Done to go back to the home screen.


NOTE: If the alert is a critical alert, you may not be able to access the home screen and should call an HVAC professional.
Alerts codes
| Number | Alert/Reminder |
Definition |
| 170 | Internal Memory Error | The memory of the thermostat has encountered an error. Please replace the thermostat. |
| 173 | ThermostatTemperature Sensor Error | The sensor of the thermostat has encountered an error. Please replace the thermostat. |
| 405 | Low Battery Alert | The batteries are getting low. Replace them within two months. |
| 407 | Critical Low Battery | The batteries are almost depleted and should be replaced as soon as possible. |
Troubleshooting
If you have difficulty with your thermostat, please try the following suggestions.Most problems can be corrected quickly and easily.
| Display is blank | Make sure fresh AA alkaline batteries are properly installed (see page 3). |
| The heating or cooling system does not respond | Press Menu and then Mode to set the system to Heat. Make sure the temperature is set higher than the Inside temperature.Press Menu and then Mode to set the system to Cool. Make sure the temperature is set lower than the Inside temperature.Check the circuit breaker and reset if necessary.Make sure the power switch at the heating & cooling system is on.Make sure the furnace door is closed securely.Wait 5 minutes for the system to respond. |
| Heat On / Cool On flashing on the screen | The compressor protection feature is engaged. Wait 5 minutes for the system to restart safely, without damage to the compressor. |
Electrical Ratings
| Terminal | Voltage (50 Hz/60 Hz) | Running Current |
| W Heating | 20 Vac – 30 Vac | 0.02 A- 1.0 A |
| W2 (Aux) Heating (TH3210U only) | 20 Vac – 30 Vac | 0.02 A -1.0 A |
| E Emergency Heat (TH3210U only) | 20 Vac – 30 Vac | 0.02 A – 0.5 A |
| Y Compressor Stage 1 | 20 Vac – 30 Vac | 0.02 A -1.0 A |
| G Fan | 20 Vac – 30 Vac | 0.02 A – 0.5 A |
| 0/B Changeover | 20 Vac – 30 Vac | 0.02 A – 0.5 A |
5-year limited warranty
Resideo warrants this product, excluding battery, to be free from defects in workmanship or materials, under normal use and service, for a period of five (5) years from the date of first purchase by the original purchaser. If at any time during the warranty period the product is determined to be defective due to workmanship or materials, Resideo shall repair or replace it (at Resideo’s option).If the product is defective,
- return it, with a bill of sale or other dated proof of purchase, to the place from which you purchased it; or
- call Resideo Customer Care at 1-800-468-1502. Customer Care will make the determination whether the product should be returned to the following address:Resideo Return Goods, 1985 Douglas Dr. N., Golden Valley, MN 55422, or whether a replacement product can be sent to you.
This warranty does not cover removal or reinstallation costs. This warranty shall not apply if it is shown by Resideo that the defect was caused by damage that occurred while the product was in the possession of a consumer.Resideo’s sole responsibility shall be to repair or replace the product within the terms stated above. RESIDE SHALL NOT BE LIABLE FOR ANY LOSS OR DAMAGE OF ANY KIND, INCLUDING ANY INCIDENTAL OR CONSEQUENTIALDAMAGES RESULTING, DIRECTLY OR INDIRECTLY, FROM ANY BREACH OF ANY WARRANTY, EXPRESS OR IMPLIED, OR ANY OTHER FAILURE OF THIS PRODUCT.Some states do not allow the exclusion or limitation of incidental or consequential damages, so this limitation may not apply to you.THIS WARRANTY IS THE ONLY EXPRESS WARRANTY RESIDE MAKES ON THIS PRODUCT. THE DURATION OF ANY IMPLIED WARRANTIES, INCLUDING THE WARRANTIES OF MERCHANTABILITY AND FITNESS FOR A PARTICULAR PURPOSE, IS HEREBY LIMITED TO THE FIVE-YEAR DURATION OF THIS WARRANTY. Some states do not allow limitations on how long an implied warranty lasts, so the above limitation may not apply to you.This warranty gives you specific legal rights, and you may have other rights which vary from state to state. If you have any questions concerning this warranty, please write Resideo Customer Care, 1985 Douglas Dr, Golden Valley, MN 55422 or call 1-800-468-1502.![]() CAUTION: ELECTRICAL HAZARDCan cause electrical shock or equipment damage. Disconnect power before beginning installation.
CAUTION: ELECTRICAL HAZARDCan cause electrical shock or equipment damage. Disconnect power before beginning installation.![]() CAUTION: EQUIPMENT DAMAGE HAZARDCompressor protection is bypassed during testing. To prevent equipment damage, avoid cycling the compressor quickly.
CAUTION: EQUIPMENT DAMAGE HAZARDCompressor protection is bypassed during testing. To prevent equipment damage, avoid cycling the compressor quickly.![]() CAUTION: MERCURY NOTICEIf this product is replacing a control that contains mercury in a sealed tube, do not place the old control in the trash. Contact your local waste management authority for instructions regarding recycling and proper disposal.
CAUTION: MERCURY NOTICEIf this product is replacing a control that contains mercury in a sealed tube, do not place the old control in the trash. Contact your local waste management authority for instructions regarding recycling and proper disposal.
 Resideo Technologies Inc.1985 Douglas Drive North, Golden Valley, MN 554221-800-468-150233-00521EFS—03 M.S. Rev. 03-20Printed in the United States© 2020 Resideo Technologies, Inc. All rights reserved.The Honeywell Home trademark is used under license from Honeywell International, Inc.This product is manufactured by Resideo Technologies, Inc. and its affiliates.
References
[xyz-ips snippet=”download-snippet”]