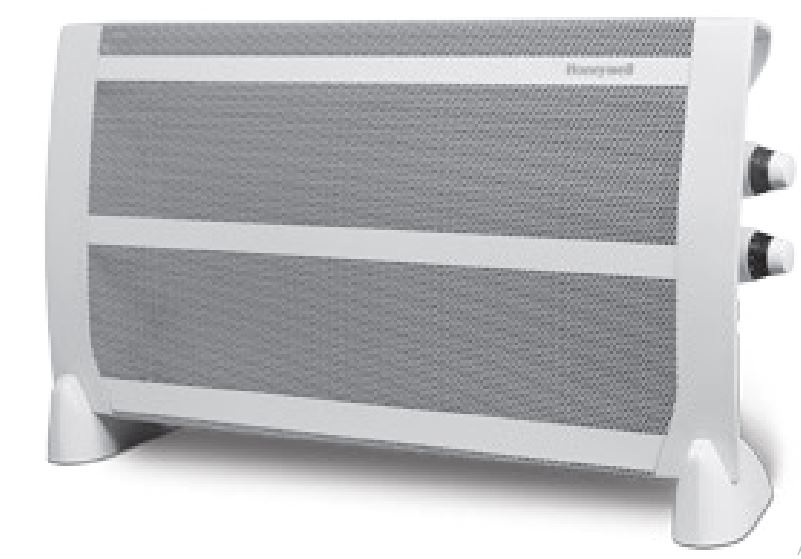
Honeywell HW223E Heater Instruction Manual

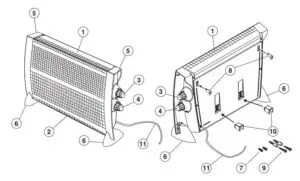
COMPONENTS
CONTROL PANEL
FOOTSTAND INSTALLATION

WALL MOUNTING INSTALLATION
IMPORTANT SAFETY INSTRUCTIONS
Read through all the instructions before starting to use the appliance. Keep this manual in a safe place for future reference. These instructions are also available on our website. Please visit www.hot-europe.com.
- This appliance must only be operated as instructed in this user manual.
- This appliance can be used by children aged from 8 years and above and persons with reduced physical, sensory or mental capabilities or lack of experience and knowledge if they have been given supervision or instruction concerning use of the appliance in a safe way and understand the hazards involved. Children shall not play with the appliance.
- Children of less than 3 years should be kept away unless continuously supervised Children aged from 3 years and less than 8 years shall only switch on/off the appliance provided that it has been placed or installed in its intended normal operating position and they have been given supervision or instruction concerning use of the appliance in a safe way and understand the hazards involved. Children aged from 3 years and less than 8 years shall not plug in, regulate and clean the appliance or perform user maintenance.
- CAUTION — Some parts of this product can become very hot and cause burns. Particular attention has to be given where children and vulnerable people are present.
- Never position this appliance immediately underneath a power socket.
- Do not use this heater in the immediate surroundings of a bath, a shower or a swimming pool.
- DO NOT COVER WARNING: In order to avoid overheating, do not cover the heater with anything, as indicated by the symbol. This can lead to overheating, fire or electric shocks. Ensure that the air intake and outlet vents are not obstructed.
- The appliance is intended only for use indoors, not for outdoor use or commercial use.
- Do not use the appliance anywhere near easily flammable gases or substances such as solvents, lacquers, glues, etc. Some of the internal parts can be hot and could throw sparks.
- Keep flammable materials at least 100cm away from the heater. To prevent burns, do not allow bare skin to come in contact with hot surfaces.
- If the supply cord is damaged, it must be replaced by the manufacturer, its service agent or similarly qualified persons in order to avoid a hazard.
- Never touch the unit with wet hands.
- Check for any obstructions. If you find an obstruction, turn off the heater using the power button on the control panel. Allow the heater to cool completely, then remove the obstruction. Wait at least 10 minutes, then turn on the heater and follow the instructions for use.
COMPONENTS (See page 2)
- Air inlet grille
- Air outlet grille
- Power setting knob
- Thermostat knob
- Handles
- Feet
- Feet assembly screws
- Wall mounting clips
- Wall mounting screws and rawl plugs (for concrete)
- Wall spacers
- Power cable
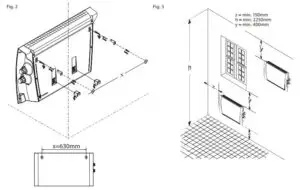
ASSEMBLY (See page 3)
This heater may be used with feet on the floor or attached directly to the wall.FOOTSTAND INSTALLATION
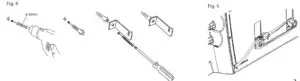
- For floor use, attach the feet to the lower part of the heater by snapping each foot into the matching holes (fig. 1). Respect the “L” (left) and “R” (right) positions for the feet.
- As shown in fig. 1A, please tighten the feet at the bottom of the heater using the feet assembly screws provided.
- Place the heater on a firm, level, open surface at least 90cm away from any other object. DO NOT use on an unstable surface such as bedding or deep carpeting.
WALL MOUNTING INSTALLATION
- For wall mounting, find a position for the heater ensuring proper clearances (fig. 3).
- Secure the wall mounting clips into the wall using the wall mounting clip screws and rawl plugs (for concrete) provided (fig. 4).
- Attach the wall spacers on the back of the heater to keep the minimum distance to the wall. Attach the heater to the mounting clips, using the mounting holes on the back of the heater (fig. 2).
POWER CABLE WINDING (See page 3)
- If you want to wind the power cable on the heater when not in use, mount the wall spacers at the rear side of the heater.
- Wind the power cable around the wall spacers (fig. 5).
- When you wish to use the heater, you must completely unwind the power cable. An incompletely unwound power cable can lead to overheating and cause a fire.
OPERATING INSTRUCTIONS (See page 2)
- Turn the power setting knob counterclockwise to the () position.
- Plug the heater power cable into an outlet.
- Turn the power setting knob to the desired power setting (fig. 6):= Low – 600W= Medium – 900W= High – 1500W
- Turn the thermostat knob clockwise to the highest temperature setting for rapid warming.
- When the room reaches a comfortable temperature, turn the thermostat knobcounterclockwise until the heater switches off (a click is heard and the pilot light goes off). At this setting, the thermostat will automatically turn the heater on (the pilot light illuminates) and off (the pilot light goes out) to maintain the selected temperature.
- To turn the heater off, turn the power setting knob to the () position and unplug the heater.
AUTOMATIC ANTI-FROST FUNCTION
The heater is equipped with an automatic anti-frost function. Plug in the heater. Turn the power setting knob to any of the active settings ( , or ). Turn the thermostat knob counterclockwise to its lowest setting, indicated by the snowflake icon ( ). As soon as the room temperature is below + 5° C the heater will automatically switch on. As the heater will automatically turn on in anti-frost mode, make sure the heater is not covered or obstructed by any object.
AUTOMATIC SAFETY CUT-OUT
This heater is equipped with an automatic safety cut-out. If the heater stops unexpectedly, the safety cut-out may have operated. Once the safety cut-out has operated, the heater will not restart until the heater has been turned off and cooled down. In this situation, you must turn the power setting knob to the () position and unplug the heater. Allow the heater to cool, then follow the “Operating Instructions”.
TIP-OVER SWITCH
The heater is equipped with an automatic tip-over switch that will disable the heater if it is accidentally tipped over.
IF THE HEATER FAILS TO OPERATE
- Check for and remove any obstructions.
- Check if the heater is in the standing position.
- Check if the heater is plugged in. Also check if the power socket is working(e.g. plug in a different working electrical device).
- Make sure that the thermostat is not set too low. With the power setting knob set to one of the active settings ( , or ) turn the thermostat knob clockwise until the heater turns on again (pilot light illuminates).
- If the heater still does not work, consult the warranty for further instructions.
CLEANING
We recommend you to clean the appliance twice a year (or before if you notice performance to be impaired) with a vacuum cleaner.
- Unplug the unit.
- Allow it to cool down for 20 minutes.
- Use a vacuum cleaner to suck out dust and dirt from both grilles.
MAINTENANCE
In the event of overheating, the safety system will automatically turn off the heatingelements and/or the motor, if any. If this happens please remove any obstacles to the air outlet grille and clean the unit as indicated under cleaning instructions.
DISPOSAL
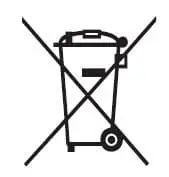 This appliance complies with EU legislation 2012/19/EU on end of life recycling. Products showing the ‘Crossed Through’ wheeled bin symbol on either the rating label, gift box or instructions must be recycled separately from household waste at the end of their useful life.
Please DO NOT dispose of appliance in normal household waste. Your local appliance retailer may operate a ‘take-back’ scheme when you are ready to purchase a replacement product, alternatively contact your local government authority for further help and advice on where to take your appliance for recycling.
CONDITION OF PURCHASE
As condition of purchase the purchaser assumes responsibility for the correct use and care of this Kaz product according to these user instructions. The purchaser or user must himself or herself decide when and for how long this Kaz product is in use.
WARNING: IF PROBLEMS ARISE WITH THIS KAZ PRODUCT, PLEASE OBSERVE THE INSTRUCTIONS IN THE GUARANTEE CONDITIONS. DO NOT ATTEMPT TO OPEN OR REPAIR THE KAZ PRODUCT YOURSELF, AS THIS COULD LEAD TO TERMINATION OF THE GUARANTEE AND CAUSE DAMAGE TO PERSONS AND PROPERTY.
This product carries the CE mark and is manufactured in conformity with theElectromagnetic Directive 2004/108/EC, the Low Voltage Directive 2006/95/EC and the RoHS Directive 2011/65/EU.
Technical modifications reservedHW223E220-240V ~ 50Hz1500W
ADDITIONAL IMPORTANT SAFETY INSTRUCTIONS
- This appliance is not intended for use by persons (including children) with reduced physical, sensory or mental capabilities, or lack of experience and knowledge, unless they have been given supervision or instruction concerning use of appliance by a person responsible for their safety.
- Children should be supervised to ensure that they do not play with the appliance.
Read More About This User Manuals…
report this adQuestions about your Manual? Post in the comments!
[xyz-ips snippet=”download-snippet”]