PROSiXPIRWireless Passive Infrared Motion SensorInstallation Instructions
This wireless passive infrared motion sensor is intended for use with Honeywell Home controls that support PROSiXTM series devices.
Mounting Location
- The optimal range is obtained at a mounting height of 7′ 6″ (2.3 m).
- Allow a clear line of sight to all areas to protect.
- Do not directly face windows.
- Avoid close proximity to moving machinery, fluorescent lights, and heating/cooling sources.
- For use in applications with pets up to 80 pounds (36 kilograms).
In Applications with Animals:
- Mount with the center of the device at 7.5 feet (2.3m)
- Mount where the pet cannot come within 6 feet (1.8m) of the sensor by climbing on furniture, stairs, boxes, or other objects.
- Test each installation to determine the exact level of animal immunity; levels vary based on environmental differences and the amount of heat radiated by an animal.
Mounting Options
After enrolling, verify adequate signal strength by conducting a sensor test (see the controller’s instructions) with the device in its intended mounting location. Adjust the device location and orientation as necessary.The PROSIXPIR can be mounted on the wall or in corners:
- [A] = Wall mounting holes.
- [B] = Corner mounting holes.
- The rear tamper plate MUST be mounted to a stud, solid wood, or with a robust wall anchor.
Enroll the PROSIXPIR
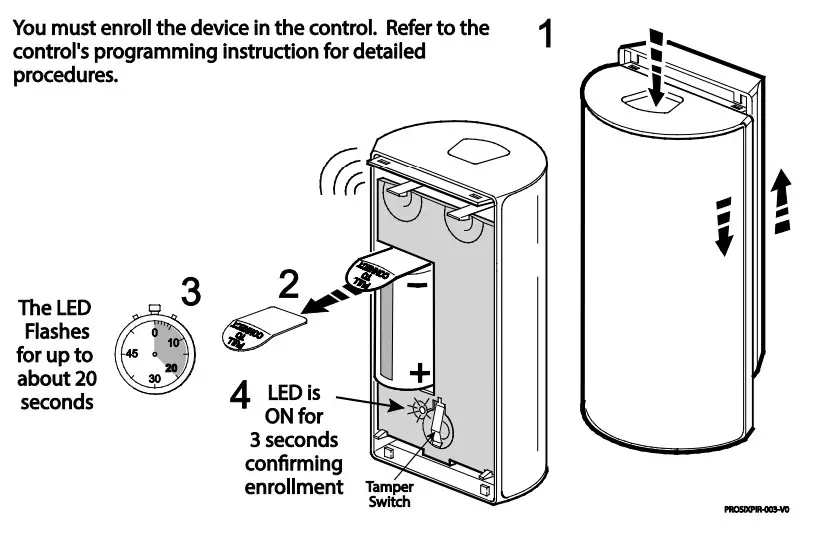
Press down on the top latch and separate the front and back covers.
- Put the control in Programming Mode:
- Remove the battery tab to activate and beginthe enrollment process.
- The green LED beneath the battery flashes (up to about 20 seconds*) during enrollment. The device sends its unique MAC ID (Serial Number) and Services information to the controller.
*NOTE: Enrollment time varies depending on the signal strength between the device and the controller. 4. Enrollment is confirmed when the LED is ON for 3 seconds. NOTE: If the sensor is not successfully enrolled during the enrollment period, the LED turns off and the device enters a sleep mode. Activate a tamper or remove and reinsert the battery to restart the enrollment process.NOTE: Pet Immunity is selectable: Off or Up to 80 lbs (36 kg). NOTE: Once enrolled in a system, the sensor cannot be used with another controller until it is removed from the current controller. See the Controller’s instructions for details.
 24-Hour Enrollment Deletion and Default
If the device is enrolled in a panel different than the intended panel, and you are unable to delete it from the unintended panel, reset default the device to factory default setting:
- Open the cover and remove the battery.
- Hold down the tamper switch while reinserting the battery.
This procedure is available for 24 hours after enrollment with a panel and the device remains powered (battery installed).

Walk Test the PROSIXPIR
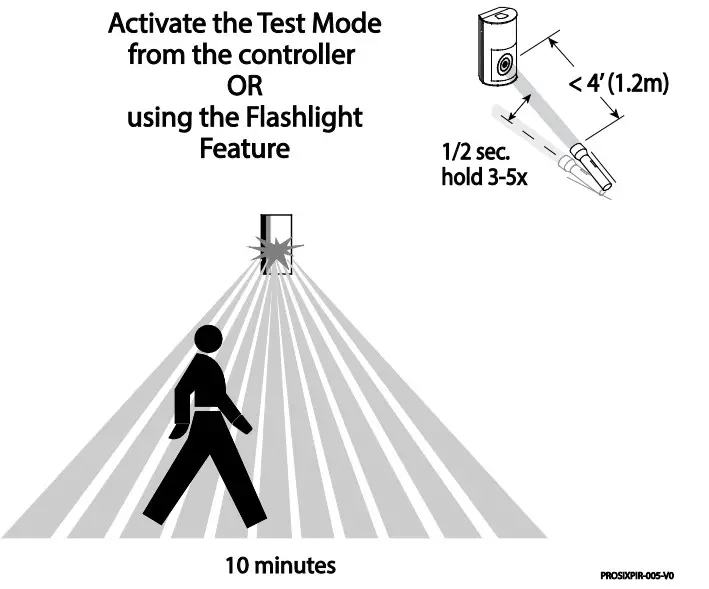
After power-up and enrollment, the sensor automatically enters Walk Test mode.Walkthrough the detection area and observe the LED.After 10 minutes, the sensor automatically exits Test mode, disables the LED, and enters normal operation mode.To restart a 10 minute Test period, activate the Test mode with the controller (see the Controller’s instructions), or use the flashlight feature (see the following section).NOTE: the system must be disarmed to enter Test Mode.

Flashlight Feature
The flashlight feature is only available for the first 24 hours after the first power-up, or until the system is first armed. This feature is no longer available after the first system arming.Each time the flashlight features is used, and the system is disarmed, the walk test timer restarts for 10 minutes.
- Use a flashlight with a bright light beam, and stand within 4′ (1.2 m) of the sensor.
- Swing the light beam past the sensor Lens 3-5 times, holding the beam on the window for 0.5 seconds each pass.

NOTE: the flashlight feature only initiates or restarts the Test Mode and does not change any other sensor settings.
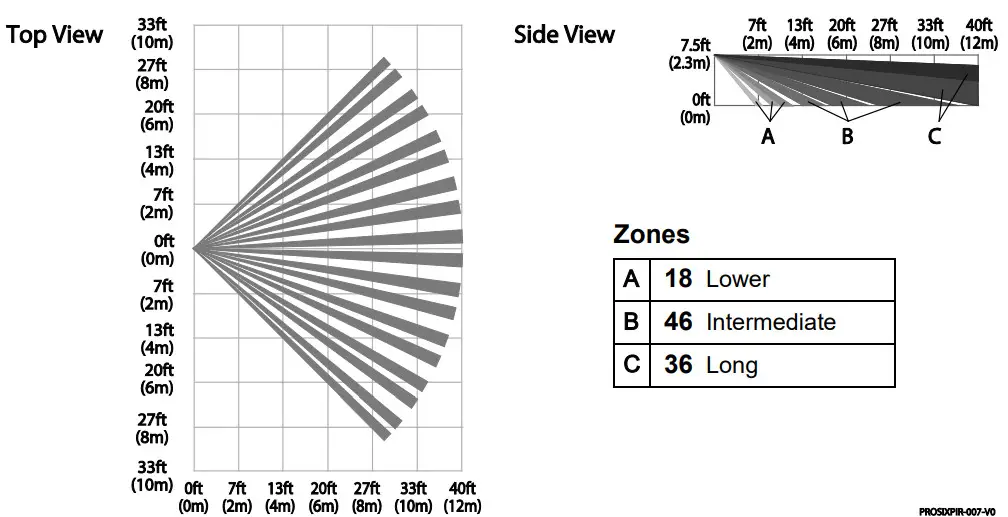
Detection Patterns

Battery Replacement
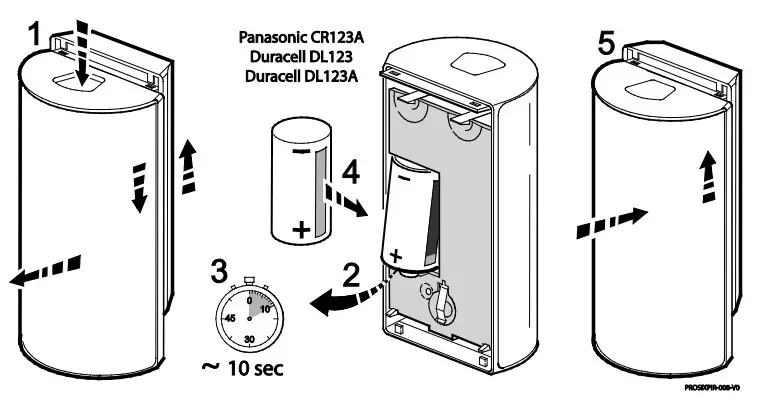
- Press the latch at the top of the device and slide the front cover down to remove it.
- Remove the battery and wait 10 seconds, then insert a new battery. Recommended batteries: Panasonic CR123A Huiderui CR123A Duracell DL123A
- Place the front and back covers together and slide the front cover upward as shown.
BATTERY CAUTION: Risk of fire, explosion, and burns. Do not recharge, disassemble, heat above 212°F (100°C) or incinerate. Dispose of used batteries properly. Keep away from children.NOTE: Constant exposure to high or low temperature or high humidity may reduce battery life.

Specifications
Range: 40′ x 56′ / 12 m x 17 mWall Mounting Height: 7′ 9′ (2.1 m 2.7 m); Optimal 7’6″ (2.3 m)Battery: 1 x 3V, Lithium; Panasonic CR123A, Duracell DL 123A, Huiderui CR123ARF Frequency: 2.4GHzTamper: Cover and Wall reported separately to the panel.Operating Temperature: 32° 122°F / 0° 50°C (Agency Compliance 32° 120°F / 0° 49°C)Relative Humidity: 95% max. (Agency Compliance – 93% max.),non-condensingDimensions: 4.13″ H x 2.38″ W x 1.61″ D / 105 mm H x 60.4 mm W x 41 mm D Weight: 3.97 oz / 112.67g (net weight)
Approval Listings FCC / ICcETLus ListedConforms to UL 639Certified to ULC-S306-03Other Standards: SIA-PIR-01 RoHSThe product must be tested at least once each year.
FEDERAL COMMUNICATIONS COMMISSION (FCC) & INDUSTRY CANADA (IC) STATEMENTSThe user shall not make any changes or modifications to the equipment unless authorized by the Installation Instructions or User’s Manual. Unauthorized changes or modifications could void the user’s authority to operate the equipment.CLASS B DIGITAL DEVICE STATEMENTThis equipment has been tested to FCC requirements and has been found acceptable for use. The FCC requires the following statement for your information: This equipment generates and uses radiofrequency energy and if not installed and used properly, that is, in strict accordance with the manufacturer’s instructions, may cause interference to radio and television reception. It has been typing tested and found to comply with the limits for a Class B computing device in accordance with the specifications in Part 15 of FCC Rules, which are designed to provide reasonable protection against such interference in a residential installation. However, there is no guarantee that interference will not occur in a particular installation. If this equipment does cause interference to radio or television reception, which can be determined by turning the equipment off and on, the user is encouraged to try to correct the interference by one or more of the following measures:
- If using an indoor antenna, replace it with a quality outdoor antenna.
- Reorient the receiving antenna until the interference is reduced or eliminated.
- Move the radio or television receiver away from the receiver/control.
- Move the antenna leads away from any wire runs to the receiver/control.
- Plug the receiver/control into a different outlet so that it and the radio or television receiver are on different branch circuits.
- Consult the dealer or an experienced radio/TV technician for help.
INDUSTRY CANADA CLASS B STATEMENTThis Class B digital apparatus complies with Canadian ICES-003.FCC / IC STATEMENTThis device complies with Part 15 of the FCC Rules, and Industry Canada’s license-exempt RSS. Operation is subject to the following two conditions: (1) This device may not cause harmful interference, and (2) This device must accept any interference received, including interference that may cause undesired operation.Responsible Party / Issuer of Supplier’s Declaration of Conformity: Ademco Inc., a subsidiary of Resideo Technologies, Inc., 2 Corporate Center Drive., Melville, NY 11747, Ph: 516-577-2000RF EXPOSUREWarning – The antenna(s) used for this device must be installed to provide a separation distance of at least 7.8 inches (20 cm) from all persons and must not be co-located or operating in conjunction with any other antenna or transmitter except in accordance with FCC and ISED multi-transmitter product procedures.
 The product should not be disposed of with other household waste. Check for the nearest authorized collection centers or authorized recyclers. The correct disposal of end-of-life equipment will help prevent potential negative consequences for the environment and human health.Any attempt to reverse-engineer this device by decoding proprietary protocols, de-compiling firmware, or any similar actions is strictly prohibited.Support and WarrantyREFER TO THE INSTALLATION INSTRUCTIONS FOR THE CONTROL WITH WHICH THIS DEVICE IS USED, FOR DETAILS REGARDING THE LIMITATIONS OF THE ENTIRE ALARM SYSTEM.For the latest documentation and online support information, please go to: https://mywebtech.honeywellhome.com For the latest warranty information, please go to: www.security.honeywellhome.com/warranty For patent information, see www.resideo.comThe Honeywell Home trademark is used under license from Honeywell International Inc.This product is manufactured by Resideo and its affiliates.

2 Corporate Center Drive, Suite 100P.O. Box 9040, Melville, NY 11747©2020 Resideo Technologies, Inc.www.resideo.com
 800-25243B 2/19 Rev B
[xyz-ips snippet=”download-snippet”]
