Installation Manual
Honeywell WiFi ThermostatModel: RTH65801006 & RTH6500WF Smart Series
Installing your thermostat
You might need the following tools to install this thermostat:
- No. 2 Phillips screwdriver
- Small pocket screwdriver
- Pencil
- Level (optional)
- Drill and bits (3/16” for drywall,
- 7/32” for plaster) (optional)
- Hammer (optional)
- Electrical tape (optional)
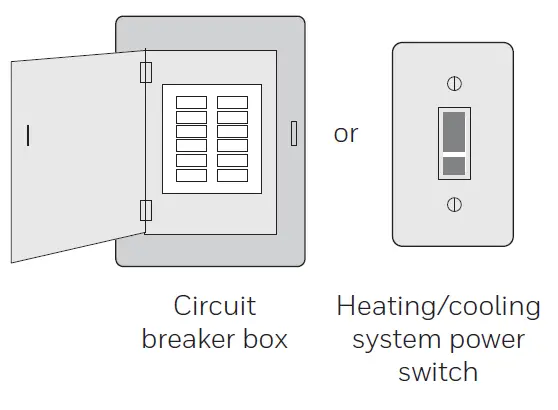
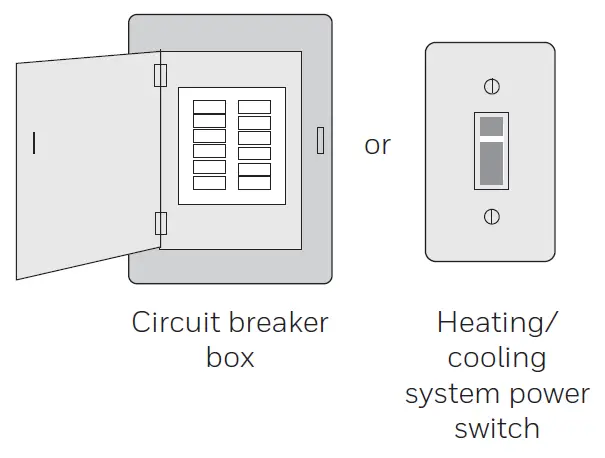
- Switch OFF power to your heating/cooling system.Important! To protect your equipment, switch OFF the power to your heating/cooling system at the breaker box or the system switch.

- Remove old thermostat faceplate and leave wires connected.2a. Take a picture of the wire connections for later reference.2b. If no wire is connected to a terminal labeled C or no C terminal exists on the old thermostat, view the Alternate Wiring videos at honeywellhome.com/wifi-thermostatIf you have an older thermostat with a sealed mercury tube, turn to page ii for proper disposal instructions.Important! C wire is required and is the primary power source for your thermostat. Without a C wire, your thermostat will not power up.
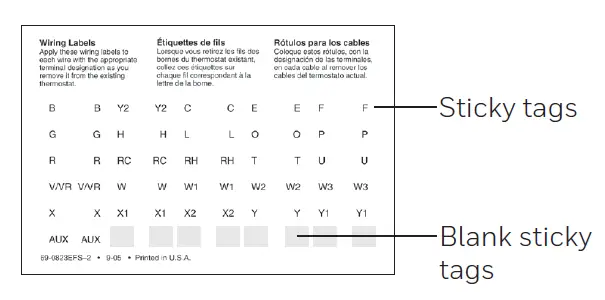
- Label wires.Do not label by wire color. Use the supplied sticky tags to label each wire as you disconnect it. Label wires according to the oldthermostat terminal designations, not by wire color.Note: If no tag matches a wire terminal label, write the terminal label on a blank tag.
- Remove wallplate.Remove the old wallplate from the wall after all wires have been labeled and disconnected.
- Separate thermostat and its wallplate.On your new thermostat, grasp the finger holds on the top and bottom of the wallplate with one hand and the thermostat (front) with the other hand. Pull pieces apart.
- Mount wallplate for thermostat. Mount your new wallplate using screws and anchors included with the thermostat.If necessary:Drill 3/16-in holes for drywall. Drill 7/32-in holes for plaster.Note: You may be able to use your existing wall anchors. Hold the wallplate up to the existing anchors to check for alignment.

Important! The thermostat requires a C wire to operate. The C, or common, wire brings 24 VAC power to the thermostat. Many older mechanical or battery operated thermostats do not require a C wire. If you don’t have a C wire, try:
- Looking for an unused wire that is pushed into the wall. Connect that wire to C and check that it is connected to the 24 VAC common at your heating/cooling system.
Note: Not all heating/cooling systems label the 24 VAC common C. Check your system manual or contact the manufacturer to find out which terminal is the 24 VAC common.

View the Alternate Wiring videos at honeywellhome.com/wifi-thermostat
Wiring
For conventional heating/cooling systems (natural gas, oil or electric furnace, air conditioner), see page 5. See “Glossary” on page 23 for further definition.
For a heat pump system, see page 7. See “Glossary” on page 23 for further definition.
Wiring (conventional system)
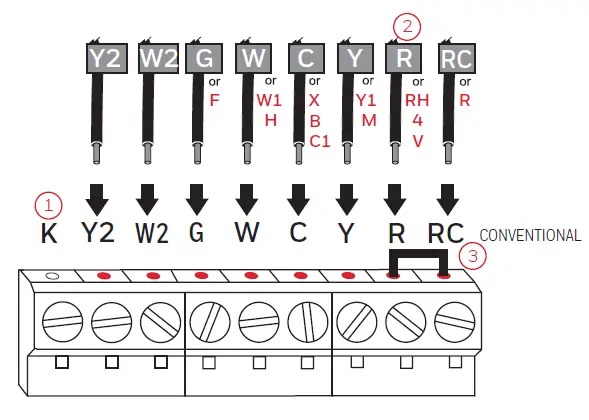
- 7A. Wire the thermostat to your conventional system.a. Starting with the C Wire, match the sticky tag on the wire to the terminal labels.You must have a C wire.b. Loosen screw, insert wire on inside edge of terminal, then tighten screw.c. Verify wire is firmly secured by gently pulling on wire.d. Repeat steps a–c for all other wires.
e. Push any excess wire back into the wall opening after all wires are installed.
f. Continue to page 8.
Labels don’t match? See alternate wiring key on pages 6.
Note: The wiring for your application might be different from the shown above.

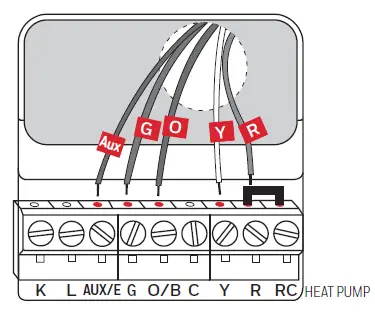
Wiring (Heat Pump System Only)
- 7B. Wire thermostat to your heat pump.a. Starting with the C Wire, match the sticky tag on the wire to the terminal labelsYou must have a C wire.b. Loosen screw, insert wire on inside edge of terminal, then tighten screw.c. Verify wire is firmly secured by gently pulling on wire.d. Repeat steps a–c for all other wires.
e. Push any excess wire back into the wall opening after all wires are installed.
f. Continue to Wiring (Heat Pump System Only).
Note: If old thermostat has separate wires on AUX andE, place both wires into the E/AUX terminal. If old thermostat has wire on AUX with a jumper to E, place wire on E/AUX terminal. No jumper is required.
Note: The wiring for your application might be different from the wiring shown above.
Alternate wiring (conventional system)
Use this if your wire labels don’t match the terminal labels.
Note: You must have a C wire or equivalent.
Alternate wiring key (conventional system)
- Do not use K terminal. For future use.
- If your old thermostat had both R and RH wires, remove metal jumper.
- Connect the R wire to the RC terminal, and the RH wire to the R terminal.
- Remove metal jumper connecting R and RC only if you must connect both R and RC.
Alternate wiring (heat pump system only)
Use this if your wire labels don’t match the terminal labels.
Note: You must have a C wire or equivalent.
Alternate wiring key (heat pump system only)
- Do not use K terminal. For future use.
- If old thermostat has separate wires on AUX and E, place both wires into the E/AUX terminal.
- If old thermostat has wire on AUX with a jumper to E, place wire on E/AUX terminal. No jumper is required.
- If your old thermostat had an O wire and not a B wire, attach the O wire to the O/B terminal.
- If your old thermostat had separate O and B wires, attach the B wire to the C terminal.
- If another wire is attached to the C terminal, check honeywellhome.com for help. Attach the O wire to the O/B terminal.
- If your old thermostat had separate Y1, W1 and W2 wires, check honeywellhome.com for help.
- If your old thermostat had both V and VR wires, check honeywellhome.com for help.
- Leave metal jumper between R and RC terminals in place.
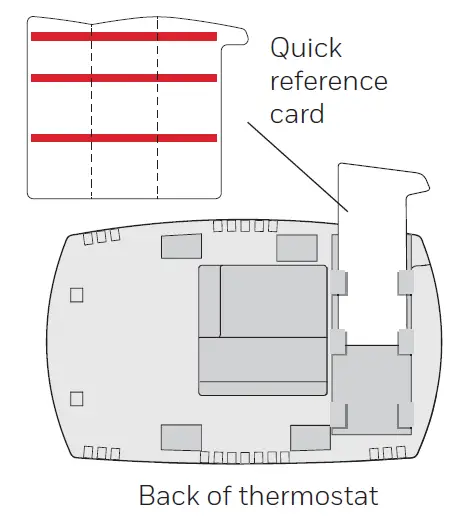
- 8. Insert quick reference card.Fold quick reference card along score lines, and slide it into the slot on the back of the thermostat.
- 9. Attach thermostat to wallplate.Align the thermostat to the wallplate and then snap into place.
- 10. Switch heating/cooling system ON.Important!10a. Verify that the C wire is connected at the thermostat and at the heating/cooling system.10b. Make sure the heating/cooling system door is firmly secured.
10c. Switch power back ON for your heating/cooling system at the breaker box or its power switch.
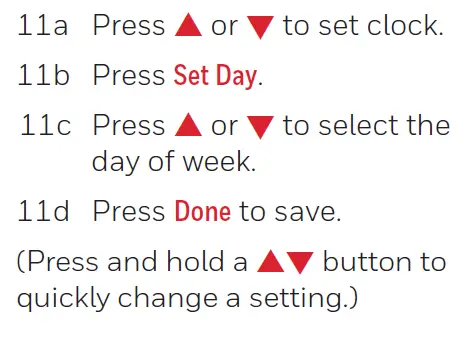
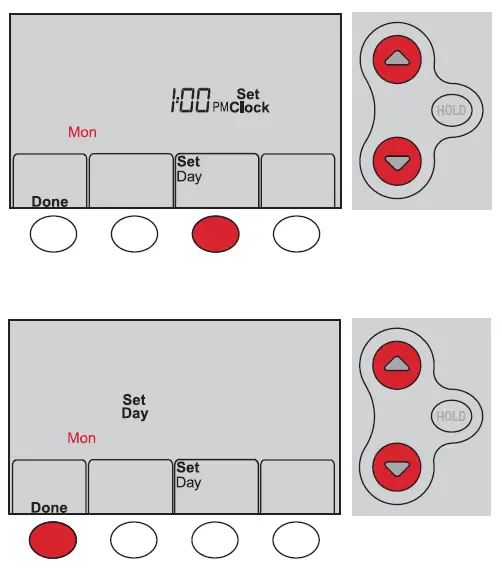
- 11. Set clock to current day and time.
12. Determine your heating/cooling system type.
Important! Heating/cooling system type must be set so that your thermostat operates properly and does not damage your system.
12a. If your system type is conventional single stage (natural gas-powered single stage with a/c), continue to “Connecting to your Wi-Fi network” .
12b. If your system is:
- Conventional multistage heat and cool
- Any type of heat pump
- Hydronic
- Other
If you are not sure of your heating/cooling system type or have other questions, go to honeywellhome.com/support.
You MUST change the system type by setting system function 1. See page 18 to match your thermostat to your system type.
Congratulations! Your thermostat is operational.
13 Test your thermostat
13a. Press the System button to change to heating or cooling and begin operation.
13b. For remote access to your thermostat, continue to “Connecting to your Wi-Fi network” .
Heating/cooling system not turning on? Refer to page 20 or FAQ at honeywellhome.com/support
Read More About:
Honeywell WiFi Thermostat
Honeywell WiFi Thermostat Installation and Programming Manual
report this adHoneywell WiFi Thermostat Installation and Programming Manual
[xyz-ips snippet=”download-snippet”]