HoodUser Manual
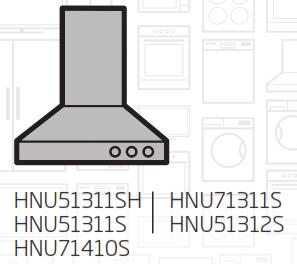
Please read this user manual first!Dear Valued Customer, Thank you for preferring this Beko appliance. We hope that you get the best results from your appliance which has been manufactured with high quality and state-of-the-art technology. For this reason, please read this entire user manual and all other accompanying documents carefully before using the appliance and keep it as a reference for future use. If you hand over the appliance to someone else, give the user manual as well. Follow the instructions by paying attention to all the information and warnings in the user manual. Remember that this user manual may also apply to other models. Differences between models are explicitly described in the manual.
Meanings of the Symbols
Following symbols are used in various sections of this user manual:
| Important information and useful hints about usage. | |
| WARNING: Warnings against dangerous situations concerning the security of life and property. | |
| Warning for danger of fire. | |
| Warning for electric shock. |


![]()
![]()
![]()
Important safety and environmental instructions
General Safety
Important Safety Instructions Read Carefully And Keep For Future Reference This section contains safety instructions that will help protect from risk of fire, electric shock, exposure to leak microwave energy, personal injury, or property damage. Failure to follow these instructions shall void any warranty.
- Beko products comply with the applicable safety standards; therefore, in case of any damage on the appliance or power cable, it should be repaired or replaced by the dealer, service center, or a specialist and authorized service alike to avoid any danger. Faulty or unqualified repair work may be dangerous and cause risk to the user.
- This appliance is intended to be used in household and similar applications such as:– Staff kitchen areas in shops, offices, and other working environments;– Farmhouses– By clients in hotels and other residential type environments;– Bed and breakfast type environments.
- Operate the appliance for its intended purpose only as described in this manual.
- The manufacturer cannot be held liable for damages resulting from improper installation or misuse of the product.
- This appliance can be used by children aged from 8 years and above and persons with reduced physical, sensory or mental capabilities or lack of experience and knowledge if they have been given supervision or instruction concerning use of the appliance in a safe way and understand the hazards involved.
- Children shall not be allowed play with the appliance. Cleaning and user maintenance shall not be made by children without supervision.
- The minimum distance between the supporting surface for the cooking vessels on the hob and the lowest part of your product must be at least 65 cm.
- If the instructions for installation for the gas hob specify a greater distance, this has to be taken into account.
- Make sure that your mains power supply complies with the information supplied on the rating plate of the appliance.
- Never use the appliance if the power cable or the appliance itself is damaged.
- Prevent damage to the power cable by not squeezing, bending,or rubbing it on sharp edges. Keep the power cable away from hot surfaces and naked flame.
- Use the appliance with a grounded outlet only.WARNING: Do not connect the appliance to the mains until the installation is fully complete.
- Place the appliance in a way so that the plug is always accessible.
- Do not touch the lamps if they have operated for a long time. They can burn your hands since they will be hot.
- follow the regulations set out by competent authorities on the discharge of the exhaust air (this warning is not applicable for use without flue).
- Operate your appliance after putting a pot, pan, etc. on the hob. Otherwise, high heat may cause deformation in some parts of your product.
- Turn off the hob before taking the pot, pan, etc. from it.
- Do not leave hot oil on the hob. Pans with hot oil may cause self-combustion.
- Pay attention to your curtains and covers since oil may catch fire while cooking food such as fries.
- The grease filter must be replaced at least monthly. The carbon filter must be replaced at least every 3 months.
- The product shall be cleaned in accordance with the user manual. If cleaning was not carried out in accordance with a user manual, there may be a fire risk.
- Do not use non-fire-resistant filtering materials instead of the current filter.
- Only use the original parts or parts recommended by the manufacturer.
- Do not operate the product without the filter and do not remove the filters while the product is running.
- In the event of be started any flame, de-energize your product and cooking appliances.
- In the event of be started any flame, cover the flame and never use water to extinguish.
- Unplug the appliance before each cleaning and when the appliance is not in use.
- The negative pressure in the environment should not exceed4 Pa (4 x 10 bar) while the hood for electric hob and appliances running on another type of energy but electricity operate simultaneously.
- In the environment where the appliance is being used, the exhaust of devices running on fuel oil or gas, such as room heater must be absolutely isolated or the device must be hermetical type.
- When connecting the flue, use pipes with a diameter of 120 or150 mm. Pipe connection must be as short as possible and have as few elbows as possible.The danger of choking! Keep all the packaging materials away from children.CAUTION: Accessible parts may become hot when used with cooking appliances.
- The product outlet must not be connected to air channels that include other smoke.
- The ventilation in the room may be insufficient when the hood for the electric hob is used simultaneously with the devices operating on gas or other fuels (this may not apply to appliances that only discharge the air back into the room).
- Objects placed on the product may fall. Do not place any objects on the product.
- Do not flambe under your product.WARNING: Before installing the Hood, remove the protective films.
- Never leave high naked flames under the hood when it is in operation
- Deep fat fryers must be continuously monitored during use: overheated oil can burst into flames.


![]()
![]()
1.5 Vital Risk Poisoning Risk


![]()
![]()
![]()
![]()
![]()
![]()
![]()
![]()
![]()
![]()
![]()
![]()
![]()
![]()
![]()
![]()
![]()
![]()
![]()
![]()
![]()
![]()
![]()
![]()
![]()
![]()
![]()
![]()
![]()
![]()
![]()
![]()
![]()
![]()
![]()
![]()
![]()
![]()
![]()
![]()
![]()
![]()
![]()
![]()
![]()
![]()
![]()
![]()
![]()
![]()
![]()
![]()
![]()
General appearance
2.1 Overview
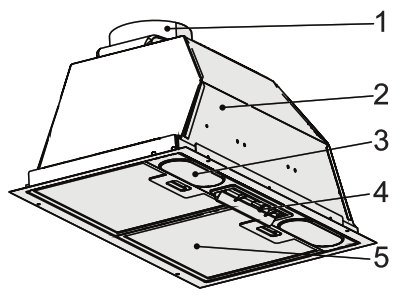

1. Air Exhaust Flue2. Body3. Hob Lighting4. Control Panel5. Aluminum Oil Filter
2.2 Technical Data
![]()
![]()
![]()
| Supply Voltage | 220-240V 50 Hz. |
| Lamp Power (W) | 2×3 W |
| Motor Power (W) | 1×185 W |
| Motor Insulation Class | F |
| Insulation Class | CLASS I |
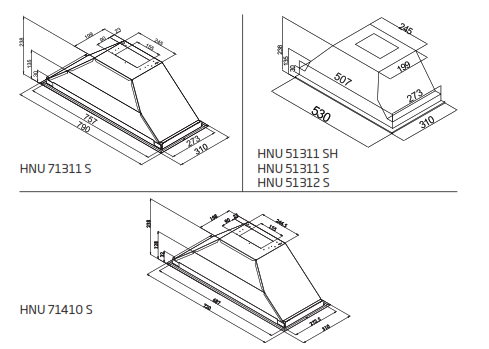
Technical and design modifications are reserved. The dimensions presented in the technical drawings are in mm. This image is only provided to inform about the parts of the appliance. Parts may vary according to the model of the appliance. Pictures are provided in a representative manner.
2.3 Scaled Technical Drawing

2.4 Package Content


1. Hood2. Ø120 mm Plastic Flue3. User Manual4. Installation Draft5. 4 X 3,9 X 32 Screw ( Used for Installation of Hood )6. 3.5 x 9.5 Screw (Used for Installation of Plastic Flue)
Installation and Use of the Appliance
3.1 Position of the Appliance
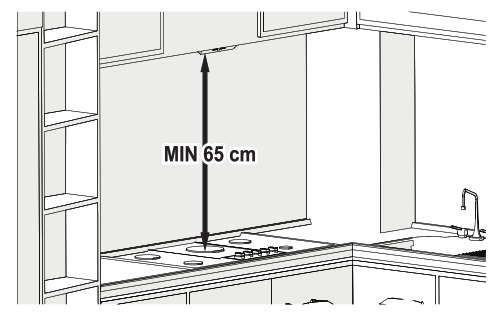

• Attention should be paid to the distance between the hob and hood before installation. This distance should be 65 cm.• The measure must be taken from the grill surface on gas hobs and from the glass surface on electric hobs.
![]()
![]()
![]()
![]()
![]()
![]()
3.2 Things to do for energy saving;
• Ensure sufficient air intake to make the hood operate efficiently and with low operation noise during cooking.• Set the fan level according to the density of steam in kitchen. Use the high level only when needed. A lower fan level means less energy consumption.• If dense smoke is expected in the kitchen, select a higher level of fan in advance. It is required to operate the hood much longer to remove the smoke already spread all over kitchen.• Turn off the hood when not in use.• Clean or replace the filter at intervals stated, thus, the efficiency of the ventilation is increased and the risk of fire is eliminated.
3.3 Installation of the Appliance
CAUTION![]()
![]()
![]()
![]()
![]()
![]()
![]()
![]()
![]()
![]()
![]()
![]()
![]()
![]()
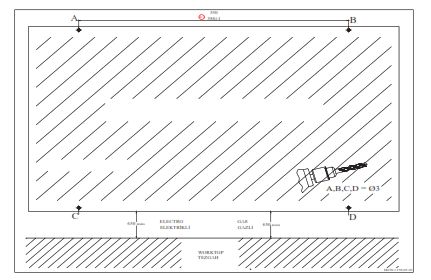

3.4 Drilling Mounting Holes
• Adhere the installation template provided with the appliance onto the surface on which the installation will be carried out.• Drill the holes indicated on the installation draft with A, B, C, D using a Ø4 mm drill bit. Pic. 6


• Cut the lower surface of the cabinet where the hood will be installed in the dimensions speci-fied in the technical drawing (Pic. 7).
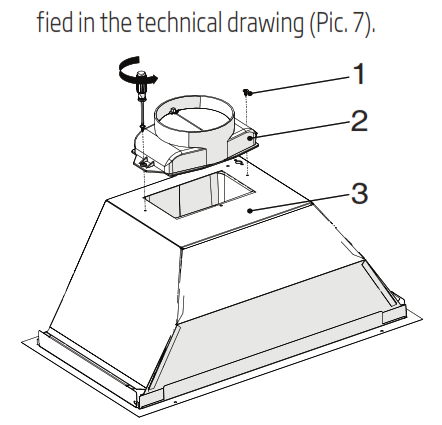

1. 3.5 x 9.5 Screw2. Ø 120 mm Plastic Flue3. BodyValve Pin Socket• Attach the plastic flue contained in the package to the body of the appliance using 2 screws 3.5 x 9.5. (Pic. 8) Do not rub it against the surface. Pic. 8


1. Air discharge pipe2. Air exhaust flue of the hood• Attach the air discharge pipe to the air exhaust flue and fasten via clamp (Pic. 9).
![]()
![]()
![]()
![]()
![]()
![]()
![]()
![]()
![]()
![]()
![]()
![]()
![]()
![]()
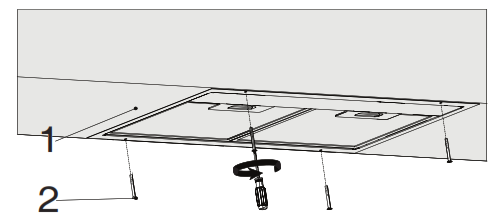

1. Kitchen cabinet bottom view2. 4 X 3,9 X 32 hood installation screw• Place the hood into the kitchen cabinet and attach the hood to 4 installation holes drilled before (Pic. 10).
3.5 Use of the Appliance
3.5.1 Use of the Rocker Switch


• Bring the lamp switch to position ‘0’ to turn off the lamp.• Bring the lamp switch to position ‘1’ to turn on the lamp.• Bring the motor switch to position ‘0’ to turn off the motor.• You can operate the motor in the 1st-speed level minimum and in the 3rd-speed level maximum according to the density of cooking steam.
3.6 Lamp Replacement
3.6.1 Candle Bulb Replacement![]()
![]()
![]()
![]()
![]()
![]()
![]()
![]()
![]()
![]()
![]()
![]()
![]()
![]()
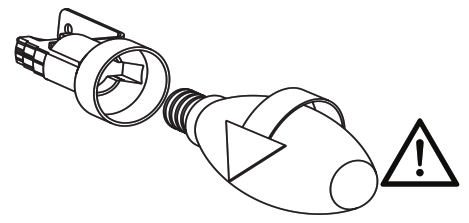

Pic. 11: Candle Bulb Replacement• Remove the aluminum cartridge filter. Remove the faulty lamp and replace it with the one having the same value. Pic. 11
![]()
![]()
![]()
![]()
![]()
![]()
![]()
![]()
![]()
![]()
![]()
![]()
![]()
![]()
![]()
![]()
![]()
![]()
![]()
![]()
![]()
![]()
![]()
![]()
![]()
![]()
![]()
![]()
![]()
![]()
![]()
![]()
![]()
![]()
![]()
![]()
![]()
![]()
![]()
![]()
![]()
![]()
Cleaning and Maintenance
![]()
![]()
![]()
![]()
![]()
![]()
![]()
![]()
![]()
![]()
![]()
![]()
![]()
![]()
![]()
![]()
![]()
![]()
![]()
![]()
![]()
![]()
![]()
![]()
![]()
![]()
![]()
![]()
![]()
![]()
![]()
![]()
![]()
![]()
![]()
![]()
![]()
![]()
![]()
![]()
![]()
![]()
Cleaning and Maintenance
![]()
![]()
![]()
![]()
![]()
![]()
![]()
![]()
![]()
![]()
![]()
![]()
![]()
![]()
![]()
![]()
![]()
![]()
The appliance you have purchased is suitable for use with a carbon filter. To attach the carbon filter;1- Place the carbon filter into its housing. Pic. 15/12- Turn the carbon filter clockwise to make sure that it is tightly inserted. Pic. 15/2


If the carbon filter is not properly at- tached, it can fall and damage your product.![]()
![]()
![]()
![]()
![]()
![]()
![]()
![]()
![]()
![]()
![]()
![]()
![]()
![]()
![]()
![]()
![]()
![]()
![]()
![]()
![]()
![]()
![]()
![]()
![]()
![]()
![]()
![]()
• The surface may be damaged due to abrasive or rubbing cleaning agents. Never use abrasive and rubbing cleaning agents. Acquire the cleaning agents and protective materials suitable for your appliance form your authorised service. The surface of the appliance and the controllers are sensitive to scratching.• Clean the surfaces with a soft and damp cloth, dishwashing liquid or a soft glass cleaning agent. Soften the dried and adhered dirt with a damp cloth. Do not scratch out!• Dry cloths, sponges that may scratch, materials that require rubbing, sand and the other effective cleaning agents containing mineral water, acid or chloride are not suitable.• Clean the stainless steel surfaces only in the direction of grinding.• Do not use a stainless steel cleaning agents or wet cloths for control units. Cleaning the metal oil filters Used metallic oil filters hold the humidity generated in the kitchen and the oily particles contained within the steam. In case of regular use (1 to 2 hours per day), clean the metal oil filters about once every 3 months.• Do not use over-effective, acidified or corrosive cleaning agents.• For the cleaning of the metal oil filters, use a damp cloth to clean holding parts of metal oil filters inside the appliance.• You can clean the metal oil filters in the dishwasher or byhand.• Do not apply spray cleaning agents directly on the appliance.• Do not put flammable and/or heavy decorative items on the appliance.
4.1 Washing in the Dishwasher
• In case of washing in the dishwasher, slight discoloration may occur. This does not affect the function of the metal oil filter.• Do not wash heavily soiled metal oil filters together with the dishes.• Place the metal oil filters in the dishwasher loosely or freely. Metal oil filters should be placed in the dishwasher without being jammed.
4.2 Washing By Hand
• You can use a special oil dissolving agent for stubborn dirt. You can get this agent from the authorised sales center.• Soften the metal oil filter in hot water containing dishwashing liquid.• Use a brush for cleaning and wait for the liquid on the metal oil filter to be drained well. Rinse the filters well after cleaning.• Technical specifications and this manual may be changed without prior notice.• This appliance complies with the Regulation for Supervision of the Waste Electric and Electronic Equipment.• This hood is designed to be used over the hob. Make sure that the wall can bear the weight of the hood. The cost of crushing, cutting and similar procedures to be carried out on the wall or cabinet during installation should be covered by the consumer. The hood may be used with a flue system that discharges the air, or without a flue (by attaching the carbon filter). Pay attention to the matters that may be encountered before or during the installation. Installation should be performed by the authorized service agent. Installation should be carried out by an authorized specialist who has knowledge of ventilation. Service life of the appliance identified by the Ministry of Industry (period of availability for the spare parts required for the performance of functions of the appliance) is 10 (ten) years.• Your appliance must be kept in its original packaging to avoid damage to its components during handling and transportation.• Keep the appliance in its normal position during handling.• Do not drop the appliance and protect it against damage during transportation. Warranty does not cover the faults and damages occurred during transportation after delivery of the appliance to the customer.
Troubleshooting
|
Troubleshooting |
Reason |
Help |
| The product does not work. | Check your fuse. | Your fuse might be closed, make it work. |
| The product does not work. | Check the electrical connection. | The mains voltage should be between 220-240 V. |
| The product does not work. | Check the electrical connection. | Check if the other products in your kitchen are working or not. |
| The lighting lamp does not work. | Check the electrical connection. | The mains voltage should be between 220-240 V. |
| The lighting lamp does not work. | Check the lamp switch. | The lamp switch should be in the “on” position. |
| The lighting lamp does not work. | Check the lamps. | The lamps of the product should not be faulty. |
| The air intake of the product is poor. | Check the aluminum filter. | The aluminum oil filter should be cleaned at least once a month under normal conditions. |
| The air intake of the product is poor. | Check the air vent flue. | The air vent flue should be in the ”on” position. |
| The air intake of the product is poor. | Check the carbon filter. | For products with carbon filters, the filter should normally be changed every 3 months. |
References
[xyz-ips snippet=”download-snippet”]

