
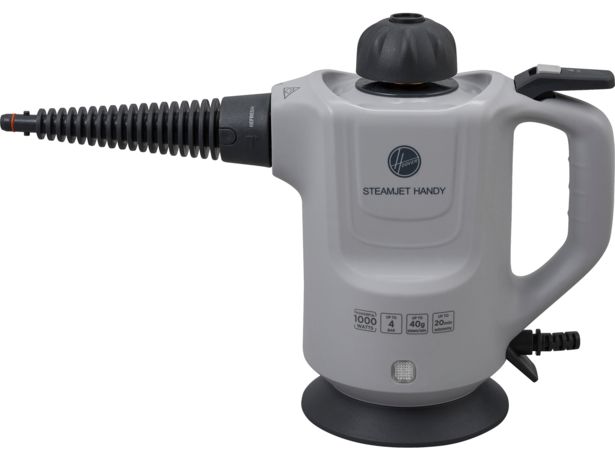
HOOVER Steamjet Handy
INSTRUCTIONS FOR SAFE USE
- This appliance should only be used for domestic cleaning, as described in this user guide. Please ensure that this guide is fully understood before operating the appliance.
- Do not leave the appliance plugged in. Always switch off and remove the plug from the socket after use, or before cleaning the appliance or any maintenance task.
- This appliance can be used by persons with reduced physical, sensory or mental capabilities or lack of experience and knowledge if they have been given supervision or instruction concerning use of the appliance in a safe way and understand the hazards involved. Children shall not play with the appliance.
- Keep the appliance out of reach of children when it is energized or cooling down.
- The appliance is not to be used if it has been dropped, if there are visible signs of damage or if it is leaking.
- If the power cord is damaged stop using the appliance immediately. To avoid a safety hazard, an authorised Hoover service engineer must replace the power cord.
- This appliance must be earthed.
- The appliance shall not be left unattended while it is connected to the supply mains.
- Do not use your appliance out of doors.
- Use only attachments, consumables or spares recommended or supplied by Hoover.
- Do not use the appliance to clean or direct steam towards animals, people or plants.
- Liquid or steam must not be directed towards equipment containing electrical components, such as the interior of ovens.
- Always unplug the cleaner, switch off and press the steam release trigger to release any remaining steam pressure before filling the water container. Do not fill over the MAX mark.
- The filling aperture must not be opened during use.
- Surfaces are liable to get very hot during use. Avoid contact with steam.
- Do not stand on or wrap the cord around arms or legs when using your appliance.
- Do not position the appliance above you when cleaning the stairs.
- When using the cleaning tools ensure to always steady the appliance with your other hand. This will ensure that the appliance does not fall while in use.
- Do not handle the plug or appliance with wet hands.
- Do not run over the power cord when using your appliance or remove the plug by pulling on the power cord.
- Do not continue to use your appliance if it appears faulty.
- Hoover service: To ensure the continued safe and efficient operation of this appliance we recommend that any servicing or repairs are only carried out by an authorized Hoover service engineer.
- Do not immerse the appliance in water or other liquids.
- Do not use detergents or liquids other than water inside the appliance.
For UK and Ireland only: This appliance has a 13 amp mains plug. If you need to change the fuse in the mains plug, use a 13amp ASTA (BS1362) fuse.
The Environment
The symbol on this appliance indicates that this appliance may not be treated as household waste. Instead it must be handed over to the applicable collection point for the recycling of electrical and electronic equipment. Disposal must be carried out in accordance with local environmental regulations for waste disposal. For more detailed information about treatment, recovery and recycling of this appliance, please contact your local city office, your household and waste disposal service or the shop where you purchased the appliance.
GETTING TO KNOW YOUR CLEANER
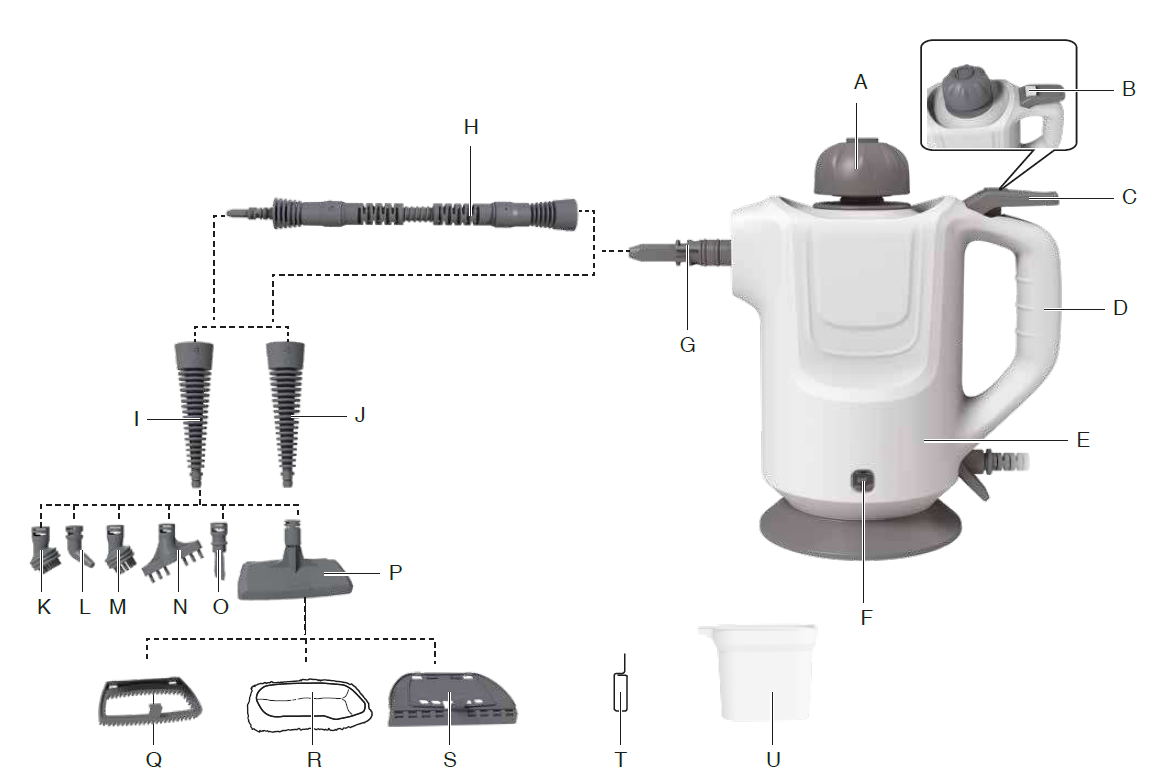
- A. Safety Cap
- B. Steam Trigger Lock
- C. Steam Release Trigger
- D. Handle
- E. Cleaner Main Body
- F. Steam Ready Light
- G. Steam Outlet
- H. Steam Hose
- I. Refresh Conical Pipe
- J. Deep Cleaning Conical pipe
- K. Small Round Brush
- L. Curved Nozzle
- M. Copper Round Brush
- N. Comb Nozzle
- O. Shovel Plate
- P. Multi-Purpose Nozzle
- Q. Refresh Tool
- R. Textile Pad
- S. Large Scraper
- T. De-scaling tool
- U. Measuring Jug
ASSEMBLING YOUR CLEANER
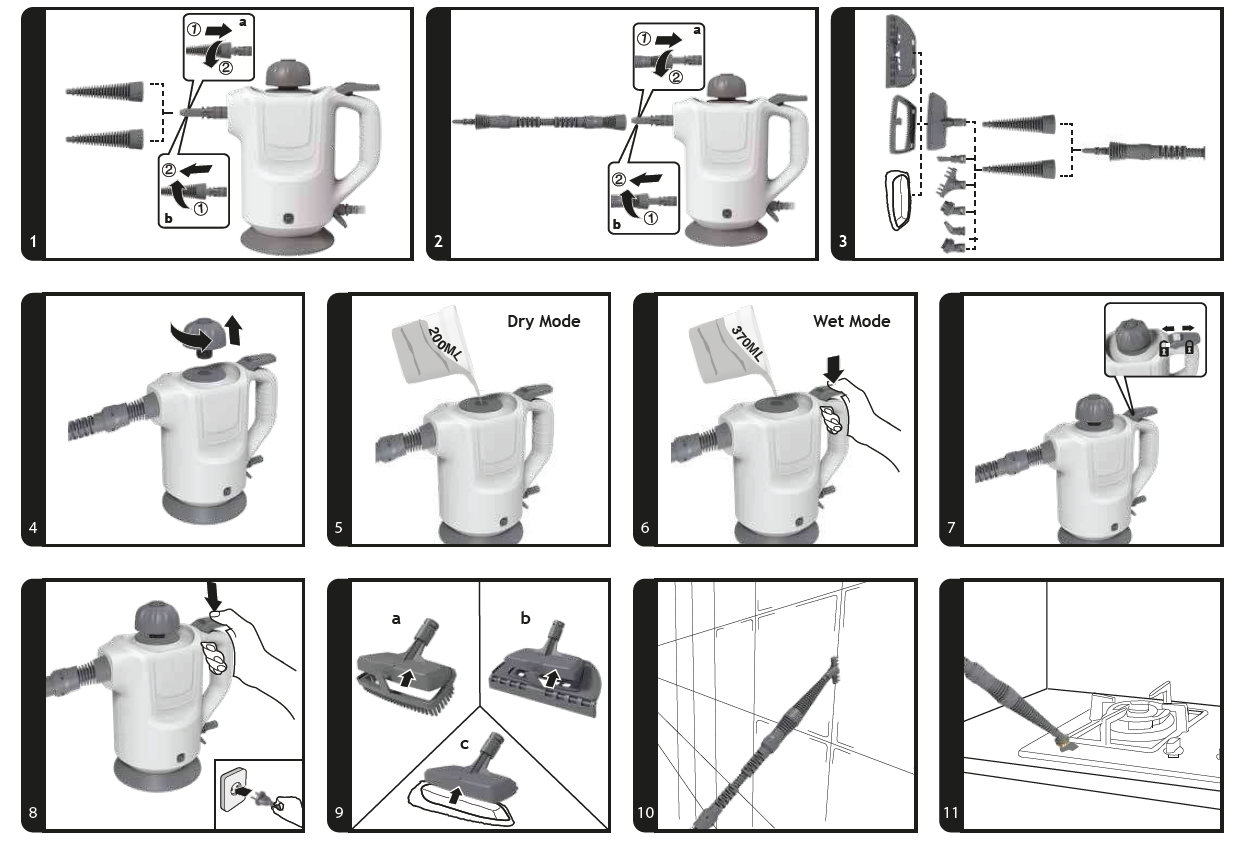
WITHOUT HOSEAttach one of the conical pipes [I,J] to the steam outlet [G]; Rotate the conical pipe clockwise aligning the graphic marks until securely locked in position. [1a]
WITH HOSEAttach the hose [H] to the steam outlet [G]; Rotate the hose clockwise aligning the graphic marks until securely locked in position. [2a]
Once the conical pipe or hose are attached, they can be used for direct steam applications or you can attach an accessory.You can choose from a variety of accessories depending on what tasks you are performing.To attach an accessory, fit the conical pipe to the steam outlet or the end of the hose, fit the accessory onto the conical pipe and rotate clockwise until locked into position. [3]To remove the conical pipe or hose, switch off your product and allow it to cool down, rotate counter-clockwise and gently pull away from cleaner. [1b & 2b]
USING YOUR CLEANER
You can choose between Dry Steam mode or Wet steam mode. Dry steam mode is recommended for textile cleaning and refreshing clothes. Wet steam mode is recommended for all other surfaces and deep cleaning.
- Remove the safety cap by turning anti-clockwise [4].
- DRY Steam Mode: Fill the boiler with 200ml of normal tap water or demineralized water [5].
- WET Steam Mode: Fill the boiler with 370ml of normal tap water or demineralized water [6].
- Re-fit the safety cap to the boiler turning clockwise, ensuring it is shut tightly.
- Attach the accessory most suited for the surface and task to be performed.[3]
- Plug the mains cable into a suitable earthed mains power outlet. The steam ready light will illuminate red. When the light changes from red to green, the product is ready to deliver steam.
- To deliver steam, release the trigger safety lock [7] and push steam release trigger [8].Ensure the trigger safety lock is in the locked position when your product is not in use [7].
NOTE: In order to significantly reduce mineral build-up and to prolong the life of your steam cleaner, it is highly recommended to use distilled or demineralized water.IMPORTANT: Always unplug the cleaner and press the steam release trigger to release any remaining steam pressure before adding water [17].
ACCESSORIES
According to your cleaning needs, you can choose between 2 conical pipes:Refresh conical pipe allows you to have less powerful steam but a longer steaming time. It is advised for delicate surfaces and for longer cleaning sessions. Deep Cleaning conical pipe allows you to have more powerful steam and is advised for deep cleaning, especially on heavily soiled areas such as showers and kitchens.
NOTE: All accessories can only be attached to the conical pipes and cannot be connected directly to the product or the hose.Comb Nozzle: Ideal for removal of limescale and grime. [10]Copper Round Brush: Ideal for removal of very stubborn stains. [11]Shovel Plate: Ideal for removal of baked in grease from ovens and racks. [12]Curved Nozzle: Ideal for cleaning hard to reach areas such as taps etc. [13]Small Round Brush: Ideal for use on stubborn grease and grime. [14]Multi-Purpose Nozzle: this is used along with the Large scraper, Textile pad and Refresh tool. [9]
- Large scraper: insert the multi-purpose nozzle into the large scraper, which is ideal for use on windows and mirrors for a for a smear clean free finish. [15]
- Textile pad: fit the textile pad over the multi- purpose nozzle, ideal for cleaning fabric and soft furnishings.
- Refresh tool: insert the multi- purpose tool into refresh tool, ideal for use on garments and textiles. [16]
IMPORTANT: As the accessories become very hot during use, you must be very careful when removing them or replacing them. Either use an oven glove to handle them or wait until they cooled down. Always ensure that the product is disconnected from the mains power before changing the accessories.
CLEANER MAINTENANCE
Before each use, inspect the seal on the steam nozzle, if the seal is missing or damaged, do not use the appliance and contact the authorized Hoover service.IMPORTANT: ALWAYS ENSURE THE CLEANER HAS FULLY COOLED DOWN BEFORE PERFORMING ANY MAINTENANCE TASKS.
Empty the water tank
- Unplug the cleaner from the mains power and ensure the unit has cooled.
- Hold the steam release trigger down to release any remaining steam pressure. [17]
- Remove the safety cap turning anti-clockwise. [4]
- Lift the cleaner and empty any remaining water. [18]
Removing and Preventing Blockages.
Use the Descaling tool [T] regularly to remove any build up of limestone in the steam outlet ends of the following parts: Main body steam outlet, Refresh Conical Pipe, Deep Clean conical pipe and Hose end [19].
Removing and cleaning the textile pad
- Unplug the cleaner from the mains power and ensure the unit has cooled.
- Remove the textile pad from multi-purpose nozzle.
- Wash the textile pad by hand or machine with a mild detergent at max temperature 30°C.
IMPORTANT: Do not use bleach or fabric softener when washing the textile pad.
TROUBLESHOOTING
Should you have a problem with the product, complete this simple user checklist before calling your local HOOVER service. The steam cleaner will not powered.
- Check the unit is plugged in.
- Check the power cord
The product is not producing steam.
- Check the unit is plug in.
- There may be no water in the water tank.
- The water is not at the correct temperature. The green light will illuminate when ready.
The cleaner is taking a long time to heat up.
- If you live in a hard water area the water tank may have become blocked. The unit will have to be descaled.
CLEANING FAQS
When is Steam Capsule Express ready? The light changes from red to green.Can I use Steam Capsule Express on all floor surfaces? On all hard floors like marble, ceramic, stone, linoleum, sealed hardwood floors and parquet.Does Steam Capsule Express emit steam automatically? No, to produce steam you should press Steam Trigger Button under the handle.Can I put detergents or other chemicals inside the tank? No, you would damage the product.What if in the city where I live the water is very hard? Use filtered water, distilled or de- mineralized water.How long will one tank of water last before needing to be refilled? Up to 23 minutes if you press the trigger continuously.
IMPORTANT INFORMATION
Hoover Spares and ConsumablesAlways replace parts with genuine Hoover spares. These are available from your local Hoover dealer or direct from Hoover. When ordering parts always quote your model
QualityHoover’s factories have been independently assessed for quality. Our products are made using a quality system which meets the requirements of ISO 9001.
Your GuaranteeThe guarantee conditions for this appliance are as defined by our representative in the country in which it is sold. Details regarding these conditions can be obtained from the dealer from whom the appliance was purchased. The bill of sale or receipt must be produced when making any claim under the terms of this guarantee.Subject to change without notice.![]()
References
[xyz-ips snippet=”download-snippet”]