HOPKINS 554076181 Smart Hitch Camera/Sensor System Installation Guide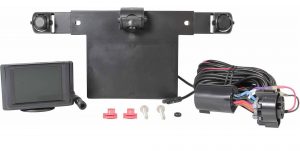
IMPORTANT: This product is designed to give you years of reliable performance. Read the following instructions carefully before installing and/ or operating the Smart Hitch Camera/ Sensor System. If you have any concerns with this product or the installation process, our technical support team can assist you. Call 1-800-835-0129 8am-5pm CST, M-F.
PARTS:(A) 3.5” Color Monitor(B) Camera(C) Mounting Bracket with Sensors(D) Installation Cables(E) 2 Cable Clips (optional)(F) 2 License Plate Screws(G) Grommet(H) Connector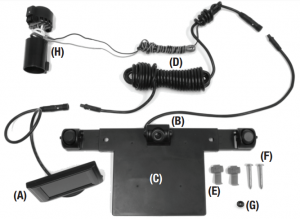
TOOLS NEEDED:
- Screwdriver
- Drill (If Necessary)
- 11/32” Drill Bit(If Necessary)
INSTALLATION GUIDE
Select monitor location, plan out the cable route, install the cables
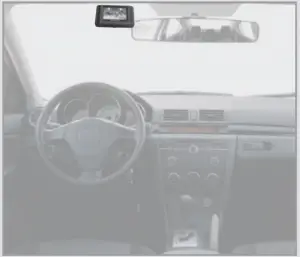
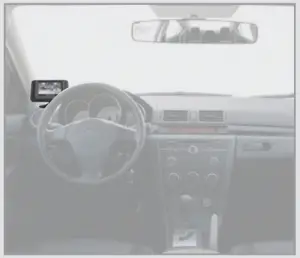
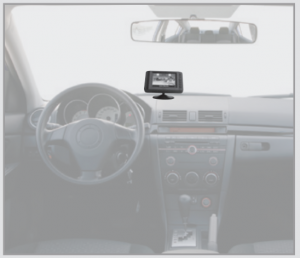
Possible monitor mounting positions (monitor appears larger for illustration purposes).
FIGURE 1


Place monitor (A) in desired location (dash or windshield) (Fig. 1) but do not permanently mount until later.
WARNING: DO NOT PLACE MONITOR WHERE AIR BAGS ARE LOCATED ON YOUR VEHICLE. Before selecting a locationfor the monitor please check to be sure the monitor does not obstruct your view while driving.
For Vehicles WITH OEM 7 Blade Tow Package Connector(If your vehicle dos NOT have an OEM connector please skip to the “For Vehicles WITHOUT OEM Connector” section)
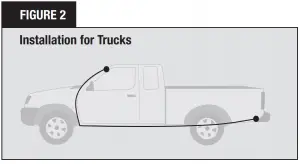
- Connect installation cable (D) to monitor (A) and route the installation cables (D) to the back of vehicle stopping at the back side of the OEM connector on vehicle (Fig. 2).
 NOTE: If additional length is needed call 800 835-0129.
 - Remove OEM plug from back side of the OEM connector on the vehicle.
- Loosen gray tab, press down and pull out OEM plug on back side of connector.
- Insert camera system OEM plug (H) into OEM connector. Secure gray tab.
For Vehicles WITHOUT OEM connector
- Cut/Remove OEM plug (H)
- Connect installation cable (D) to monitor (A) and route the wires to the reverse light assembly (Fig. 3).
 NOTE: If additional length is needed call 800 835-0129.
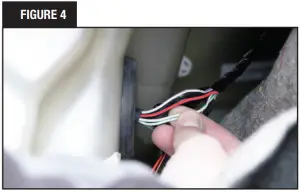
 - Locate the reverse light wire and splice the red wire to the reverse light wire. (Fig 4).

- Locate the common/ground wire behind the tail light assembly and splice the black wire to the ground wire.
- Reassemble tail light assembly and secure wires out of the way. Place cable clips (E) where needed.
Install the license plate bracket and camera
- Remove license plate from the back of your vehicleIMPORTANT: Unfold sensors from the back of the mounting bracket (C) and lock them in place. Ensure camera (b) is secured directly in the middle of the main bracket. This will ensure “hitch mode” works perfectly with your hitch when hitching to your trailer.
- Place the mounting bracket (C) behind the license plate and make sure license plate fits behind the sensors.
- Some vehicles may have a hole available to pass the wire through where the license plate is mounted or you can drill 11/32” hole close to where the power cable is attached to the mounting bracket (C). If you are going to drill a hole, remember to check the area to ensure nothing will be damaged behind the bumper while drilling.
- Insert grommet (G) into the hole to protect the wire. Feed the wire from the bracket (C) through the hole.
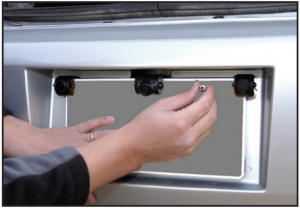
- Install the main bracket (C) with license plate to the back of your vehicle using license plate screws (F) included in the package. These screws are longer than standard license plate screws to help provide support and better attach the system to the vehicle.
 Secure license plate bracket with provided screws
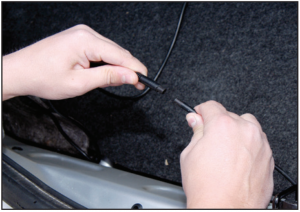
 Connect wire from main bracket to the wire coming from the monitor
Connect the cables and secure the monitor
- Connect wire from mounting bracket (C) to the wire coming from the monitor (A). This will provide power to the camera and sensors. Hide wire where convenient depending on vehicle type.
- Place monitor (A) in desired location. Remove backing from foam tape and press down firmly to ensure the monitor is secure.
Positioning the adjustable sensors and camera
- Measure from ground to the center line of the sensor. For an accurate measurement ensure your vehicle is on a level surface.
- Identify the angle of your license plate. Stand to the side of your vehicle and see if the top of your license plate is angled (Backward, Flat, Forward).
- Based off your sensor height from the ground and angle of licence plate, adjust the sensor setting according to the chart below. Adjust each sensor to the appropriate setting and tighten screws. Default setting for the sensors is setting 3.

- For camera (B), adjust the angle up/down to create maximum visibility behind your vehicle.
- To ensure the sensors and camera are working correctly, slowly back toward a stationary object.
HOW THE MONITOR WORKS
 Everyday Mode:SmartZone™ Sensing:Green – 3.5 feet to 5.5 feetYellow – 1.5 feet to 3.5 feetRed – 0 to 1.5 feet
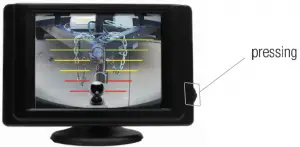 Hitch Mode:Simply press “IN” on the side button and press up or down on the button to activate hitch mode from “OFF” to “ON”. Repeat process to go back to Everyday Mode.
Sound VolumeThe volume can be turned up or down by pressing the side button “up” or “down”. There are 4 volume levels (Mute, Low, Medium, High).
WARRANTY INFORMATION
ONE YEAR LIMITED WARRANTY:Subject to the limitations and exclusions set forth in the Limited Warranty, Smart Hitch Camera/Sensor System is warranted by Hopkins Manufacturing Corporation against defects in material or workmanship that result in a product failure during the one year period following the date of purchase. This Limited Warranty applies only to claims made by the original end user (hereinafter “you”) and cannot be assigned, transferred or conveyed to any subsequent users.
EXCLUSIONS FROM COVERAGE:This warranty does not apply to any claims arising from misuse, abuse, unauthorized repair or alteration, circumstances where Smart Hitch Camera/Sensor System is improperly installed or improperly wired contrary to Smart Hitch Camera/Sensor System instructions; or damage or defect attributable to fire or other casualty, including, without limitations, acts of God or exposure to abrasive or corrosive materials or pollutants, or attributable to collision or other accidents involving vehicles upon which the Smart Hitch Camera Sensor System is installed.
LIMITATIONS:Hopkins Manufacturing Corporation expressly limits the applicability of the implied warranty of merchantability and the implied warranty of fitness for a particular purpose to the one-year warranty as provided herein. Some states do not allow limitations on how long an implied warranty lasts, so the above limitation may not apply.To the extent permitted by state law, the remedy of repair or replacement discussed below is the sole remedy available to the end user under this Limited Warranty. THIS LIMITED WARRANTY SPECIFICALLY EXCLUDES ALL INCIDENTAL, SPECIAL, OR CONSEQUENTIAL DAMAGES SOME STATES DO NOT ALLOW THE EXCLUSION OR LIMITATION OF INCIDENTAL OR CONSEQUENTIAL DAMAGES, SO THE ABOVE LIMITATION OR EXCLUSION MAY NOT APPLY TO YOU. To the extent permitted by state law, Hopkins Manufacturing Corporation liability for Smart Hitch Camera/Sensor System will not exceed the purchase price paid for the product.NOTICE: This warranty gives you specific legal rights, and you may also have other rights, which vary from state to state.
IMPORTANT NOTE:Please check with you local and state laws to ensure by covering up part of the license plate is not a violation to the law. Hopkins Manufacturing takes not responsibility for paying any type of fine or ticket associated with this product.
EXCLUSIVE AGREEMENT:To the extent permitted by state law, this one-year limited warranty is a complete and exclusive statement of the warranties, which apply to the Smart Hitch Camera/Sensor System; there are no express or implied warranties beyond those expressly stated above. No employee, agent, dealer or other person is authorized to give any warranties on behalf of Hopkins Manufacturing Corporation, except as authorized in writing.
STATUE OF LIMITATIONS:To the extent permitted by state law, in purchasing the Smart Hitch Camera/Sensor System you agree that any action for breach of contract or warranty must be commenced within one year after the cause of action has occurred.
PROCEDURE:In the event that a product failure covered by thiswarranty occurs while this warranty is still valid, Hopkins ManufacturingCorporation will, at its option, either: (a) repair the defective unit; (b) replace the defective unit with a new unit; or (c) replace the defective unit with a refurbished unit. Hopkins Manufacturing Corporation will ship your repaired, new, or refurbished unit to you without charge for parts, service, or any other cost (except shipping and handling) incurred by Hopkins Manufacturing Corporation or its representatives in connection with the performance of the warranty. Failed units covered under this warranty must be sent by you to Hopkins Manufacturing Corporation with shipping prepaid by you. You are responsible for all cost incurred in the removal, reinstallation, and shipping of the unit. A copy of the sales slip received by you at the point of purchase of the unit must accompany the returned unit. Call Hopkins Manufacturing Corporation for Warranty Return Authorization.
For Warranty return AuthorizationCall: Hopkins Manufacturing CorporationToll Free: (800) 835-0129
 Web: www.HopkinsTowingSolutions.com
References
[xyz-ips snippet=”download-snippet”]



 NOTE: If additional length is needed call 800 835-0129.
 NOTE: If additional length is needed call 800 835-0129.
 Secure license plate bracket with provided screws
 Connect wire from main bracket to the wire coming from the monitor