
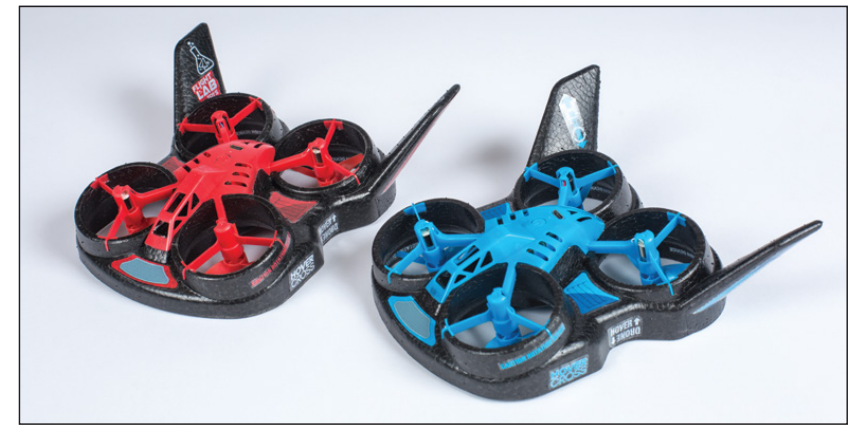
HOVER CROSS FHT1000 Micro RTF Hybrid Drone Instruction Manual
Specifications
Aircraft Type: Hybrid Hover DroneMaterials: PP and EPP foamWidth (Diagonal Shaft to Shaft): 3.94” (100mm)Total Width: 6.5” (165mm)Total Length: 6.5” (165mm)Height: 2.17” (55mm)Weight: 1.34 oz.(38g)Motors: 7mm coreless (4)Charger: Micro USB charge cordInternal Battery: 3.7V 300mAh (non-replaceable)Transmitter: 4-channel, 2.4GHzFlight Times: Over 6 minutes in drone mode Up to 12 minutes in hover mode
14+ AGE RECOMMENDATION: Not for children under 14 years. This is not a toy.
Safety Precautions and Warnings
- As the user of this product, you are solely responsible for operating in a way that does not endanger yourself and others or result in property damage
- Always operate your product in open spaces away from full-size vehicles, traffic, and people, making sure to maintain a safe distance around your product to avoid injuries to people or damage to property.
- Do not leave the product in direct sunlight or in hot spaces such as an automobile.
- To avoid injury, do not fly near your face. Keep props away from your fingers, hair, eyes, or other body parts.
- Do not fly toward people or animals.
- This product is controlled by a radio signal subject to interference from many sources outside your control. Interference can cause momentary loss of control.
- Always keep small parts and anything electrical out of the reach of children.
- Avoid any water exposure to this product. Moisture causes damage to electronics.
- Never place any portion of the model in your mouth as choking could cause serious injury.
- Never operate your transmitter with low transmitter batteries and do not mix new and used batteries.
- Batteries should be recycled or disposed of per state and local guidelines.
- Always keep transmitter powered on while aircraft is powered.
- Always keep aircraft in sight and under control.
- WARNING: Do not fly if props become damaged or broken. Flying with damaged props could lead to damage or cause injury.
![]()
Supplier’s Declaration of Conformity
This device complies with part 15 of the FCC Rules. Operation is subject to the following two conditions: (1) This device may not cause harmful interference, and (2) this device must accept any interference received, including interference that may cause undesired operation.
Replacement Parts
| Part Number | Description |
| FHT1000 | HoverCross RTF, Red |
| FHT1001 | HoverCross RTF, Blue |
| FHT1002 | Propeller Set (4) Red; HoverCross |
| FHT1003 | Propeller Set (4) Blue; HoverCross |
| FHT1004 | Replacement Motor; HoverCross |
| FHT1005 | Decal Sheet, Red; HoverCross |
| FHT1006 | Decal Sheet, Blue; HoverCross |
| FHT1007 | USB Charge Cable; HoverCross |
| FHT1008 | 2.4GHz Transmitter; HoverCross |
Installing Batteries
 Open the battery compartment and insert three AAA batteries
- Make sure that you match the polarities (+ and -) as marked inside
- Replace the cover and screw in place
 Open the battery compartment and insert three AAA batteries
Charging Instructions
- Place the HoverCross on a flat surface as in hover mode
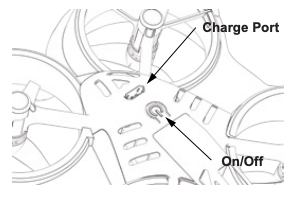
- Plug the mini USB on the charge cord as shown and the USB charger into a 5V USB power source
- Green LED’s show while charging and turn off when charge is complete
- Charging should take between 35 and 40 minutes
- When the charge is complete, unplug both connectors
- Use only the included USB charge cord
 Place the HoverCross on a flat surface as in hover mode
Operating Instructions
- Press the On/Off button on the transmitter. Press and hold the On/Off button on the aircraft until the LED lights begin blinking. Move the left stick up for one beep and all the way down until you hear another beep. The transmitter is now paired with the HoverCross and the red LED’s will stop flashing.
- In hover mode, press the Auto-Take Off/Land button or move the left stick up and the Hover Cross will begin to move forward. To take off in drone mode, press the Auto-Take Off/Land button and the unit will climb to an altitude of 1.5 to 2 meters and maintain a steady hover.
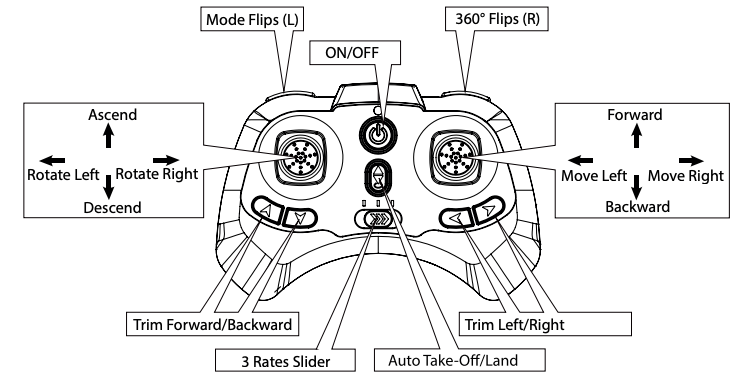
- See the transmitter diagram for movements and control during operation.
- If the HoverCross tends to “drift” in any direction during flight, use the trim buttons as shown in the transmitter diagram.
- The HoverCross has 3 flying rates – beginner, intermediate, and expert. The slide switch shown in the transmitter diagram moves left to right in progression for the rates. The transmitter will beep to let you know which rate is currently being used – 1 beep for beginner, 2 for intermediate, and 3 for expert. It is recommended to start flights in beginner and progress as your flying skills increase. The expert rate should only be used by advanced pilots in either large indoor spaces or outdoors with no wind.
- To flip from one mode to another, press the L button on the top left of the transmitter.
- For 360 flips in drone mode, press the R button on the top right of the transmitter and the right transmitter stick to the direction you want to flip. In hover mode this button initiates a jump.
- To land the HoverCross in drone mode, either press the Auto-Take Off/Land button or slowly lower the left transmitter stick. To stop in hover mode, lower the left transmitter stick.
Calibration
- The calibration step is used to reset the gyro stabilization system of the HoverCross. It is important to use this process after a crash or whenever you find the unit is flying erratically.
- First, turn on the transmitter. Then, place the HoverCross on a level surface in hover mode. Press the On/Off button to turn on the unit and then pair with the transmitter.
- Move both transmitter sticks to the outside bottom simultaneously as shown in the diagram.
- The red LED’s will flash quickly for a few seconds. When the flashing stops, the HoverCross has been reset and is ready for either hover or drone mode.
 The calibration step is used to reset the gyro stabilization system of the HoverCross. It is important to use this process after a crash or whenever you find the unit is flying erratically.
Prop Replacement
- There are 2 types of props used on the aircraft. Props marked 1 or 3 are counterclockwise rotation and props 2 and 4 are for clockwise rotation.
- Make sure that the replacement prop is of the correct type as shown on the drawing or by looking at the number on the bottom side of the blade tips.
- When replacing a prop make sure that it is not pushed on to the shaft so tightly that it inhibits the ability of the prop to spin freely.
 There are 2 types of props used on the aircraft. Props marked 1 or 3 are counterclockwise rotation and props 2 and 4 are for clockwise rotation.
Limited Warranty
This product is guaranteed to be free from defects in materials and workmanship at the date of purchase. For parts availability and service issues, please contact your local hobby shop or the distribution partner in your territory.
![]()
 report this ad
Printed in China
[xyz-ips snippet=”download-snippet”]