![]()
HOZELOCK 2212 Sensor Controller User Manual


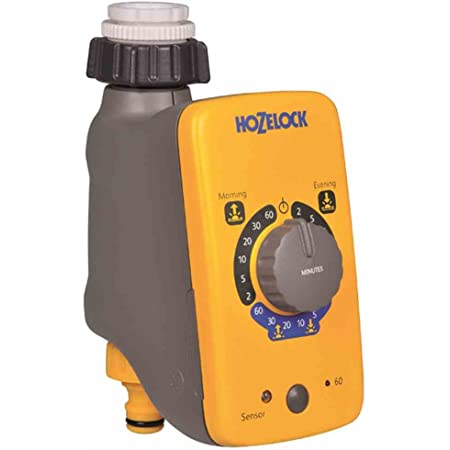
Sensor Controller


Installation & operating instructions
READ THESE INSTRUCTIONS CAREFULLY BEFORE ATTEMPTING TO USE THIS PRODUCT.
FAILURE TO OBSERVE THE FOLLOWING NOTICES MAY RESULT IN INJURY OR PRODUCT DAMAGE
General information
![]() THESE INSTRUCTIONS ARE ALSO AVAILABLE ON THE HOZELOCK WEBSITE.
THESE INSTRUCTIONS ARE ALSO AVAILABLE ON THE HOZELOCK WEBSITE.![]() This product meets the requirements of IP44 and therefore can be used in exposed weather conditions.
This product meets the requirements of IP44 and therefore can be used in exposed weather conditions.![]() This product is not suitable for supplying drinking water.
This product is not suitable for supplying drinking water.![]() Threaded water connections are suitable for hand tightening only.
Threaded water connections are suitable for hand tightening only.![]() This product can be fitted to mains water supply.
This product can be fitted to mains water supply.![]() This product can be fitted to outdoor water butts or tanks that have an inline filter fitted before the controller.
This product can be fitted to outdoor water butts or tanks that have an inline filter fitted before the controller.
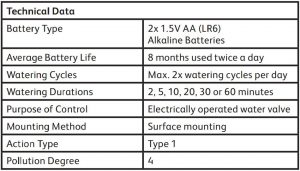
Installing the batteriesYou must use Alkaline batteries – alternatives will result in incorrect operation.
- Remove the front panel as shown (Fig. 1), gripping the recessed part and pulling towards you.
- Insert 2 x 1.5v AA (LR6) batteries (Fig. 1) and replace the controller front panel.IMPORTANT: Rechargeable batteries must not be used.
- Replace batteries each season. (max 8 months use, used twice a day)
- When batteries are installed the motor will operate the internal valve to check that it is ready for use and the batteries installed have enough charge to safely operate the valve
- If the LED indicator flashes red, the batteries need to be replaced.
Connecting the Sensor Controller to the tap
- Choose the correct tap adapter (Fig. 3)
- Using the correct adapter(s), attach the controller to the tap and tighten firmly to avoid leaks. Do not use a spanner or other tool to tighten as this might damage the threads. (Fig. 4)
- Turn on the Tap.
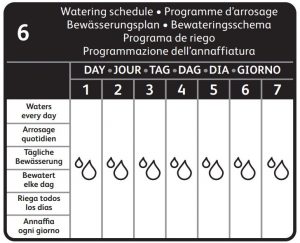
How to set up the Sensor Controller – automatic watering
Sunrise and Sunset is the best time to water your garden to avoid evaporation and leaf scorch. The Daylight sensor automatically adjusts the watering schedule to coincide with the changing time for sunrise and sunset.
Cloudy or overcast mornings and evenings might cause a slight delay to the watering times, but these are not significant to have any adverse effects on your garden.
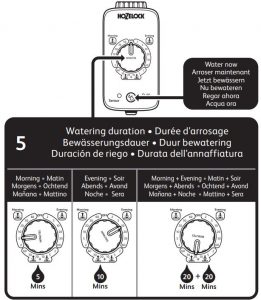
- Rotate the control dial to select from the 3 marked sections – Sunrise (once a day), Sunset (once a day) or Sunrise and Sunset (twice a day). (See Fig. 5)
- Choose from the required watering durations – 2, 5, 10, 20, 30 or 60 minutes of watering.
How to turn off the Sensor ControllerIf you do not want the controller to automatically come on turn the rotary dial to the “OFF” position. You can still use the ![]() button to manually water your garden.
button to manually water your garden.
Initial synchronisation periodWhen you install new batteries there is a 6 hour lockout period to prevent the controller from watering while you are setting up your system. After a 24 hour cycle of Sunrise and Sunset the controller will be synchronised with the changing light levels. You can manually water your garden using the ![]() button during the 6 hour lockout period.
button during the 6 hour lockout period.
Positioning your Sensor Controller outdoors
It is important that your water controller is in an outdoor location. Do not point the control panel directly towards outdoor security lights or other bright lights that come on during the night as these might interfere with the recorded light levels and cause the controller to come on at the wrong time.
Ideally, you should not set up your controller in a heavily shaded passageway or behind buildings where light levels remain low all day long. Do not position the controller inside buildings such as garages or sheds where it will not receive natural daylight to function correctly.
The controller is designed to be positioned directly underneath an outdoor tap. Do not position the controller on its side or lying on the ground whereby rainwater cannot flow away from the product.
1 hour delay(when using 2 Sensor Controllers together)If you install two Sensor Controllers you might want to stagger the start times to prevent pressure loss when two appliances are used simultaneously – for example sprinklers.
Remove the delay plug from the storage location on the back of the control panel (Fig. 2) and fit the plug on the location below the batteries.
With the plug inserted the one hour delay affects all automatic watering. The delay period of one hour cannot be changed.
Manual operation (water now)
You can turn on the water controller at any time by pressing the ![]() button once. Press again to turn off at any time.
button once. Press again to turn off at any time.
Note: To protect battery life the water controller can only be turned on and off a maximum of 3 times in one minute.
How do I cancel an automatic watering operationThe ![]() button can also be used as a manual override to cancel any current automatic watering operation that has started. The schedule will then resume.
button can also be used as a manual override to cancel any current automatic watering operation that has started. The schedule will then resume.
Battery level checkPress and hold down the Water Now ![]() button to check the status of the batteries at any time.
button to check the status of the batteries at any time.
GREEN = BATTERY IS GOODRED = BATTERY LEVEL IS LOW, REPLACE THE BATTERIES SOON.
Failure prevention modeA built in safety feature detects when the battery levels have dropped to a level that could fail whilst the valve is open and result in wasting water. The safety mode prevents the controller from turning on until the batteries have been replaced. The LED indicator light will flash red when the failure prevention mode has been activated. The Water Now function will also not operate until the batteries have been replaced.
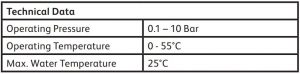
 This product is not designed to be used in sub-zero (frost) temperatures. During winter months drain any remaining water out of your timer and bring it indoors until the next watering season.
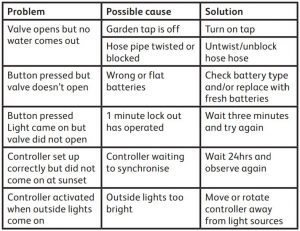
Troubleshooting
Contact details
If you have any further problems with your water timer please contact Hozelock customer services.
Hozelock LimitedMidpoint Park, Brimingham. B76 1AB.Tel: +44 (0)121 313 1122Internet: www.hozelock.comEmail:
Declaration of Conformity to CE
Hozelock Ltd declare that the following Electrically Operated Water Valves:
- Sensor Controller (2212)
Comply with:
- the Essential Health and Safety Requirements of the Machinery Directive 2006/42/EC and its amending directives.
- EMC Directive – 2014/30/EU
- RoHS Directive 2011/65/EU
and conforms to the following harmonised standards:
- EN61000-6-1:2007
- EN61000-6-3:2011
Date of Issue: 09/11/2015
Signed by:…………………………………………………………………………………………………..

Nick IaciofanoTechnical Director, Hozelock Ltd.Midpoint Park, Sutton Coldfield, B76 1AB. England.

WEEE
![]() Do not dispose of electrical appliances as unsorted municipal waste, use separate collection facilities. Contact you local government for information regarding the collection systems available. If electrical appliances are disposed of in landfills or dumps, hazardous substances can leak into the groundwater and get into the food chain, damaging your health and wellbeing. In the EU, when replacing old appliances with new ones, the retailer is legally obligated to take back your old appliance for disposals at least free of charge.
Do not dispose of electrical appliances as unsorted municipal waste, use separate collection facilities. Contact you local government for information regarding the collection systems available. If electrical appliances are disposed of in landfills or dumps, hazardous substances can leak into the groundwater and get into the food chain, damaging your health and wellbeing. In the EU, when replacing old appliances with new ones, the retailer is legally obligated to take back your old appliance for disposals at least free of charge.
References
[xyz-ips snippet=”download-snippet”]