
HQ POWER HQSM10011 Smoke Machine User Manual

Introduction
![]() To all residents of the European UnionImportant environmental information about this product
To all residents of the European UnionImportant environmental information about this product
This symbol on the device or the package indicates that disposal of the device after its lifecycle could harm the environment. Do not dispose of the unit (or batteries) as unsorted municipal waste; it should be taken to a specialized company for recycling. This device should be returned to your distributor or to a local recycling service. Respect the local environmental rules.
If in doubt, contact your local waste disposal authorities.
Thank you for choosing HQPower™! Please read the manual thoroughly before bringing this device into service. If the device was damaged in transit, do not install or use it and contact your dealer.
Safety Instructions
![]() Read and understand this manual and all safety signs before using this appliance.
Read and understand this manual and all safety signs before using this appliance.
![]() Indoor use only.
Indoor use only.
- This device can be used by children aged from 8 years and above, and persons with reduced physical, sensory or mental capabilities or lack of experience and knowledge if they have been given supervision or instruction concerning the use of the device in a safe way and understand the hazards involved. Children shall not play with the device. Cleaning and user maintenance shall not be made by children without supervision.
- Always connect the device to a grounded circuit to avoid risk of electrocution.
- Always disconnect mains power when the device is not in use or when servicing or maintenance activities are performed. Handle the power cord by the plug only.
- If the external flexible cable or cord of this device is damaged, it shall be exclusively replaced by the manufacturer or his service agent or a similar qualified person in order to avoid a hazard.
- All cords and cables should be routed so that they will not be walked on or pinched by items placed upon or against them. Pay particular attention to the point where they exit the unit.
- Remove all flammable materials close to the device before switching on.
- Do not install the device on a flammable surface (linoleum, carpet, wood, paper, cardboard, plastic, etc.).
- Protect this device from heat sources such as radiators, heat registers, stoves, or other appliances (including amplifiers) that produce heat.
- Do not remove the cover under any conditions. There are no user-serviceable parts inside. Never operate this device when its cover is removed.
- Do not operate a visibly damaged device. Do not attempt to operate this device if the power cord has been frayed or broken.
- Always mount this device in a safe and stable manner. Mount this device in an area that will allow proper ventilation. Allow about 15 cm between this device and a wall.
- This device should only be serviced by qualified service personnel.
- Familiarise yourself with the functions of the device before actually using it.
- Always make sure to connect the device to an alternating current matching the value stated on the device.
- Always install the device in a well-ventilated location.
- Keep this device away from dust and extreme temperatures. Make sure the ventilation openings are clear at all times. For sufficient air circulation, leave at least 2.5 cm in front of the openings.
- Never connect the device to a dimmer or rheostat.
- Never carry or move the device from the power cord or any other moving part. Always use the bracket.
- In the event of an operating problem, stop using the device immediately.
- Never try to repair the device. There are no user-serviceable parts inside the device. Refer to an authorized dealer for service and/or spare parts.
- This device is not designed for permanent operation: regular operation breaks will prolong its live.
General Guidelines
- Refer to the Velleman® Service and Quality Warranty on the last pages of this manual.
- All modifications of the device are forbidden for safety reasons. Damage caused by user modifications to the device is not covered by the warranty.
- Only use the device for its intended purpose. Using the device in an unauthorised way will void the warranty.
- Damage caused by disregard of certain guidelines in this manual is not covered by the warranty and the dealer will not accept responsibility for any ensuing defects or problems.
- Nor Velleman nv nor its dealers can be held responsible for any damage (extraordinary, incidental or indirect) – of any nature (financial, physical…) arising from the possession, use or failure of this product.
- Keep this manual for future reference.
Installation
General Guidelines
![]()
- Have the device installed by a qualified person, respecting all applicable norms.
- Install the device on an even, fire-resistant, scratch-resistant, water-resistant and non-slippery surface.
- The carrying construction must be able to support 10 times the weight of the device for 1 hour without deforming.
- Make sure there is no flammable material within a 1 m radius of the device.
- Install the device in a location with few passers-by that is inaccessible to unauthorised persons.
- Install the device in a location where you can easily access the power cord.
Overhead Installation
![]()
- When hung, the device must always be secured with a secondary attachment e.g. a safety cable (not incl.).Secondary AttachmentHangerWhere a hanger is provided, the bearing parts of the hanger shall be capable of supporting ten (10) times the weight of the luminaire without permanent deformation and shall be manufactured from non-combustible materials such as steel or its equivalent.AccessoriesThe design of the luminaire shall be such that removable accessories, e.g. colour frames and barn doors, when properly inserted, cannot fall out of the luminaire.Secondary SuspensionA secondary suspension shall be provided for the luminaire, except where the luminaire is arranged for floor mounting or if it is intended for handheld use. The secondary suspension shall be designed and mounted in such a way that in the event of a failure of the primary suspension, no part of the luminaire can fall. The secondary suspension must withstand a 30 cm vertical drop for 30 times.
- Never stand directly below the device when it is being mounted, removed or serviced. Have a qualified technician check the device once a year and once before you bring it into service.
- Overhead mounting requires extensive experience: calculating workload limits, determining the installation material to be used… Have the material and the device itself checked regularly. Do not attempt to install the device yourself if you lack these qualifications as improper installation may result in injuries.
- For truss mounting, use an appropriate clamp (not incl.) and fit an M10 bolt through the centre of the (folded) bracket.
Connection
![]()
- Have a qualified electrician carry out the electric connection.
- Connect the device to the mains with the power plug. All devices must be powered directly off a grounded switched circuit. Do not connect to a dimmer pack.
- The installation has to be approved by an expert before the device is taken into service.
Overview
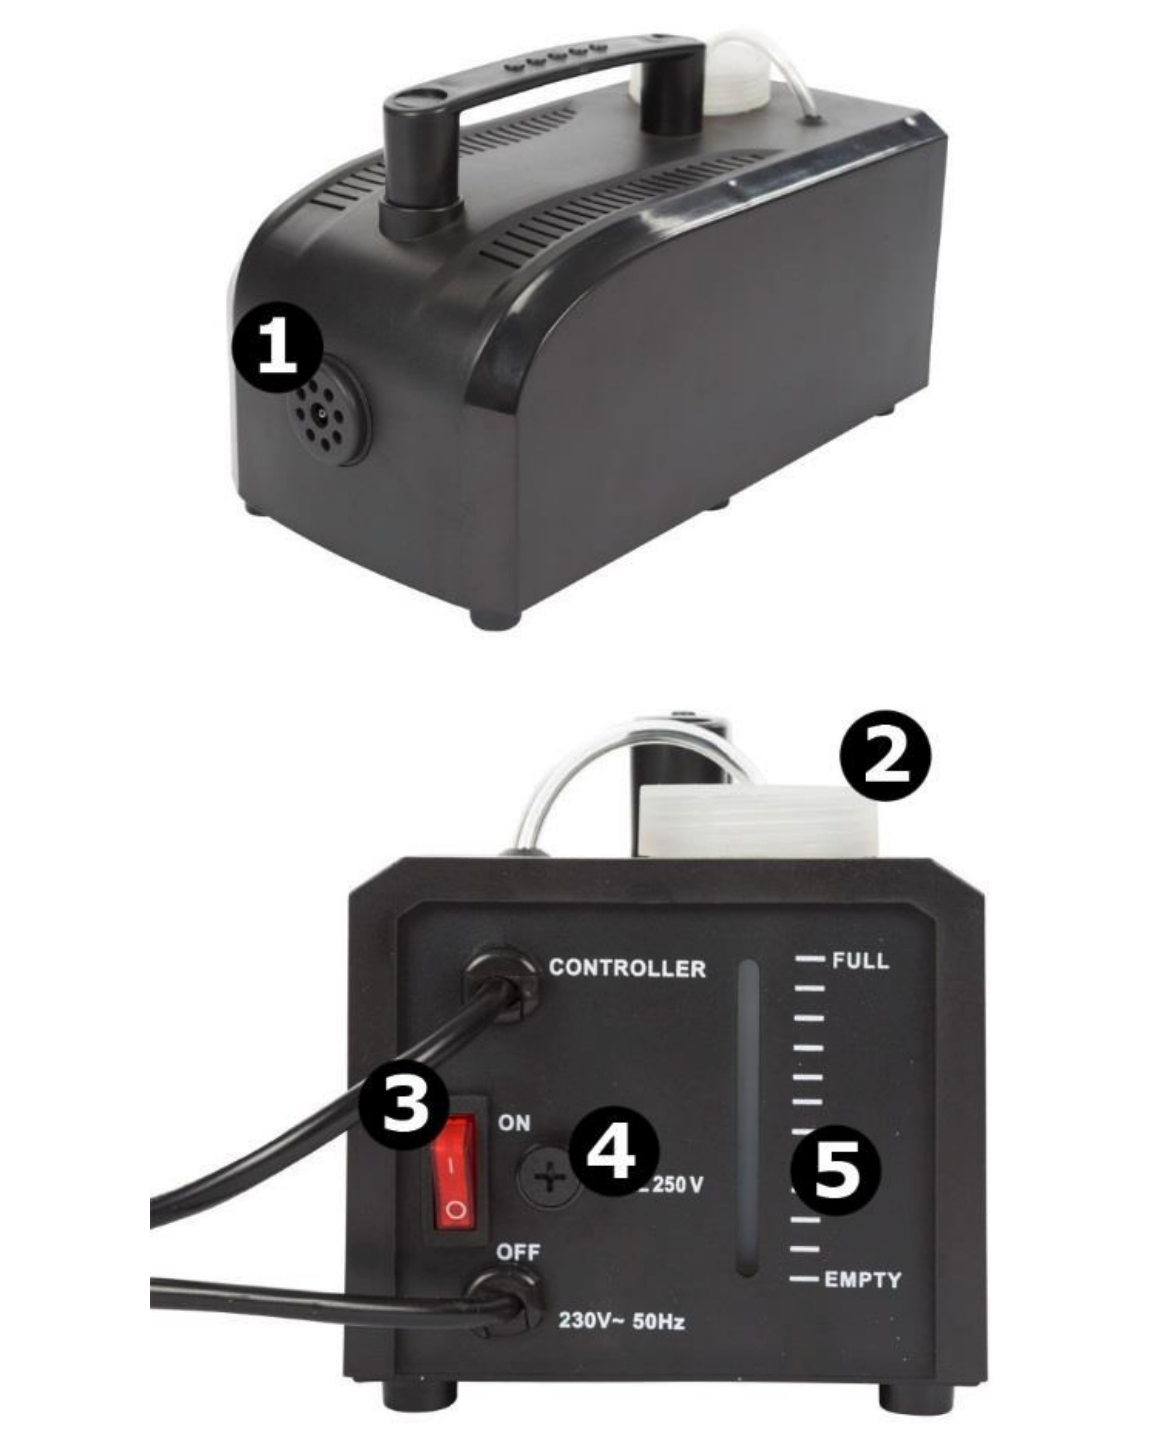
Refer to the illustrations on page 2 of this manual.
| 1 | output nozzle |
| 2 | smoke liquid filler cap |
| 3 | on-off switch |
| 4 | fuse |
| 5 | smoke liquid level gauge |
Operation
- Install and connect the device as described above.
- Fill the tank with adequate smoke liquid (not incl.). Never overfill the tank or run the device with an empty tank.
- Switch on the device. The device is ready-for-use as soon as the knob on the remote controller lights.
- Briefly press the knob on the remote controller to produce smoke.
- Switch off and disconnect from the mains after use.
Cleaning and Maintenance
Before starting any cleaning or maintenance activities:
- Unplug the device’s power cord from the outlet.
- Let the device cool down.
Cleaning
- Use normal glass cleaner and a soft cloth to wipe off the outside casing.
- Always be sure to dry all parts completely before plugging the device back in.
- Cleaning frequency depends on the environment in which the unit operates (i.e. smoke, fog residue, dust, dew).
- Do not immerse the device in any liquid.
Maintenance
- All screws should be tightened and free of corrosion.
- The housing, the lenses, the mounting supports and the installation location (e.g. ceiling, suspension, trussing) should not be deformed, modified or tampered with; e.g. do not drill extra holes in mounting supports, do not change the location of the connections…
- Mechanically moving parts must not show any signs of wear and tear.
- The electric power supply cables must not show any damage. Have a qualified technician maintain the device.
- There are no user-serviceable parts, apart from the fuse and the lamp.
- Refer to an authorized dealer for service and/or spare parts.
Fuse Replacement
- Unplug the device’s power cord from the outlet.
- Let the device cool down.
- Open the fuse holder.
- Replace with an identical fuse.
- Insert the fuse holder back in its place, replace the rear cover and reconnect power.
Technical Specifications
power supply: 220-240 V~, 50 Hzpower consumption: 400 Woutput: ± 70 m³/mintank capacity: 300 mlfluid consumption: 60-80 ml/minwarm-up time: ± 4 mindimensions: 230 x 110 x 110 mmweight: 2 kgfuse: F5AL 250V
Use this device with original accessories only. Velleman nv cannot be held responsible in the event of damage or injury resulting from (incorrect) use of this device. For more info concerning this product and the latest version of this manual, please visit our website www.velleman.eu. The information in this manual is subject to change without prior notice.
© COPYRIGHT NOTICE
The copyright to this manual is owned by Velleman nv. All worldwide rights reserved. No part of this manual may be copied, reproduced, translated or reduced to any electronic medium or otherwise without the prior written consent of the copyright holder.
Made in PRCImported by Velleman nvLegen Heirweg 33, 9890 Gavere, Belgiumwww.velleman.eu
References
[xyz-ips snippet=”download-snippet”]