
HQ-POWERPower Amplifier HQDA10002User Manual
HQDA10002
1. Introduction
 To all residents of the European UnionImportant environmental information about this productThis symbol on the device or the package indicates that disposal of the device after its lifecycle could harm the environment. Do not dispose of the unit (or batteries) as unsorted municipal waste; it should be taken to a specialized company for recycling. This device should be returned to your distributor or to a local recycling service. Respect the local environmental rules.
If in doubt, contact your local waste disposal authorities.
Thank you for choosing HQPower™! Please read the manual thoroughly before bringing this device into service. If the device was damaged in transit, do not install or use it and contact your dealer.
2. Safety Instructions
Read and understand this manual and all safety signs before using this appliance.Indoor use only.
WARNING!Dangerous high voltage. Risk of electroshock. Do not open.
- This device can be used by children aged from 8 years and above, and persons with reduced physical, sensory or mental capabilities or lack of experience and knowledge if they have been given supervision or instruction concerning the use of the device in a safe way and understand the hazards involved. Children shall not play with the device. Cleaning and user maintenance shall not be made by children without supervision.
- Do not expose this appliance to dripping or splashing liquids. Do not place objects filled with liquid, such as a vase, on top of the appliance.
- Do not block any ventilation openings. Install in accordance with the manufacturer’s instructions.
- Do not install near any heat sources such as radiators, heat registers, stoves or other devices (including amplifiers) that produce heat.
- Only use attachments and accessories specified by the manufacturer.
- Unplug this appliance during lightning storms or when not in use for long periods of time.
- Protect the power cord from being walked on or pinched, particularly at the prongs, convenience receptacles, the point where they exit from the appliance.
- If the external flexible cable or cord of this device is damaged, it shall be exclusively replaced by the manufacturer or his service agent or a similar qualified person in order to avoid a hazard.
- Use only with the cart stand, tripod bracket or table specified by the manufacturer or sold with the appliance. When a cart is used, utilize caution when moving the cart/appliance combination to avoid injury from tipping over.
- Where the mains plug or an appliance coupler is used as the disconnect device, the disconnect device shall remain readily operable.
- This appliance may require the use of a different line cord, attachment plug, or both, depending on the available power source at installation. Connect this appliance only to the power source indicated on the appliance’s rear panel. To reduce the risk of fire or electric shock, refer servicing to qualified service personnel or equivalent.
3. General Guidelines
- Refer to the Velleman® Service and Quality Warranty on the last pages of this manual.
- All modifications of the device are forbidden for safety reasons. Damage caused by user modifications to the device is not covered by the warranty.
- Only use the device for its intended purpose. Using the device in an unauthorised way will void the warranty.
- Damage caused by disregard of certain guidelines in this manual is not covered by the warranty and the dealer will not accept responsibility for any ensuing defects or problems.
- Nor Velleman nv nor its dealers can be held responsible for any damage (extraordinary, incidental or indirect) – of any nature (financial, physical…) arising from the possession, use or failure of this product.
- Keep this manual for future reference.
4. Overview
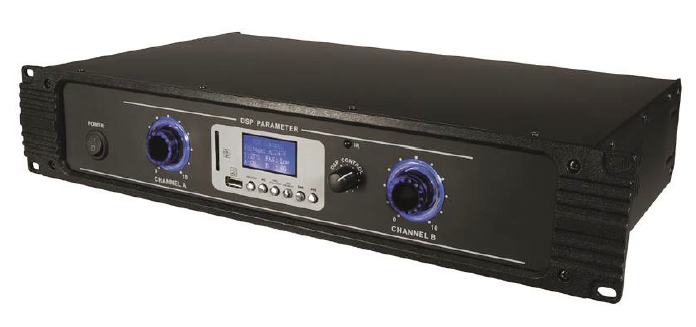
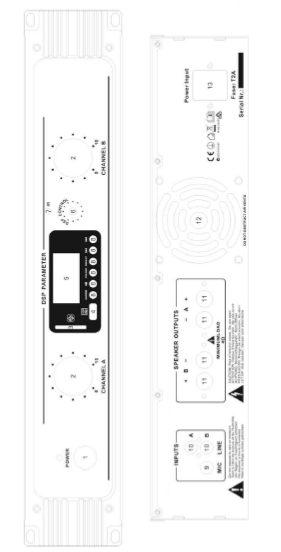
Front Panel
- Power switch.Press the power switch to switch the amplifier on or off.
- Volume control.Adjust the volume to control the signal output of channels A and B.
- SD port.Insert your SD/MMC card into this slot to play MP3 or WMA files.
- USB port.Insert your USB device into this slot to play MP3 or WMA files.
- Display and media player.
- DSP control.♦ Microphone control: Adjust the echo and voice changer.♦ Line control: EQ Set + Play DRC + MIC and LINE volume.
- IR sensor.
- USB controls.♦ MODE: Press to select the USB, SD, Bluetooth® or Line input function.♦
 : Press to play/pause the selected track.♦ REC FOLDER: Press to select a directory in a connected USB device.♦ REPEAT: Press to select a repeat mode (all, one or random).♦ : Press to replay the selected track or to select the previous track.♦ : Press to select the next track.Rear Panel
 - MIC input.6.35 jack input for the connection or a microphone.
- RCA inputs.RCA jack inputs for the connection of audio devices with a line-level output, e.g. PC, CD player, TV set…
- Speaker outputs.Outputs for the connection of speakers.
- Ventilation fan.
- AC power socket.
5. Connection
Decide where the appliance is to be physically installed – it can be used free-standing or mounted in a standard 19” rack requiring two rack spaces. When installed, makes sure that both the front and the rear panels are unobstructed and that there is good ventilation around the entire unit.
Before switching on the appliance, make sure the appliance is switched off and the volume controls are at their minimum position. It is never a good idea to power up any amplifier that is not connected to loudspeakers.
Use the correct connectors to connect the appliance to the loudspeakers and sound system.
6. Care and Maintenance
Cleaning
- Disconnect from the mains before any cleaning operation.
- Occasionally wipe with a damp cloth to keep it looking new. Do not use harsh chemicals, cleaning solvents or strong detergents.
Long Periods of Non-Use
- Disconnect from the mains during long periods of non-use.
Service
This appliance should be serviced when:
- The power cord or the plug has been damaged.
- Objects have fallen or liquid has been spilled into the appliance.
- The appliance has been exposed to rain or water.
- The appliance does not appear to operate normally.
- The appliance has been damaged.
Maintenance
Do not attempt any inspection or maintenance by yourself. Refer all servicing to qualified personnel.
Fuse Replacement
- Unplug the device’s power cord from the outlet.
- Let the device cool down.
- Open the fuse holder and replace with an identical fuse.
- Insert the fuse holder back in its place, replace the rear cover and reconnect power.
7. Technical Specifications
- Power supply: 220-240 V~, 50/60 Hz
- Fuse: T2A 250V
- Power consumption: max. 1.5 A
- Output power: 2 x 100 W @ 4 Ω
- THD: < 0.5 %
- Distortion: > 98 dB
- Signal-to-noise ratio: > 95 dB
Line output
- Sensitivity: 775 mV
- Impedance : 10k Ω
Mic input
- Sensitivity : 10 mV
- Impedance: 47 Ω
Others
- Crosstalk : > 82 dB
- Dimensions : 482 x 270 x 88 mm
- Weight : 3.2 kg
RED Declaration of Conformity
Hereby, Velleman NV declares that the radio equipment type HQDA10002 is in compliance with Directive 2014/53/EU.
The full text of the EU declaration of conformity is available at the following internet address: www.velleman.eu.
Use this device with original accessories only. Velleman nv cannot be held responsible in the event of damage or injury resulting from (incorrect) use of this device. For more info concerning this product and the latest version of this manual, please visit our website www.hqpower.eu. The information in this manual is subject to change without prior notice.
© COPYRIGHT NOTICE
The copyright to this manual is owned by Velleman nv. All worldwide rights reserved. No part of this manual may be copied, reproduced, translated or reduced to any electronic medium or otherwise without the prior written consent of the copyright holder.
Made in PRCImported by Velleman nvLegen Heirweg 33, 9890 Gavere, Belgiumwww.velleman.eu
References
[xyz-ips snippet=”download-snippet”]