
INSTRUMENTSMT-4/MT-6Infrared ThermometerUser Manual
Introduction
Congratulations on your purchase of our professional non-contact infrared thermometers.These units can provide fast, easy, and accurate temperature readings. With the non-contact (infrared) technology, they can be used to measure the surface temperature of hard-to-reach objects like electrified equipment or moving objects, without any damage or pollution to them.
Features
- Fast and easy measurement
- Precise non-contact measurement
- The built-in laser pointer increases the target accuracy
- Max/Min Record
- Backlight LCD display
- Emissivity adjustable from 0.1~to 1.0
- Automatic measurement range selection with resolution 0.1℃/℉
- Automatic trigger off
- Auto power off
Application
These units are widely used in Food preparation, Safety and Fire inspection, Plastic molding, Asphalt, Marine, Printing ink and dryer temperature, Diesel, and Fleet maintenance.
Safety
- Use extreme caution when the laser beam is turned on.
- Do not point the beam toward anyone or any animals.
- Do not allow the beam to strike the eye from a reflective surface.
- Do not use the laser near explosive gases.
- Safety Symbol
Comply with EMC
Field of View
The meter’s field of view is 12:1, for example, if the meter is 12 inches from the target spot, the diameter of the target must be at least 1 inch. Other distance ratios are shown below in the field of view diagram.
Specifications
| MT-4 | MT-6 | |
| Tents. range | -50°C–550°C (-58°F–1022°F) | -50°C–750°C (-58°P–1382°F) |
| Accuracy | -20°C.–0°G-4°P-32°F: 4:4°C/7°F | |
| Above 0°C/32°F: 12% of reading:62°C/3.6°F | ||
| Optical Resolution | D:S=12:1 | |
| Response time | < 500ms | |
| Emissivity | adjustable from 0.1-1.0 | |
| Resolution | 0.1°C(0.1°F) | |
| Spectral Response | 8— I4um | |
| Polarity Display | Auto display, “-” indicates negative, whilepositive with no sign. | |
| Diode Laser | Output<lmW, 630-670nm,class 2(11) | |
| Auto Power Off | Auto shuts off after 20 seconds of inactivity | |
| Operating Temp. | 0°C to 50°C / 32°F to I22°F | |
| Storage Temp. | -20°C to 60°C / -4°F to 140°F | |
| Relative Humidity | Operating:io-95%RH,Storage:<80%RH | |
| Power Supply | 9V battery | |
| Weight | 176g | |
| Dimensions(L*w*H) | 155.5×98.8×27.5mm |
Meter Description
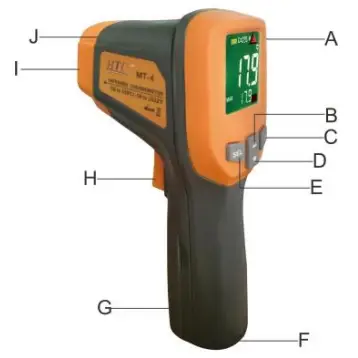
A. LCD DisplayB. UP buttonC. LaserD. DOWN buttonE. SET buttonF. Wrist strap holeG. Battery coverH. Measurement triggerI. IR sensorJ. Laser pointer
LCD Display Description
 report this ad
A. Measurement IconB. Data Hold IconC. Emissivity IconD. Laser IconE. Low Battery IndicationF. ℃/℉IconG. Current temperature valueH. Max/Min Record valueI. Max/Min IconJ. Colour LCD back Light is always ON
Operating Instruction
Operating steps:
- Hold the meter by its handle grip and point it toward the surface to be measured.
- Pull and hold the Trigger to turn the meter on, the “SCAN” icon will appear and begin testing.
- The surface temperature being tested will be displayed on the LCD screen.
- Release the trigger, the “HOLD” icon will appear, and the reading will be beheld for several seconds.
- The meter will automatically shut off after 20 seconds.Measurement Note:If the meter is used at an ambient temperature with a wide temperature change, allow it at least 30 minutes to adjust to it.The laser is designed for aiming only; it can be shut off while operating in a short distance to save the battery.
- ℃/℉button: In Measurement Mode, press button“
 ”to switch the temperature unit ℃ or ℉.
 - Laser pointer: In“HOLD” Mode,press the button“ ”to turn on/off the laser pointer.
- SEL Button
- After power on the meter, press the button“ ”to review MAX and MIN values.
- After powering on the meter, keep pressing the button“ ” until ” ”icon flashes on the screen, then the loose button“ ”, enter into Emissivity Mode, press button“ ” to adjust emissivity value, then keep pressing the button“ ” return to the normal measurement mode.
Battery Replacement
- When the low battery icon“ ”appears, replace the meter’s battery.
- Open the battery compartment, replace the 9V battery and close the battery compartment cover.
Notes
- Work Principle• The infrared thermometer is designed for measuring the surface temperature of an object.• The optical sensor can emit, reflect and transmit energy, which is collected and focused on a detector, then translate it into the temperature reading by electronics and displayed on the LCD screen.• The laser is used for aiming the target object only.
- Field of View• The object under test should be larger than the spot size calculated by the field of view diagram.• The smaller the target object is, the closer the meter should be to it for accurate measuring.• When accuracy is critical, make sure the target is at least twice as large as the spot size.
- Distance & Spot Size• As distance (D) from the object increases, the spot size (S) of the area measured by the unit becomes larger.
- Locating a hot spot• To find a hot spot, first aim the thermometer to the outside of the target area, then scan across in an up and down motion until the hot spot is located.
- Notice• Not recommended for measuring shiny or polished metal surfaces like stainless steel, aluminum, etc.• Do not make measurements through transparent surfaces such as glass.• If the surface of the object under test is covered with frost, oil, grime, etc., clean before taking measurement.
- Maintenance• Do not use volatile liquids to clean the unit, wipe it with a dry soft cloth.• Do not disassemble the unit, repair it by qualified personnel• Do not immerse it in water.• Do not store it in high temperature or humidity.
Accessories
- User’s manual
- 9V Battery
- carry case
[xyz-ips snippet=”download-snippet”]