![]()
Thank you for choosing Hugolog.Please read this user manual before fitting and using your keypad lock, and keep it for future reference. “NEED HELP?For technical support and more, please let us know.”
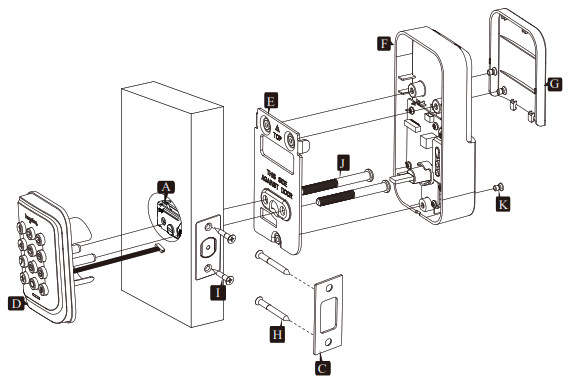
Parts List

Installation Guide
TOOL REQUIRED: USE OF A POWERED SCREWDRIVER IS NOT RECOMMENDED
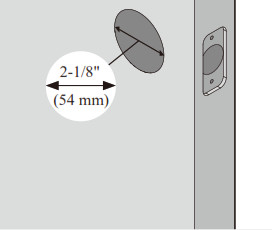
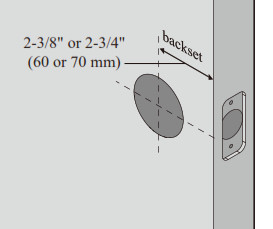
- Prepare the door and check dimensions
A. Measure to confirm that the hole in the door is 2-1/8″ (54 mm) . B. Measure to confirm that the backset is either 2-3/8″ or 2-3/4″ (60 or 70 mm) . 
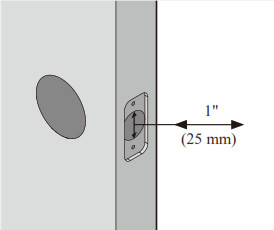
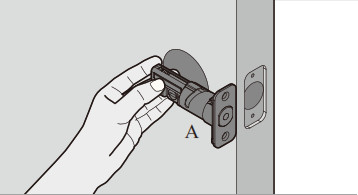
C. Measure to confirm that the the hole in the door edge is 1″ (25 mm) . D. Measure to confirm that the door is 1-3/8″ to 2″ (35 mm or 50 mm)thick . - Install the latch and strikeA. Hold the latch in front of the door hole, with the latch face flush against the door edge.
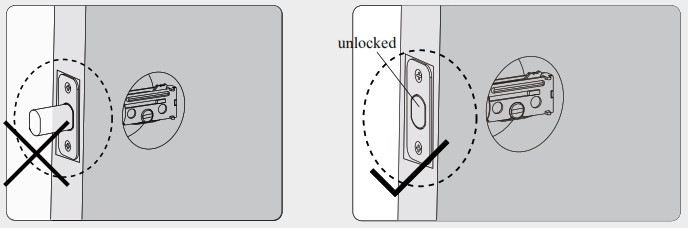
Is the slotted hole centered in the door hole?Slotted hole is centered.NO
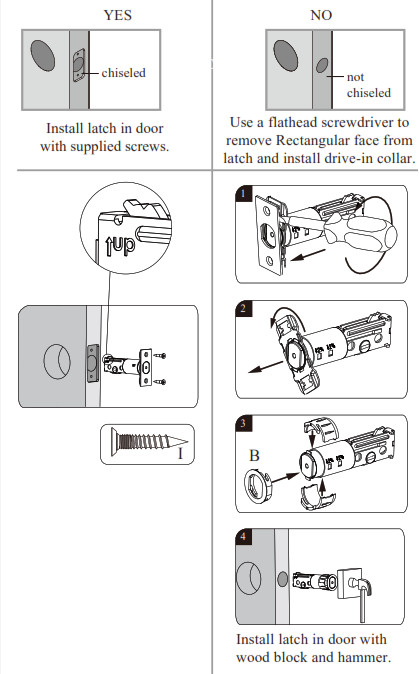
Slotted hole is NOT centered.No adjustment is required. Proceed to next step. Rotate and pull the latch as shown to extend latch. B. Is the door edge chiseled?
C. Install strike on the door frame.IMPORTANT: Make sure hole in door frame is NO drilled a minimum of 1″ (25 mm) deep.D. With the door closed, use a flat-head screwdriver to test if deadbolt works smoothly. Check alignment between the latch and the strike, making sure when the deadbolt is extended, it is going into the bolt hole and not hitting the deadbolt strike or door frame. - Install exterior assemblyA. Before installation, make sure the latch is fully retracted (in the unlocked position).
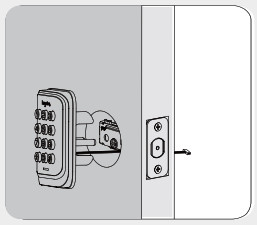
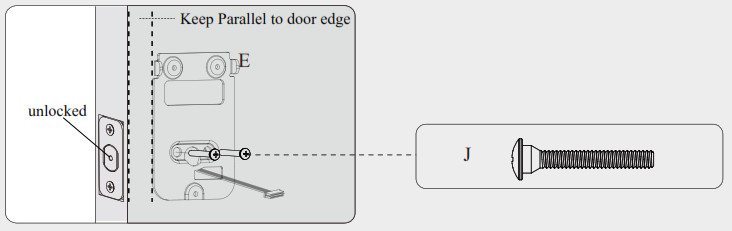
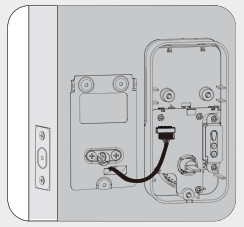
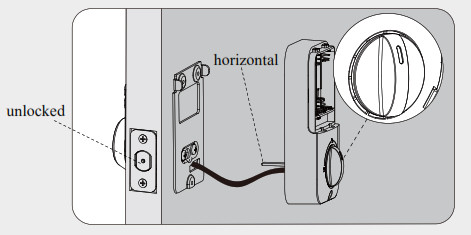
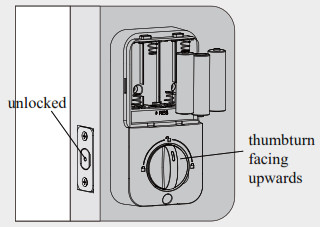
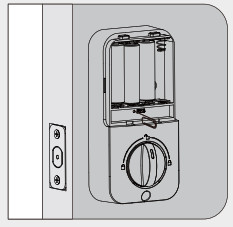
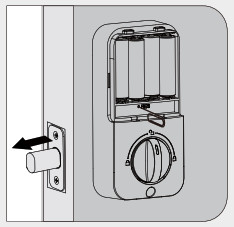
A. Before installation, make sure the latch is fully retracted (in the unlocked position). B. Route the cable below the latch. C. Send the cable through the bottom horizontal slot in the mounting plate. D. Secure the mounting plate with the supplied screws. - Install interior assembly
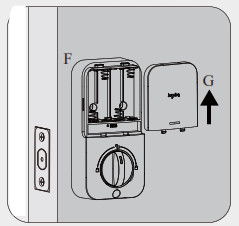
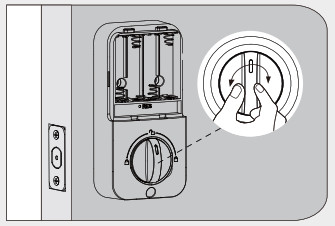
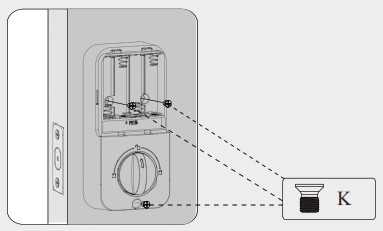
A. Remove the battery cover.Do not load batteries until lock is completely installed. B. Connect the cable and ensure tight cable connection. C. Rotate the thumbturn in upward position and make sure the latch is still fully retracted. Insert the torque blade through center hole mounting plate. D. Test the thumbturn for smooth rotation.If thumb turn doesn’t rotate, repeat step 4B, making sure the thumb turn facing upwards. Secure the interior assembly with screw K.
- Detect left/ right hand door installation Perform a factory reset to teach the lock the orientation of the door. Always run this step after installation. The motor will not operate before completing the step.
A. While the door is OPENED and UNLOCKED, load 3 AA batteries into the battery compartment. For best results, use new, nonrechargeable Alkaline batteries only. Do not mix old and new batteries. B. Press and hold the Reset button using a pen or a paper clip. Do not release the reset button until you completed the next step. C. Place the 4th battery and keep holding the reset button, until the latch bolt extend.If the latch doesn’t extend within 10 seconds, repeat step 4C and 5A, making sure the thumbturn is always facing upwards and latch always in unlocked position.

 Is the slotted hole centered in the door hole?
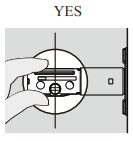 Slotted hole is centered.
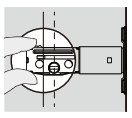 Slotted hole is NOT centered.
 C. Install strike on the door frame.IMPORTANT: Make sure hole in door frame is NO drilled a minimum of 1″ (25 mm) deep.
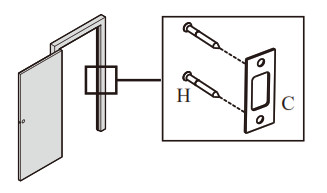 D. With the door closed, use a flat-head screwdriver to test if deadbolt works smoothly. Check alignment between the latch and the strike, making sure when the deadbolt is extended, it is going into the bolt hole and not hitting the deadbolt strike or door frame.
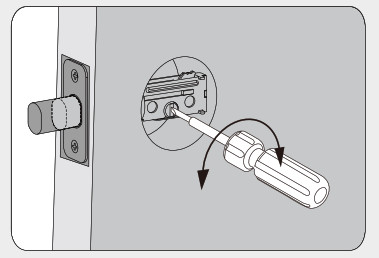

How To Use
UNLOCK the door from outside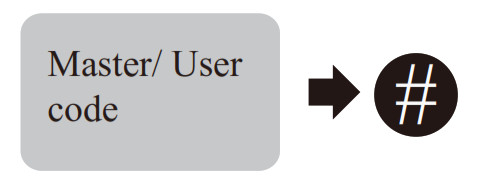
UNLOCK the door from inside![]() Rotate the thumbturn to Unlock position.
Rotate the thumbturn to Unlock position.
LOCK the door from outsideOne-Touch Locking Press any key on keypad for 2 seconds.![]() Enable Auto LockAfter Auto Lock is enabled, the bolt will automatically extend in 30 seconds after unlocking to lock the door. (see Quick Set Up for how to enable this function)LOCK the door from inside
Enable Auto LockAfter Auto Lock is enabled, the bolt will automatically extend in 30 seconds after unlocking to lock the door. (see Quick Set Up for how to enable this function)LOCK the door from inside![]() Rotate the thumbturn to Lock position.
Rotate the thumbturn to Lock position.
Programming Instructions
Information & Safety Warnings
- Protect your User Codes and Master Code.
- Restrict access to your lock’s interior assembly and routinely check your settings to ensure they have not been altered without your knowledge.
- This lock meets IP54 water-resistance. It can withstand water splashes ; however, it is not waterproof. Do not let water and liquids get into the lock. Avoid exposure to direct sunlight. Long-term exposure to direct sunlight may damage the lock.
Programming Basic
- Master Code (4 to 10 digits): Required for programming and feature settings. Property owner/ manager should keep this information confidential. The default Master Code is 12345678. This code must be changed prior to programming.
- User Code (4 to 10 digits): A total of 20 User Codes (and one temporary one-time user code) can be programmed.
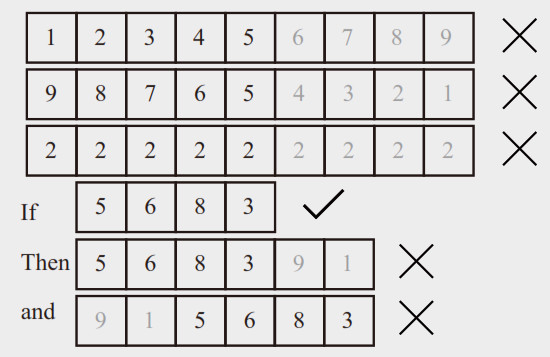
- Both master and user codes do not support the following combination.
A. Forward number sequenceB. Backward number sequenceC. Repeat number sequenceD. Contain existing code sequence
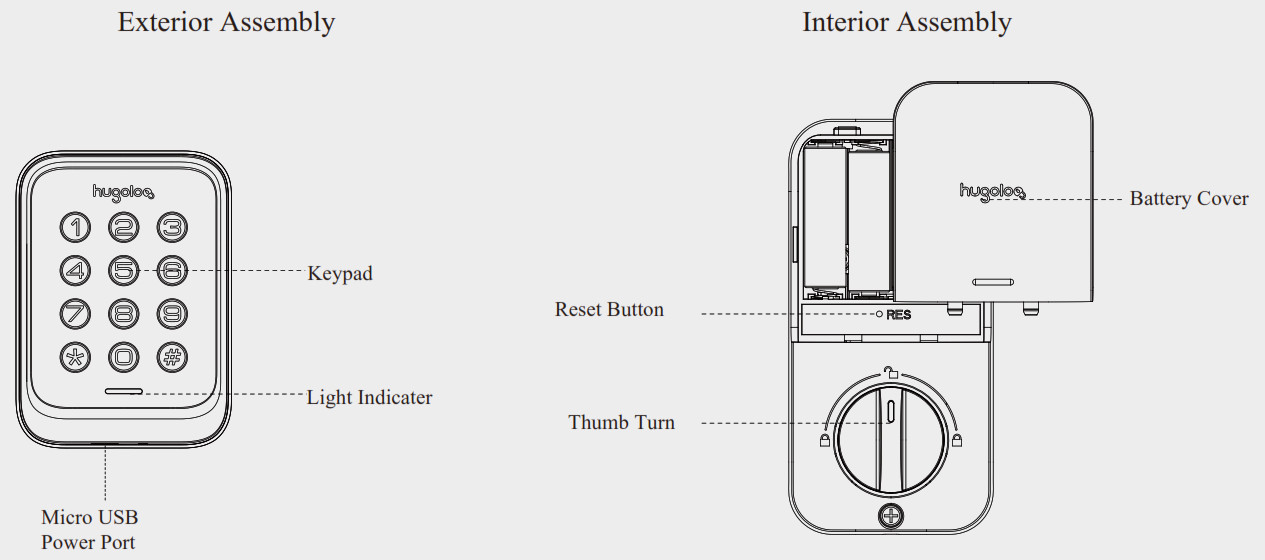
Parts Illustrations
|
Item |
Specifications |
Remarks |
|
Battery (Use new, non-rechargeableAlkaline batteries only.) |
AA alkaline battery x4 (Operation voltage: 4.6~6.0V) |
Last up to one year (10 times open/close per day) |
![]() The default Master Code is 12345678. It is required that you change it to a code of your own before programming.
The default Master Code is 12345678. It is required that you change it to a code of your own before programming.
Definitions
| Auto LockAutomatically locks the deadbolt 30 seconds after unlocking. This feature is off by default. You can set the Auto Lock time delay between 10 and 99 seconds.Emergency Power PortEmergency USB Port can be used when battery is completely dead. Supply power by connecting an external power bank to the micro-USB port.
Wrong Entry LimitAfter 10 unsuccessful attempts at entering a valid PIN code, the unit will shut down for 3 minuets. Low Battery IndicatorIf you hear 10 beeps corresponding with 10 red flashes after pressing any key or lock and unlock the door, that’s an indication that the batteries need to be replaced soon. Please replace with 4 new AA alkaline batteries and do not mix old and new batteries. All settings are retained in the memory when the batteries are removed and replaced. |
Silent ModeThe beep sounds when pressing keypad can be muted. But you will still hear low battery and system alerts.Vacation ModeThis is a security feature for you when you are leaving your home for vacation or long trip. Enabling vacation mode will restrict all user codes until master code is entered on keypad. If the lock is unlocked by thumb turn, the lock will sound an alarm.
One Time User CodeThis code can only be used once and is automatically deleted when used. Unlock with Fake codeUser can prevent pin code exposure from strangers by entering random digits before or after pin code. |

Quick Set Up
IMPORTANT:
- The default Master Code is 12345678 and it can’t be used to program the lock. Please change it to a code of your own first.
- Each programming steps needs to be completed within 5 seconds. If you hear 5 rapid beeps with flashing red lights, it indicates entry error or time-out. Please start over.
| Change Master Code |  |
| Add User Code |  |
| Delete User Code |  |
| Silent Mode |  |
| Auto Lock |  |
| Auto Lock Time Delay | |
| Add One-Time User Code |  |
| Vacation Mode |  |
Factory Default Settings
|
Settings |
Factory Defaut |
|
Master Code |
12345678 |
| Auto Lock |
Disabled |
|
Silent Mode |
Disabled |
| Wrong Code Entry Limit |
10 times |
|
Shutdown Time |
3 mins |
| Vacation Mode |
Disabled |
Restore To Factory Default SettingsIMPORTANT:Factory reset process is the same as door handing. By performing the steps below, you will teach the lock the orientation of your door and delete all User Codes and custom settings associated with the lock.
- Keep the door opened and unlocked (thumbturn facting upwards and latch retrated).
- Press and hold the Reset button, at the same time take out one battery and then place it back.
- Keep holding the Reset button for 10 seconds, until the latch extend.
Troubleshooting
- Problem: When resetting the lock, the latch does not extend but I can hear the motor is turning.Cause(A): The latch and strike are misaligned, causing the latch to bind.Solution(A): a. Adjust the position of the strike plate.b. Make sure you reset the lock with the door opened.Cause(B): Internal electronic components have a residual charge which the lock tries to use, and it is not adequate to allow the lock to function when connecting the batteries.Solution(B): Disconnect the batteries. Press and release any key on the keypad and keep the batteries disconnected for at least 5minutes. If there is residual charge within the lock, this will consume the charge. Cause(C): The mounting screws securing the exterior keypad and the latch bolt are over-tightened. Solution(C): Slightly loosen the screws.
- Problem: When resetting the lock, the latch does not extend and I can’t hear the motor turning.Cause: The lock is not reset properly.Solution: Repeat step 4C and 5A, make sure that the thumbturn is facing upwards. and the deadbolt latch is retracted (unlocked) when installing and resetting.
- Problem: The lock does not lock and unlock electronically.Cause: The door handing process was not executed.Solutions: Perform a factory reset to teach the lock the orientation of your door (Step 5).
- Problem: After installation, the thumbturn cannot rotate.Cause(A): The lock is not installed properly.Solution(A): Remove and re-install the whole lock, making sure that the thumbturn is facing upwards and the lock is in unlock position when installing.Cause(B): Internal electronic components have a residual charge which the lock tries to use, and it is not adequate to allow the lock to function when battery connected.Solution(B): Disconnect the batteries. Press and release any key on the keypad and keep the batteries disconnected for at least 5 minutes. If there is residual charge within the lock, this will consume the charge.
- Problem: The keypad doesn’t respond when touched (no lights are visible and no beeping is heard) . Cause: The lock has no power.Solution: a. Make sure the cable is properly connected.b. Change the batteries with 4 fresh AA standard alkaline batteries. Do not mix old and new batteries.
- Problem: The batteries run low quickly.Cause: The deadbolt and the strike plate could be misaligned, especially when there’s change in temperature and humidity, doors can become `warped’. As a result, there could be strong `friction’ as the deadbolt tries to extend. More friction means that the motor needs to work harder to lock your door, so your batteries life may be impacted.Solution: Make sure your door locks and unlocks smoothly. Re-install your lock and make sure the latch and strike are properly aligned.
- Problem: When attempting to lock the deadbolt electronically, the latch goes in and out for a few times.Cause: The latch and strike are misaligned.Solution: a. Make sure the bolt hole on the door frame is at least 1 inch deep so the bolt fully extends.b. Check if the door closes properly. Make sure when the deadbolt is extended, it is going into the bolt hole and not hitting the deadbolt strike or door frame.c. Check for loose door hinges.
- Problem: When attempting to unlock the deadbolt electronically, the latch goes in and out for a few times.Cause: As in the problem with locking the bolt, the bolt may be binding against the strike plate. There may be interference, especially if the door has warped due to a change in the weather.Solution: a. Check if the door closes properly. Make sure when the deadbolt is extended, it is going into the bolt hole and not hitting the deadbolt strike or door frame.b. Check for loose door hinges
- Problem: I received 5 rapid beeps when programming.Cause: a. Tme-out b. Wrong entrySolution: a. Complete each step within 5 seconds.b. Change the default master code before programming.c. Enter a new code in correct format and within 4 to 10 digits.
- Problem: I forgot my Master Codes.Solution: Perform a factory reset. Once the reset is completed, all codes and settings will be erased and the Master code will return to the default value ( 12345678) .
- Problem: I lost all the preset codes after door handing.Cause: Door handing is the same as factory reset. You lock has restored to factory default. Solution: Re-program your codes.* If none of the above resolves your issue, please contact us.* Installation video: https://www.amazon.com/vdp/78e7ffc8ca2e4f45befd77c60cc13e86
References
[xyz-ips snippet=”download-snippet”]