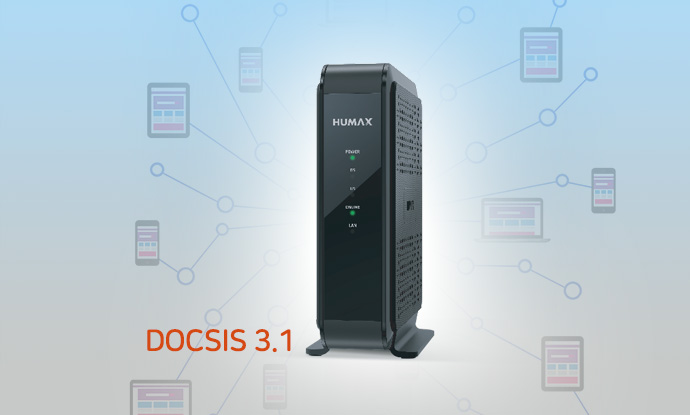
HUMAX HGD310 Cable Modem
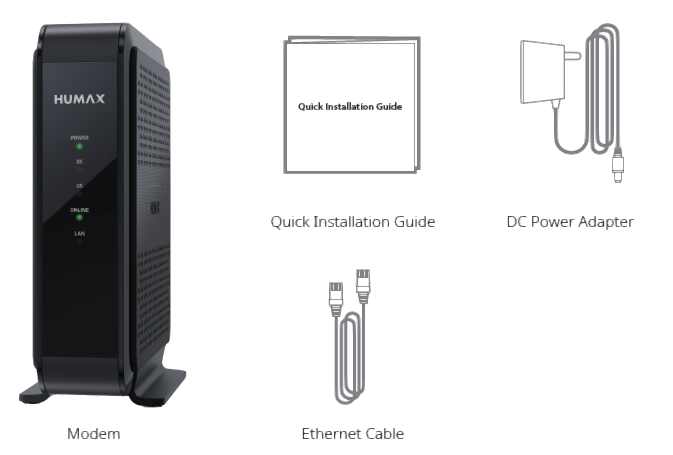
Accessories
The following items should be found in your package.
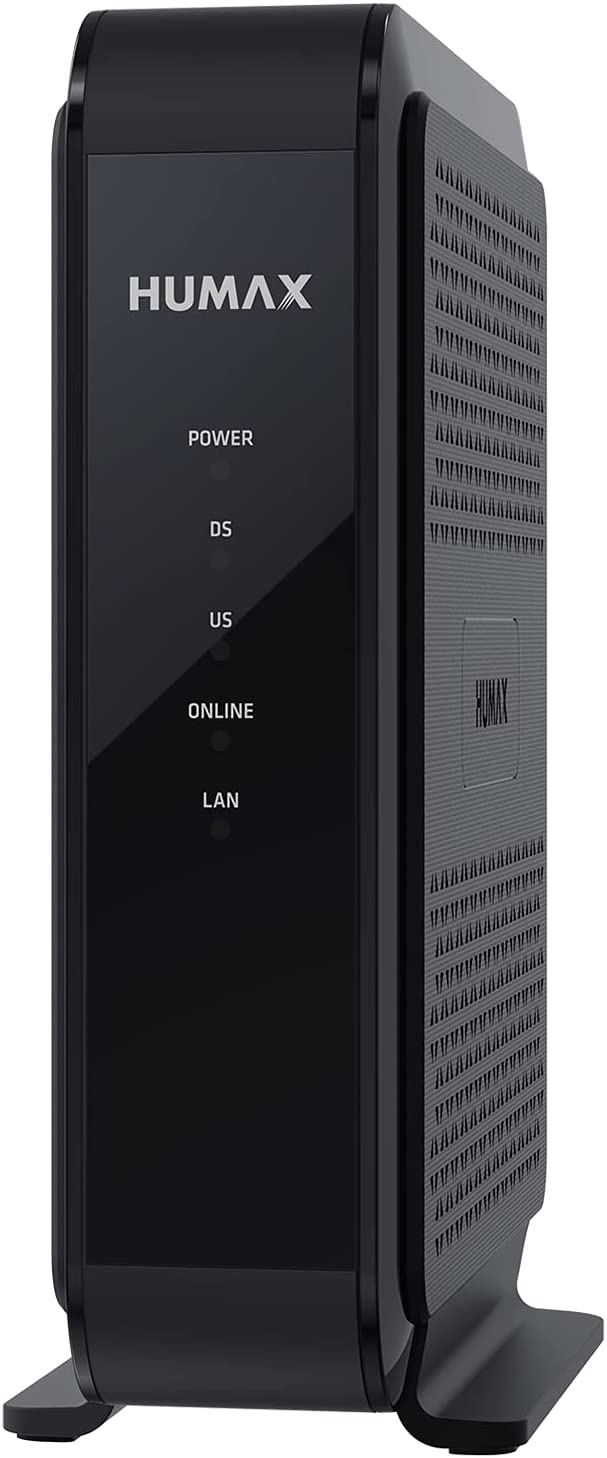
Product Overview
Front Panel
Your cable modem has LEDs on the front panel to indicate the working status. You can refer to the table below to check your cable modem works properly.
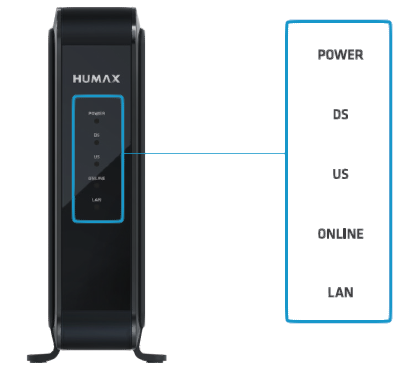
LEDs on for checking working status
| LED | Operation | |
|
POWER |
Green On | The power is on. |
| Off | The power is off. | |
|
DS |
Green On | The downstream signal channels is locked. |
|
Green Blinking |
The downstream scanning is in progress.
The software update (over-the-air) is in progress. |
|
| Off | No downstream channel is locked. | |
|
US |
Green On | The upstream signal channels is locked. |
|
Green Blinking |
The upstream scanning is in progress.
The software update (over-the-air) is in progress. |
|
| Off | No upstream channel is locked. | |
|
ONLINE |
Green On | The cable modem is online. |
| Green Blinking | The cable modem is offline. | |
|
LAN |
Green On | Network device is connected to the LAN ports. |
| Green Blinking | Data is being transmitted through the LAN ports. | |
| Off | No device is connected to the LAN port. |
Rear Panel
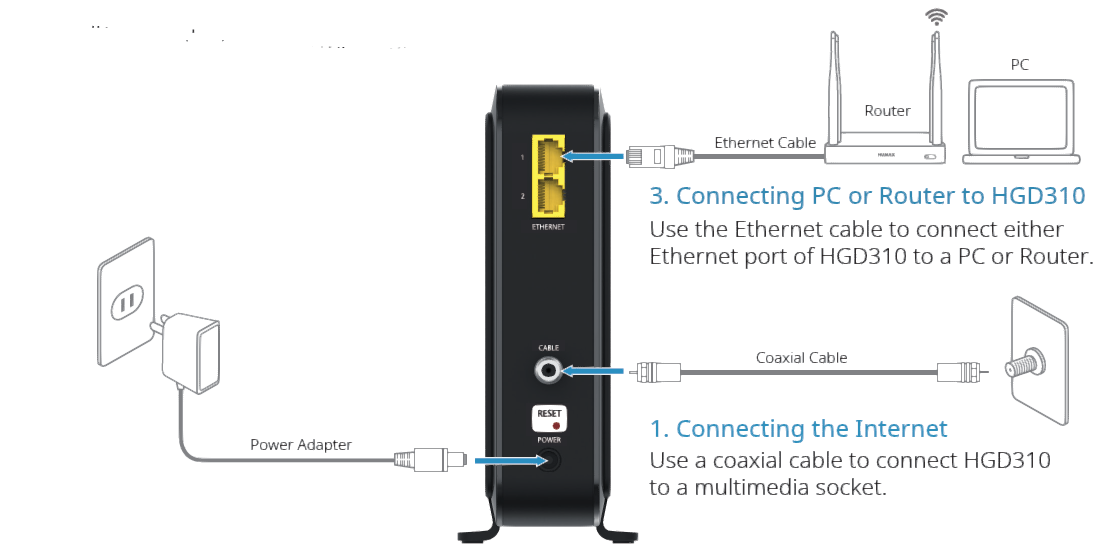
The back panel provides the connections and button shown the following figure.

Label
The label is located on the side the cable modem. It contains specific cable modem ID that you may need when contacting your service provider or HUMAX Technical Support for assistance.To receive Internet service, you need to contact your service provider for assistance. You may have to provide Model Name, Serial Number and MAC Address listed on the cable modem label. 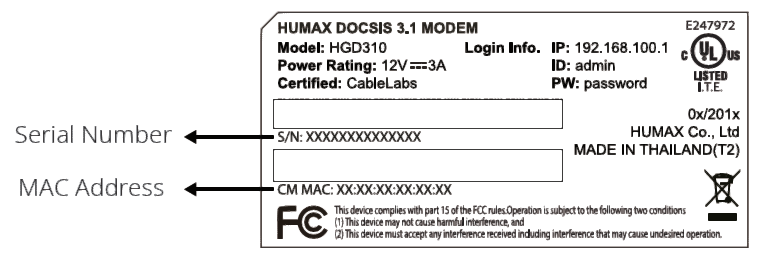
Connecting Your Cable Modem
Follow the steps below to install the product and activate the Internet service.
Powering On
Plug in the DC power adapter from the power connector to an electrical outlet.If the power successfully turns on, a green light on the POWER LED is turned on.
Note:
- Use only the DC power adapter provided in this product. Using other adapters may damage the product.
- If you want to connect additional device(e.g.: PC, router, game console, etc) to 2nd Ethernet port while 1st Ethernet port is being used, you need two (2) IP addresses. Please contact your service provider to check your Internet plans and packages before connecting.
- If you want to use the Link Aggregation feature, refer to 3.3 Advanced Features > Link Aggregation section in this document.
Connection
Follow the steps below to install the product and activate the Internet service. However, please read the warnings below before proceeding.Warning For safer protection, unplug your product from an electrical outlet anddisconnect the cables to avoid damage due to the lightning and power surges.
Connect the Coaxial CableUse a coaxial cable to connect HGD310 to the Internet.Connect the coaxial cable from the wall socket to the CABLE port of HGD310.If you use a cable splitter
- a. Connect a coaxial cable from the wall socket to a cable splitter.
- b. Connect another coaxial cable from the cable splitter to your TV.
- c. Connect the other coaxial cable from the cable splitter to the CABLE port of HGD310.
Note: Check with your service provider to ensure broadband cable service is available in your area. Separate purchasing of cable splitter is required.
Powering OnConnect the DC power adapter from the power connector to theelectrical outlet.. If the power successfully turns on, a POWER LED at the front panel turns on.Note: Make sure you use an adapter approved by UL.
Connect the PC or RouterUse an Ethernet cable to connect your router or PC to HGD310Connect one end of the Ethernet cable to either ETHERNET port of HGD310 and the other end to the Ethernet port of your router or PC.
Activate Your Internet Service
Comcast XfinityActivate your Internet service by using Comcast Xfinity’s self-activation process.Before you start the self-activation processMake sure to collect following information.
- Comcast account number
- Phone number (associated with Comcast account)
Using PC
- Power ON the PC connected to your cable modem.
- Open the PC’s web browser. You will be automatically redirected to the Xfinity self-activation page. If you are not redirected to the Xfinity self-activation page, visit the following website: https://xfinity.com/activateNote: For further assistance, please visit following URLs.• Install & Activate Your Purchased Modem: https://xfinity.com/Internetsetup• Home Networking Support: https://xfinity.com/Internetsupport
- Provide your Xfinity information and complete the self-activation process.
Note: Duration of activation process might take up to 15 minutes.
Using Xfinity Mobile App
- Download the Xfinity app on the App store or on the Google Play™. If you already have the Xfinity app, make sure you have updated to the latest version.
- Open the app and sign in with your Xfinity ID.
- Follow the steps to get online.
If you cannot complete the Xfinity’s self-activation process
You can activate the Internet service through contact Comcast Xfinity customer service center at 1-800-XFINITY (1-800-934-6489)Note: When you call Comcast Xfinity customer service center, they may ask to provide the following information.
- Modem manufacturer: HUMAX
- Modem model number: HGD310
- Model serial number: Serial number is on the product label, which is on the side of the cable modem
- Modem MAC address: MAC address is on the product label, which is on the side of the cable modem
Charter SpectrumBefore activating the Internet service Make sure to collect following information.
- Charter account information
- Modem model number: HGD310
- Model serial number: Serial number is on the product label, which is on the side of the cable modem
- Modem MAC address: MAC address is on the product label, which is on the side of the cable modem
Activate your Internet service with Charter SpectrumSelect one of the two methods and activate it to activate the Internet service.
- Visit the following website: https://activate.spectrum.net/ and follow the prompts to activate your Internet service.
- Call Charter Spectrum for support at 1-833-267-6094Note: Listed contact information is subject to change. You can also find the contact information in your monthly Internet service billing statement.
Monitoring Your Cable Modem
You can easily check the status of the cable modem through the Web UI. Web-based utility can be used on any Windows, Macintosh or UNIX OS with a Web browser, such as Microsoft Internet Explorer, Google Chrome, Mozilla Firefox or Apple Safari.
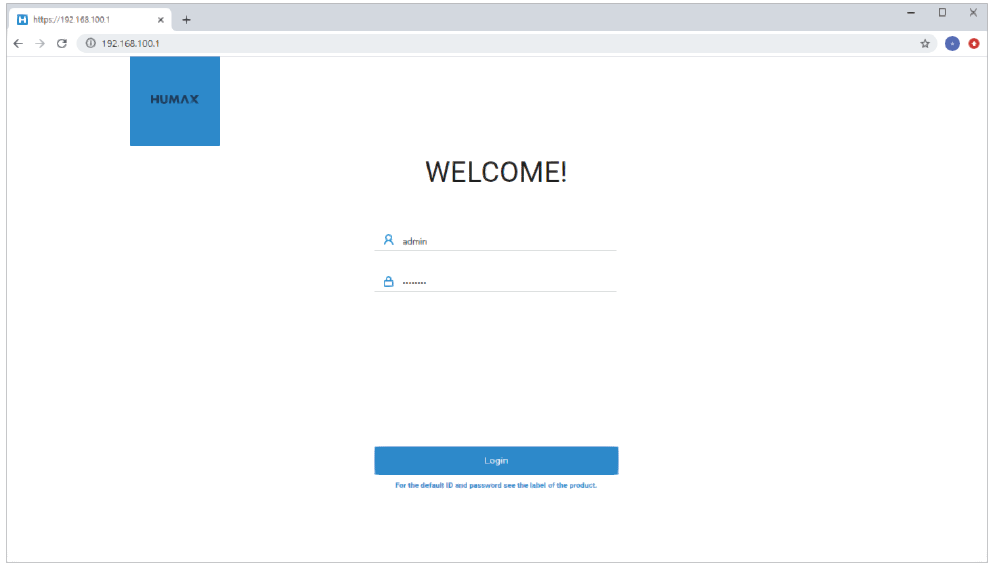
Follow the instructions below to log into your cable modem.
- Connect the Ethernet cable between LAN port of Cable Modem and LAN port of PC.
- Open the PC’s web browser.
- Enter https://192.168.100.1 to the address bar, and then press the Enter key.
- Enter the ID and password. The default ID and password are printed label of your cable modem. They are case-sensitive.
- Click the Login button.
Note: We recommend you change the password to secure your network. Go to System > Change Password to change your password.
Map on Web UI
Follow the steps below to install the product and activate the Internet service. However, please read the warnings below before proceeding.HeaderThe header is always displayed at the top of the web page. You can see the Manufacturer /Model Name, Internet status, Help message and System settings.
- Manufacturer/ Model Name
- Internet Status: Show the Internet status.
- Icon: Show the help message on each page.
- System Icon: Support to set the Language, Change Password, Restart & Factory Reset and Date/Time.
- Logout Icon: Can logout.
System > Change PasswordYou can change the login password. We recommend you change the password to secure your network.

System > Restart & Factory Reset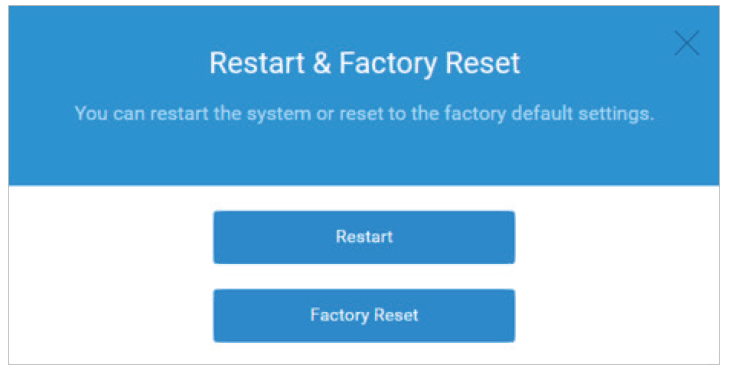
- Restart: Reboot the system.
- Factory Reset: Restore to the factory default settings. Then, the system will restart and it may take a few minutes.
System > Date/TimeYou can see the date and time of system.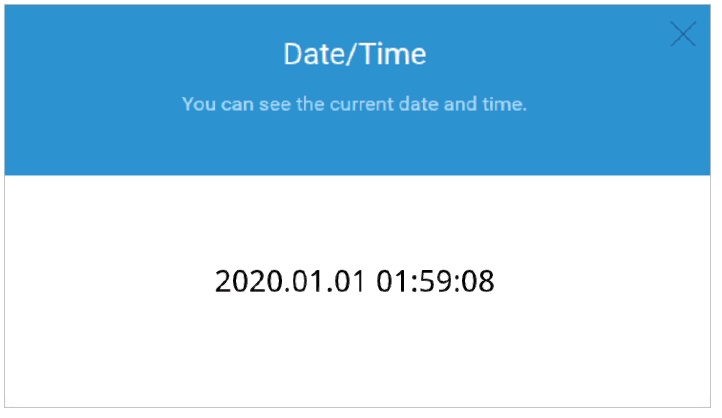
You can see the information on the Internet and the connected devices in the home menu.Internet ConnectionClick the globe image to see the Internet connection status and Downstream/Upstream channel status.
Cable Modem InformationClick the product image to see the information on your cable modem.
Connected DevicesClick the network device image to see the information on the connected devices. You can check the number of connected devices, their MAC addresses and device name.
Advanced Features
Logs

- On/Off: Toggle to see the log information.
- Level: Set the level of logs to be saved.
- Display Level: Set the level of displayed log.
Click Log button to see the log information as below.

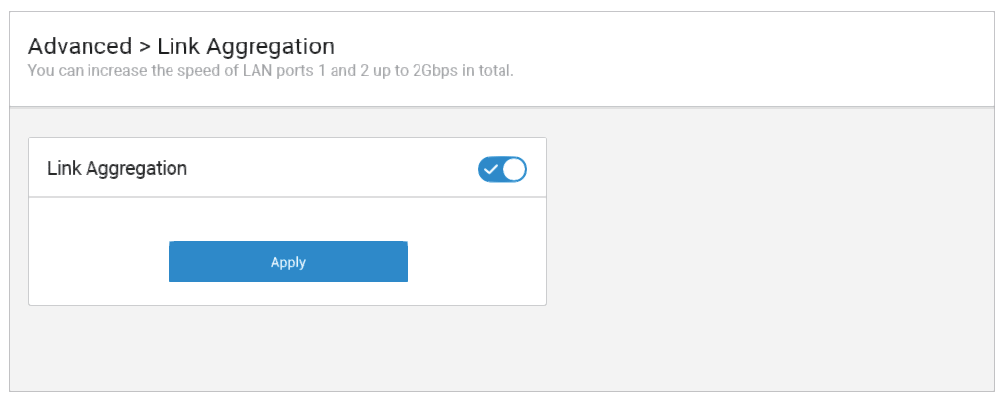
Link Aggregation
By combining both LAN port 1 & 2, HGD310 can support bonding that can increase speed up to 2Gbps. After activating Link Aggregation feature, connect your PC or router with LAN port 1 & 2 simultaneously.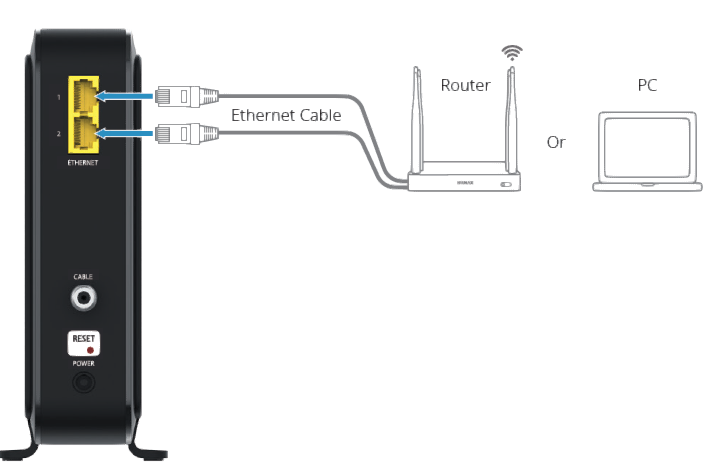
Note: To support Link Aggregation feature, your Internet plan should be over 2Gbps & also PC or router you want to connect must support Link Aggregation feature as well, please check your Internet service status before usage.
Specification
| Memory | |
| NAND Flash | NAND Flash 128MB |
| DRAM | DRAM 256MB |
| Data Interface | |
| Cable Modem | DOCSIS 3.1 |
| Channels | |
| Downstream | 2 OFDM for DOCSIS 3.1, 32 Channels for DOCSIS 3.0 |
| Upstream | 2 OFDMA for DOCSIS 3.1, 8 Channels for DOCSIS 3.0 |
| Input / Output | |
| Tuner | F-Connector (female 75) |
| Ethernet | Two(2) 10/100/1000 Gigabit Ethernet Ports |
| Environmental | |
| Input | 100-120V~ 57/63Hz |
| Output | 12V, 3A |
| Operating Temperature | 0° to 40°C |
| Physical Specification | |
| Size (W x D x H) | 45 x 152 x 160 (mm) |
| Weight | 417.5g |
| Certification | |
| CableLabs DOCSIS | |
| FCC | |
| UL |
Troubleshooting
You can find information to diagnose and solve problems you might have with your product. Before contacting the customer service center, make sure to read the tips below carefully. If the problem persists after you complete the following procedure, please contact the customer service for further instructions.The product does not work
- Check the POWER LED lights on.
- Check the power adapter is plugged into a suitable electrical outlet.
- Connect the power adapter to another electrical outlet.
- Restart the system and wait until the POWER LED lights on.
Cannot login to the cable modem
- Check the Ethernet cable is correctly connected between the cable modem and PC.
- Make sure that PC’s IP address is on the same subnet as the cable modem. The IP address of your PC must be in the range of 192.168.100.2 to 192.168.100.254.
- Try to access with IP address 192.168.100.1.
- Close the browser and launching it again.
- Power off the cable modem by detaching the power adapter and then restart the system within a few seconds.
Safety and Regulatory Information
NoticePlease read this user guide carefully to be able to safely install, use and maintain the product at maximum performance. Keep this user guide next to your product for future reference. The information in this guide is subject to change without notice.
Copyright (Copyright© 2020 HUMAX Corporation)Not to be copied, used or translated in part or whole without prior consent in writing except approval of ownership of copyright and copyright law.
WarrantyThe warranty does not cover parts which may become defective due to misuse of the information contained in this guide.
FCC Customer InformationThis device complies with Part 15 of the FCC Rules. Operation is subject to the following two conditions:(1) This device may not cause harmful interference, and(2) this device must accept any interference received, including interference that may cause undesired operations.
WARNINGAny changes or modifications not expressly approved by the manufacturer could void the user’s authority to operate the equipment.This equipment has been tested and found to comply with the limits for a Class B digital device, pursuant to part 15 of the FCC Rules. These limits are designed to provide reasonable protection against harmful interference when the equipment is operated in a commercial environment. This equipment generates, uses, and can radiate radio frequency energy and, if not installed and used in accordance with the instructions, may cause harmful interference to radio communications. However, there is no guarantee that interference will not occur in a particular installation. If this equipment does cause harmful interference, the user is encouraged to try to correct the interference by consulting with a dealer or an experienced technician for technical assistance.To reduce the risk of fire or electric shock, do not expose this product to rain or moisture.The apparatus shall not be exposed to dripping or splashing and no objects filled with liquids, such as vases, shall be placed on the apparatus.
Important Safety Instructions
- Read these instructions.
- Keep these instructions.
- Heed all warnings.
- Follow all instructions.
- Do not use this apparatus near water.
- Clean only with dry cloth.
- Do not block any ventilation openings. Install in accordance with the manufacturer’s instructions.
- Do not install near any heat sources such as radiators, heat registers stoves, or other apparatus (including amplifiers) that produce heat.
- Protect the power cord from being walked on or pinched particularly at plugs, convenience receptacles, and the point where they exit from the apparatus.
- Only use attachments/accessories specified by the manufacturer.
- Use only with the cart, stand, tripod, bracket, or table specified by the manufacturer, or sold with the apparatus. When a cart is used, use caution when moving the cart/apparatus combination to avoid injury from tip-over.
- Unplug this apparatus during lightning storms or when unused for long periods of time
- Refer all servicing to qualified service personnel. Servicing is required when the apparatus has been damaged in any way, such as power supply cord or plug is damaged, liquid has been spilled or objects have fallen into the apparatus, the apparatus has been exposed to rain or moisture, does not operate normally, or has been dropped.
- Apparatus shall not be exposed to dripping or splashing and no objects filled with liquids, such as vases, shall be placed on the apparatus.
- When wall mounting is needed, please maintain placement of HGD310 within 2 meters from the ground.
Note: Wall mount is not included in the package. This instruction is to comply with UL safety standard.
SupportFor any technical queries, the HUMAX team are here to help. https://americas.humaxdigital.com/support

References
Xfinity Activation
Questions and Inquiries | HUMAX-Americas
Internet Help and Support | Xfinity by Comcast
How To Activate Your Xfinity Voice Service – Xfinity Support
Spectrum – Activation Home
Internet Help and Support | Xfinity by Comcast
Xfinity Activation
How To Activate Your Xfinity Voice Service – Xfinity Support
Spectrum – Activation Home
Questions and Inquiries | HUMAX-Americas
Questions and Inquiries | HUMAX-Americas
Xfinity Activation
How To Activate Your Xfinity Voice Service – Xfinity Support
Internet Help and Support | Xfinity by Comcast
Spectrum – Activation Home
[xyz-ips snippet=”download-snippet”]