
![]()
Pirouette® Window Shadings EasyRise and UltraGlide Operating Systems and Two-On-One Headrail Shadings© 2018 Hunter Douglas. All rights reserved. All trademarks used herein are the property of Hunter Douglas or their respective owners.
GETTING STARTED
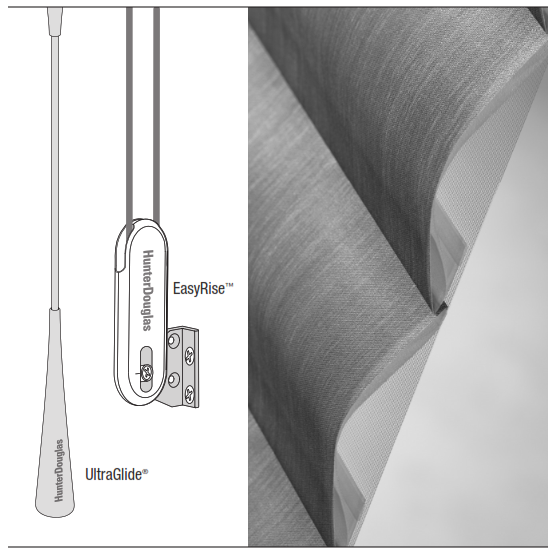
Product View

Thank you for purchasing Hunter Douglas Pirouette ® window shadings. With proper installation, operation, and care, your new shadings will provide years of beauty and performance. Please thoroughly review this instruction booklet and the enclosed packing list before beginning the installation. Leave the protective cover on the fabric-covered headrail until you are satisfied with the installation and operation of your shading.IMPORTANT: An orange shipping clip is installed in the headrail for the UltraGlide ® shading. Please do not remove the clip until instructed to do so.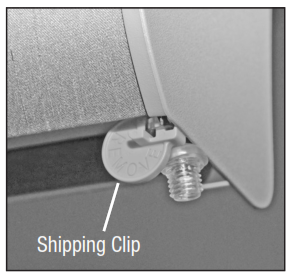
Tools and Fasteners Needed
■ Flat blade and Phillips screwdrivers■ Level (laser level is recommended)■ Measuring tape and pencil■ Pliers■ Power drill, 3 /32″ drill bit, and 1 /4″ hex driver■ Open-end wrench, 5 /16″ (8mm)■ Scissors (heavy-duty) In addition, you will need fasteners designed to work with your specific mounting surface(s).■ #6 Hex Head Screws (Provided). Two 1 1 /2″ screws are provided per installation bracket.■ Longer #6 Hex Head Screws (Not Provided). If using spacer blocks, use #6 screws long enough for a secure attachment.■ Speed Nuts and Screws (Provided). Extension brackets come with screws and speed nuts.■ Drywall Anchors (Not Provided). Use drywall anchors when mounting into drywall.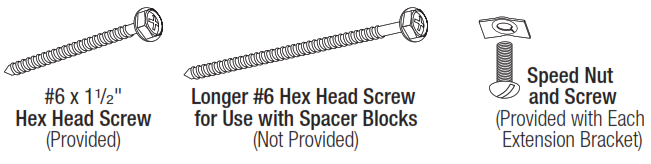
INSTALLATION
Installation Overview
■ Your order will include the correct number of installation brackets for your shading width, as shown in the table below.■ Shading orders may also include spacer blocks or extension brackets if they were specified for added clearance.➤ Extension brackets are used for end mount shadings, as well.

Mounting Types and Window Terminology
If the installation brackets are mounted correctly, the rest of the installation process follows easily. To prepare for this important first step, review the mounting types and basic window terminology illustrated below.
Molding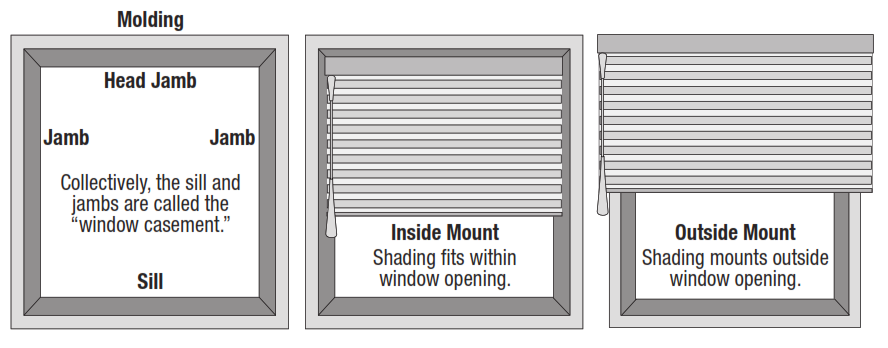 ■ Refer to the appropriate page below based on your order:➤ Inside Mount — Page 4➤ Outside Mount — Page 6➤ End Mount — Page 8
Mount the Installation Brackets — Inside Mount
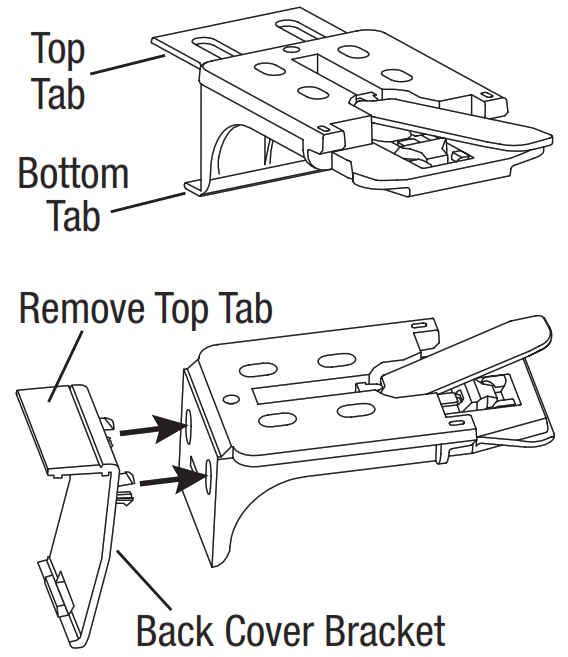
■ If using the optional back cover: Use pliers or heavy-duty scissors to remove both the top and bottom tabs on the installation brackets.➤ Then remove the top tab on the back cover brackets.➤ Snap the prongs on the back cover brackets into the holes on the back of the installation brackets.NOTE: Save these tabs once removed. They may be used as shims, if necessary.
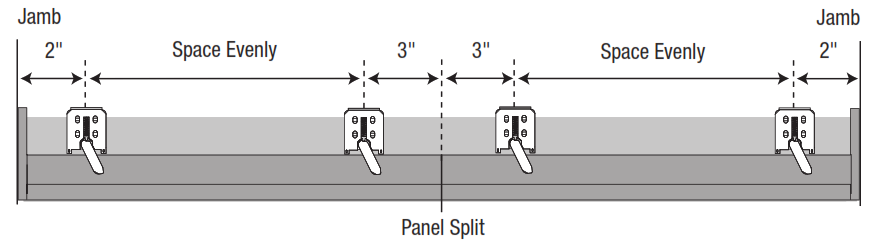
Mount the Installation Brackets■ Mark 2″ from each jamb for bracket location.➤ If more than two installation brackets came with your order, space additional bracket(s) evenly between the two end brackets and mark their location. Mount into wood whenever possible.
■ Two-On-One Headrail Shadings. Place installation brackets 3″ on each side of the panel split, as shown below.
■ Decide whether the front or back set of installation bracket holes works best in your application. (The front set is the preferred location.) Mark the location of the screw holes.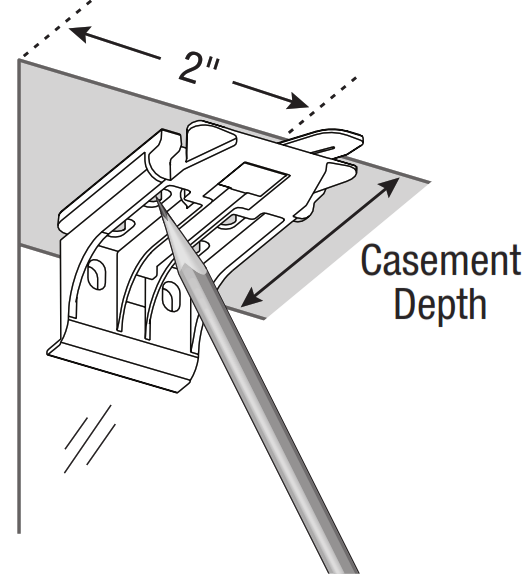
➤ The minimum depth required for mounting is 1″.➤ The fully recessed mounting depth is 3 3 /4″.➤ If using the optional back cover, an additional 1/4″ mounting depth is required.IMPORTANT: The front edges of the installation brackets must be level and aligned to each other.
![]() WARNING: Failure to properly align the brackets could result in the headrail releasing from the brackets.
WARNING: Failure to properly align the brackets could result in the headrail releasing from the brackets.
■ Use a level to check that the mounting surface is level. Shim the brackets, if necessary.■ Drill the screw holes using a 3 /32″ drill bit.CAUTION: Use drywall anchors when mounting into drywall.
■ Attach the installation brackets using the screws provided.IMPORTANT: Do not overtighten the screws. Check to ensure the lever can be moved easily from side to side. If not, loosen the screws in one-eighth turn increments until the lever can be moved easily.■ If using the optional back cover: Install the cover into the back cover brackets. If necessary, trim the back cover to the desired width.
Mount the Installation Brackets — Outside Mount
■ Use pliers or heavy-duty scissors to remove both the top and bottom tabs on the installation brackets.
NOTE: Save these tabs once removed. They may be used as shims, if necessary.
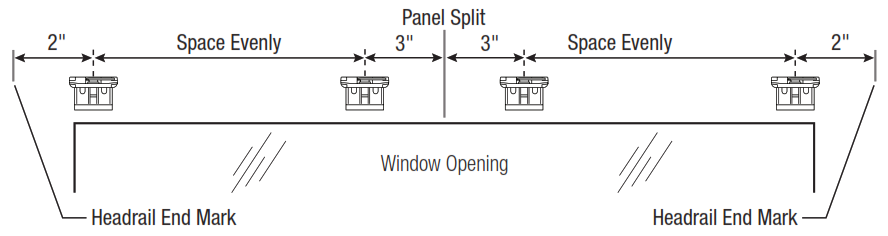
■ Center the headrail over the window opening at the desired height. Use a pencil to lightly mark each end of the headrail.➤ Alternatively, measure the width of the headrail and use that width to mark the headrail endpoints over the window opening.■ Mark 2″ from each end of the headrail.➤ If more than two installation brackets came with your order, space additional bracket(s) evenly between the two end brackets and mark their location. Mount into wood whenever possible.

■ Two-On-One Headrail Shadings. Place installation brackets 3″ on each side of the panel split, as shown below.
■ Center the installation brackets or extension brackets on your marks and mark the location of the screw holes.➤ A minimum 1″ flat vertical surface is required for the installation brackets. Extension brackets require 11/4″.➤ The tops of the installation brackets or extension brackets should be at the desired height. The brackets should be level and aligned.CAUTION: The rear of the brackets must be flush against a flat mounting surface. Do not mount brackets on the curved molding.
■ Center the installation brackets or extension brackets on your marks and mark the location of the screw holes.➤ A minimum 1″ flat vertical surface is required for the installation brackets. Extension brackets require 1 1 /4″.➤ The tops of the installation brackets or extension brackets should be at the desired height. The brackets should be level and aligned.CAUTION: The rear of the brackets must be flush against a flat mounting surface. Do not mount brackets on the curved molding.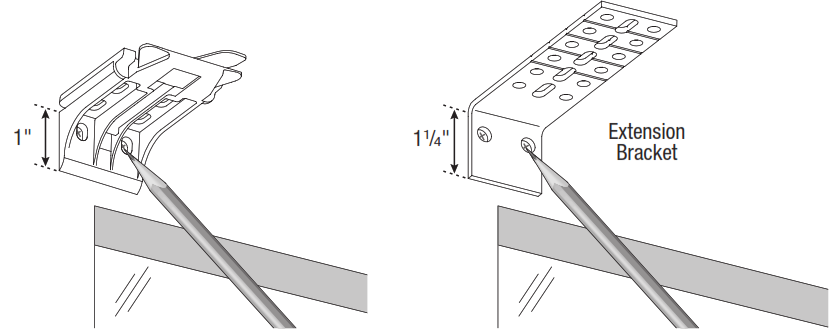
■ Drill the screw holes using a 3 /32″ drill bit.CAUTION: Use drywall anchors when mounting into drywall.■ Attach the installation or extension brackets using the screws provided.IMPORTANT: The tops of the installation brackets or extension brackets must be level with their front edges aligned.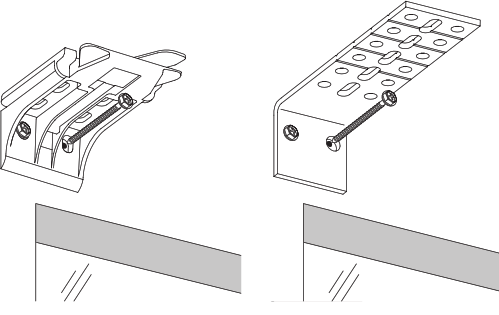
■ If using spacer blocks, attach the spacer block(s) and installation bracket to a flat vertical mounting surface with #6 screws long enough for a secure installation.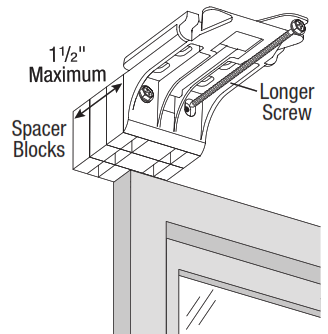 IMPORTANT: Do not add more than 11/2″ of clearance using spacer blocks.IMPORTANT: The tops of the installation brackets must be level with the front edges aligned.
■ If using extension brackets, attach an installation bracket to the underside of each extension bracket using the speed nuts and screws provided.
Mount the Installation Brackets — End MountEnd mount the headrail when conventional mounting techniques will not work — for example, in an arched window opening.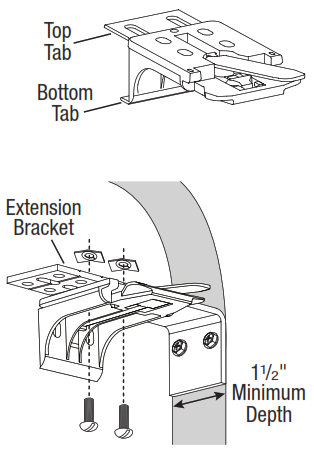
NOTE: Save these tabs once removed. They may be used as shims, as described later in these instructions.
■ Mount the extension brackets on a flat vertical surface at least 11/2″ wide.■ Attach the installation brackets to the extension brackets using the provided screws and speed nuts.
![]() WARNING: To end mount shadings into a surface other than a secure wall stud, use medium to heavy-duty wall anchors (not provided) matched to the wall thickness. Failure to mount the brackets securely may result in injury or property damage.
WARNING: To end mount shadings into a surface other than a secure wall stud, use medium to heavy-duty wall anchors (not provided) matched to the wall thickness. Failure to mount the brackets securely may result in injury or property damage.
■ If using the optional back cover:➤ Snap the prongs on the back cover brackets into the holes on the back of the installation brackets.➤ Install the cover into the back cover brackets. If necessary, trim the back cover to the desired width. Install the ShadingIMPORTANT: Leave the protective cover on the fabric-covered headrail until you are satisfied with the installation of your shading.
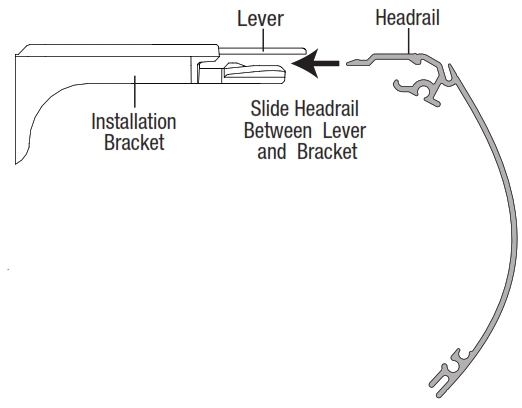 ■ Position the shading so that the front faces you.■ Slide the headrail into the installation brackets so the edge of the headrail is between the lever and the bracket, as shown.■ Firmly push the headrail into each bracket until it clicks and the lever snaps to the right side of the bracket.IMPORTANT: Carefully pull on the headrail at each bracket to ensure it is installed securely.■ Remove the protective film from the fabric-covered headrail.
Attach the Dust Cover (Optional for Outside Mounts and End Mounts)The dust cover is used to protect the top of the headrail from exposure on outside and end mounted shadings.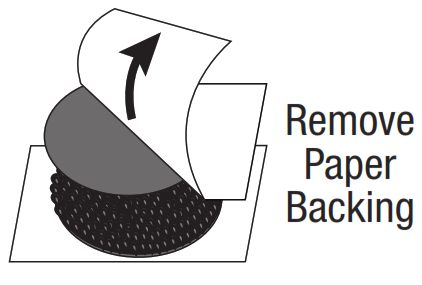
■ Cut the dust cover to desired width.■ Remove the paper backing on one side of the hook and loop fastener dots.■ Apply the dots to the installation brackets on each end of the shading.

■ Remove the remaining paper backing from the dots.■ Center the dust cover over the top of the shading, above the dots.■ Press the dust cover down onto the dots.
Attach the Universal Cord Tensioner (UCT) — EasyRise™ Only
IMPORTANT: Before you proceed, you must first slide the cord tensioner to the bottom of the cord loop.
■ Insert a small screwdriver, punch, or awl through the screw hole at the bottom of the cord tensioner.■ Move the screw hole down to the indicator line to release the safety mechanism.■ Slide the cord tensioner down to the bottom of the cord loop.■ Attach the cord tensioner according to the instructions provided with the Universal Cord Tensioner Installation Kit.
 WARNING: It is imperative that the cord tensioner be properly secured to the wall or window frame to reduce children’s access to the cord loop. Young children can strangle in cord loops. They can also wrap cords around their necks and strangle.CAUTION: The shading will not operate properly unless the cord tensioner is secured. A Universal Cord Tensioner Installation Kit has been included with your shading. Follow the instructions in the kit to correctly secure the cord tensioner.
Attach the Wand — UltraGlide® OnlyThe wand must be securely attached to the shade for proper operation.■ Remove the orange shipping clip.➤ Grab the edge of the clip and pull straight down.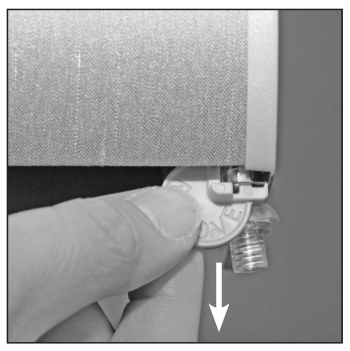
■ Remove the wand from its packaging.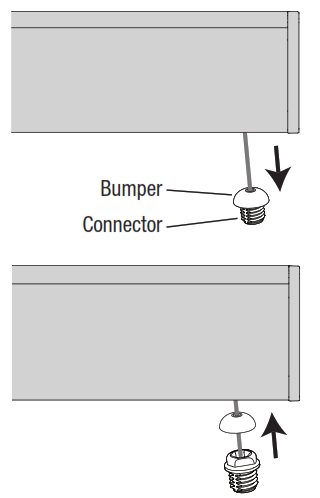 ■ Gently pull out the bumper and threaded the connector until it is visible.■ Slide the bumper away from the threaded connector.CAUTION: Do not grip the bumper on top of the connector and attempt to screw on the wand at this point. Secure attachment of the wand cannot be guaranteed if tightened by hand.■ Hold the threaded connector with a 5/16″ (8mm) open-end wrench, and screw the hollow end of the wand onto the threaded connector, as shown. If necessary, pliers can be used instead of a wrench.
 ➤ Continue to firmly rotate the wand until you feel it click two times and the wand stops moving. This ensures the wand is securely attached.CAUTION: If the wand is not properly secured, it will come loose after repeated use.■ Slide the bumper back onto the threaded connector.➤ Make sure the bumper is properly aligned and seated tightly on top of the threaded connector.NOTE: The underside of the bumper matches the shape on the top of the threaded connector.
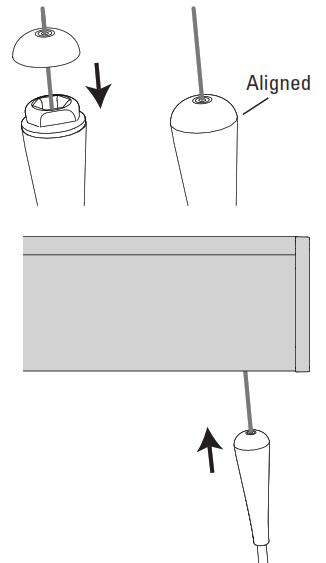
Attach Magnetic Hold-Down Brackets (Optional)
■ Lower the shading, keeping the vanes closed.■ Place the magnetic hold-down brackets onto the bottom rail just inside the end caps, oriented as shown.■ Hold the brackets while opening and closing the vanes. (It may be necessary to have someone assist you.) Adjust the brackets to the best overall position.■ Mark the screw locations using one of the mounting options shown below.➤ The screw should be placed in the middle of the channel. This will allow for adjustment.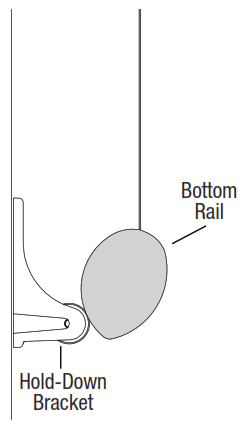 Outside MountOutside Mount
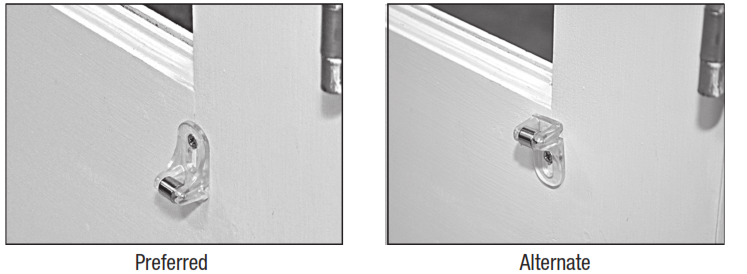 Inside Mount

■ Drill the screw holes using a 3/32″ drill bit.■ Attach the hold-down brackets to the mounting surface using the screws provided.■ If necessary, adjust the bracket height by loosening the screw and sliding the bracket up or down.

OPERATION
Operate the Shading
Important Operating NoteIf a shading has been fully lowered with the vanes open for a long period of time, the vanes may become “set” — they may not easily close or flatten. This is a normal characteristic of fabric products. If this happens, toggle the shading up and down to coax the vanes as closed as possible. If necessary, gently pull down on the lowest operable vane. You may also dress the vanes gently with your hands to help them close. Then roll up the shading slowly to flatten the vanes. Allow the fabric to remain in the headrail for up to 24 hours. To prevent vane set, regularly “exercise” the shading by raising and lowering it and opening and closing the vanes.
EasyRise™ Shadings■ Pull the front or rear cord to raise or lower the shading. The shading will hold its position when you release the cord.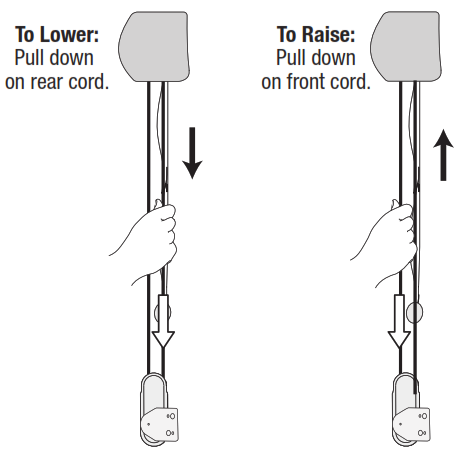
➤ To Lower the Shading: Pull down on the rear cord of the cord loop (indicated by the white arrow).➤ With the shading fully lowered, continue to pull the rear cord to open the vanes.➤ To Raise the Shading: With the shading fully lowered, pull down on the front cord of the cord loop (indicated by the white arrow).
IMPORTANT: If the cord tensioner moves up the cord, you have not secured it to the wall or window casement. You must do so for the shading to operate properly. See “Attach the Universal Cord Tensioner (UCT) — EasyRise™ Only” on page 10.IMPORTANT: With Two-On-One Headrail EasyRise Shadings, both cord tensioners must be properly secured to the wall or window casement for the shadings to operate correctly.
UltraGlide® Shadings
To Lower the Shading■ Pull the wand straight out from the fabric at an angle greater than 25 degrees. The clutch will click and the fabric will proceed with a controlled descent.■ To stop the shading in any position, simply pull the wand straight down.IMPORTANT: Avoid pulling the wand in the non-operable zone. This is the area between the angle for lowering the shading and the straight down position for raising the shading.Refer to the illustration below.To Open the Vanes■ After lowering the shading completely, continue to pull on the wand at an angle greater than 25 degrees, until the vanes are fully open.To Close the Vanes and Raise the Shading■ Hold the wand close to the fabric and pull it straight down.■ Pump the wand down using short strokes to gradually raise the shading.CAUTION: To avoid damage to the shading or personal injury, do not release the wand until it is fully retracted. To avoid breaking the wand, do not use long strokes (over 42″) or apply excessive force on the wand while pulling it.

Two-On-One Headrail ShadingsTwo-On-One Headrail shadings have two wands. The right wand operates the right shading and the left wand operates the left shading.
Troubleshooting
| Problem | The shading will not snap into the installation brackets. |
| Solution | Check that the installation brackets are level. Shim to level, if necessary.Check that the headrail is completely inserted into the installation brackets. See “Install the Shading” on page 9. |
| Problem | The EasyRise™ cord tensioner has climbed to the headrail. |
| Solution | Pull down on the spring to relieve tension and pull the cord tensioner to the bottom of the cord loop. Then properly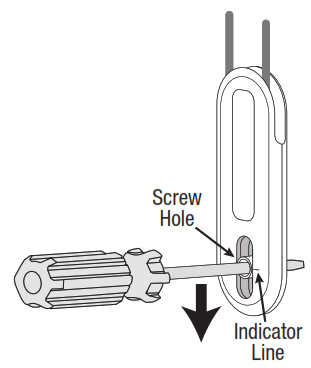 mount the cord tensioner. See “Attach the Universal Cord Tensioner (UCT) — EasyRise Only” o page 10 and/or the instructions included with your Universal Cord TensionerInstallation Kit. mount the cord tensioner. See “Attach the Universal Cord Tensioner (UCT) — EasyRise Only” o page 10 and/or the instructions included with your Universal Cord TensionerInstallation Kit. |
| Problem | The EasyRise cord tensioner grabs onto the cord when the cord is pulled. |
| Solution | Check that the universal cord tensioner is mounted properly. Reinstall, if necessary. |
| Problem | The shading is hard to raise or lower, or will not raise or lower. |
| Solution | Check that there is clearance between the ends of the shading and the window casement on inside mounts.Check that the universal cord tensioner is mounted properly. Reinstall, if necessary.Check that the installation brackets are level. Shim to level, if necessary. Check if the fabric rolls up evenly into the headrail. If not, see “Adjusting the Bottom Rail Weight” on page 16. If hold-down brackets are used, make sure they have been released. |
Problem: The shading raises or lowers unevenly, the bottom rail is not level when fully raised, or the fabric winds unevenly or starts to rub against one end of the headrail.Solution: Check that the installation brackets are level. Shim to level, if necessary. Check if the window is out-of-square by measuring the diagonals. Shim the installation brackets to level, if necessary. If the headrail is level and the window is square, adjust the bottom rail weight.Adjusting the Bottom Rail WeightIMPORTANT: Only adjust the bottom rail weight if the fabric does not roll up straight into the headrail. First, release both weight locks. On the back of the bottom rail, insert a flat blade screwdriver into the slot in each weight lock and rotate the lock-up, toward the center of the rail.
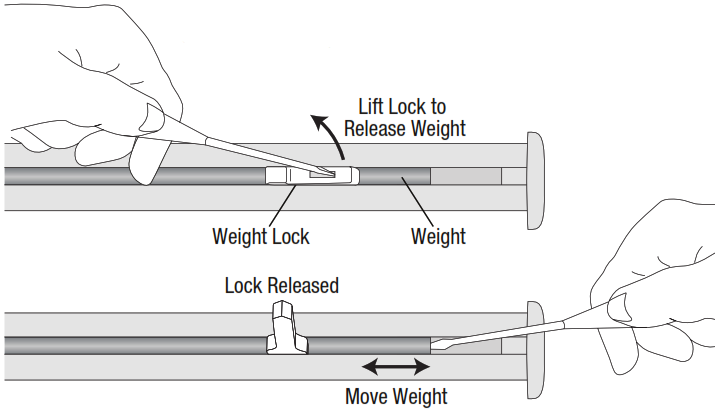
Slide the weight, in 1″ increments, in the direction the fabric is gathering.

Test and, if necessary, adjust again. After final adjustment, rotate each lock down toward the outside of the rail to secure the weight. At least 1″ should overhang each lock.
| Problem | The vanes will not open when the shading is first operated. |
| Solution | Open and close the shading quickly to help open the vanes. If necessary, gentlypull down on the bottom rail. |
| Problem | The vanes do not close completely. They stay contoured and do not flatten. |
| Solution | Use the cord or wand to open and close the vanes quickly. Coax the vanes as close as possible. If necessary, gently pull down on the bottom rail. You may also gently dress the vanes with your hands to help them close. Then roll up the shading slowly to flatten the vanes. Allow the fabric to remain in the headrail for up to 24 hours. To avoid this in the future, regularly “exercise” the shading by raising and lowering it and opening and closing the vanes. |
CARE
Removing the Shading■ Fully raise the shading.■ Move each lever of the installation brackets to the left to release the shading.➤ A flat blade screwdriver can be used to move the lever. CAUTION: Be very careful not to tear or damage any of the fabric.
➤ If the lever is inaccessible or inoperable, lower the shading until you can see the underside of the bracket. Carefully reach a small flat blade screwdriver behind the shading to the tab on the bottom of the bracket between the screw holes.➤ Push the tab away from the shading and pull the headrail to release it from the bracket.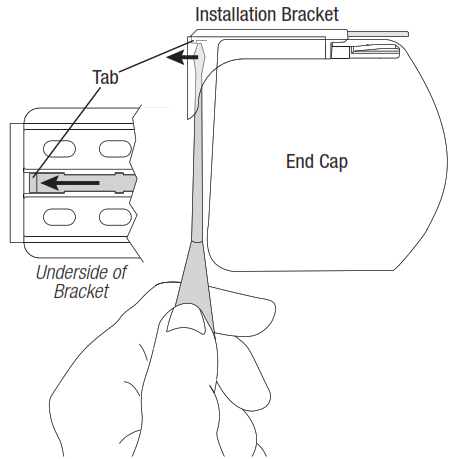
Cleaning Procedures
■ Carefully pull the shading to remove it from the brackets.Pirouette® window shadings are made of 100% polyester, which means they are inherently durable and resilient. However, care must be taken to avoid wrinkling the fabric, particularly where the vanes meet the sheer backing fabric.CAUTION: Do not steam Pirouette fabrics.Fabric-Covered Headrail■ Lightly dust with a clean, dry cloth, vacuum using low suction, or spot clean with a damp cloth and mild detergent.Dusting■ Regular light dusting with a feather duster is all the cleaning that is needed in most circumstances.Vacuuming■ Use a low suction, hand-held vacuum for more thorough dust removal.
CHILD SAFETY
Injection/Extraction■ Most Pirouette® window shadings can be professionally cleaned using the injection/ extraction method.
Ultrasonic CleaningCAUTION: Do not ultrasonically clean Satin Metallic or Shantung fabrics.■ Most Pirouette window shadings can be ultrasonically cleaned by a professional.■ Specify that a mild detergent solution be used.■ Never immerse the headrail in the solution.■ Dry the shading completely in the lowered position.
Electrostatic Cleaning■ Do not use electrostatic cleaning devices on any Pirouette window shading.
A Note About Pirouette FabricAs with all textiles, Pirouette fabric is subject to some variations. Slight wrinkling, puckering, or bowing is inherent to this textile product and should be considered normal, acceptable quality. These characteristics are not usually visible from the front or rear but may be visible from a side angle. Precautions should be taken to reduce exposure to harsh environmental elements, such as salt air. Continuous exposure through open windows and doors will accelerate the fabric deterioration.
CHILD SAFETY
 WARNINGFor more safety information call 1-888-501-8364 in the U.S. or 1-800-265-8000 in Canada.
■ Young children can STRANGLE in cord loops. They can also wrap cords around their necks and STRANGLE.■ Always keep cords out of the reach of children.■ Move cribs, playpens, and other furniture away from cords. Children can climb furniture to get to cords.
Cord Loop Shadings■ Attach the cord tensioner on the cord loop to the wall or window casement. See “Attach the Universal Cord Tensioner (UCT) — EasyRise™Only” on page 10. This can prevent children from pulling cord loops around their necks.■ Hunter Douglas provides a cord tensioner installation kit with instructions for attaching the cord tensioner. For the shading to operate properly, the cord tensioner must be correctly mounted and secured.■ Fasteners provided in the cord tensioner installation kit may not be appropriate for all mounting surfaces. Use appropriate anchors for the mounting surface conditions.■ Only Hunter Douglas supplied cord tensioners and hardware should be used. Replacement parts may be obtained by contacting the Hunter Douglas Consumer Support at 1-888-501-8364.
NOTE: The warning labels on the bottom rails of corded window coverings contain important safety information. These warning labels are designed to be permanent, in accordance with the industry’s safety standards, and must not be removed.
The Hunter Douglas ® Lifetime Guarantee is an expression of our desire to provide a thoroughly satisfying experience when selecting, purchasing and living with your window fashion products. If you are not thoroughly satisfied, simply contact Hunter Douglas at (888) 501-8364 or visit hunterdouglas.com. In support of this policy of consumer satisfaction, we offer our Lifetime Limited Warranty as described below.
| COVEREDBY A LIFETIME LIMITED WARRANTY• Hunter Douglas window fashion products are covered for defects in materials, workmanship, or failure to operate for as long as the original retail purchaser owns the product (unless shorter periods are provided below).• All internal mechanisms.• Components and brackets.• Fabric delamination.• Operational cords for a full 7 years from the date of purchase.• Repairs and/or replacements will be made with like or similar parts or products.• Hunter Douglas motorization components are covered for 5 years from the date of purchase. | NOT COVEREDBY A LIFETIME LIMITED WARRANTY• Any conditions caused by normal wear and tear.• Abuse, accidents, misuse, or alterations to the product.• Exposure to the elements (sun damage, wind, water/moisture) and discoloration or fading over time.• Failure to follow our instructions with respect to measurement, proper installation, cleaning, or maintenance.• Shipping charges, cost of removal, and reinstallation. |
Hunter Douglas (or its licensed fabricator/distributor) will repair or replace thewindow fashion product or components found to be defective.TO OBTAIN WARRANTY SERVICE
1. Contact your original dealer (place of purchase) for warranty assistance.2. Visit hunterdouglas.com for additional warranty information, frequently asked questions and access to service locations.3. Contact Hunter Douglas at (888) 501-8364 for technical support, certain parts free of charge, for assistance in obtaining warranty service or for further explanation of our warranty.
NOTE: In no event shall Hunter Douglas or its licensed fabricators/distributors be liable or responsible for incidental or consequential damages or for any other indirect damage, loss, cost or expense. Some states do not allow the exclusion or limitation of incidental or consequential damages, so the above exclusion or limitation may not apply to you. This warranty gives you specific legal rights, and you may also have other rights which vary from state to state. Different warranty periods and terms apply for commercial products and applications.
![]()
References
[xyz-ips snippet=”download-snippet”]