
![]() HZ-AUXHorizon™ In-Wall, Multiway RemoteQuick Start
HZ-AUXHorizon™ In-Wall, Multiway RemoteQuick Start
The Crestron® HZ-AUX Horizon™ in-wall multiway remote controls Horizon-style dimmers and switches. The device features the following:
- Field replaceable rocker button (supplied), engravings available
- The HZ-AUX must be used in conjunction with an HZ-DIMEX, HZ-DIMUEX, or HZ-SWEX (not supplied). It cannot control a load directly.
![]() In the Box
In the Box
- HZ-AUX, Horizon™ In-Wall Multiway RemoteAdditional Items
- Screw, 6-32 x 1 in., Truss Head, Combo (2054883)1 Spacer, Multi-Gang Alignment (2049924)1 Nut, Wire, Blue (2045230)
![]() Important Notes
Important Notes
CAUTION: TO REDUCE THE RISK OF OVERHEATING AND POSSIBLE DAMAGE TO OTHER EQUIPMENT, DO NOT INSTALL TO CONTROL A RECEPTACLE, A MOTOR-OPERATED APPLIANCE, A FLUORESCENT LIGHTING FIXTURE, OR A TRANSFORMER-SUPPLIED APPLIANCE.
ATTENTION: GRADATEURS COMMANDANT UN BALLAST-AFIN DE RÉDUIRE LE RISQUE DE SURCHAUFFE ET LA POSSIBILITÉ D’ENDOMMAGEMENT À D’AUTRES MATÉRIELS, NE PAS INSTALLER POUR COMMANDER UNE PRISE, UN APPAREIL D’ÉCLAIRAGE FLUORESCENT, UN APPAREIL OPÉRÉ DE MOTEUR OU UN APPAREIL ALIMENTÉ PAR UN TRANSFORMATEUR.
WARNING: To avoid fire, shock, or death, turn off the power at the circuit breaker or fuse and test that the power is off before wiring!
NOTE: The HZ-AUX cannot be used to control a load directly. It must be used in conjunction with an HZ-SWEX, HZ- DIMUEX, or HZ-DIMEX.NOTE: All 3- or 4-way switches in a multi-way circuit must be replaced by HZ-AUX units or HZ-KPEX units with a single HZ-DIMEX, HZ-DIMUEX, or HZ-SWEX unit installed at the load side of the multiway chain.
NOTES: Observe the following points.
- Codes: This product should be installed and used in accordance with appropriate electrical codes and regulations.
- If you are unsure about any part of these instructions, consult a qualified electrician.
- Wiring: Use copper wire only. For supply connections, use wires rated for at least 75° C (167° F).
- Temperature: For use where temperatures are between 32° to 86° F (0° to 30° C).
- Electrical Boxes: Devices mount in standard electrical boxes. For easy installation, use 3-1/2 in. (89 mm) deep electrical boxes. Several devices can be installed in one electrical box (multi gang). For a smooth appearance, one-piece multi gang faceplates (not supplied) must be installed. When installing into a multi-gang box, do not fully tighten the devices to the box until the faceplate has been aligned.
- When installing into a multi-gang box, do not fully tighten devices to the box until the faceplate has been aligned.
- Switches: Mechanical 3- or 4-way switches do not work with.
- Spacing: If mounting one device above another, leave at least 4-1/2 in. (115 mm) vertical space between them.
 Installation
WARNING: Turn off power at the circuit breaker. Installing with power on can result in serious personal injury and damage to the device.
Install the HZ-AUX:
- Turn the power off at the circuit breaker.WARNING: If the HZ-AUX is used in a multiway configuration, power may need to be turned off at multiple breakers.
- Wire the device as shown in Wiring Diagrams, where typical wiring configurations for the HZ-AUX are shown. Select the appropriate configuration and connect the necessary wires. In multi-gang installations, daisy-chain Hot and Neutral wires with other Horizon devices to eliminate excess wiring.
- Fold the wires into the electrical box. Avoid pinched wires.
- Secure the HZ-AUX to the electrical box using the integrated mounting screws on the device. To allow for adjustments, do not fully tighten the screws at this time. Ensure that any text on the device is in the proper orientation and facing up.CAUTION: Do not overtighten the screws when attaching the keypad to the electrical box. Damage to the unit and undesired functionality may occur.
- Place the metal mounting bracket (not supplied) over the back of the HZ-AUX. The two parts of the metal mounting bracket clip together which allows the wiring to remain in place.NOTE: When installing the HZ-FP-G faceplate over an old work electrical box, do not use the metal mounting bracket.
- Attach the HZ-FP-G series faceplate using the faceplate mounting screws. Ensure that the “Top” label is properly oriented.
- Ensure that the HZ-AUX is properly aligned within the HZ-FP-G and then fully tighten the integrated mounting screws to secure the device to the electrical box.
- Attached are the magnetic top and bottom trim pieces to the HZ-FP-G.
- Ensure that all buttons actuate without sticking.
- Restore power at the circuit breaker.
HZ-AUX Single Gang Installation
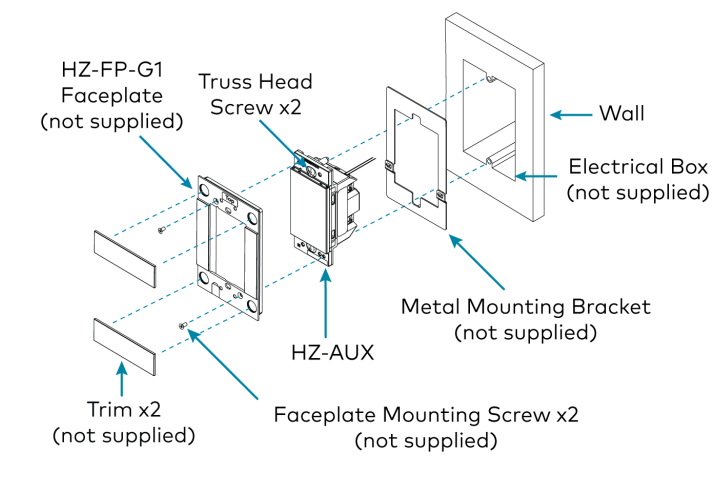
HZ-AUX Multigang Installation

Wiring Diagrams
Two Points of Dimming or Switching Control (3-Way)
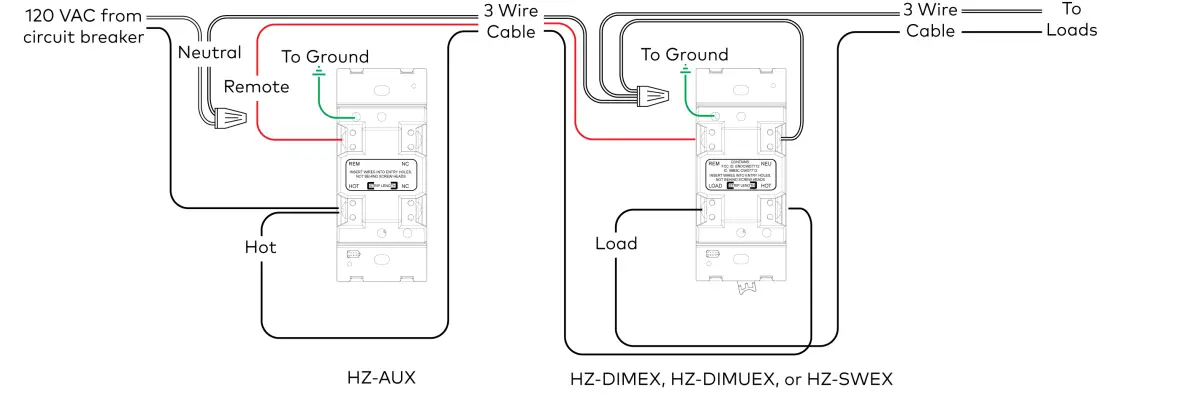
Dimmer must be located at the load side of the 3-way chain.The hot and load wires shown are the wires that were previously connected to the common terminal of the original switches (typically black instead of brass).
Three or More Points of Dimming or Switching Control (4-Way)
NOTE: Please refer to the following diagram when making connections to the device.

Operation
Basic OperationThe specific functions of the multiway remote device depend on the master device at the other end. If the master is an HZ- DIMEX, then the button function is the same as an HZ-DIMEX with a rocker. If a switch is installed, the multiway remote device function is the same as a switch with a rocker button.The HZ-AUX is shipped with a rocker button preinstalled. In this configuration, the unit will function as shown below.
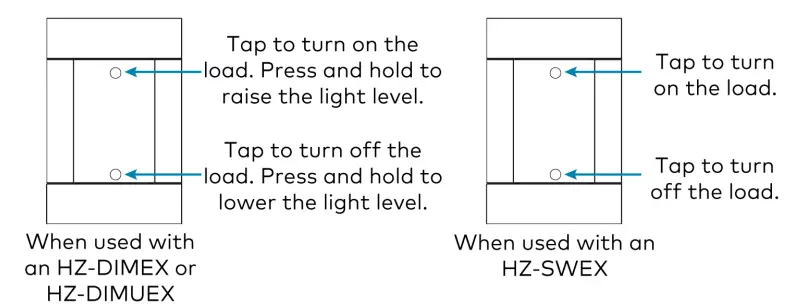
NOTE: The HZ-AUX does not provide an LED backlight or feedback.
Button FunctionsThe HZ-AUX recalls the functions defined on the connected load controller. The HZ-AUX does not directly control a load. The figures below illustrate the functions available for the rocker button configuration and tap/hold actuation sequences when the HZ-AUX is connected to a load controller.
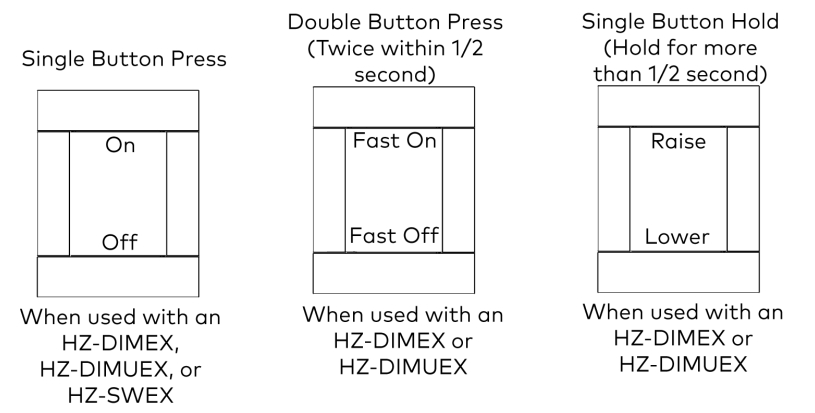
NOTE: The default “On” powers the load to 100% in 1 second for the HZ-DIMEX and HZ-DIMUEX. The default “Fast On” powers the load to 100% in 1/4 second. The load behavior for “On” and “Fast On” operations can be modified when programming the HZ-DIMEX or HZ-DIMUEX.
Troubleshooting
For general troubleshooting, please refer to the following table:
| Trouble | Probable Cause(s) | Corrective Action |
| Master device doesnot function whenbuttons pressed onmaster or local buttonon HZ-AUX. | Problemwith deviceinstallation. | Refer to the Troubleshooting section indevice installation guide |
| Existing 3or4-wayswitch stillconnected. | Replace 3- or 4-way switches with anHZ-KPEX or an HZ-AUX. Replace the3-way switch connected to the loadwith an HZ-DIMEX, HZ-DIMUEX, orHZ-SEX. | |
| Master device works but local button on the HZ- AUX does not work. | Wiring issue. | Check connections on all slave unitsand on a master dimmer. |
| Existing 3or 4-way switch stillconnected. | Replace 3- or 4-way switches with anHZ-KPEX or an HZ-AUX. Replace the 3- way switch connected to the load with an HZ-DIMEX, HZDIMUEX, or HZ-SWEX. |
![]() Visit the Product PageScan the QR code to visit the product page.
Visit the Product PageScan the QR code to visit the product page.
 www.crestron.com/model/6510898
Additional Information
 report this ad
Original InstructionsThe U.S. English version of this document is the original instructions. All other languages are a translation of the original instructions.
Crestron product development software is licensed to Crestron dealers and Crestron Service Providers (CSPs) under a limited nonexclusive, nontransferable Software Development Tools License Agreement. Crestron product operating system software is licensed to Crestron dealers, CSPs, and end-users under a separate End-User License Agreement. Both of these Agreements can be found on the Crestron website at www.crestron.com/legal/software_license_agreement.
The product warranty can be found at www.crestron.com/warranty.The specific patents that cover Crestron products are listed at www.crestron.com/legal/patents.Certain Crestron products contain open-source software. For specific information, visit www.crestron.com/opensource.Crestron, the Crestron logo, and Horizon are either trademarks or registered trademarks of Crestron Electronics, Inc. in the United States and/or other countries. Other trademarks, registered trademarks, and trade names may be used in this document to refer to either the entities claiming the marks and names or their products. Crestron disclaims any proprietary interest in the marks and names of others. Crestron is not responsible for errors in typography or photography. ©2020 Crestron Electronics,
Inc.Doc ID 8485B03/27/20
[xyz-ips snippet=”download-snippet”]